Adjusting the refrigerator door using washers
- 14.1. Related articles:
There is an even easier way to adjust the door. This can be done using metal flat washers, which are sold at any hardware store. To do this, you need to select the washers so that their inner diameter matches the size of the pin on which the refrigerator door hinges are attached.
The essence of this method is that 2-3 metal washers are placed on the hinged pins, thereby lifting the refrigerator door. To install these washers, you must first remove the cabinet door, then install it again.
This closes the gap formed as a result of the distortion.
Why is the refrigeration door skewed?
The main reason that the door is skewed is the overload of the hanging shelves. Heavy bottles and cans pull the door down. There is a place for these products on the shelf in the chamber; it is not necessary to completely block the refrigerator door.
With prolonged sagging, the hinge bracket that secures the appliance door from below becomes deformed. As a result, the part may break and cannot be easily repaired. Similar damage also occurs when refrigeration equipment is improperly transported.
Fill the refrigerator evenly. The circulation of cold air between products depends on this. If shelves are tightly packed, cooling will be poorer, leading to food spoilage.
What to do if there is a gap between the door and the camera? First of all, check:
- take a sheet of thin paper;
- insert the sheet one by one around the entire perimeter of the chamber and close the door;
- where the sheet will sit tightly, the closure is airtight; Where it falls out or is easily pulled out, the tightness is broken.
If you are convinced that there is a gap, inspect the brackets. The adjustment of the fastening bolts will depend on where the door does not fit well.
Adjusting the refrigerator door if it squeaks
A creaking door is not a serious problem and can be easily fixed on your own. The doors of almost every refrigerator hang on two hinges - on the top and bottom. Abrasion of the lubricant in them leads to a squeak when opening.
You can correct the defect in the following way:
- Identify hinges that make an unpleasant sound when opening and closing.
- Lubricate the hinges with special products: paraffin wax, petroleum jelly or mineral oil.
- Open and close the door several times in a row until the squeak disappears.
These actions are not so easy to do. The process for lubricating the hinges is as follows:
- The refrigerator door is completely cleared of the items stored in it. Then it needs to be lifted as much as possible onto the hinges so that the parts are freely accessible for applying products. An assistant will not hurt in this case, since the door can be quite heavy.
- For lubrication, you can use any of the already known means. They are sold in every household store or market. Don't skimp and don't use other oils. Products not intended for lubrication may leach into food stored in the refrigerator. This will negatively affect the taste, smell or appearance of the food.
- Lubricant is applied to the lower part of the hinge and distributed along the entire length. Raising the door higher will make it easier to distribute the product evenly. To make the process easier, you can use a small flathead screwdriver.
- Finally, the doors need to be opened and closed several times in a row until the creaking disappears.
This work is best done with rubber gloves. If the unpleasant sounds persist, the door will have to be removed and the hinges lubricated with Vaseline. The quality of lubricants is very important - the better the product, the less often you will have to use it.
Periodically, squeaking also occurs when there are no defects in the operation of the refrigerator. Sometimes it appears in the first days of using the unit; it happens that it is caused by a worn rubber seal. In a situation where the creaking becomes too loud, it would be better to contact a specialist.
How to hang the door of an LG refrigerator
The range of LG refrigerators is very wide and meets all the needs of even the most demanding customers. Whether you choose a multi-compartment, top-freezer, bottom-freezer, Side-by-Side, Door-in-Door or InstaView refrigerator from LG, you can rest assured that you're getting a reliable appliance that will last you for years to come.
When developing LG refrigerators, manufacturers take into account the slightest nuances and try to use the space inside the refrigerator and freezer compartments as efficiently as possible. The result of LG's many years of development in this direction is a balanced ecosystem inside the refrigerator, which allows you to properly store various types of food.
Also, modern models of LG refrigerators are part of a “smart home” and their functions can be controlled using a smartphone. However, you will first need to connect your LG refrigerator to wi-fi. Read more about how to do this here.
You can also customize the refrigerator “for yourself” in other ways. For example, manufacturers have provided the ability to move the LG refrigerator door to the other side.
With standard assembly, most LG refrigerator models have doors that open to the right. But this may not be convenient, since the design and size of the kitchen are different for all buyers. That is why the design of most LG refrigerator models provides the ability to reverse the door so that it opens to the opposite side.
When is it necessary to rehang the door of an LG refrigerator?
The main reason why you should decide to rehang the refrigerator door is the comfort and convenience of the owner.
- You can reverse the door of an LG refrigerator if the owner is left-handed and it is inconvenient for him to open the door to the right.
- If access to the refrigerator is difficult due to other kitchen furniture (for example, in a compact kitchen).
- If it is not possible to open the door fully, since it rests against furniture or a wall.
How to rehang the door of an LG refrigerator yourself? Step-by-step instructions
You can hang the door of an LG refrigerator without any outside help. Although, if you are not confident in your abilities or you do not have the appropriate tools, or you have lost the instructions for the refrigerator, it is recommended that you contact an official LG service center, where you can get help from a certified, highly qualified specialist.
Do not forget that any independent intervention, if your LG refrigerator is still under warranty, will automatically result in a waiver of the manufacturer's warranty.
If you decide to re-hang the refrigerator door yourself, you must do this with care so as not to disturb the tight fit of the door to the refrigerator, otherwise it will not be able to maintain the internal temperature of the refrigerator compartment, which will negatively affect its performance and service life.
Also note that if you have an LG refrigerator with a display or an Insta View model refrigerator, it will be very difficult to re-hang it yourself, and the manufacturer recommends not to take this risk. In order to reinstall the display, you need to remove part of the interior lining of the refrigerator. Doing this at home and without having the appropriate skills is dangerous.
In other cases, the diagram for hanging the refrigerator door is as follows:
First we rehang the freezer door of the LG refrigerator
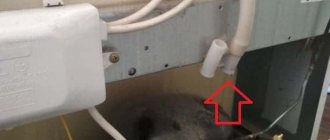
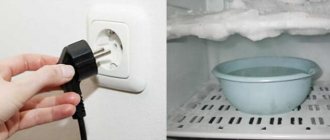
- Make sure your LG refrigerator is not plugged in.
- Prepare the appropriate tools. You will need a flathead and Phillips screwdriver, wrenches, and a knife.
- Remove the façade awning.
- Find the plugs masking the bottom door hinge fasteners and carefully remove them using a flat-head screwdriver or knife.
- Use a wrench to loosen the door bolts. At this stage, it is important to ensure that the door of your LG refrigerator does not fall. You may need additional help.
- Unscrew the bottom bracket that holds the door in place. Release the pin.
- Remove the freezer door.
The refrigerator door is removed in a similar way, so in order to dismantle it, follow steps 3-7.
— After dismantling, you will need to reinstall the refrigerator door handles on the opposite side.
— Swap the plugs on the doors.
— Reinstall the pins on the upper and lower brackets into the free holes.
— Screw in the brackets that hold the door in place. Make sure the door does not fall. If possible, have someone hold the door in place while you do the installation.
— Make sure the doors fit tightly.
Adjusting the refrigerator door when there are gaps in the seal
The rubber seal is an important element of the refrigeration chamber, which is responsible for insulating the internal space from external heat. If the rubber band wears out, warm air will flow inside the refrigerator, which will lead to condensation and additional problems.
Over time, the surface of the rubber becomes covered with dents and gaps, and the initial elasticity is lost. If you do not take the necessary measures and do not overhaul the refrigerator door, the device may fail. This is explained by the fact that when the seal is lost, it operates at peak loads and is subject to severe wear. Ignoring the problem will lead to unnecessary costs.
With prolonged use of the refrigerator and lack of care, the rubber seal will begin to become clogged with household debris, crumbs and other contaminants. To get rid of them, you can use the following methods:
- Treat the rubber surface with a soft sponge soaked in an alcohol-based cleaner.
- Apply a solution of soda and vinegar to the seal. Such substances do not cause damage to surfaces, but restore the purity of rubber.
- Do not use compositions with abrasive impurities for cleaning, as they can damage the part.
If the seal cannot be restored using the methods listed above, the seal will have to be replaced. The degree of wear is determined by the following characteristics:
- Yellowness appeared on the rubber and it became hard, especially in the corner areas.
- The surface was covered with small cracks.
- To restore its original shape, you need to treat the seal with hot water, pouring along the perimeter.
There are other ways to restore the seal. This could be rehanging the door to calculate optimal placement, or treating it with a stream of hot air from a hairdryer.
Using this method, you must adhere to the following instructions:
- Disconnect the device from the outlet.
- Start heating the rubber with a hairdryer to 80°C.
- Straighten all problem areas with your hands (to protect yourself from injury, you need to wear linen gloves).
The heated area should cool down on its own when the chamber is closed. This technology is only suitable for simple breakdowns.
A popular solution for seal repair is boiling water. The gum is placed in hot water and left there for a while to swell. After increasing in volume, the tightness of its fit will be restored. The method has a significant drawback. The seals in the latest refrigerator models are secured with glue or foam rather than bolts. When removing the rubber band, you can easily damage it.
If the refrigerator door is sagging due to problems with the rubber part, you can treat it with a steam iron. The door is removed and placed on the floor, after which gauze and an iron are placed on the rubber surface. When exposed to steam, the rubber will straighten.
If the seal is severely damaged, you can send the refrigerator to a service center, where the part will be replaced with a new one. If there is a warranty, it will be serviced free of charge. In other cases, you will have to pay for the services of specialists or change the part yourself.
If severe cracks and sagging appear, it is not advisable to smooth or soak the elastic. You can find many spare products on sale, and repairing a refrigerator door by replacing the seal does not require special skills or effort.
Replacing an elastic band yourself requires following certain rules and taking into account a lot of nuances. Polyvinyl chloride is used to make such products. They may differ in format, fastening method and other features depending on the model of the refrigerator compartment.
If the rubber band is fixed around the perimeter of the door with screws or recessed into a special groove, the replacement will be completed as quickly as possible. When gluing a part into a door, you will need the help of specialists.
Seals for modern cameras are sold in every household appliance store. However, if we are talking about replacing a part for a rare camera, a lot of problems can arise here. It is not easy to find original rubber bands for such units, so you will have to use your imagination and select alternative solutions. So, you can use a large compactor and cut off excess sections horizontally and vertically.
Quick adjustment of a skewed refrigerator door
Refrigerator door hinges are a cleverly designed element that is attached to the plane of the door with pins. To dismantle a door that has begun to sag and needs to be adjusted, you need to gain access to the fastening bolts. To do this, you need to turn the unit on its side so that the canopies are on top. It is prohibited to place equipment on the back wall, as there is a high probability of damage to the cooling circuit pipeline and freon leakage.
When inspecting the bottom, the bolts securing the lower door canopy are easily identified. If you remove it, the sash can be easily removed from the upper groove. It is easy to determine the play of canopies - when, under low load, the canopy “walks”, makes a knock or turns, it needs to be replaced or fixed more firmly. Cracks and bent pins are an indicator of wear on the element and need to be replaced with a new one. Depending on how the canopy is attached, the technology for installing the door back is as follows:
- We set the bolts of the curtain at level 90 in relation to the bottom of the unit in line with the lower canopy and screw it on. Rarely, to strengthen a structure, we use a thin counter washer that prevents the bolt from unwinding.
- Rivets - I rivet them with a specialized tool, which is similar to a punch for metal. I recommend replacing with bolts or self-tapping screws - this will prevent possible damage to the equipment body in the event of re-riveting.
- Self-tapping screws - the algorithm of actions is the same as in the case of bolts, but you need a Phillips screwdriver or a straight slot.
When a crack is detected in the area where the bracket is attached, it is permissible to move the door to the other side of the case. To do this, we dismantle the doors (from the refrigerator compartment and freezer), free the pin sockets from the plastic plugs that are present on the other side. We close the holes or cracks in the previous place where the valves are attached with plastic covers that are supplied with the refrigeration equipment, or you can fill them with epoxy resin (cold welding) if the crack is large.
Quick adjustment if the refrigerator door is skewed
Refrigerator door hinges are a cleverly designed element that is attached to the plane of the door with pins. To dismantle a door that has begun to sag and needs to be adjusted, you need to gain access to the fastening bolts. To do this, you need to turn the unit on its side so that the canopies are on top. It is prohibited to place equipment on the back wall, as there is a high probability of damage to the cooling circuit pipeline and freon leakage.
When inspecting the bottom, the bolts securing the lower door canopy are easily identified. If you remove it, the sash can be easily removed from the upper groove. It is easy to determine the play of canopies - when, under low load, the canopy “walks”, makes a knock or turns, it needs to be replaced or fixed more firmly. Cracks and bent pins are an indicator of wear on the element and need to be replaced with a new one. Depending on how the canopy is attached, the technology for installing the door back is as follows:
- We set the bolts of the curtain at level 90 in relation to the bottom of the unit in line with the lower canopy and screw it on. Rarely, to strengthen a structure, we use a thin counter washer that prevents the bolt from unwinding.
- Rivets - I rivet them with a specialized tool, which is similar to a punch for metal. I recommend replacing with bolts or self-tapping screws - this will prevent possible damage to the equipment body in the event of re-riveting.
- Self-tapping screws - the algorithm of actions is the same as in the case of bolts, but you need a Phillips screwdriver or a straight slot.
When a crack is detected in the area where the bracket is attached, it is permissible to move the door to the other side of the case. To do this, we dismantle the doors (from the refrigerator compartment and freezer), free the pin sockets from the plastic plugs that are present on the other side. We close the holes or cracks in the previous place where the valves are attached with plastic covers that are supplied with the refrigeration equipment, or you can fill them with epoxy resin (cold welding) if the crack is large.
Re-hanging when the refrigerator door is skewed
Removing the top sash
Most refrigeration equipment has two chambers and, accordingly, two doors. It's better to start from the top sash. First, attach the door to the refrigerator body with tape in several places so that it does not fall during disassembly. Basically, the sash hinges are attached with a bolted joint (2 bolts). They need to be removed first, after first removing the plastic plugs from similar holes on the other side of the door (the place to which the dismantled hinge will be screwed).
Attention! The plugs must be removed carefully using a flat-head screwdriver. If there are decorative panels, then their dismantling is carried out with a Phillips screwdriver.
When it is necessary to remove the top cover of the unit to gain access to the canopies, remove it and then unscrew the hinges. When the handle on the door is non-removable, there is no need to try to remove it, since the manufacturer most likely provides the option of reinstalling the door. After unscrewing the fasteners and removing the hinges, it is permissible to remove the tape and remove the top sash, lifting it to separate it from the middle canopy. We put the dismantled door aside. We fix the previously removed plugs onto the empty sockets that were vacated.
Removing the bottom sash
To remove the bottom door of the refrigerator, you also need to secure it with tape to the body of the refrigerator. Next, use a wrench to unscrew the middle loop, having first removed the gasket from the pin. When only the bottom fasteners remain, remove the tape and remove the sash from the hinge. The further procedure for reversing the refrigerator doors is performed according to the following algorithm:
The middle hinge is removed and the mounting holes on the opposite side are released, after first removing the protective plugs and moving them to a new place. To move the lower hinge, first unfasten it from the body of the refrigerator cabinet, for which you use a screwdriver and a wrench. The plugs of the lower part are also rearranged into the vacated holes.
When disassembling the refrigerator doors and moving the hinges is completed, you can begin installing the doors on the other side in the reverse order. Before hanging the refrigerator doors, the hinges are re-checked for screwing strength - this will make the fastening more durable.
Advice! When tightening the fixing bolts, lubricate the threads with paint or varnish - this will make the fastener less likely to become loose.
Reinstallation of sashes
Install the refrigerator doors on the opposite side in the reverse order - this makes it more difficult to mix up the hinge parts and makes it easier to hold the doors. If parts of the fastenings have been mixed up, then there is a risk of excessive sagging, which is associated with the development of resources. The algorithm for reassembling a refrigerator with the doors open is as follows:
- Move the lower hinge to a new location and carefully tighten the bolts. After installing the pin, be sure to put the spacer back in place.
- Hang the lower door with the freed mounting hole and the moved handle on the hinge and secure it in the desired position with tape.
- Insert the middle pin into the hole in the upper part of the lower door and fix it to the main part of the refrigerator. Be sure to line up all holes before tightening the bolts.
- Place a spacer on the top of the middle loop. The door should be placed on the middle pin and additionally secured with tape before installing the last hinge.
- When attaching the top hinge, remember to align the holes. The adhesive tape can be peeled off only when the bolts are already tightened and you are confident in the reliability of the fastening.
Attention! When installing the doors on the refrigerator, I recommend tilting the cabinet slightly away from you - this will hold the door more securely.
After completing the installation of the doors, it is necessary to check the tightness of their closure. To do this, you need to perform a simple test:
- Close the doors and visually check the tightness of the sealing rubber.
- If the cracks are not visible at first glance, then you need to place a sheet of paper when closing the refrigerator.
- The door can be considered correctly aligned only when the sheet is pressed tightly around the entire perimeter.
There are 2-chamber refrigerators with separate hinges in the middle. In such cases, work on reinstalling the sashes is somewhat more difficult - when working between the doors, you need to remove an additional hinge. In some cases, such a canopy can be an advantage - only one door is hung to avoid conflict with the furniture.
Two ways to adjust the refrigerator door yourself
First way
If the depressurization of the chamber occurred due to the door being skewed due to its overload, then reversing it to the opposite side
. Almost all modern refrigerators provide this option, that is, on the other side there are the necessary gaps and fastenings. They are usually closed with special plastic plugs.
How to hang a refrigerator door
- Unplug the appliance and clear the door of food.
- Remove the plugs where the center bracket is attached and remove the screws using a screwdriver.
- Pull the structure towards you slightly to remove the plastic fastening pins at the top and bottom from the hinges. If they are also secured with screws, unscrew them. In some models, in order to remove the door from the outer hinges, you must first remove the top and bottom panels. This will give you access to the necessary screws that will need to be unscrewed.
- After the door is dismantled, we proceed to rehang it on the other side. To do this, you need to open the plugs provided for this manipulation and change the position of all the hinges so that they are on the opposite side, similar to the original assembly.
- Install the door using the same procedure as for dismantling, only in reverse order.
In some Indesit models, reinstallation may require additional elements that are included with the device.
Typically, this procedure helps when the refrigerator door is skewed, and the chamber will close tightly again.
Adjusting the refrigerator door if the plastic spacer is faulty
In most cases, problems with the plastic spacer appear in older refrigerators. A similar problem is accompanied by the door sagging or moving downwards. To close the camera, you need to lift and slam the door. However, this will not solve the damage, so the spacer will need to be replaced.
To avoid breakdowns, you need to follow simple rules:
- Avoid sharp slams of the door, as this negatively affects the condition of the spacer, fasteners and seal.
- Do not overload the door shelves with food or other items. Otherwise it will be skewed.
Common causes of refrigerator door problems
Before repairing the refrigerator door, you need to clarify the root cause of the problem; possible options:
- Skewed shelves. Sometimes the refrigerator doors do not close for the simplest reason: the shelves are skewed due to overload. If you put too much food in the refrigerator, this can happen. Try to distribute the mixture evenly and not overfill the refrigerator. It is not difficult to straighten the position of the shelves yourself. If the door still does not close, read the text further.
- Poor lubrication. If the refrigerator door sticks when opening and closing, you should pay attention to the door hinges. Many people do not even know that they need to be lubricated periodically.
- Contamination or wear. Dirt gradually accumulating on the seal is another reason for seal failure. For cleaning, it is recommended to use water with vinegar or a soap solution: you should not use chemicals. We also note that seals are prone to wear: often over time, the rubber element ceases to be elastic.
- Spacer. The spacer also wears out, moving towards the floor and preventing the door from closing completely. It is usually made of polymer materials and is located at the junction of the door and the main part of the device. Its function is to ensure smooth opening and closing.
- Uneven surface. Occasionally, the door may not close well due to uneven surfaces on which the unit is located. The latter tilts to one side, to correct which it is necessary to tighten the legs or place additional support.
- Closing sensor. A special door closing sensor is often found on modern refrigerators. Its function is to notify the owner about a leak in the seal by sounding a sound signal. Failure of an element results in it reporting false information.
What to do if the refrigerator door does not close
Before you say goodbye to your old refrigerator, you need to see what can be done to make the door close normally. Can I fix this problem myself?
How to check if a door closes tightly?
The following situation may also happen: the door, at first glance, closes tightly, but the food in the refrigerator begins to quickly deteriorate, and the unit itself often overheats.
Such a case is a reason to check the operation of the door. To do this, take a regular notebook sheet and press it against the refrigerator door. If it closes, it means the unit remains sealed; if not, its density is lost.
Main reasons
Before you start repairing the refrigerator, you should understand the reason why the door does not close. There may be several of them:
- the rubber seal is too dirty, greasy and therefore does not maintain its tightness;
- the rubber seal has lost its tightness due to age and expiration;
- the door spacer element has become loose, causing its position to become uneven;
- the strut began to crack from age;
- overloading the refrigerator door, which caused its position to become deformed;
- The refrigerator is tilted due to an uneven floor.
If the unit is equipped with a special sensor that monitors the tightness of the door closure, there is another reason: it could break down and give false information that the refrigerator door is not slammed shut.
How to avoid door sagging and cracks
In order to avoid these problems in the future, you need to follow these simple tips:
- The refrigerator must be level.
- Do not store overly heavy items on the door.
- Periodically wash the gum from crumbs and debris using a disinfectant detergent.
- Once a year, go over the seal with hot water or a hairdryer.
- Don't slam the door. Close it carefully.
- Frequently looking into the refrigerator leads to micro-tears in the seal and difficulties opening the door.
- For preventive purposes, lubricate the hinges once every six months. This will prevent unpleasant sounds from occurring when opening and closing the door.
- Do not overload the side doors.
- If your unit has a drip defrosting system, defrost it in a timely manner.
- The seal must be maintained regularly: it must be washed with warm water, thoroughly dried using talc, and lubricated. By following these simple steps, the seal will not have to be changed frequently.
Video: hang the door on the refrigerator with your own hands
Hang the door on a hotpoint ariston refrigerator with your own hands
Watch this video on YouTube
Do you want to understand better than others?
- What is the best way to lubricate refrigerator doors? — The refrigerator door can make annoying squeaking noises, just like any other appliance. The lubricant inside the hinges wears off after a certain period of time. This leads to…
- Do-it-yourself refrigerator door repair - Replacing old household appliances with newly purchased ones is a task that not every person can afford. A refrigerator is quite important for maintaining a normal home life...
- Removing the refrigerator door - Step-by-step removal of the upper door of the refrigerator To complete all work, you will need operating instructions for the refrigerator from which the door will be removed...
- Removing and Disassembling a Refrigerator Door - How to Disassemble a Refrigerator Door to Re-Hang It on the Other Side At the very top of the refrigerator, above the freezer door (you may need a ladder), remove two...
- Self-removal and replacement of the refrigerator door handle: step-by-step instructions with photos - General instructions for removing the refrigerator handle The process of removing the handle is quite simple and does not cause difficulties even for beginners. Don't forget to take precautions...
Other Recommendations for Refrigerator Door Repair
Other problems, in addition to replacing the rubber seal, when minor DIY repairs of the refrigerator are required, are the door creaking or reinstalling it. You can eliminate the appearance of a squeak in the following way:
- Identify the hinge (or several hinges) that squeaks when opening/closing the refrigerator door.
- Eliminate the defect with a drop of machine oil by placing it in the door hinges (under no circumstances use vegetable oil, i.e. edible oil, for these purposes).
Thus, simply adjust the hinges by lifting them (as far as free movement allows) and dripping a few drops of oil onto the axle in order to get rid of the unpleasant creaking sound.
Another, no less difficult job of self-repairing a refrigerator is adjusting the door when it is reinstalled or sagging, which is done using plastic shims. Depending on the amount of door subsidence, you will need to purchase 2-4 such washers.
In order to adjust the refrigerator door with your own hands when it is sagging, you need to carefully remove the door by unscrewing the refrigerator panel and removing its fasteners at the top. Then you will need to place adjusting washers (1-2 pieces) on the bottom bracket pin and adjust the door horizontally. Next, all that remains is to “put” the refrigerator door in place, checking it for any distortions and cracks, as well as for the tight fit of the rubber band to the body (or door) and the operation of the light switch in the refrigerator.
Before you start repairing the refrigerator door yourself, it is strongly recommended not to load the refrigerator door with food from the inside.
If a break in the mounting hole is detected, the door will simply need to be moved to the opposite side, where it is intact. Similarly, adjust the door for distortions (see description above) using adjusting plastic washers. If the hole breaks in two places and it is impossible to hang the door, a plate will need to be strengthened onto the damaged surface using “cold welding.” Then prepare a hole of the appropriate size for the bracket axis and hook the door into its original place.
Replacing old household appliances with newly purchased ones is a task that not every person can afford. A refrigerator is a fairly important appliance for maintaining normal household life, but it also has a fairly high cost. The breakdown of this unit has a serious impact on the family budget, even when the refrigerator door fails - it becomes skewed, wears out or the seal lags, and the like. It is not profitable to buy new equipment in such a situation - it is cheaper and easier to fix the current breakdown. Read on in the material about how to proceed when repairing a refrigerator door yourself and when it is recommended to contact a specialist.