Do you remember that you didn’t start the next wash, but suddenly you hear a characteristic splash of water from the room where your electric assistant “lives”? No, this is not a poltergeist or a rise of the machines. Your washing machine probably draws water on its own when it is turned off. Such non-standard behavior of equipment should be immediately stopped and the reasons for its occurrence should be immediately understood.
Sometimes, as practice shows, you can fix such a problem yourself, and in some cases you will not be able to do it without the help of an experienced technician. Why the machine can spontaneously fill with water and how to avoid such a situation in the future - let’s look at it in more detail.
Causes of malfunction
When a washing machine breaks down, water can come from both the sewer and the water supply. You can tell by the color and smell; if cloudy water slowly appears in the drum, then this is clearly water from the sewer.
At the same time, when the machine draws water from the water supply without stopping, the Aquastop system will not save you from overfilling the drum with water . The leakage protection sensor is fixed in the washing machine tray, and water will leak onto the floor. Therefore, even the most advanced protection will be powerless in this case.
But what is the reason that the machine takes on water? There are two reasons:
- water supply valve malfunction;
- malfunction of the siphon valve or its absence;
- the drain system is clogged, causing water to flow back into the drum through the drain hose.
Important! If such a problem is caused by improper connection of the washing machine to the drain, then you will be denied warranty repairs. You will have to fix the problem yourself or at your own expense.
Troubleshooting
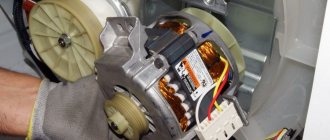
So, when you see that the switched off washing machine is drawing water, immediately turn off the water supply tap. Only then proceed to troubleshooting. Do not forget to disconnect the machine from the power supply. If the reason for the water intake is the solenoid valve, then it must be replaced with a similar one. It's not difficult to do this yourself.
For your information! If the washing machine is under warranty, then the valve must be replaced by a service center technician. Otherwise, after independently tampering with the inside of the washing machine, the warranty on the equipment will expire.
Getting to the filling solenoid valve is easy. In front-loading machines, it is located under the top cover of the housing, and this is what needs to be removed. In vertical machines you will have to remove the side cover. But first, turn the machine around so that it is convenient to work, and disconnect the water supply hose. Having seen the valve, disconnect the hoses from it, loosening the clamps, and the electrical wires, remembering the polarity of these wires. Unscrew the valve from the machine body and remove it.
For your information! On some models of washing machines, in order to remove the fill valve, you need to remove the plastic box under the powder tray. Therefore, the replacement process may become somewhat more complicated.
Since solenoid valves cannot be repaired, we take a new spare part and connect it to the hoses. At the same time, we use new clamps to ensure reliable connections. Then, observing the polarity, we connect the electrical wires and fix the fill valve.
Before closing the lid of the washing machine, connect the inlet hose and run a test wash. Check connections for leaks. Once you are sure everything is in order, reassemble the machine and set it in place.
Causes of leaks when drawing water
As noted above, if water flows from under the washing machine only when water is filled, then the problem is located on the supply line between the tap of the water supply system and the dispenser. Along its length there are usually several pipes, the hose itself, a hopper (a plastic box where the dispenser is located) and clamps.
Therefore, the number of causes of leaks in this case is quite limited:
- A crack appears in the hose;
- Loosening of clamps over time, due to which the quality of the connection of elements decreases;
- Lack of sealing of the pipe.
It is worth noting that if the pipe or clamps are to blame for the leaks, then these elements should have a white, yellow or gray coating on them. The hose can only be checked using water supply.
Figure 2 - A classic example of pipe damage, which is expressed in drying water streaks, as well as the presence of rust at the connection (this is where the water flows)
Important: all manufacturers recommend regularly checking the dispenser after completing the next wash for the presence of residual undissolved substance in the dispenser. Its manual removal will prevent the formation of possible leaks during future water intake.
After the water supply is completed, it is recommended to pay attention to the machine door, since immediately after turning it on, water can pour out from under it; then you only need to change the sealing collar.
Reasons for water getting into a switched off washing machine
In fact, liquid can appear in the drum for many reasons, but first you need to check how correctly the drain hose is connected to the machine. So, why does water remain in the drum in a washing machine:
- The unit is connected to a siphon well above the knee. In principle, this connection option cannot be called incorrect, but if the sewer becomes clogged, water will begin to fill the machine through the drain hose directly from the washbasin. To avoid this, a return valve is installed in the drain outlet, that is, a thin rubber band that allows water to exit directly into the sewer and immediately closes the return access. Unfortunately, it is not present in all siphons. If you connected the washing machine yourself, check again the rules for installing the SMA siphon.
- Brand new devices may simply not be connected to the sewer correctly. It is because of this that a sudden rush of water into the drum from the riser can occur.
- Damage to the flow water supply valve due to rust particles and sand. Therefore, it may not work properly and leak water. More often, this malfunction goes away on its own, that is, debris is washed out of the valve itself.
Important! To reduce problems due to blockages, install a special filter for your washing machine during routine repairs.
Causes of poor drainage
What is the reason for water accumulation in the equipment drum? After all, modern washing devices have a special function of protection against smudges, called Aquastop. Everything is prepared in such a way that the water environment does not have the ability to leak out and cause a flood. There are also devices with check valves if the machine does not need to be used.
However, even taking into account preventive measures, water appears. We immediately determine the primary source of water penetration into the machine at rest. Let's analyze this water in the tank:
- with contaminated water that gives off the stench of sewage, we are dealing with the machine being somehow connected to the sewer;
- provided the water is free of dirt and odorless, this is the fault of the plumbing and problems in the machine itself.
If the connection is not made according to the rules, a problem arises in the operation of the sewer system and the water drain does not function. This in itself causes liquid to appear in the tank, and if problems in the machine itself are added to this, this further aggravates the situation. Let's look at specific examples of the appearance of water in the drum, and consider ways to eliminate it.
Common washing machine faults and their solutions
It often happens that water enters the washing machine when it is turned off, and water can accumulate in its various parts and components. Let's look at the most popular problems associated with water accumulation and how to fix them.
Water collects in the drum
If you find liquid directly in the loading hatch of the washing machine, most likely the drain system is clogged or the drain pump has broken down. This problem can be solved by unscrewing and checking the pump filter, because it is possible that the blockage has formed there. If you have no idea how to proceed in this case, read the detailed instructions for cleaning the filter.
Important! It is a heavily clogged filter that most often prevents water from leaving the drum.
If the filter turns out to be completely clean, it means the pump is broken, and it still makes a characteristic humming sound. At first the machine stops washing, but when restarted it starts working again.
Important! With subsequent washes, the pump fails more and more often, so it is best to replace it to avoid more serious problems.
Water comes from the sewer
Often, wastewater enters the device due to its incorrect connection to the sewer system, that is, the drain hose is poorly positioned. Therefore, it is necessary, first of all, to check whether its installation complies with the manufacturer’s recommendations; if there are deviations from the designated standards, correct the situation.
Preventive measures against this type of leakage
Remember that if the solenoid valve fails, water will fill the tank until it spills directly onto the floor, which can lead to a real flood, not only of your bathroom, but also of your neighbors. Therefore, such malfunctions must be eliminated.
It is best to install a special tap at the entrance directly to the washing machine. And as soon as the washing cycle is completed, you just need to turn off the tap, which means that water will definitely not get into the machine itself or into its other elements.
Important! It is recommended to install it close to the tie-in to the main pipeline to prevent leakage due to a rupture of the inlet hose.
You decided to do another wash, opened the hatch of the washing machine to put in dirty clothes, and discovered that there was water in the machine. It’s even worse if the water is not only in the washing drum, but also in the form of a puddle on the floor. But where did she come from? After all, all this time the machine was disconnected from the network! Perhaps this is a serious breakdown and you will have to call a repairman? Don't rush to conclusions. Let's take a closer look at this problem and how to eliminate it.
Common causes of Samsung washing machines leaking
As for another South Korean company, in this case there are slightly more reasons for leaks on the floor. Firstly, on several forums, owners of equipment from this manufacturer complain about the insufficient quality of the inlet hose, in particular, the fastening element that directly connects the hose and the device itself.
Secondly, for some reason, in Samsung washing machines, the device that controls the level of liquid poured into the dispenser - pressotate - often fails. Being one of the main indicators of the processes occurring in the machine, the pressotate, if it breaks, can cause a huge number of troubles:
- The system collects an excess amount of water, as a result of which it can spill out through the hopper and dispenser;
- Incorrect determination of the amount of water in the working space may result in its not being removed, and a new fill with the machine loaded to the top can squeeze out the “extra” water through the sealing collar.
Finally, a leak may simply be caused by poor assembly. As practice shows, the quality of execution of the same model very much depends on a specific plant: for example, a plant in China supplies the market with devices that are better assembled than the plant in Kaluga, from which goods began to be supplied to Europe only in 2016.
Where does the water come from in a non-working washing machine?
There are two “ways” for water to appear in the drum of a turned off washing machine:
- From the sewer. In this case, cloudy water with a characteristic odor accumulates in the washing machine drum. This often happens if the water drain from the machine is connected to the siphon of the sink in the kitchen or bathroom. From time to time, the siphon may become clogged and function incorrectly: while using the sink, the water level in it rises, water enters the drain hose, and then into the washing machine tank.
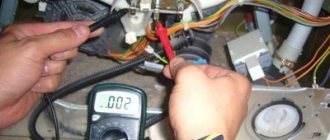
- From the water supply. In this situation, clean water will slowly collect in the tank. The reason for this is a faulty water inlet valve into the washing machine. It allows water to pass through in the “closed” position. Diagnosing this malfunction is simple - turn off the shut-off valve of the water supply to the washing machine. If the fluid stops collecting, then we can say with confidence that the problem is in the inlet valve.
Methods for eliminating leaks
If the hose is leaking...
As has been mentioned many times above, low-quality single-layer rubber used as a wire channel for water supply can dry out and crack in a fairly short period of time. It is only in the interests of the owner of the washing machine to detect the location of the leak as soon as possible, since while the water supply to the machine can be adjusted with a tap (and the intensity of the inflow can be reduced), it is not possible to drain it.
You can only find out where the water is leaving, as they say, in the “old-fashioned” way: unfasten the hose, and then apply a weak pressure of water into it. If the hose was independently extended by the owner (for example, if the factory length was short), it is also recommended to check the attachment points, since the connection of the plastic and rubber components may not be reliable enough (shown in the figure below).
Figure 5 – Connection of plastic elements with the rubber hose body
The recommendation in this case is simple: it is better to replace the hose. If it is not possible to purchase it, then you can make do with improvised means: electrical tape, a silicone glue gun, corrugation and clamps. However, this is only a temporary measure, since with high pressure the water is quite capable of breaking through the patch and flowing out again.
It’s clear how to use corrugation and electrical tape to patch an unintended hole, but the glue gun has not yet become so widespread. Special silicone tubes are first melted at the tool nozzle, after which the mixture is directed to the gluing site, where at room temperature it quickly fills the hole and dries. If it is small, you can quickly seal a fragment of the hose in this way, additionally wrapping the area with electrical tape.
Some recommendations to prevent damage to hoses:
- The hoses involved in water circulation must be in a position that simultaneously corresponds to the diagram shown and ensures the least number of bends along the line. This will prevent the occurrence of microcracks;
- The clamps should not be tightened tightly, this will only make the problem worse. When installing for the first time, you should pay attention to the degree of tension of the hose at the point of contact with the clamp. The hose should not jump out, but it should also not form folds at the point of contact with the clamp;
- Regularly inspect the connection between the hose and metal elements, since the gasket inside may become unusable from constant contact with water and being in a humid environment.
Drain pump failure as a cause of leakage
It is quite simple to determine that the leakage of water from the system is due to the improper functioning of the drain pump; you just need to record the start time of its operation, and then monitor the behavior of the washing machine. Obviously, as soon as the machine begins to supply waste water to the outlet, the pump will start working, and if the cause of the leak lies in it, a puddle of an opaque, grayish tint will certainly appear on the floor.
In Figure 2 you can see the rubber gasket, which is necessary to seal the shaft passing through the entire pump housing; Deterioration of this gasket over time can also cause leaks, but they will almost certainly be very small in volume.
When diagnosing the drain pump, it is also recommended to evaluate the degree of performance of the filter, located literally in the same place, since the drain filter is one of the dirtiest places in the design of the entire machine. By screening out excess debris, it ensures not only the supply of water devoid of large suspended matter to the central water supply system, but also high-quality operation of the pump.
Note: sometimes filters “stick” to their location, making it impossible to unscrew or remove them. There is no need for such extra sealant, since at one moment it may not withstand the load and burst under the simultaneous influence of water pressure and vibration emanating from it. Therefore, if such a case of gluing is detected, it is recommended to remove the part from the inside.
If the reason lies in the drain pump, most likely it is jammed due to foreign objects getting inside, or the electronics are damaged. In this case, there will be nothing left to do but take the part to the master.
Briefly, the process of disassembling a washing machine to remove a part can be described as follows:
- First, the lower secret panel is unscrewed, hiding the filter and pump behind it;
- The water remaining in the system after washing is poured out;
- Disconnecting the pump from the power supply;
- After unscrewing the filter, the pump itself must be slightly pressed inward in order to pull it out from under the main body of the machine.
Water leaking from dispenser and hopper
Probably, in terms of its popularity, this problem clearly occupies the last position, since the least load falls on these structural elements of the washing machine: when it comes into operation for literally two or three minutes, the dispenser can participate in the rest of the washing process only occasionally and at the request of the owner. The hopper (or box) is only necessary to protect the dispenser from other elements of the system.
There are not many reasons why a washing machine leaks in the dispenser area, but they are all related either to the intensity of the circulating liquid or its composition:
- An excessively powerful flow of water from the water pressure system can break through a low-quality plastic box, so it is better to adjust the water supply control valve manually;
- The distribution device tends to gradually become overgrown with fat, the particles of which, gravitating towards each other, begin to take up a lot of space;
- Residues of detergent can clog both the dispenser and the pipe with the inlet line, which are responsible for connecting the dispenser and the tank. To prevent this from happening, it is enough to always use an automatic powder and regularly clean the cells.
However, it is very important to pay attention to the fact that in no case should you exceed the loading rate established by the manufacturer, even by several hundred grams. The fact is that a large volume of laundry placed inside means a greater consumption of liquid for washing, which can lead to incorrect interpretation of the data by the pressotate, as well as overflow from the dispenser.
Ways to eliminate the problem of leakage from a dispenser or hopper are simple: firstly, you should adjust the level of water supply, and secondly, if possible, regulate its hardness, which will additionally help in the fight against the accumulation of mucus and the formation of areas impassable by water.
By the way: as a preventative measure, it is recommended to regularly wash the dispenser and the hopper itself once every 2 and 6 months, respectively (it is advisable to douse the containers with hot water). Bringing it to a state similar to that shown in Figure 6 is highly not recommended, as this will negatively affect both the quality of the wash and the condition of the machine as a whole.
Figure 6 – Disgusting condition of the washing machine dispenser
Water leakage from under the hatch seal
It is quite simple to determine that water is flowing from under the cuff, because a characteristic trickle will appear right at the sash during any operation performed with a device involving liquid.
However, if it is not possible to continuously monitor the washing process, then this particular leak location can be distinguished by several signs:
- The presence of physical defects, that is, holes, abrasions, etc.
- Formation of plaque on rubber;
- Presence of fungi.
In the latter case, it is strongly recommended to get rid of the cuff, plus, at the same time check the entire apartment for detection. For the rest, you can also use improvised means. The leak can be found by placing the entire gasket under water and observing the appearance of bubbles for a limited amount of time (5-10 minutes).
You can eliminate troubles using the same glue gun, plus creating a “plaster” using an old bicycle inner tube. The material used in their composition is the same, so making an impromptu patch will not be so difficult. To detach the old cuff, you just need to disconnect the two plastic clamps, and then walk around the sash with a flat screwdriver or your hand. After this, it is imperative to clean the edge from accumulated dirt and dust.
Leaking main washing machine tank
According to statistics, this type of breakdown is very rare, since damage to this structural element requires sufficient effort from the owner, unless there is a manufacturing defect. Plus, this applies much more to plastic tanks rather than metal ones.
A leak can form for two reasons:
- A solid object has entered the gap between the drum and the main tank. Damage will be especially critical if the item is picked up at high speed (that is, during spinning and high-temperature washing);
- Also, the weak point of the tank is also the attachment points of its halves, which are equipped with sealing gaskets for sealing. Firstly, the rubber gasket itself may also dry out over time, which will lead to the formation of a leak, and secondly, if the machine is used frequently, the screws may become loose.
“Healing” the crack in this case is not recommended, since it is useless: with simultaneous exposure to the enormous rotation speed of the drum, high temperature and water diluted with powder, any sealant will not provide even two hours of insulation. If the tank of the machine has leaked, then it should only be replaced.
Bearing failure leading to leakage
The average modern washing machine usually has two bearings that are mounted directly on the shaft just behind the seal. The main task of these parts is to ensure smooth running of the machine drum, reduce the level of noise emitted and outgoing vibration and the influence of centrifugal force on the cross, which is located immediately behind the tank.
Therefore, the main signs of identifying bearings that have become unusable are the presence of a metallic noise, strong vibration of the machine during normal operation, as well as play between the drum and the tank. An indirect cause of bearing damage may be the deterioration of the sealing properties of the oil seal, as a result of which water flowing in streams gradually washes out the lubricant. It is for this reason that when replacing bearings it is better to additionally replace the oil seal: it is relatively cheap and is located in the same place; Taking such measures will definitely help avoid the need for repeated repairs.
Figure 7 – Typical washing machine cross with a set of bearings
Important: if a significant amount of time has passed since the purchase of the washing machine (5-7 years), and it is used quite often, then it is recommended to change the bearings, since this time period, on average, is their service life.
There is only one way to troubleshoot the problem: completely disassemble the washing machine, replace the bearing-oil seal system and apply lubricant to the bearings.
The analysis is carried out in several steps:
- Disconnecting the device from communications and the electrical network;
- Draining water from the filter located in the pocket at the bottom of the device;
- Removing the filter itself;
- Unscrewing all the screws and bolts located on the front and back sides of the machine for removing panels (they can additionally be held using plastic clips, which should only be slightly snapped off);
- After this, the dispenser with the hopper is removed, and only then the wires are disconnected;
- Next, the drive belt and corner pipe are disconnected;
- Finally, the tank is removed (just unfasten the latches and pull out one half), and the bearings are knocked out of the cross using a hammer or the handle of another tool.
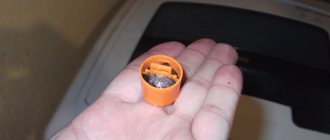
Drain filter malfunction
The drain filter is always located at the bottom of the washing machine. Usually it is either hidden behind a special pocket, which has a rectangular shape and is located near the left corner of the case, or is simply hidden behind a long plastic lower bumper. Direct signs of a clogged filter include:
- The appearance of an unpleasant odor during the washing process;
- Weak outflow of water during spinning and draining;
- The appearance of water drops directly near the pocket.
The latter is a late sign of trouble and it is best to prevent the possibility of the filter becoming clogged by scale, hair or lint with regular maintenance.
Figure 8 – Classic location of the drain filter (corner pocket behind the lower bumper)
If the cause of the leak is really a clogged drain filter, then there are two ways to solve the problem:
- Cleaning a clogged part using toothpicks, old toothbrushes and other available tools. After its completion, it is recommended to rinse the filter thoroughly under pressure of hot water;
- Replacing an element. In both cases, the filter must be removed, and to do this you should: Open the decorative pocket, or completely unscrew the bumper (the design of modern models provides a special pocket, but this is not provided for in earlier versions of the devices);
- Pressing lightly inward, unscrew the filter counterclockwise;
- If there is no counter-tension, release the filter and it will jump out of the hole into your hands.
This type of filter is very small in size, so various solid objects that get inside can cause fatal consequences and damage the entire washing machine system. And it is for this reason that you should always check the pockets and secret compartments of clothing before loading them into the machine.
Note: It is quite obvious that nowadays a person at home is surrounded by a huge number of gadgets that need regular inspection, and it is often simply difficult to devote time to each of them. Therefore, it is recommended to allocate one regular day for their maintenance, for example, once every six months. This is not burdensome, but the devices will definitely last longer than the stated period with this attitude.
Seal failure as a cause of leakage
The oil seal is a seal that acts as a kind of intermediary between the shaft and the drum of the washing machine: being an ordinary rubber gasket, it prevents moisture from entering the bearings. It is almost impossible to determine for sure that the cause of the leak lies precisely in the drying and cracking of such a rubber band, except by the slightest change in the sound emanating from the machine.
To remove the oil seal, you should disassemble the device as was already described above in relation to bearings. In most cases, this seal will pop out along with the bearings when they are knocked out, but if not, you can use pliers.
Any seal in a washing machine must be lubricated with a special product that has all of the properties listed below:
- Water repellency;
- Density (this will not allow the solution to leak onto the shaft);
- Chemical neutrality (obviously, the lubricant should not react chemically with rubber);
- Heat resistance (at high shaft rotation speeds, the rubber heats up, and the task of the lubricant is not to lose its water-repellent properties).
Reinstalling the oil seal must be very careful: since the size is selected specifically for a specific part, it is important to ensure that its edges do not bend or form folds, and that it fits completely inside. Otherwise, there is a possibility that it will quickly become unusable.
Malfunction of pipes
The design of the washing machine has three pipes:
- Filler pipe connecting the intake valve to the dispenser. It very rarely becomes unusable due to the fact that it is operated under always the same conditions (low temperature water, direct location). It can only deteriorate if it dries out;
- The pipe through which water runs from the dispenser to the reservoir (or tank). For the same reasons, it rarely malfunctions;
- Drain pipe. This element of the system, as practice shows, most often becomes unusable. This is due to the increased temperature (as a consequence, a large difference during drying), and to a more aggressive environment of influence (dissolved powder, although it does not critically change the acidity, has an effect on the rubber), and due to the ingress of a large object (for example, a coin) that was not previously removed from the pockets.
As mentioned above, a crack or rip in a pipe is one of the easiest breakdowns to fix, since such parts are small in size, have less load compared to hoses and are located relatively close to the protective box. All this allows them to be repaired or replaced in the shortest possible time.
It is in this case that the use of a glue gun for spot application of silicone glue or other sealant is justified. It is not recommended to use only electrical tape or tape to fix a leak; it is better to use them to secure a piece of corrugated plastic tube.
Other causes of leakage
If the standard faults were listed above, then below are far from the most obvious causes of the leak. For example, clamps used to tighten hoses can indirectly cause cracks in the hose.
As practice shows, not everyone is able to correctly select the correct force for attaching a clamp to a hose: many prefer to simply turn the screw to the maximum. The result of this is a breakthrough in the hose as a result of high water pressure and back pressure from the compressed rubber.
But: on the other hand, weak clamp tension at the junction of the plastic parts with the rubber hose can also cause a leak. In short, the degree of tightening of the clamp must be determined experimentally.
Despite the fact that in most regions of the Russian Federation, centralized water supply water is of decent quality, it makes sense to find out or measure its hardness level before using a washing machine. If the value is increased, it is recommended to install a special filter that will capture the smallest solid particles that can accumulate and form scale on the pump.
To summarize what has been said, it is important to emphasize that an expensive washing machine from any manufacturer is not a priori the best in technical terms and ideal in terms of reliability. Incorrect operating technique, failure to comply with the fundamental principles of installing the device and failure to maintain parts are the main factors in the breakdown of such devices. Regular preventive measures in the absence of manufacturing defects in the design will ensure long service life of any machine.
What to do
Once you have determined where the water in the disabled washing machine came from, it’s time to move on to action to eliminate the problem. But what is the best thing to do: call a specialist or try to fix everything on your own?
- If water comes from the sewer, then the reason is either a blockage or an incorrect connection of the drain to the sewer. In principle, anyone can remove the blockage on their own. Getting the drain out correctly is a more difficult task. If you cannot cope with it on your own, then you can use the service of professional installation of washing machines.
- If water enters the washing machine due to a faulty inlet valve , you can, of course, try to replace it yourself. However, this is a very risky undertaking, especially if you are going to change the valve for the first time. Therefore, you should not experiment - it’s better to call a specialist. In the meantime, you are waiting for him to arrive, just turn off the water supply valve to the machine.
Important for those whose washing machine is under warranty!
You should be aware that the manufacturer's warranty does not cover problems caused by improper connection of the washing machine to the sewer. Therefore, in this case, there is no point in calling the warranty service center; they will refuse you free repairs.
"RemBytTech" - professional repair of washing machines with a guarantee
If you are not sure that you can cope with the problem yourself when a switched-off washing machine fills with water, call the RemBytTech workshop
and entrust the repair to professional craftsmen.
Company advantages:
- telephone consultation;
- qualified craftsmen;
- repairs at your home within 24 hours after your request;
- free diagnostics (if the repair is carried out by our technician);
- Warranty up to 2 years on all spare parts and work performed.
How to avoid trouble
To avoid finding a washing machine full of water and a mini-flood in the bathroom before your next wash, follow these recommendations:
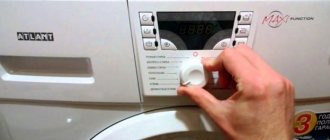
- Close the shut-off valve immediately after washing. If the tap is open all the time, the inlet valve membrane experiences constant water pressure and wears out faster.
- Install a non-return (anti-siphon) valve. This device is designed to protect the drain system from returning wastewater from the sewer back into the drum of the washing machine.
- Use apartment leak protection systems. The Aquastop system built into the washing machine will not cope with the situation when the machine is turned off and draws water on its own. Since the aquastop sensor is located in the pan of the washing machine, and after the drum is overfilled, water will not pour into the pan, but directly onto the floor. In global leakage protection systems, the aquastop sensor is installed directly on the floor of the room. And it goes off at the slightest appearance of water on the floor.
Causes of leakage during washing and spinning
Since the technological operations during the washing and spinning process are fundamentally no different from each other (draining during spinning occurs according to the same scheme as during washing), it makes sense to consider the reasons for the appearance of water in the machine together.
One of the most common causes of leaks during operation of a washing machine is a malfunction of the drain pump or filter. The first element is necessary for directly pumping water out of the working volume during any operation, and even the smallest solid object found inside the washing machine can damage it.
Due to its small size, it can not only fly through the drain pipe, reaching the filter, but also knock it out due to its enormous speed (the average rotation speed of a washing machine drum is 1,000 rpm, so a conventional coin has a very decent starting speed) , which can damage the pump. Obviously, for the same reason, the filter can quickly become unusable.
Figure 3 – Drain pump
If water mainly accumulates at the back wall of the device, the cause is probably a malfunction of one of the two seals. The oil seal is another sealing device that is designed to prevent the formation of leaks from the drum bearings, which, in turn, ensure quiet operation of the machine. Therefore, if a leak is accompanied by a multiple increase in noise compared to what usually comes from the machine, this is a sure sign that the problem lies either in it or in the bearing.
Note: manufacturers strongly recommend that such an oil seal device be lubricated annually with a water repellent, as this will ensure a better degree of sealing of the structure.