What to do if the flared style does not suit your body type at all or creates complete disharmony with other wardrobe details? There is a way out! Flared trousers can be sewn into straight lines with just an hour of free time, basic sewing skills and a sewing machine. Let's consider step by step how to do this yourself, without turning to a studio or professional seamstresses for help.
Important! If a slight reduction in the legs is required, this should not be done only on the sides, since in this case the product will be guaranteed to skew.
What is necessary? Preparing for work
To work, you don’t need much, first of all, the mood and the desire to acquire something updated with your own hands. In addition, you must have minimal experience using a sewing machine. You will also need to prepare:
- a flat surface (a table is ideal);
- iron;
- tailor's pins;
- measuring tape;
- chalk or sharpened soap;
- threads of two colors (white for basting and matching the color of the pants for stitching);
- sewing machine
How to sew jeans?
After the trouser legs were ironed, I took my old denim leggings (the model of which suited me) and traced the desired shape of the jeans using them.
Then I folded the trouser legs in half and transferred the chalk line to the second trouser leg using tailor's pins.
Connect the splitting points with pins using chalk lines on the side of the second trouser leg.
After that, you need to remove the pins and machine stitch along the chalk lines, on both legs with threads matching the color of the fabric.
Overlock the allowances on the overlocker with threads in the color of the fabric, from the front halves of the trousers.
Press the finished seams with an iron onto the back halves of the trouser legs.
Attention!
To do this, you can use a special sleeve block, which is included with the ironing board. Or a special pillow that you can make with your own hands.
Stages of suturing
After preparation, we begin the process of sewing the trousers. First you need to decide how much you want to reduce your trouser legs. A small excess of a couple of centimeters is removed along the inner seam, and it is advisable to baste and try on the product before stitching. If it is necessary to make a reduction from the hips or knees, we will follow a different algorithm. Throughout the entire process, some operations will have to be done manually, while others will have to be done by machine. Work algorithm:
- open the hem at the bottom and iron;
- on the wrong side, press the side seams so that they form a single fabric with the product;
- on both sides of the trouser leg from the seams we measure the same number of centimeters (in total equal to the amount of the entire excess);
- using chalk, connect the marks with straight lines until they intersect with the seam;
- we wash it with white threads, try it on;
- if the fitting is satisfactory, cut off the excess material (leaving 1 cm for allowance);
- carefully rip out the old seams, remove the remaining threads;
- After stitching with threads to match the color of the material, iron the stitched trousers.
How to use the machine?
The machine will be needed for stitching the product, and also as an overlocker. But not every home appliance has such a function, so the inner edges can be finished with a zigzag seam or covered with tailor’s tape. The seams are processed together or separately - depending on the thickness of the fabric and the style of the trousers.
Jeans: features of turning flares into straight legs
The process of sewing flared jeans has some differences, especially in cases where it is necessary to perform finishing stitches along the side seams.
- First you need to rip the bottom of the trousers and side seams, and steam them with an iron.
- Then, laying the product out on a flat surface and attaching straight trousers of your size, draw a remnant over them.
- Pin or baste the seams, try them on, stitch with thick threads, and overlay.
- Iron from the wrong side.
- Turn it right side out and iron it through gauze moistened with water and a weak solution of vinegar (to prevent shine). Fold the seams over the back half of the legs.
- Stepping back 2 mm from the edge of the seam, sew the first finishing line; this can be done with threads that match the color of the jeans or with colored threads that match the rest of the trim.
- The second stitch is laid parallel to the first one, the width of the sewing machine foot. After this, the bottom of the trousers is also sewn off.
- The jeans are ready!
By the way, when processing the edge of the product, the places where a significant thickening forms can be tapped with a hammer, after wetting them and covering them with dense material .
How to sew a man's bell-bottom?
The process of sewing up men's bell-bottom trousers is similar to the algorithm for reducing women's panties. To some extent, it is even simpler, since the expansion in them always comes only from the knee. What is the easiest way to sew them in?
- Decide on the width of the pants by measuring the circumference of your leg at the ankle, adding 5-7 cm.
- Put it on inside out and pin up any unnecessary excess on one pant leg.
- Transfer to another, baste and try on.
- Sew with a neat stitch, leaving seam allowances.
- Iron the finished product.
Wide trousers can be made smaller by yourself by adjusting them to your figure to look fashionable and neat. To do this, you need to have skills in working with a sewing machine, read the recommendations and choose the appropriate method (from below, along the entire length, shortening, etc.).
Tapering denim pants at the bottom
Often, flared jeans make fashionistas and fashionistas rush to boutiques to get a new model. Unfortunately, not everyone has this opportunity. Especially for those people who cannot afford to buy a new pair of jeans, but really want to have an attractive appearance, tips on tapering jeans at the bottom will be useful.
Required Tools
To narrow or sew denim trousers, you will need the following materials and tools:
- sewing machine;
- threads (to match the color of the product and for finishing stitching);
- pins;
- needle;
- overlock or special foot;
- scissors;
- cute or crayon;
- meter;
- iron;
- ironing board.
Instructions for performing the work
- Open the bottom of the trouser legs.
- Use a well-heated iron to iron the seams to avoid creases.
- Turn the pants inside out.
- Put on jeans and measure the places that will be sutured. Mark them with pins.
- Take them off.
- Straighten it on the table, eliminating all bends.
- Use chalk or soap to outline the lines along the pins.
- Baste stitches along the given lines with a needle and thread, using a “needle forward” stitch.
- Re-fit. If there is a need, then adjust the lines.
- Take off your jeans. Apply new lines taking into account the seam allowance of 15 mm.
- Trim off excess parts with scissors.
- Overcast the allowance area.
- Iron the resulting seams.
- Sew the trousers along the given contour lines.
- Align the bottom of the shoe cuts.
- Draw an allowance of 30 - 40 mm along the bottom with chalk or soap.
- Choose the color of the thread for processing the lower part.
- Fold the bottom of the legs along the seam allowance and sew from the front with finishing thread.
- Iron the stitching with a heated iron.
- Eliminate excess threads.
- Turn the trousers inside out and put them on for fitting.
- If the result is positive, iron the entire product again.
Reference! The best way to taper denim trousers is along the inseam. This way the outer decorative stitching of the trouser legs will not be damaged.
How to sew pants correctly
Depending on the desired effect, adjustments are made in different areas. But there are general rules:
- before starting work, the trousers are ironed from the wrong side, paying attention to the seams, and the joints are smoothed out in the process;
- make marks and draw lines on the product with chalk or a special washable marker so that they are clear;
- the transition line from the old seam to the new one should be smooth;
- allowances are left - 1 cm;
- First you need to do basting and fitting to make sure the pants fit, and then machine stitching.
To properly sew in trousers, you should not chop off excess fabric when putting the item on inside out - puffy pockets and seams will not allow you to objectively assess where and what excess needs to be removed; it is better to chop them off with needles from the front side, and then transfer the marks to the wrong side.
How to sew wide trousers in the waist and sides
If the trousers are wide at the waist and hips, the following measurements are needed: waist, hips, height of the area being sutured (along the side seam). To make pants with belt loops, jeans or men's pants smaller, use this method:
- The belt is peeled off from the side so that it is convenient to carry out further manipulations with it.
- The side seams are ripped out to the marked point from which the narrowing begins.
- The belt is cut on each side under the adjacent belt loops so that they completely hide the junction. If there are no belt loops, the belt is cut so that the joint is located exactly above the side seam.
- The parts are ground down and excess fabric is cut off.
- The upper part of the belt is connected along the old lines, and the lower part is attached to the trousers in the same way as they were sewn.
To sew the trousers in the belt, it can be completely cut off and shortened. The excess width in the waist area is taken into the side seams, and then the belt is sewn in.
Correcting the middle seam
The middle seam is also called the elephant seam and the seat seam. Its adjustment is considered simple and therefore, in order to narrow trousers, this method is used most often:
- Exactly in the middle of the back, on the front and back sides of the product, draw a vertical line on the belt, as if continuing the seam line, and mark the segment that needs to be picked up.
- Rip off the belt loop and belt (about 8 cm on each half) and remove the decorative stitching, if any.
- Cut the belt along the marked line.
- The seam and waistband are sutured, excess fabric is cut off, the finishing stitching is restored and the waistband is attached.
It is recommended to take no more than 3 cm from each back half.
How to sew pants only on the sides
If the trousers are too big in the buttocks and hips, and the belt fits well, it is enough to sew in the trousers on the sides:
- Put on your trousers and measure and pin off any excess fabric in front of the mirror.
- If the new stitch line runs near the rivets, they must be removed.
- Baste the seams, try them on, and if you are satisfied with the result, machine stitch them.
- Trim off excess fabric and finish the edges with an overlocker or zigzag stitch.
How to suture by hand
At first glance, the procedure for reducing a trouser size seems quite simple. However, in reality, when carrying out it, it is worth considering many nuances.
Preparation
First of all, it is important to properly prepare for the procedure. To do this, the item should be washed and ironed.
It is recommended to wash the item first. Some fabrics, such as wool or cotton, shrink frequently. As a result, they can fit to size.
After washing, trousers should be ironed. Thanks to this, you will be able to avoid mistakes or irregularities. You should try on clothes and mark any excess with pins.
Materials and tools
It is recommended to have a chalk on hand. Soap is also great. These devices help mark everything you need. The craftswoman will also need a ruler and pins. Scissors and thread are often needed. In some cases, a sewing machine is also used.
Instructions
When sewing trousers, there are many features to consider. First of all, it is recommended to identify the problem.
Flare to straight
Relatively recently, flared models were in trend. But today they have lost their popularity. To update this item of clothing, it is worth sewing it up. To do this, it is recommended to do the following:
- Turn the model inside out and pin the excess fabric.
- Remove excess material and sew up the ripped areas using a machine.
- Finish edges and iron clothes.
Try on and baste clothes.
How to taper to the bottom
This is a fairly simple procedure. First, you should rip the bottom and iron the trousers. Try them on inside out and figure out how much you need to narrow them. Excess material should be marked with pins.
Then do the following:
- Carefully remove your trousers and lay them out on the table;
- align and apply another line for the seam;
- baste with thread along the first line;
- try it on again and evaluate the comfort;
- make adjustments if necessary;
- remove excess material;
- process the edges;
- sew the model on a typewriter.
How to sew in on the sides correctly
If the product is too loose in the hips, it is reduced along the outer seam. To do this, do the following:
- turn the model inside out;
- try on and mark the places that need to be reduced;
- draw a line with chalk;
- manually sweep away the marked areas;
- turn it back inside out and try it on;
- open the seam and stitch along the entire length;
- cut off excess fabric and process the edges;
- sew on a belt;
- fix the bottom of the trouser leg.
How to make skinny jeans
If wide-leg jeans are made from soft, stretchy fabric, they can be converted into skinny jeans—they sit snug on the hips and calves, tapering downward. The bottom of the pants is ripped off and hemmed last, after fitting; in most cases, they need to be shortened. Excess fabric must be pinned off in such a way that waves, creases or distortions do not form. It is a mistake to think that you can only sew jeans on the side of the seam where there is no finishing stitch. For comfortable free movement, you need to leave 2-3 cm at the following points:
- ankle;
- the middle part of the leg between the knee and ankle.
After this, the upper point from which the narrowing begins is determined, and all 3 marks are connected under the ruler and swept away.
For skinnies, leave an allowance of 1.5 cm. Excess fabric is cut off and the parts are sewn down. Then the seam allowances are processed by folding them together and ironed onto the back halves.
The parts of jeans at the factory are connected with a backstitch, which is difficult to reproduce at home without skills, so to ensure that the seam is the same along the entire length, the vertical and finishing stitches are completely ripped out. On the inside of the leg, the details do not need to be stitched with contrasting thread. And to decorate the exterior ones, choose threads that match the color and a thick needle (No. 100-110). To ensure that the stitching does not differ from the factory one, a thread folded in half is threaded into the needle.
When sewing seams from several layers of fabric (for example, in places of side seams with a hem), it is recommended not to rush, turn the wheel manually and pull the fabric away from you.
Option #1: How to Taper Jeans
You can sew the jeans at the bottom along the inside and outside seams. However, it is recommended to use the first option. It is the least noticeable if you make minor mistakes, and the outer seam is a finishing seam, which complicates the process. But you should not expect that crooked stitching on the inside of the pants will not spoil the overall silhouette; on the contrary, careless treatment will make the crookedness appear more pronounced.
- To start making wide jeans skinny, you need to carefully rip the seam from the knee, if you need to narrow only the bottom, and from the crotch, if the entire pant leg needs to be narrowed. The hem of the trousers should also be unraveled.
- Iron seam allowances to remove creases and simplify the process. Turn the jeans inside out. The product is put on and secured with pins to the required width.
It is recommended to carry out the procedure with additional assistance. When tilting, measurements have an error, which leads to distortion of the result.
- The result is checked for comfort while walking and sitting down.
There is no need to make the bottom too narrow; it is recommended to leave a margin of 1 cm for stitching and future shrinkage.
- The jeans are removed and laid on a flat, hard surface.
- A line for stitching is drawn along the fixed pins. The width is measured using a ruler; it should be the same on both legs. Baste the jeans along the resulting lines using a simple thread. Repeat the fitting and eliminate any inaccuracies. The jeans are removed again and allowance lines are drawn 1-1.5 cm from the stitching. Excess fabric is cut off. The edges are processed with an overlog on a machine or manually. The processed edge is smoothed with an iron.
You can use a sleeve block for convenience, or fill your pant leg with homemade pillows.
- Smoothly moving from the existing seam at the top of the jeans, sew the trousers along the chalk stripe. The bottom of the pants is hemmed with two lines, folding the fabric 2-3 cm.
How to sew pants by hand
Initially, you should decide in which directions you need to sew your trousers. So, you can sew in the length of the product (shorten), the width of the trouser legs themselves, along the hips (at the waist or along the entire length), remove flares, and adjust the waist.
It is necessary to stitch evenly from the side and from the step (internal) seam.
Sometimes you can do without a pattern. This applies to small adjustments to things. For example, changing the length, inserting small darts, narrowing the bottom of the trousers. And sometimes a pattern is required. This applies to adjusting clothing around the waist. The less you change, the easier it is to change.
Preparation
First, the product is washed. For example, cotton and wool shrink the product and can fit to size.
Then the trousers are ironed. This is necessary to prevent errors and irregularities. Trying on pants. Excess fabric is marked with pins.
It is always advisable to have chalk or soap on hand for marking, a sewing ruler, scissors, pins, thread, and a sewing machine. It is better not to draw with a pen or pencil, otherwise marks will remain.
How to sew bell-bottom pants into straight ones
A flare is a slight extension of fabric onto items. The expansion can be smooth and large. It can start from the hip, knee, or mid-thigh.
- Initially, you try on your pants and need to twirl in front of the mirrors.
- The fit of clothes is examined from different angles.
- Excess fabric on the wrong side is marked with sewing pins or needles with knobs. It is recommended that someone do this to avoid curvature.
- We attach the needles with the point down so as not to prick.
- You can measure on both legs at once, but in the end they should be the same. Or then measure the processed one and transfer it to the second one.
- The product is carefully removed without touching the needles.
- The product is laid out on the table. The edges are aligned.
- First, all the work will be done on one trouser leg, then on the second.
- Using tailor's chalk, we mark with dashes the places marked with pins. If you choose a pen or pencil, you will have to scrub for a very long time.
- We take out the pins.
- Straighten the pant leg again.
- We draw a straight line.
- Mark a second line on the side seam 1-2 cm.
- We baste the seam along the first line.
- Try it on. Checked for measurement error, curvature, comfort.
- The thing is removed. Adjustments are made if necessary.
- Trying it on again.
- Excess fabric is trimmed.
- Ironed.
- The product is turned inside out if it was previously done on the front side.
- Levels out.
- The ends are processed separately or together. Preferably using a machine using a zigzag or machine foot.
- The product is stitched on a sewing machine. Ready.
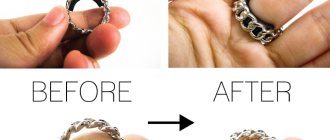
How to turn old jeans into new ones
Making wide jeans straight is much easier than, for example, flaring narrow ones: for this you don’t have to be a sewing master and you don’t have to spend the whole day, one hour will be enough. To begin, take the old jeans that you are planning to remake and turn them inside out. Put it on yourself and, using needles and nails, mark at the bottom those parts of the trouser leg that will need to be cut off. Please note: you need to pin the excess fabric with needles along the outside of each pant leg. Pin needles with nails with the point down, this will prevent you from pricking yourself when you take off your jeans.
After you have marked the seam location, the jeans must be carefully removed and, without removing the needles, laid out on the table. Then draw a line along the needle basting; it shows the location of the intended seam. It is better to use a piece of regular dry soap or school chalk for this purpose. Next, fold the jeans - you should have the same indentation on each leg. If everything is correct, take a needle and bright thread and sew the trousers along the marked line using a regular seam.
After the basting seams are ready, the needles and tacks can be removed and you can start altering the jeans. Carefully trim off the excess fabric below the knee, leaving 1.5–2 centimeters for finishing the seam with an overlocker. The fabric must be cut carefully, avoiding torn edges, as this will make it difficult to process the seam.
Please note: denim fabric tends to shrink, which means you shouldn’t make the bottom too narrow, almost the width of your leg.
They are gaining more and more popularity. And it’s not surprising that many people have a question: how to convert wide jeans into skinny jeans? How to narrow your jeans yourself? Why remake it and not buy new ones in the store? Because doing something with your own hands is interesting. And because almost everyone has wide jeans that are already tired of them. But which may well serve and even become a wardrobe decoration as skinny jeans. Banal savings on buying new jeans can also be a reason to take up denim crafts. But there's another reason to make your own skinny jeans. As a rule, these jeans fit you much more comfortably than any store-bought ones.
Making skinny jeans from wide ones is quite possible for anyone who knows how to hold a needle in their hands and operate a sewing machine. There are several ways to turn wide jeans into skinny ones.
First way. Simplest.
We turn the jeans inside out and put them on ourselves.
We pin the jeans along the outer seam or along the inner seam (depending on your body and the original style of the jeans) so that they fit tightly to the body. At this stage it is better to ask someone for help. Because it’s difficult to stand up straight and pin pins tightly to your body. If you bend over, you may not be able to pin your jeans neatly.
Carefully remove the jeans, draw a line along the pins and stitch along the drawn line.
We try on the jeans again, leaving them inside out. If necessary, we adjust. Usually you have to grab a little more, usually at the top.
We sew the seam using a machine. Along the stitched seam, draw a line on the second leg and stitch it in the same way. How to make a seam depends on your desire and your capabilities.
Second way. Not much more difficult than the first, but requires skinny jeans that fit you perfectly.
Turn the jeans inside out and lay them out on a large table or floor.
We attach our skinny jeans to them and mark a new seam line along the wide jeans.
We are not stitching yet, but simply stitching the jeans along the intended line.
We put the sour cream jeans on ourselves, inside out, and adjust the new seam in place, pinning it where necessary. Just like we did in the previous method.
Again we sew along the pinned pins.
You can try on the jeans again and if everything is fine, we sew the seam on the machine. Using the first leg, we make a second one.
Both methods have a common complexity. These are existing seams. If the jeans are stitched on the outside with a double seam, and you need to narrow the jeans from the hip, then the seam will be a hindrance. No matter how hard we try, the transition from the old seam to the new one will be noticeable. The solution may be to completely cut out the old seam. But this is not always possible. Another way is to carefully cut the seam on both sides to the desired location. And after the jeans are tapered, sew it directly on top of the new seam. But this method is also not without its drawbacks.
The solution may be to choose jeans without a double outer seam. Or use a third method to narrow your jeans.
Third way. Perhaps not the most complex in terms of technology, but definitely not simple and very labor-intensive. But the most interesting.
After we have decided on the line along which to sew the jeans (it doesn’t matter how: along other skinny jeans or directly along the leg), we cut out the excess fabric, as if making a cut on the legs. We sew the edges and sew patterned fabric or fabric from the inside onto the cut, instead of a seam. Finishing the cut with stitched stripes of denim will look great. Cut pieces of jeans are suitable for this. This method is great (and solves the problem) if you need to narrow your jeans from the hip.
Fourth way. The most difficult method, which requires not only the presence of skinny jeans that fit you perfectly and which are already worn out or damaged, but also cutting and sewing skills.
We simply rip wide leg jeans into separate patterns. Then we rip out old or damaged skinny jeans and transfer the skinny jeans patterns onto the wide jeans pieces. If you have proven skinny jeans patterns, then you may not need your old skinny jeans. We cut out new patterns and re-sew the jeans. This method is not exactly a remake. It's more about making jeans, which not every atelier can do.
It’s quite possible that you have other ideas - how to narrow wide jeans, how to turn tired wide jeans into skinny jeans. Share these ideas.
Today, wide flared jeans are gradually going out of fashion, and many people are wondering how to narrow the bottom of jeans at home in order to give them a second wind and turn them into a fashionable style again. The tapering procedure itself depends not only on the style and style of the trousers, but also on the fabric from which they are made. Today we will tell you how to turn wide jeans into skinny ones simply, quickly and without additional costs.
How to tape your trousers at home
There is nothing difficult in creating such beauty. Open the bottom edge (hem). Iron the product. Try on the pants from the wrong side. Spin around the mirror. Mentally estimate how much it needs to be narrowed.
Adjustment on one side is made subject to slight narrowing. Then it looks more practical (internal or external). Is there any decor?
Mark excess material on the material with pins. You have to be careful here. This may affect stretch fabric. The fabric will stretch a little and the stitching will be crooked. If the fabric is non-stretchy, your legs should fit comfortably into the pant leg. The main thing is not to overdo it.
- Remove carefully and spread on the table.
- Align. Draw a line with chalk along the marked areas. Draw a 2nd line for the seam.
- Baste with threads along 1 line.
- Try it on again and check the comfort.
- Adjust as necessary.
- Trim off excess fabric.
- Seal the edges.
- Machine sew trousers.
Adjustments on both sides are made under the condition of large narrowing. The same actions are performed, only on both sides at an equal distance. Otherwise it will be crooked. Finish hem and iron.
How to taper jeans at the bottom at home without a sewing machine?
Fashion dictates its terms, so many people are now trying to look beautiful, stylish, youthful. If you want to make your jeans skinny at the bottom, but you don't have the skills to work with a sewing machine, then you can use a simple method of folding excess fabric on the legs.
This option for narrowing your trousers will take you no more than two minutes if you proceed as follows:
- Put on your pants and stand in front of the mirror.
- Pull one leg to the desired width with one hand.
- Holding the trouser leg with the fingers of one hand, fold the excess fabric to the right or left, as convenient for you, with the other hand.
- Fold the bottom of the trouser leg once, securing the folded fabric. You can wrap the bottom twice if the length allows.
- Evaluate the result - if this width satisfies you, then do the same manipulations with the other leg.
- Experiment with the height of the trousers and their width until you are completely satisfied with the result.
How to properly sew in the sides of trousers with your own hands
If the trousers are too large due to lack of volume in the hip area, then suturing can be done along the outer seam.
- Turn the product inside out.
- Try it on. Squat, walk around.
- The places to reduce how much are indicated with pins. Everything is distributed equally to avoid curvature.
- Draw a straight line with chalk.
- Manually sweep the marked areas.
- Turn it onto your face and try it on.
- Rip out the factory seam.
- Sew along the seam you have marked. For the entire length of the trouser leg, so that there are no distortions.
- Cut off the excess pop of the material and process the edges.
- Sew on the waistband and bottom edge of the trouser leg.
- Don't forget about the 2nd leg. Both should be the same length.
How to sew trousers in a belt
There are several ways to make your pants smaller around the waist.
Stitching along undercuts
The item is tried on and how well the product will be sutured is assessed. Most often, excess matter will be reduced due to undercuts. Either the old ones are torn apart, or new ones are added.
The pants are ironed and then tried on. Excess fabric is marked on the trousers. The edges of the darts may butt up against the side seams, but avoid this. Otherwise, unsightly folds and distortion of the product are possible.
The harness and belt are unraveled. The necessary seams are basted. Excess is cut off. The darts are sewn using a sewing machine.
The belt itself is cut on the sides. Excess fabric is cut off. The edges of the product and the belt are sewn down. The belt is carefully sewn to the product along the lines. The harness is attached.
Reduction due to back seam
The waist of the item is reduced by several sizes due to the back seam. After trying on, the belt loops (belt fasteners) and belt are removed. The belt is cut in half.
The stitching on the middle seam is unraveling. The suture is sutured to the marked distance. The belt is reduced and processed. Stitched on a sewing machine. It is sewn to the main product. The belt loop is being restored.
Complete alteration
The most labor-intensive variation will affect the entire product. The belt loop comes off in the required places. Most often at the back of the product. The belt is separated a few cm (10) in both directions.
The crotch seam is ripped out to 9 cm. The middle seam is also ripped out. All are secured with pins to prevent displacement.
In the waist area it is necessary to deviate from the middle line by 2 cm. A line is drawn for the future seam. You should get a triangle.
It is stitched on a sewing machine and the edges are finished. The crotch seam is sewn up. The excess is cut off at the belt. Finish the edges and sew them back. The belt loop is attached.
How to shorten pants
You need to try on the item. Fold the excess fabric and secure the length with needles. It is advisable to carry out this to a third party. This way there will be no curvature or length errors on the product. If this is a female model, then you need to take into account the heel. Also, the length depends on the model of the pants. If they taper towards the bottom, the edges should be just above the heel.
Place the product on the table and spread it out. Draw straight lines using chalk along the marks. The first is the desired length, the second with a hem. It will be 1-2 cm for women, 4-5 for men.
It is necessary to go through with a needle and thread to secure the desired result. Try it on again. Spin around the mirror. Then remove. If necessary, make adjustments.
Place the product on the table. Trim off excess material. Finish the edges. Sew on a machine.
It is not always necessary to cut off excess fabric if the excess fabric is small. You can simply hide them in the hem. Or use double-sided sewing tape at the hem. But after each wash you will have to re-attach it.
It is often recommended to sew on the braid. It will prevent the edges from fraying. The shade of the braid is selected to match the tone of the product.
It is better to sew it on a product that has never been worn. But the edges have already been treated to prevent fraying. The middle of the braid should run along the final length of the product. It is necessary to baste there.
On the inner side seam we bend the free end so that the beginning is closed. Fold the braid in half. It should remain inside and stick out from below by a couple of mm. We stitch on a machine. We process the hem of the product.
How to sew sweatpants
With this action, the material (knitwear), edge processing (straight, with elastic, with ties), and the tailoring itself are taken into account. These can be with an oriental motif, tight, straight pants. In a tight model, almost the entire model is most often altered. In the eastern ones, the side and crotch seams are altered.
So, the pants can be too wide in the elastic at the waist, too big in the leg, and in length. If the sweatpants are too big at the hips, you will have to sew them in at the side seams. Reduces material in equal proportions along all seams. Sometimes the middle seam is also connected when adjusting the seat height.
- Try it on.
- Mark excess material with pins. Remove the product.
- Turn inside out. Gently straighten it on the table.
- Draw a line. Leave to process the edges.
- Baste along this line.
- Try it on and compare the difference. Take off.
- Open the waistband and the bottom edge of the trouser leg.
- Open the edges of the side seams, the step seam, and the isch seam. Especially if the model should fit the figure. Most often, you can only sutured on the sides.
- It is stitched by machine.
- The edges are processed.
Excess material on the belt is trimmed. The edges on it are processed and sewn back. If there is an elastic band, then it looks according to the situation (how it fits on the figure and what kind of elastic). If there is a lot of material, it is better to trim it. Everything should look aesthetically pleasing.
If the problem is the length, then it is shortened. The elastic bands are altered onto the shortened product, taking into account their height.
How to sew wide-leg trousers along the entire length
Most often this concerns suturing on the sides, affecting the waist. This method is possible when suturing 2 sizes. The side, step, and ischial seams are altered. The material is removed evenly. The belt is also affected. This is described above.
If you need to alter an item to a larger size, you will have to redraw everything, build a sketch, transfer it to fabric and cut it, grind it and then sew it together.
Any thing can be sutured, but you need to clearly understand whether anyone can handle it. Most often, complex adjustments are required. And there is a risk of messing up. If you are not sure, you should take it to the studio. It would be a shame to ruin a good thing. It is worth considering one more nuance. Not all trouser models can be sewn in due to the peculiarities of tailoring.