With the arrival of persistent frosts, the most pressing task becomes to protect the crop from damage.
For most vegetables, short-term exposure to sub-zero temperatures is fraught with complete loss of shelf life. However, not all vegetable growers have a well-equipped basement or cellar. It turns out that if simple conditions are met, it is possible to store vegetables on the balcony even in winter.
What varieties are suitable?
When choosing balcony storage for the winter, you should pay attention to the following varieties:
- Queen of Autumn. This is the easiest variety developed by Russian breeders. The weight of one fruit is 200 g, and the length reaches 25-30 cm. 120 days pass from the first shoots to maturity. The variety is excellent for fresh consumption and canning. The fruit is juicy and has a pleasant taste. Can be stored until June. At this time, their presentation and taste do not deteriorate.
- Flaccoro. This is a variety of Dutch selection. Market maturity occurs 110-1130 days after sowing. The color of carrots is bright orange. It is elongated, smooth with delicate flesh. The variety is characterized by high yield, the length of the root crop is 30 cm. Help. Its main advantage over other species is its excellent storability. Commercial quality is maintained until next summer.
- Vita Longa. This is a relatively new variety that is characterized by high yield. The duration of the growing season is 140 days. Recommended for winter storage, as it has excellent shelf life. Can be consumed fresh. The root crop weighs 200-300 g, length 30 cm.
- Carlena. A high-yielding variety, the fruits of which ripen 130 days after planting the seeds. Since root vegetables contain a high concentration of sugar, they should not be used by people with diabetes. Carlena is easy to care for, and if the right microclimate is maintained, the harvest will last until spring.
- Samson. This variety is one of the most unpretentious. The duration of the growing season is 110-115 days. Has improved taste. The carrot is 20 cm long and weighs 160-200 g. There is no core, but the pulp contains a high concentration of carotene, vitamins and microelements. The variety can grow in areas with any degree of fertility. You can store it until the next harvest.
- Vitamin. This variety was specially obtained for long-term storage. Ripens 110 days after planting. The length of the fruit is 17 cm. With high-quality care and regular watering, carrots are characterized by increased juiciness and excellent taste.
We talked in more detail about which varieties of carrots are suitable for long-term storage for the winter here.
Making a cellar on the balcony with your own hands
Winter storage for vegetables is easy to make yourself. Cash costs do not compare with the cost of factory products. Main consumables: wooden blocks, boards (laminated chipboard), foil insulation, foam plastic, fastening metal corners and screws (nails).
At the first stage, it is necessary to choose the location of the cellar: stationary or mobile, and the expected storage volume of agricultural products.
Mobile unheated design
The work begins with assembling the frame. A base in the form of a parallelepiped made of bars 5 cm thick is mounted on a flat surface. They are connected to each other with ten-nails. Additional fixation with metal connecting brackets.
The length of the blanks depends on the desired volume. For a chest with a volume of 105 liters you will need about 9 linear meters of timber. When calculating the volume, it is necessary to take into account that some parts are overlapped.
Horizontal and vertical are set using a level.
At the bottom of the frame, long blanks are connected by two additional jumpers. After this, the bottom and side walls are sewn up with available materials.
The next step is installation of insulation. Pieces of foam are inserted between the base frames. 1 sq. A meter of “five” costs 85 rubles. The workpieces must be mounted in the frame with minimal gaps. Unavoidable cracks are sealed with silicone or polyurethane foam. This work must be done to prevent the formation of cold bridges.
Foil insulation is attached to the inner surface consisting of foam plastic. The shiny side faces the inside of the box. For fixation, you can use liquid nails, a thin layer of foam or double-sided tape. Foil reflects heat and allows you to create a “thermos effect”. To prevent the shiny layer from peeling off, it is advisable to protect the wall with a piece of cardboard before placing the vegetables in the box.
To make the top of the container, a rectangle is knocked down to fit the dimensions of the box. Subsequent operations are similar to upholstery and insulation of the body. The opening lid is connected to the frame by the second segment of the door hinge. Strips of foam rubber, used for insulating windows, are glued to the points of contact between the lid and the surface of the box.
The strength of the structure allows the box to be used as a seating area. The resemblance to a chair will increase if you put a piece of foam rubber on the lid of the chest and cover it with a piece of upholstery fabric. The fabric is attached to the lid with a construction stapler.
Heated box
Storing vegetables on the balcony goes to the next level if a heating system is used.
Previously, in the most severe winters, to prevent frost from penetrating into the cellars, a simple method was used. A candle was left in the storage room, and the temperature never dropped below critical.
To protect the box for storing vegetables on the balcony in winter from the encroachments of Santa Claus, you can use a simple 15-watt incandescent light bulb. The downside is that it "hogs" the usable storage space.
The ideal heater is infrared film. To place it in an already built cellar on the balcony, you need to prepare a thin-walled plywood box and cut a groove for connecting the electrical wire.
The heating film is laid on plywood on top of the insulation. Several unconnected bars 1.5 - 2 cm thick are placed on the foil along the contour. They will serve as the basis for installing a box made of thin plywood. Its walls should retreat from the insulation and form an air gap of 1 cm.
The resulting gap is used to lay the electrical wire. Numerous holes are drilled into the plywood to allow the circulation of warm air coming from below.
Such a cellar on the balcony will completely protect the harvest from the worst frosts.
How to store vegetables in winter on a cold balcony. Types of containers
According to their design, all such systems are divided into 2 main types:
- Flexible ovens for storing vegetables. They vaguely resemble a large warm bag made on a textile basis. The obvious advantage of a thermal bag is that at the end of the winter season it can be folded, thus saving a lot of space.
- Insulated boxes, which are a solid structure made of one material or another. Most often wood is used (boards, plywood, OSB sheets, etc.).
Chest from an old refrigerator
In addition, different storage facilities are classified depending on what material they are made of (wooden, waterproof durable fabric, plastic, with a metal frame), as well as whether such a storage location is heated or not. Their volume can also be different, sometimes they differ in the location of the shelves (horizontal or vertical).
On a note! For additional convenience and use of free space, a bench is made from the upper part of such winter containers, and sometimes even an entire small sofa, which in the summer will serve as a banquette where you can sit down and relax.
As for structures without additional electrical heating, it is best to use them in places where there is no direct contact with frosty air. In other words, we are talking about entrances, common corridors, glazed loggias, and so on. Although, on some closed balconies it is better to install a heated warm box, preferably equipped with a thermostat. Thanks to the latter, you have the opportunity to regulate the air temperature inside. The range can be different, for example, from 0 to 10 degrees, depending on what products you intend to store there. Their level of electricity consumption, accordingly, will also be different. In any case, it will be safer, vegetables in such a chest will not freeze, and jars of cabbage or pickled mushrooms will not burst from frost.
It is quite possible to store vegetables on the balcony in winter in a flexible container that vaguely resembles a large bag or backpack. Such structures are very practical because, as already noted, if necessary, they can be removed or temporarily moved. Some models are equipped with heating with a thermostat. On the other hand, you can make a box for vegetables on the balcony with your own hands, which cannot be said about a soft bag, the production of which, in most cases, is carried out industrially. It is usually better to buy such things in a store rather than do it yourself. Despite all its practicality, a thermos bag cannot be used to make an ottoman, sofa or seat. So, all types of structures have their advantages and disadvantages. Everyone chooses the option independently, based on their conditions and requirements.
As for what temperature such structures can withstand. It all depends on several criteria, including how insulated the vegetable cabinet is, whether it has additional insulation, whether the balcony is open or closed, and so on. In any case, it is better not to store food at temperatures of -30C or below. By the way, the same recommendation also applies to insulation, since in excessively warm weather, potatoes and other vegetables can be spoiled. It is desirable that the walls of the cellar are not thin and act as an isotherm even at positive temperatures.
Conditions for proper storage of various products
To prevent vitamin reserves from deteriorating over the long winter, you need to try to provide them with optimal conditions. There is no universal solution here, they will all be different:
- Potato. It does not deteriorate at temperatures from +1 to +5 C. High humidity is unacceptable, it provokes the development of rot. Tubers are placed in boxes, trays or even nets in a layer no higher than 100 cm. An important point: darkening is necessary, otherwise the potatoes will begin to sprout.
- Root vegetables (carrots, beets, etc.). The optimal temperature for them will be from 0 to +2 C. Their skin dries out very quickly, so it is best to put the food in storage and sprinkle it with wet sand or sawdust.
- Red or white cabbage. It is well preserved from +2 to -1 C if you place it on shelves with the stalks up. Broccoli or cauliflower is not stored this way. They only need to be frozen, after cutting them into inflorescences.
- Garlic or onion. Dry completely and hang or lay in bulk. In the first version, the heads are woven into a kind of braids or folded into a net. The best temperature is from -2 to 0 C.
Instagram drevlev A box made of natural wood is well suited for storing vegetables
Cellar for storing vegetables on the balcony
The easiest way out of the problem is to purchase a ready-made soft product, which the townspeople call a cellar for storing vegetables. It is a flexible container adapted to fulfill its purpose.
The container is equipped with a heating system that will prevent food from freezing even in severe frosts. The only condition for their uninterrupted functioning is safety from any precipitation.
The cellar is usually made of fabric material. It has many layers with a heating system in the middle. The convenient lid is equipped with a lock. In spring, wipe the flexible storage box with a damp cloth soaked in a disinfecting solution. Then they are thoroughly dried and put away until next autumn.
How to insulate a potato box
Before starting to make the box and insulate it, measure the area of the balcony. When planning the dimensions of a potato thermobox, take into account that the depth of the box should not exceed 0.7 m.
Step by step guide
For work you will need the following materials:
- timber with a section of 5×5 cm;
- plywood 15-20 mm thick;
- thermal insulation material 5 mm thick;
- 2-3 incandescent lamps or one 100 W;
- iron pipe;
- screws and iron corners.
How to make an insulated box:
- Determine the dimensions of the thermal container. It will consist of two boxes, one inside the other. The internal base should be 120-140 mm smaller than the external one.
- Cut out 4 future walls of the box and the bottom from plywood. Measure and saw off 4 bars that serve as frame posts. To use as a sheathing for the plywood, saw off 12 bars. Place them horizontally on the product, 2 on each surface, including the lid and floor.
- To protect wood from fungus, treat all workpieces with a special compound (“Pinotex”, “Snezh”). If the box will not be covered in the future with any finishing material, cover all the wood with waterproof varnish or oil paint.
- After the wood and plywood have dried, begin assembling the box. Mount the timber frame and fasten it with iron corners. Provide support for the sides by connecting the corners with additional bars.
- Cover the frame with plywood, which is secured with self-tapping screws.
- Drill small holes in each wall for ventilation.
- Line the inside of the box walls with penoplex. If the balcony is very cold, lay a layer of isolon with foil on top of the penoplex.
- Make an inner drawer using the same principle, changing the dimensions to smaller ones. You can do without a frame by simply covering the walls and floor with plywood.
- In the middle of the box, place an iron pipe on supports (a pipe from a drain will do) with a length slightly less than the length of the box.
- Place electrical equipment in the pipe - lamps with sockets on wires, which are hung on an additional wooden crossbar.
- Mount a temperature sensor on the front wall of the box, which will help control the temperature inside the box. You can design the electrical equipment in such a way that it works automatically. There are thermostats on sale that are equipped with a temperature sensor, which starts heating when the temperature inside the box drops.
The lid for the box is made separately. It is covered with thermal insulation and hung on hinges to the back wall of the heating cabinet.
Reference. If you use a 2 cm thick board instead of plywood, you will not need to make ventilation holes.
Recommendations
To ensure that the thermobox reliably protects the potatoes, follow the recommendations:
- Any thermal box, even a factory-made one, will not save the harvest on an open balcony. A sharp wind, high humidity in autumn and winter, and temperature changes are dangerous not only for potatoes, but also for electrical appliances - they will simply fail. The balcony must be glazed (at least one glass) and slightly insulated (walls and floor).
- Connect the carrying lamp to your home network using an extension cord.
- In very severe frosts, additionally wrap the box with cotton blankets.
What types of boxes are there?
Heated
This type is suitable for a cold loggia (glazed with single glass). The box is equipped with electric heating. In order to save money, you can opt for a budget version and, instead of a flexible ribbon heating element, use products that are always at hand - a regular hair dryer or incandescent lamps. Two lamps are placed in a tin cylinder, having previously been painted with dark paint. Incandescent lamps do not consume much electricity, unlike a noisy hair dryer.
Without heating
On a warm balcony, heating the box is not needed. It is enough to cover its walls with insulation. The manufacturing process of such a design is simple and does not require large investments:
- Two rectangular containers are made from timber and slats so that one can fit into the other. The gap between the walls should be 8 cm. The bottom of the boxes is made of moisture-resistant plywood 8-10 mm thick.
- The surface of the products is coated with an antifungal composition for wood (“Snezh” or “Snezh Bio”).
- The space between the walls is filled with insulation - penoplex, sawdust, polystyrene foam or old batting. Experienced builders have recognized penoplex as the best insulation material. It does not absorb moisture at all and will reliably protect the potatoes from the cold.
In addition to the usual homemade box, there are alternative solutions that you can use.
Refrigerated storage chamber
An old, used refrigerator is suitable as a winter cabinet for potatoes. It is freed from the refrigeration equipment (compressor and heat exchanger) and placed in a horizontal position with the door up.
The manufacturer provides sealed and warm walls in the refrigerator compartment. In them, between the plastic casing and the metal body, the entire space is filled with thermal insulation. The only thing that remains is to tidy up the appearance: paint it, cover it with plastic panels or beautiful thick fabric. This storage chest can be unheated or heated.
Factory thermobox
The factory thermobox is a metal box in which heating elements are installed that can maintain a temperature of +2...+10°C. The heating cabinet remains operational when the temperature drops to -35…-40°C. Some models have a manual temperature control system.
Flexible containers
Made of two-layer dense fabric, between the layers of which flexible heating elements are mounted. The maximum capacity of the “miracle bag” is 300 liters. A soft thermal container is an economical solution for an unheated balcony.
Preparatory stage
Preparing carrots for storage is a very important stage. For successful preservation of root crops, it is necessary to correctly and timely harvest. Each variety has its own ripening period. Over-ripened carrots in the ground will receive an excess of nutrients and will become a tasty morsel for pests, while unripe ones will not accumulate the full amount of vitamins, which will affect the taste.
Important! You can determine the ripening of the fruit by the tops; if the lower leaves begin to turn yellow, then the crop is ready for harvest. The harvest must be harvested before the first frost.
- After harvesting, it is necessary to trim the tops to preserve moisture and beneficial vitamins and dry them in the sun for 2-3 hours.
- Cut off the top of the leaves with a sharp knife, leaving 1 cm.
- Before storing, the vegetable is kept for a week at a temperature of 10-15 degrees. During this time, the cutting areas are tightened, and diseased and spoiled vegetables give themselves away.
Root vegetables that are firm and without damage are selected for storage; the rest are used immediately.
Vertical drawer design
Option for vertical implementation of the box.
An excellent option is to arrange a vertical vegetable storage facility with your own hands on the balcony. Thanks to this option, you can save a lot of space in the room and place a lot of vegetables in the structure. This cabinet has its own characteristics:
- The heating lamp, in contrast to the design described above, is located at the bottom.
- Since the door to the balcony storage opens to the full height of the cabinet, access to the heating element is unobstructed.
- The vertical arrangement will eliminate the need to use a fan.
- To make the heating process more efficient, one lamp is placed at the very bottom, and the second at the level of the middle of the cabinet.
Even at the planning stage, the design should be calculated in such a way that the home vegetable storage facility has a reserve to withstand operational loads. It is better to make shelves from boards, and then install them so that all the boxes can rest on them with their edges, while there should be some gap in the middle. This will significantly facilitate air circulation, and the temperature, even without a device such as a thermostat, will be optimal.
However, in this case you will still need insulation. To do this, the shelves are moved a certain distance from each wall exactly by the thickness of the foam. To prevent accidental opening of the cabinet doors, bolts are installed on them - one at the top and the second at the bottom.
Is it possible to store potatoes in plastic boxes? Storing potatoes at home
In a city apartment, you can store potatoes on a balcony or loggia. For containers, use sealed boxes with a double bottom and walls. To protect against freezing on a cold balcony, insulate the inside of the container with polystyrene foam. Cover the top of the box with a lid or a dark, warm cloth to protect the tubers from light.
To avoid rotting and sprouting of produce, place rowan or mint leaves on top of the potatoes. Such plants not only help maintain optimal humidity, but also destroy pathogenic microorganisms due to the released phytoncides.
The following will also help against rotting tubers: onion peel, dried herb, wormwood, fern, elderberry leaves.
You can transfer the tubers with pine paws or store the potatoes in boxes made from fresh spruce or pine boards.
It is very useful to keep potatoes and ginger root nearby (both keep better).
If you want to store a large amount of crops on the balcony in winter, prepare a special chest where the optimum temperature and humidity will be maintained. How to do it correctly, look at
You should store potatoes at home in the summer in the pantry or under the kitchen sink. To do this, place the vegetables in a wicker basket, plastic box or perforated bucket. The shelf life of potatoes in such conditions is 14 days.
There is an opinion that you should not use plastic bags or polypropylene bags for storing potatoes (they do not allow air to pass through, which leads to rapid rotting and spoilage of the product). But if the potatoes are prepared for storage according to all the rules, then the average number of tubers (up to 20 kg) can be kept for 3-4 weeks at room temperature in a plastic bag. Conditions: the bag must be thick, dark and very well tied (for example, garbage bags). The main thing is not to open the package “in between” and not to disturb it at all.
In a city apartment, you can store potatoes under the sink in a wicker basket, wooden or plastic box. You can also organize storage on a balcony, loggia or in the entrance corridor
Storing potatoes in the refrigerator
Many housewives are concerned about the question: is it possible to store potatoes in the refrigerator? The refrigerator maintains optimal temperature and humidity, making it suitable for storing potatoes. However, remember the significant drawback of this method - limited space does not allow you to save much harvest.
To store potatoes in the refrigerator, place the potatoes in a paper bag and place it in the crisper drawer. In such conditions it can persist for up to several months. The refrigerator is ideal for storing finished potatoes - boiled, baked in jackets or stewed. This allows you to make preparations for the morning or for several days.
Sometimes housewives need to preserve peeled potatoes. To do this, place the tubers in a container and fill with cool water. You can store peeled potatoes at room temperature for 2-4 hours, and in the refrigerator for 2 days.
How to store potatoes in the freezer
Potatoes are perhaps the only vegetable that is not recommended to be frozen raw. Under the influence of low temperatures, starch turns into sugar, which affects the taste of the product.
However, you can store a small amount of blanched vegetable in the freezer. To do this, you need to prepare it correctly:
- Wash and peel the tubers well.
- Cut the potatoes into strips 1-1.5 cm thick.
- Place the raw materials in a colander and rinse with water to remove starch.
- Place the potatoes in boiling water for 3 minutes and then in ice water.
- Dry the workpiece with a paper towel and place portions in freezer bags.
- Place the potatoes in the freezer. In this form, the vegetable can be stored for as long as possible.
Before freezing, be sure to wash, peel and blanch the potatoes. Do not put raw potatoes in the freezer - they will lose their basic taste.
You can also store already cooked potatoes in the freezer: boiled mashed potatoes, fried baked slices. Prepare the potatoes using your favorite method, cool and place in plastic containers or freezer bags. Put the products in the freezer, and you will always have a ready-made preparation for lunch or dinner at hand.
Arranging a loggia for storage
The balcony is inferior in many respects to underground storage facilities. If there is no choice, then it is quite suitable for storing supplies, even in the bitter winter outside. The main condition for arranging a balcony is glazing. Without it, food will actually be on the street. Glass is the primary protection from winds, precipitation, low temperatures and other negative winter factors.
Most vegetables cannot even withstand 0°C. Your task is to ensure this condition. The optimal storage temperature range differs for different vegetables and fruits:
- potatoes: +2…3 °С;
- cabbage: -1…+2 °С;
- beets, carrots, turnips: 0…+2 °С;
- onion: 0…+1 °С;
- garlic: -1…+3 °С;
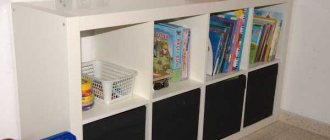
Vegetable drawer
- apples: +1…2 °С;
- pears: -1…+5 °С.
Attention! When storing crops, it is important to control both temperature limits. If the crop freezes below zero, then with high heat it will deteriorate faster.
The thermal performance of a glazed loggia or balcony is influenced by many factors:
- room area;
- type of double-glazed windows and its thickness. Plastic windows are best;
- number and size of window openings;
- warming up the apartment.
The easiest way to monitor is with a regular thermometer. It is necessary to minimize the strong temperature fluctuations that will certainly occur. To do this, you need to create your own microclimate for fruits and roots.
Methods for storing potato tubers
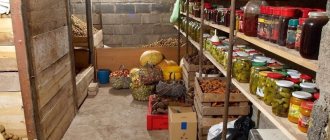
Village residents do not need to think about how to store potatoes in winter - not on the balcony, but in their own cellar, caisson or special storage for vegetables. They dig a hole, place a large box in it, or simply fill it with several bags. Unfortunately, in urban environments everything is different. To maintain order and save space, they knock together large and small drawers, arrange special cabinets or install factory-made thermal boxes.
Wooden box without insulation
The easiest way to organize storage of vegetables is on insulated balconies that are not suitable for a living room. If the temperature during the cold season is about +1-6ºС, then to store potatoes on the balcony during the winter, install a wooden box - roomy, deep, with a lid on top.
A common option for vegetable storage
It is easy to make it yourself from the following materials:
- plywood;
- MDF boards, chipboard, chipboard;
- "lining";
- wooden boards.
The width, height and depth are determined based on the size of the free balcony area, but for ease of use there is no need to build a structure that is too high. A practical solution for saving space is to combine a drawer and bench with a seat-cover.
Box with seat upholstered in eco-leather
The design of the standard product is quite simple, but changes can be made, for example, dividing a long box into several sections for different types of vegetables - potatoes, beets, carrots. Here you can hide jars with preparations.
Homemade box with insulation
If the temperature is slightly lower than recommended, the design of the box for storing potatoes on the balcony in winter will have to be improved, or rather, insulated. The body is assembled according to a standard scheme, and then thermal insulation is carried out.
Foil insulation takes up minimal space
Work order:
- A frame is knocked together from 50 mm x 50 mm bars (corners are used for fastening).
- Sheathed with clapboard or thin board.
- The internal surfaces are lined with polystyrene foam, isolon, penoplex or other insulation.
If the thermal insulation layer is not enough, you can use a regular incandescent light bulb to equip a heating system.
Diagram of a box with insulation and heating system
To connect the equipment to a power source, you will have to run an electrical cable onto the balcony and install an outlet.
Factory made thermobox
Many city dwellers do not know how to store potatoes on a balcony or loggia in winter, and do not have basic wood processing skills. The best solution for them is to purchase ready-made storage, which is a thermobox or a thermal cabinet.
Metal balcony cellar with temperature control
The advantage of the factory model is completely autonomous operation. The thermostat maintains the set temperature inside the box, which is set manually. The boxes with a metal body and internal wooden trim are equipped with forced ventilation, so vegetables will not “suffocate”. The range of products is quite large, so you can choose a certain volume and color of finish.
An alternative to metal and wooden boxes are convenient bags for storing potatoes and other vegetables on a balcony or loggia in winter. These are flexible thermal containers that look like large backpacks, the average volume of which is 150-200 liters. Heating elements allow you to preserve potatoes even at sub-zero temperatures, which is important for balconies with “cold” glazing.
Container for temporary “overexposure”
Not all city residents buy potatoes in large quantities. Many families have dachas and country houses, so they prefer to store the bulk of the harvest in caissons and basements. But it is not possible to go to the dacha every week, so 40-60 kg are also forced to be stored on the balcony. If the balcony is sufficiently insulated, ordinary wooden or plastic boxes are sufficient for a small amount of vegetables.
Wooden box with solid walls
Small boxes make it convenient to carry and transport vegetables. They are easy to make with your own hands: you need wooden slats, a screwdriver and several self-tapping screws. The boxes can be sanded, covered with stain, varnish or paint, then they will not just be storage items, but also decorative elements.
Kinds
Household thermal containers for balcony use differ from domestic manufacturers in form, functionality, technical characteristics, temperature regulation, and monitoring.
They are equipped with a thermostat that maintains the desired microclimate inside at sub-zero temperatures outside.
Among the popular models of thermal containers are:
- winter version TBPZ-140 with dimensions 60x50x80 cm - works for heating, maintaining a temperature inside the thermobox from 2˚ to 10˚С (with outside frost down to - 35˚С). Capable of holding 105 and 365 liters;
- the year-round version TBPK-240 is more spacious, its dimensions are 100x50x850 cm, it has two operating modes: heating or cooling. Its operating range is 30˚С to +35˚С. Optimal capacity – 145, 245 and 305 liters, depending on how many people are in the family;
- year-round thermal cabinet from Novosibirsk - with more impressive dimensions 120x50x85 cm, thermostat. Withstands temperature changes from -40˚ to +40˚С. There are models with an internal partition that can hold 365 liters;
- The collapsible balcony heating cabinet (manufactured in Moscow) with dimensions 79x41x75 cm has a removable movable partition, forced ventilation, ensuring uniform distribution of air in the device. Useful volume – 147 and 174 l;
It is permissible to install a thermal cellar without electricity if the temperature on the loggia does not fall below zero.
This is a mini-cellar of the simplest design - in the form of a wooden box (with vertical loading or side loading). Some options have drawers in which vegetables are stored. But in winter, even with a glazed balcony structure, they will disappear.
The thermal container is a flexible household balcony cellar with a three-layer structure, it is a bag - dimensions 30x100x70 cm. This practical, comfortable model stores the temperature from 0˚C to +7˚C.
The main advantage of the cellar is its compactness. The upper part is made of dense waterproof fabric, and the inside is made of environmentally friendly padding polyester. The heating cabinet closes with a durable zipper, creating a temperature balance inside.
The budget version of the balcony cellar does not have a thermostat. Based on the temperature readings, you will have to make adjustments yourself - turn the cellar on or off manually. A polystyrene box also works just as well.
Installation instructions
Drawing No. 2 - an easy version of a vegetable storage for a warm balcony
In any business, in order to be consistent in your actions and not do unnecessary work, it is important to draw up a work plan. To help skilled craftsmen, step-by-step instructions have been prepared, which will certainly help you construct a wonderful vegetable storage facility on your balcony at home.
We take measurements and prepare chipboard boards of the required size.
Correct measurements are half the battle. If you make a slight mistake, you will leave yourself with a lot of worries. In addition to the fact that you will have to trim unnecessary centimeters, this will entail additional financial costs. Although it is possible to trim the material at home, it will not be so ideal if it is done in a workshop using special equipment. When cutting yourself, burrs may form on the chipboard, which will take a long time to sand. This is a very labor-intensive and time-consuming process.
Processing the edges of parts.
This stage of work can be completed independently without difficulty. First you need to determine what width and length of the edge is required for the job. Then we cut it with scissors, strictly following the lines. To ensure an accurate cut, we adhere to the old Soviet rule: “Measure twice, cut once.” Once the strip is cut, it needs to be attached to the edge of the material.
For a vegetable storage facility made according to drawing No. 2, any box up to 33 cm high is suitable
This is where the iron will come to our aid. Applying the edge to the edge, we run a hot iron along it several times. In production, a special glue is applied to the edge in advance, which is activated only when it is exposed to high temperatures. Having warmed up the edge area well, you can cut off the excess using a sharp special knife. The best angle for the knife is 45 degrees. By cutting off excess sections of the edge, you can check whether the edge is glued evenly and efficiently. After this, it is worth removing the remaining glue that has come to the surface and going over it with an iron again to consolidate the resulting effect.
The container itself for storing vegetables on the balcony should be installed on a layer of foam.
Extruded polystyrene foam is best suited for these purposes. It is more hard and durable, which is exactly what we expect from a base for a vegetable storage facility. Such a foundation may not be required if the balcony already has insulated floors, but in our houses this is extremely rare.
We assemble the proposed design.
We immediately do this preliminary assembly of the box in the place where it will be located in the future. By installing a container for vegetables on the balcony, we have the last opportunity to make sure that we have chosen the right location for it.
Preparing holes for screws.
You can convert an ordinary kitchen cabinet into a vegetable storage unit by equipping it with baskets
Using a drill, drill holes into which the screws will be screwed. Places for fastening screws are usually located at a distance of 10 centimeters from the edge of the product and 8 millimeters from the edge (provided that the thickness of the material itself is not less than 16 millimeters).
- We assemble the product by tightening it using a hexagon.
- We make a lid for a vegetable storage facility.
Thermal cabinets for vegetables on the balcony should have a lid of a larger area than the cabinet itself. Pre-prepared material for covering the upper part of the vegetable storage will be needed at this stage of work. This material should be slightly larger than the area of the lid itself; some area of the material will be used for folding and tensioning.
Gradually stretching the upholstery material, you can immediately shoot it using a construction stapler. The corners of the box need to be treated especially carefully so that they are also securely secured.
Now you can screw on the lid hinges, and the product is ready.
There should be a gap of at least 10 centimeters between the inside of the cellar and the outside. It is also necessary to leave approximately five centimeters between all side walls. This is necessary so that the vegetables on the balcony do not freeze in winter. Additional air insulation is created.
Cellar under the balcony
Owners of apartments located on the first floors of multi-storey buildings have an advantage over the higher floors. They can make a cellar under the balcony. As a rule, permission to carry out such changes is given by the relevant organizations (housing office) without obstacles, except in cases where the balcony faces the main street, and its transformation will affect the appearance of the facade.
How to make a cellar under the balcony:
- A hole is cut in the balcony slab to allow an adult to pass freely. First, the contours of the hole are cut out with a grinder, and then a layer of concrete is knocked out. The reinforcement bars are also cut with a grinder;
- A pit is dug under the balcony, the width and length of which corresponds to the dimensions of the balcony slab. Its depth should be such that you can stand in the hole without resting your head on the slab. The higher the ground part of the base of the house, the shallower the depth the hole is dug;
- The floor and walls are covered with inexpensive waterproofing, preferably roofing felt. The strips are overlapped and soldered using a gas torch;
- The bottom is covered with a layer of sand and crushed stone, reinforced with steel mesh or rod, and filled with cement screed;
- The walls are laid half a brick thick, from the floor to the balcony slab. A ventilation pipe is installed at the ground level, or a hole is left in the wall, which is subsequently closed with a grate;
- The walls are lined from the inside with one of the insulating materials: mineral wool, polyurethane foam and others. On an unheated balcony, you also need to insulate the floor slab. The type of insulation and layer thickness depend on the climatic conditions of the area;
- A staircase with wide steps and a hatch are installed. It is better to make the lid and stairs wooden, since wood has low thermal conductivity. The inside of the hatch is also insulated.
On the outside of the cellar, a blind area is built around the brick wall. First, a cushion of sand and crushed stone is created, after which a cement screed is poured. The blind area should have a slight slope from the wall to prevent water accumulation. The screed will last longer if it is covered with ceramic tiles for outdoor use.
The internal filling of such a cellar is carried out in accordance with the needs of the apartment owners. You can make a bin for potatoes, hang shelves for cans of preserves and boxes of vegetables.
Storage methods
So how can you preserve vegetables in winter in an apartment at home? You should choose the right storage method and follow the recommendations.
In clay
To store in clay you will need the following: box, clay, water, cling film.
- You must first prepare the solution by mixing water with clay until smooth and leave for 3 days to infuse until it reaches the consistency of sour cream.
- Lay a film on the bottom of the box and place the fruits without touching each other.
- Next, fill it with clay and let it dry, in this order the box is filled to the top.
In sand
Sand retains moisture well and maintains temperature conditions. What you need for this is a box, sand and water. The sand needs to be moistened with one liter of water per bucket. Let's get to work.
- Pour a 3-4 cm layer of sand onto the bottom of the box, then put the carrots without touching each other, and again a layer of sand.
- Continue alternating until the box is full.
You can add 1% slaked lime or ash to the sand; such an additive has an antiseptic effect, preventing the spread of fungi and bacteria.
In the moss
On a note. Moss is able to retain carbon dioxide in the box in the required amount for carrots.
- The harvest should first be placed in a cold place for a day.
- Next, take the box and sphagnum moss, and lay it out in layers to the top of the container.
Detailed instructions on how to store carrots in moss can be found here.
In the sawdust
For such storage, only fresh sawdust is used, and last year’s sawdust may contain microbes and bacteria that will spoil the root crop. It is laid in layers, as in the previous versions.
You will find more information about storing carrots in sawdust here.
In onion skins
The husk releases essential oils that have a detrimental effect on bacteria, preventing rotting of the fruit. The laying sequence is similar to storage in sawdust.
In a saucepan
You can use large enamel pans; this option will also allow you to preserve carrots for a long time.
- The root crop needs to be washed, dried and the tops trimmed.
- Place in a vertical position, cover with a napkin and a lid on top.