Troubleshooting
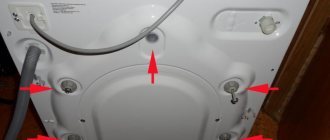
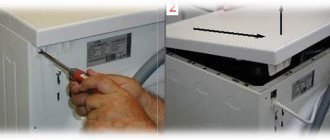
After turning off the machine and de-energizing it, disconnecting it from the water supply, we perform an external inspection to determine why the water is leaking. To carry out this inspection, you may need to tilt the washing machine or remove the back or side covers of the machine. It will be much easier to find the faulty part if you have determined at what cycle of operation the leak began to appear.
Hose damage
Damage to hoses, their premature wear and poor connection at the joints is the most common reason why a machine may leak.
Inlet hose leak
A leak in the inlet hose can be detected even when the machine is not running. If you have established for sure that there is a defect in the inlet hose, then it is not advisable to repair it, since the water pressure supplied to the washing machine system is quite high. If necessary, this hose must be replaced with a new one. And if the seal is broken at the junction of the hose with the machine components, it is necessary to change the gasket and tighten it well. In order not to break the plastic elements of the hose, you need to clamp it exclusively with your hands without using additional tools.
The drain hose may be leaking
Leaking pipe
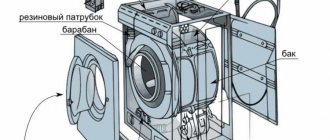
If there is a leak during water intake, which disappears after filling the tank, the most likely cause may be damage to the pipe connecting the fill valve to the powder receiver hopper. To carry out an external inspection of this unit, you will need to remove the cover from the Samsung washing machine.
Damage to the drain pipe can also cause water to leak from below. This pipe connects the tank to the drain pump. To examine it, you need to look from below, after tilting the washing machine.
poor connection between the pipe and the tank
Damage to the drain pump
If, during washing, you find water leaking in the area of the drain pump from below, then perhaps it has become unusable or damaged. To carry out a high-quality visual inspection of this unit, it must be completely dismantled. A faulty drain pump must be replaced, so professional assistance may be required.
The cuff is leaking
When washing laundry, in which careless owners sometimes forget some small items in their pockets, the sealing collar of the washing machine door may be damaged. Such damage is clearly visible in machines with horizontal loading of laundry.
If the damage is not very large, then it can be repaired using a rubber patch and special waterproof glue. After sealing the hole, it is better to turn the cuff over with the patch facing up, since with this arrangement the water load on it will be less, which can increase its service life. If the seal is damaged internally, it must be removed from the unit.
Of course, it is advisable to replace the defective cuff with a new one.
Damage to the washing machine tank
To inspect the tub of a top-loading washing machine, you will need to tilt it to check the bottom for water droplets from below. It is good to use a hand-held flashlight. If the washing machine is top-loading, you will have to remove the side wall. Tank failure may occur due to the presence of foreign solid objects or a malfunction of the heating element.
If the tank consists of two halves, then the leak may occur due to the drying out of the sealing gasket between them. Such a malfunction is extremely rare and requires replacement of the gasket.
Oil seal malfunction
As a rule, a malfunction of the oil seal during washing is difficult to determine; it becomes noticeable when the machine is operating in spin mode. If you notice that the tank seal is leaking, you must immediately stop operating the machine to avoid more serious damage to the unit.
Repairing such a malfunction involves replacing the worn oil seal or bearing with new parts. Such work requires the involvement of washing machine repair professionals from the workshop.
Leakage through the dispenser
Water may leak during washing if the dispenser hopper is clogged with powder residue or a foreign object. To eliminate the cause of the leak, you need to remove the dispenser and clean it and the hopper from obstructive contaminants.
Leakage through the dispenser is also possible due to excessive water pressure in the system and due to problems with the inlet valve. This problem can be eliminated by reducing the water pressure.
Call the master
If the Indesit washing machine is leaking and a puddle has formed under it during washing, it is important to accurately determine the cause of the problem and carry out repairs . It is not always possible to do this on your own.
In cases where professional help is required, you should contact a company that specializes in repairing washing household appliances. Contacts of such companies can be found on the Internet. Typically, the company’s website contains a list of work performed, prices and other useful information.
When calling a technician, you must clearly describe what the problem is with the washing machine and indicate the brand of the machine. The cost of the work will depend on the severity of the damage. If replacement parts are needed, the customer pays for them separately.
The average price for work in the capital is:
- Replacement of pipes - from 900 rubles.
- Replacement of the hatch rubber – from 1,000 rubles.
- Cleaning the drain filter - from 900 rubles, etc.
To carry out diagnostics and repairs, it is advisable to contact officially operating companies that have been in the service provision market for several months. Such companies value their reputation and only hire professionals in their field.
Asking for help from ad professionals can result in big problems - from poor-quality repairs to fraud.
A lot of important and useful information about repairing Indesit washing machines is presented in this section.
How to find a fault?
The first thing you need to do when starting to look for the cause of water leakage is to turn off the power to the washing machine. Check if the water drain filter is clogged. Perhaps the reason is that it is not closed well, so water leaks out. Typically, the drain filter is located at the bottom of the machine body, under the front strip. Manufacturers often build it under a special cover that opens easily. If there is no such cover, you will have to completely unscrew the bottom plastic panel.
You can then inspect the drain hose and where it connects to the machine's drain pump. For most well-known brands of washing machines (LG, Samsung, Indesit, Ariston, Whirpool, Candy, Beko, Ardo), you can get to the hose connection through the bottom of the machine. Just lay it on its side and see how tightly and tightly the hose is screwed to the pump.
In cars under the Electrolux and Zanussi brands, to check the connection location, you will have to remove the back cover of the case. The connection between the drain hose and the drain pump in machines under the Bosch and Siemens brands is difficult to access. You will have to disassemble the front of the machine, first removing the powder tray and cuff.
Having ruled out the drain hose as the cause of the washing machine leaking from below during the spin cycle, we move on to inspecting the seals and bearings. When the seals wear out, water drips appear on the back of the machine drum. To see all this you will have to remove the back cover of the case. As for the bearings, their failure is accompanied by a grinding noise during drum rotation.
If the above reasons were excluded during the inspection, one thing remains - the drain pump is broken. However, we remind you that only a specialist can accurately diagnose the reasons why water flows from the machine during the spin cycle.
Corrective Actions
The most solvable problem is a malfunction of the drain filter. If the filter is clean, but it cannot be tightened tightly because the thread is broken, then it needs to be replaced. Buy a similar filter in the store and install it in place.
With simple plumbing skills, you can replace the drain hose yourself if the cause of water leakage is in it. We described above how to get to the place where the hose is connected to the machine, then you need to:
- pull out the drain hose from the sewer outlet;
- using a screwdriver, loosen the clamp securing the hose to the pump;
- remove the drain hose from the drain pump;
- remove all fasteners securing the hose;
- take a new hose and connect it to the pump and then to the drain pipe outlet.
You can read the entire process in detail for different brands of washing machines in the article about replacing the drain hose.
If you need to replace seals or bearings in a washing machine, you need to almost completely disassemble the machine itself, because you won’t be able to get to them otherwise. Few people decide to undertake such home repair work. For those who nevertheless set the goal of eliminating such a malfunction on their own, our website has an article “How to replace the tank seal?”
In addition, you can watch a video recording that will help you repair your car, as well as evaluate the complexity of such repairs.
If the reason that the washing machine leaks during the spin cycle turns out to be a broken drain pump, then in this case you will also have to do serious work, not to mention the cost of purchasing a new similar part.
In conclusion, we note that if water flows from the washing machine during the spin process, this may indicate a serious malfunction. So the malfunction makes itself felt precisely during the spin process, when the machine is running at full power, at high speeds. Whatever the problem, it must be solved as soon as possible, otherwise it will lead to the most unfavorable consequences.
Leakage when rinsing
There are few situations when the washing machine leaks already at the stage of rinsing clothes, but if you find this problem, call a specialist, because you won’t be able to eliminate the causes on your own. Here they are:
- Bearing wear. This is a serious malfunction because the bearings are responsible for the mobility of the drum. If they have worn out, lost their properties and even caused a leak, you will definitely need professional help. To find out if there really is a problem with them, turn the tank with your hands in the off position. If you hear creaking, knocking and other extraneous noises, and the drum itself is tight, the bearings need to be replaced. Such repairs are not easy; you have to open the systems, and sometimes cut the tank. Samsung equipment is quite easy to disassemble.
- The cuff is leaking. If the seal has damage at the bottom, it is difficult to notice them, because there are many folds in this part, and it leaks from under the body. Check the integrity of the cuff regularly.
Whatever the reason that leads to leaks, they cannot be ignored; it is better to contact the trusted Remontano service by phone.
Damage to the oil seal and bearings
The appearance of water during the spin cycle may indicate damage to the tank seal. The presence of a leak of this kind is indicated by drips on the tank leading down from the bearings. In this case, the bearings and oil seal need to be replaced.
Similar problems can also be indicated by the appearance of water from the rear wall of the washing machine. To check the bearings for serviceability, you need to spin the empty drum of the washing machine by hand. If you hear extraneous noises or a slight grinding noise when it moves, most likely the seal or bearings have failed. In this case, the car must be repaired immediately, otherwise water may get on the engine.
Leakage when washing
It can be difficult to notice that the device is leaking during operation, because at first the traces may be minimal, they can easily be attributed to the proximity of the sink or laundry from the last time. But if water flows in the washing machine precisely during the washing cycle, that is, longer than during filling or rinsing, the situation will very quickly worsen and can damage the internal elements of the device, it may be impossible to restore them
Therefore, pay attention to even small puddles under the device during operation and check the most vulnerable components:
- Drum. After use, check the drum for integrity, the presence of holes and try to protect it from sharp zippers, buttons, snaps, etc. Because if the tank leaks, replacing it, especially in the expensive brands Zanussi, Miele and AEG, can cost up to 50% of the price of a new car.
- Upper part of the seal. The rubber gasket creates a tight seal inside the tank and protects against leaks. When using aggressive powders or acids for cleaning, the sealing lip may become leaky. Even if the hole is at the top, moisture will still leak out in the gentle wash mode. If you find damage, immediately call a technician for a replacement, and when you call, tell the make and model of the device so that the specialist can immediately take the necessary spare part with him.
- Drain filter. Each user should check the filter regularly for debris. But if you have not tightened the plug tightly or it is damaged, there will be leakage from this hole. If a puddle has formed below and directly under the filter, first make sure it is screwed on tightly.
Causes of leakage
The modern household appliances market is rich in a variety of models of automatic washing machines. Even models from well-known manufacturers (Samsung, Indesit, LG, etc.) may have their own shortcomings and weak points that can leak during long-term operation of the equipment. A washing machine can leak for various reasons:
- Violation of the rules for operating a washing machine;
- Using the wrong brand of washing powder;
- Mechanical damage to the machine;
- Use of low-quality parts during repair and assembly of the unit;
- Manufacturing defects.
Inspection of the breakdown
If you find a stain on the floor near a running washing machine, try to avoid contact with water. Contact with operating equipment that is leaking water can result in electric shock, even death. Therefore, it is necessary, first of all, to turn off the power to the washing machine by disconnecting it from the power supply. If you cannot remove the plug from the socket, you must run to turn off the electricity in the entire room.
Then you must limit the flow of water into the machine. To do this, you need to turn off the water supply tap to the device or completely cut off the water supply to the system.
After these operations, you need to use a drain filter to remove the remaining water in the washing unit.
Then only you can begin an external inspection of this household device.
Damage to washing machine components leading to leakage
- Tank leakage;
- Leaking drain pump (pump);
- Violation of the tightness and integrity of the hoses;
- Damage to the door seal;
- Lack of tightness of the filler pipe connection;
- Wear of the tank seal;
- Presence of debris in the powder dispenser hopper;
- Damage to the tank drain pipe.
Damage to pipes
If inspection of the hatch cuff and dispenser did not lead to the detection of a leak, it is necessary to remove the top cover of the machine and carefully inspect the pipes that lead to the dispenser hopper from the inlet valve. Worn and damaged pipes usually let water through. To eliminate the leak, they must be replaced.
The filler pipe may leak where it connects to the tank. This will be indicated by characteristic streaks on the tank. In this case, the pipe must be removed, thoroughly cleaned, dried and installed in its original place, fixing it with epoxy resin or glue. If the pipe is chafed, the part in the damaged area is sealed with a piece of thin rubber.
The pipes, including the drain pipe, may leak due to loosening of the tightening clamps. Damage to the drain pipe can also be caused by solid foreign objects entering it from the tank. To eliminate the malfunction, replace the clamp or lubricate the pipe connection with sealant.
Prevention
When the washing machine leaks during the spin cycle, it’s too late to think about prevention. Factory defects are not always the cause of trouble (often we ourselves are to blame). If you take good care of your property, your appliances will last for many years.
Follow these guidelines:
- When loading vertically, the drum doors must fit snugly against the body (check this before closing the lid);
- clean the drain filter every four months;
- clean the heating element (lime deposits accumulate there, so inspect the part every 2-3 months);
- place bras in special bags (this will protect the drum from mechanical damage);
- between washing sessions, turn off the unit (this will protect against breakdowns due to power surges);
- install the machine in the kitchen (the humidity level is lower there);
- poison rodents and cockroaches (their feces clog filters and hoses, which leads to damage to the mechanism);
- avoid overload (the recommended limit in kilograms is specified in the instructions);
- equip the system with a water softener filter.
To prevent leaks, clean your washing machine filter regularly.
Let us add that you should only use powders for vending machines, and pumping hot water into the drum is strictly prohibited. The water from the boiler room is saturated with drugs that can harm equipment. You should also not wash car mats, shoes and feather pillows in the tank - this is a recipe for mechanical damage to the tank. Operate the device wisely - this way you will extend the life of the device by 1.5-2 years.
Share Like Share Tweet Pin
Causes of leakage
To recognize the real causes of a leak, you need to carefully examine all possible problem areas. Diagnostics are performed after disconnecting the device from the network. It is also better to disconnect the hoses to free up space for moving the unit. There can be many reasons for a leak. Here's just a small part of them.
Incorrect operation
It leads to the fact that the washing machine does not work at full capacity, and blockages occur. If you follow all the recommendations for cleaning the filtration and drain systems, the risk of a leak will be minimal. A problem may arise if the hoses become mechanically damaged. Children and pets can become a source of danger.
If the leak is not under the body of the machine, but in front, you should pay attention to the condition of the cuff. They are the ones who most often suffer from mistreatment
Incorrect selection of chemicals
When, upon inspection of the washing machine, obvious traces of water leakage from the powder loading compartment are discovered, the cause may not only be a blockage. If too much detergent is added, or it has a higher foaming capacity than necessary, the excess foam will find its way out through the joints of the tray.
Manufacturing defects
Sometimes washing machines, even those produced by the most famous manufacturers, have a manufacturing defect if the cause of the leak is the failure of one of the system elements. Leaks are most often caused by the installation of low-quality seals and pipes - parts that are quite easily replaced under warranty.
Breakage of parts
As a rule, leaks are associated with the breakdown of parts only if we are talking about the drain system. In this case, a leak will occur during the spin or rinse stage, when water is discharged from the system. If the pump is faulty, water will accumulate at the back wall. A leak also forms there if the seals or drum bearings fail. A leak at the dispenser may be due to damage to the drain valve.
When water leaks through the cuff, you should definitely pay attention to the operation of the pressure switch. If this sensor, responsible for controlling the water level, fails, overflows will inevitably occur in the drum
Tank
If water is leaking through the tank, there could be two reasons.
Types of breakdowns and their elimination:
- Crack in the tank. Such parts are very fragile because they are made of plastic. You cannot wash things with small items or sharp objects, because this can lead to such unpleasant consequences as cracks in the tank. Small objects penetrate from the drum into this compartment and damage it. Often these problems go unnoticed until something starts rattling in the machine or a leak appears. It is better to replace the drum. However, this part of the unit is very expensive and not everyone can afford to buy it. There is a solution - seal the crack with sealant, or make a patch-overlay from a sheet of plastic on small screws.
- Drying the gasket between the tank halves. Over time, this gasket needs to be changed; it can leak, but this happens extremely rarely. To do this you will have to disassemble the washing machine almost completely. It's better to call a specialist.
Problems with the tank can be solved, but in most cases they reappear after a while.
If the machine begins to leak due to a breakdown in the tank, replace it immediately. A lot of money will be spent, but in the future you won’t have to deal with it again.
Repair methods
Repair methods depend on the model of the washing machine, design features and the identified cause of the malfunction. In most situations, repairing individual components is sufficient to restore functionality.
Replacing the water supply hose
If a leak is observed at the junction with the tee in the water supply system or at the connection to the housing, it is enough to install a new gasket to fix the problem. If you find a leak on the hose itself, you will need to replace it. To do this, you need to select a hose of a similar size.
If the problem is in the filter
When the filter is malfunctioning and allows water to leak due to loose fittings, you can easily fix the problem yourself. You just need to tighten the fasteners using pliers.
Cleaning the dispenser from deposits
You can clean the detergent dispenser grid from plaque and accumulated dirt with a strong stream of water. To do this, the compartment is removed from the housing and thoroughly washed. If there is heavy dirt, you should use a cleaning agent.
Replacing the intake valve pipe
If there is a leak in the pipe that is responsible for letting water into the tank, you can do without replacing the part. When the damage is at the connection point of the pipe, you need to coat it from the inside with rubber glue and press the part tightly. It takes about 15-20 minutes for the adhesive to dry and restore the connection.
Repair of the pipe that is responsible for collecting fluid
If the pipe that supplies the fluid has loose clamps, you can fix the problem by tightening them. If a serious breakdown occurs, the component must be replaced.
To diagnose the condition of the pipe, you need to proceed according to the following scheme:
- Remove the lid of the washing machine and find the tube that connects the water intake valve to the powder compartment. The pipe is held in place by fasteners on both sides.
- Using pliers, loosen the clamps and move them to the central part of the pipe.
- Carefully remove the pipe from the valve and cuvette outlet.
- Inspect the part and check for blockages. If available, you can use a bottle brush.
Replacing the rubber cuff
Most modern washing machines are designed in such a way that replacing the sealing lip does not require disassembling the body. The cuff is secured with two clamps. To remove the outer clamp, you need to bend the elastic band and pry the clamp with a thin screwdriver, pulling the cuff towards you.
To disconnect the internal clamp, remove the front panel of the machine. The process of disassembling the panel depends on the specific type of washing machine. If you cannot disassemble the equipment yourself, you should entrust the work to specialists.
Replacing the drain pump
Most washing machine manufacturers install non-separable drain pumps, so repairing them is not possible. In addition, separate repair kits are not available for models with a dismountable pump. It is possible to fix a problem in the operation of the drain pump only in a situation where its parts are intact and the pump is simply clogged.
If the blockage is not cleared in time, this may cause overload of the pump motor or breakdown of the impeller. Having discovered the first signs of a malfunction, you need to carry out diagnostics and, if necessary, replace the part.
Tank replacement
In case of mechanical damage to the tank, it is possible to eliminate the leak only by replacing the element. The old tank must be removed and the new one installed through the top of the machine.
Replacing the oil seal
The process of replacing the oil seal is labor-intensive and requires a series of steps to be performed sequentially. In particular:
- remove the top panel, back and front walls of the machine;
- remove the counterweights and disconnect the shock-absorbing springs;
- disconnect electronic and mechanical control units, remembering the location of the wire for reassembly;
- remove the tank and separate its parts from each other to gain access to the bearings and oil seal.
Before replacing the oil seal, it is recommended to inspect the condition of the crosspiece and shaft. If the washing machine operated in emergency mode for a long time, defects could form on the elements, and then replacing the seal would not bring the desired effect.
Door seal
An equally common reason why a washing machine leaks is a faulty cuff.
The rubber seal that allows the door to close tightly also wears out over time. The cuff becomes thin, abrasions and holes appear on it.
It is for these reasons that water begins to leak. The liquid flows down the door itself. This problem is hard not to notice, because after each wash, a puddle forms right in front of the door.
How to fix the problem? Check the entire door seal. If the problem is indeed the cuff, it will need to be replaced.
Cuts appear due to sharp objects or bra clasps forgotten in pockets (that’s why they are recommended to be washed in special laundry bags).
The cuffs are made of silicone, sometimes holes and cuts can be sealed. As a rule, this will last for a year, or maybe more. But as a result, the cuff will still have to be replaced.
To replace the rubber seal, it is better to call a specialist who understands this. The plumber will first dismantle the old cuff, carry out preparatory work to create a patch, then glue it and install a new cuff.
After which a check is carried out. You need to start the washing machine in idle mode or put things down so that it doesn’t work in vain, and check if there is any leakage from under the rubber seal.
The washing machine hatch may also be faulty. For example, the glass is damaged, the plastic support is faulty, the latch does not close well.
All these reasons lead to one thing - water leakage during washing or rinsing. Washing with such damage is not possible. They need to be solved first.
Violation of the integrity of one of the hoses
During operation, this part often loses its quality, and over time, leaks may form in it. For diagnosis, you can use a simple method: wrap the hose with toilet paper. If it becomes wet in a certain place, then we can safely conclude that there is a leak there. If depressurization is detected at the junction of the hose and the housing, then first of all it is necessary to replace the gasket.
The device has two hoses: inlet and drain. If water appears on the floor when filling the tank, the first option is damaged; if the washing machine leaks from below during the spin cycle, the second option is damaged.
If the diagnostic result is a violation of the integrity of one of the hoses, then it is easy to solve the problem at home, without calling a technician.
If a small hole is found on the hose, it can be patched with high-quality rubber material using glue that can withstand moisture. For the first time, you can safely use ordinary wide electrical tape. However, this is an exclusively forced temporary measure. Most experts argue that the optimal solution to the problem is to replace the hose with a high-quality analogue, rather than repair it. In addition, the cost of such an element is inexpensive, and the new hose will ensure uninterrupted operation of the technical device.
Why did the leak occur?
After turning off communications and draining the water from the LG machine, you can proceed to diagnostics. A puddle on the floor does not always indicate serious problems , and in some situations it is not even related to the device itself.
It is recommended to inspect all water supply communications in the premises and the sewage system. Water on the floor may be due to leaks that are not related to the washing machine. If the source of leakage is determined visually, solving the problem is easier than when water simply appears under the washer.
The following events can lead to a puddle or a leak from below:
After taking urgent measures, you should inspect the communications, and only after that proceed to diagnosing the washing machine.
How to fix it?
Let's consider several options for fixing the problem.
If during the inspection it was discovered that water is leaking from the tank, the device will need to be repaired. Most likely the cause is a broken hose and will need to be replaced. If it turns out that water is flowing from under the device door, most likely the hatch seal was damaged. A leak does not always occur due to a breakdown - it could also be the fault of the user. If you notice a leak after a few minutes of washing, you need to check how tightly the filter door and the device itself are closed, as well as whether the hose is inserted well. This advice is most relevant if the machine's garbage filter has recently been cleaned. Sometimes, after cleaning it, an inexperienced user does not secure this part tightly. If the user is convinced that he has closed the lid tightly, he needs to carefully inspect the place where the drain hose and the pump connect. If the intersection is not tight, a sealant will help solve the problem (be sure to take a waterproof one), but it will be safer to simply replace the parts. Even though water accumulates under the machine, the cause of the problem is sometimes higher. It is necessary to carefully inspect the dispenser (compartment) intended for powders and conditioners. It is often located in the left corner of the machine. Sometimes the dispenser is too dirty, which is why water overflows when spinning and drawing.
It is necessary to inspect both from the inside and outside, paying special attention to the corners - more often than not, leaks appear in these places.
If the user doubts that the leak is due to the powder receptacle (located in the front), the tray must be completely filled with water, wipe the bottom of the compartment with a rag until dry, and then observe the process. If the water begins to flow out slowly, this is definitely the reason. Unfortunately, this part sometimes breaks even in new models of LG machines after 1-2 years of using the device. This problem is associated with the dishonesty of assemblers who wanted to save on parts.
If the user notices that water flows during washing, the reason definitely lies in a broken pipe. To carry out an accurate diagnosis, you need to remove the top wall of the device.
Sometimes the problem occurs due to a leak in the drain pipe, which is directed to the pump from the device’s tank. In order to check this, you need to tilt the machine and look at the inside of the case from below. It is likely that the cause of the breakdown lies precisely in the pipe. To inspect it, you will need to remove the front panel of the machine and examine the area where the connection is located.
If the cause of the leak is a crack in the tank, this is one of the most unpleasant problems. Most often, it is impossible to fix it yourself; you will need to replace the tank, which is expensive. This crack could occur due to frequent washing of shoes, as well as when sharp objects get into the machine: nails, iron inserts from a bra, buttons, paper clips.
The crack could also appear due to a defect made by the manufacturer, but in any case, the device will have to be disassembled in order to remove the tank and carefully inspect it. To carry out such manipulations, it is better to call a specialist, so as not to make things even worse.
If you inspect the unit and find that water is leaking from under the door, the seal lip may be damaged. In this case, the problem can be easily solved - a special patch or waterproof glue will help fix the problem. You can also simply replace the cuff with a new one; it is inexpensive.
The article discussed the most common causes of failure of the LG washing machine, as well as ways to eliminate them. In any case, it is better, if possible, to contact a specialist or service center if the machine is under warranty. To avoid problems in general, you should be more careful with the device and check things before loading them into the tank.
You will learn further about what to do if water is leaking from your LG washing machine.
Dispenser
Water leaking from under the washing machine during washing may appear from the powder receptacle.
There are many reasons. The main ones:
- High water pressure. If the machine is not positioned correctly, tilted forward, then the pressure on the dispenser is too high. The water does not have time to pour out and begins to flow from under it onto the floor. It overflows over the edges.
- Fat and mucus have accumulated inside. Drips will appear if the dispenser is cleaned very rarely. Not only mucus and fat accumulate in it, but also powder remains if it is of poor quality. The dispenser should be cleaned once a week. Take it out and wash it with detergent. It only takes 10 minutes, but the effect will last a long time.
- The pipe is clogged. When caring for your washing machine, you need to clean more than just the drain and inlet hoses. You should spend a little time on all the little things that, at first glance, may not need to be cleaned at all. The pipe connecting the tray and the tank of the machine tends to become clogged. Most often this happens due to low-quality detergent. It prevents water from draining, and it begins to flow through the top. Here's another reason to clean your powder dispenser regularly.
- Poor quality washing powder or gel. High-quality detergents dissolve well in water and go with it into the drum of the machine. If pieces of powder are found inside the dispenser, it means it’s bad. Replace the detergent, otherwise you will soon notice a leak during washing.
- Lots of detergent. Oddly enough, but the washing machine leaks due to too many gels and washing powders. Apply detergents according to instructions. If there is too much foam, water will flow out from everywhere. It is necessary to replace the powder or reduce its amount.
- Drum drain blocked. When water leaks from washing machines during the spin cycle, the drum drain is clogged. The liquid does not go into the drain hose; it seeps through the powder receptacle during spinning. There is only one solution - clean the drain.
As you can see, there are many causes of leakage and all of them should be checked. It is advisable to conduct an annual inspection of each part, clean and rinse everything, then problems with breakdowns and leaks will occur less frequently.
Could it be the drain pipe?
Rarely, the drain pipe located below the drum may leak. Its peculiarity is that it always contains liquid, so the puddle does not stop filling even after the washing machine stops and the water supply stops. If you notice that the leak does not stop, then this is definitely the problem.
To eliminate the problem, it is not necessary to contact the service department. Almost every owner of a Samsung washing machine can make a replacement. It is enough to drain the water through the garbage filter, turn the body on its side and carefully examine all the supply channels. Replacement parts are purchased at a regular store, and loose clamps are tightened by hand.
Machine diagnostics and repair tips
Typically, questions about what to do when a leak is detected in the washing machine arise when it is used for a long time without maintenance or due to the owner’s carelessness. For example, a puddle at the bottom of the door is usually due to the fact that objects not intended for washing have entered the drum. In addition, almost any part of the flexible hose can become leaky.
Water accumulates at the door
Water leaks onto the floor from the hatch if the sealing lip does not fit tightly. It may receive mechanical damage when it comes into contact with objects that fall inside the drum. If the seal gets caught in the door ledge when closing it, there is a risk of rupture. With prolonged use, the sealing of the rubber ring may be damaged - it is restored using special compounds.
You can repair small tears and damage to the cuff yourself. An elastic patch made of a material similar in composition can easily be applied to rubber glue. To repair, the part is removed from the mount by loosening the clamp. After placing the patch, the cuff is installed so that the repaired area is above the top of the hatch, under the “roof” of the unit.
The powder tray is leaking
When liquid leaks from the powder compartment under the tray, the cause may be too much water pressure. In addition, if the detergent is not washed out well, it can gradually form a clog in the hopper itself, the outlet or the filter installed there. Sometimes the problem is due to poor quality water leaving calcified deposits inside the powder receptacle.
Fixing a leak in the tray area is quite simple. You can remove mechanical blockages by removing the powder receptacle and thoroughly washing all its parts. The strainer must be cleaned especially carefully. Its contamination most often disrupts the permeability of the system.
Leakage when filling with water
If a leak occurs when drawing water, the machine may have problems with the inlet hose. In the event of mechanical damage, its sealing is broken and cracks are clearly visible on the surface. Sometimes after rearranging furniture or doing other work in the bathroom, the hose gets pinched. If there are no obvious damages along the entire length of the flexible line, but water still leaks onto the floor, you need to conduct a more thorough diagnosis.
The easiest way to determine the damaged area is to disconnect the hose and install a plug on one side. Then it is wrapped in toilet paper and filled with water. A wet spot will appear at the damage site. If the hose is in order, the problem may be that the connection between the flexible line and the fitting is too loose - it is worth checking it and, if necessary, tightening the clamp further.
Leakage during washing
If water gets under the washing machine during the spin or rinse cycle, the problem is in the drainage system. The filter installed here rarely lets liquid through. Leaks usually occur after recent cleaning. If the filter is not tightened tightly, it may leak water when draining. Simply unscrew it and install it in the correct position.
When the machine leaks during washing, a puddle is located in the area where the drain pipe is located; the liquid may remain inside the body or end up under the bottom. The depressurization of the connection is usually associated with vibration effects and cracking of low-grade material. If damage is received precisely at the junction of the pipe with the tank or pump pump, they can only be detected when the machine is completely disconnected from the sewer, after laying it on its side.
The leak may be due to a breakdown of the volute in the pump. If foreign objects get into the drum, they can come into contact with other parts of the system and damage them. Replacing a broken pump is relatively inexpensive; you can easily purchase it in specialized stores and install it yourself.
A leak that occurs at any stage of the wash and continues throughout the entire operation of the machine may be due to a breakdown of the tank. It ceases to be airtight due to washing of products containing metal inclusions. If there is a strong impact, the container cannot withstand it, cracks, and begins to leak water. In this case, you can try to eliminate the leak using polyurethane sealant by completely disassembling the unit and drying it.
Leakage when filling with water
If you find that water is leaking in the washing machine already during the cycle, stop the cycle and turn off the water supply. We do not recommend disassembling the entire system to find a defect. But you can find the cause of the problem. Here are the most common ones:
- The supply hose is damaged. Most often, the plastic hose is damaged mechanically. If you examine it carefully, you can easily see the hole. But sometimes the hole is small or in a hard-to-reach place. To detect it, try using a popular test with toilet paper: wrap it around the entire length of the hose and turn on the water supply for a few seconds. The leak is located in the place where the paper is wet.
- The filler pipes are worn out. If this part is made of low-quality material, after 3 years of regular use it will fail. This often happens with Ariston and Candy appliances. If moisture flows below during intake, it means that the pipe is broken. It can be replaced or repaired.
- The powder dispenser is clogged. Sometimes when filling, foamy liquid flows from above the panel from under the powder receptacle. This means that you usually add too much product and it cannot completely dissolve, but only gets wet, hardens and clogs the duct. If possible, remove this container and clean the area behind it with your hands (under no circumstances should you put sharp objects in there). You need to be especially careful with Hansa and Indesit models due to their narrow channels. If the problem cannot be resolved, it is better to contact the specialists from Remontano.