Modern design furniture is often equipped with telescopic runners. This is a simple design, convenient and reliable, but, like any mechanism, it can fail. If a part becomes unusable during operation, it must be replaced. This is where the owner has questions about how to remove the drawer from the guides.
At first glance, this seems incomprehensible, but if you follow the simple instructions given below, then everything will become extremely clear. The process itself will take no more than 1–2 minutes. So what is the procedure?
Dismantling sequence
Before you remove the drawer from the slides, note that each drawer has two of these features. You must act in the following sequence:
- Pull the drawer out as far as possible.
- Plastic fasteners will be visible in the window. Lower the special “tendril” down and then pull it towards you so that it comes out.
Before removing the drawer from the guides, please note that the arrangement of the antennae varies depending on the design: symmetrical or mirrored.
In the first option, lightly pull both elements down; in the second case, one “tendril” moves down, the other moves up. Determining which method is suitable in your case can only be done by trial and error.
3. Lowering the “antennae”, pull out the drawer. It comes out of the guides without much effort.
Drawer design with guides
The device consists of 2 “P”-shaped profiles, external and internal. The first is mounted on the wall surface in the interior of the headset. There are two grooves - upper and lower, into which plastic strips containing bearings are carefully placed. It is thanks to them that the profile slides inside. To prevent it from popping out completely, a special plug is installed.
At first glance, this seems incomprehensible, but if you follow the simple instructions given below, then everything will become extremely clear.
Two profiles are nested inside each other, and inside there is a carriage that ensures the sliding of the bar thanks to bearings - balls. The bar is attached to the drawer itself. So, the bar with profiles folds into one mechanism, and when they fold out again, the shelf completely slides out of the niche. The system is convenient, because this way you can get an item from the farthest corner of the furniture.
How to return the drawer to its original position
How to return the structure back is not difficult to guess. You just need to repeat the sequence of dismantling steps described in reverse order. Insert the box into the slides and push along the guides until you hear a characteristic click.
As you can see, figuring out how to remove a drawer from telescopic guides is not so problematic. Simple instructions will always come to the rescue if you are new to repairs and need express advice without leaving your home.
Pull-out fittings for drawers from Hettich: how to install
Today we will look at the installation of such a type of retractable fittings as the InnoTech system from Hettich. This is very good fittings, the quality is quite comparable to the well-known Blum. Personally, I don’t really like their characteristic movement dynamics (before sliding, the box almost stops, after which it seems to be quickly sucked into the box), but this is purely my personal opinion.
This system is a representative of full extension drawers with a double steel wall. The height of the boxes can be of three types: 70 mm, 144 mm and 176 mm. We will analyze the installation using the example of a high 176 mm box.
I’ll start my story with an additive scheme specifically for a 176 mm box. The rest can be viewed in the official file of the manufacturer attached at the end.
Now let's go over the calculations of the components (bottom and back wall) - for all varieties.
| Height 7 cm | Height 14.4 cm | Height 17.6 cm | |
| Bottom depth | NL - 1 cm | ||
| Bottom width | LB - 2 x 12.5 - 51.5 | ||
| Rear width | LB - 2 x 12.5 - 63 | ||
| Rear wall height | 65.5 mm | 144 mm | 176 mm |
where NL is the nominal length of the guide LB is the internal width of the housing
So, we calculated and sawed the dimensions of the components. So we can get to work. The following photo shows all the system components that we have to assemble and install.
These include:
- Pair of double side walls.
- A pair of Quadro full extension guides (there are also partial extensions, but that’s not about us today).
- A pair of rear wall connectors.
- A pair of front panel (facade) fastenings.
- Set of longitudinal rails (2 pcs.).
- Pair of end caps with Hettich logos.
The facade is calculated according to general principles for all drawers. In terms of width, I make them 3 millimeters narrower than the width of the box. In general, I make the interfacade gaps equal to 3 mm.
Let's start the work by assembling the box itself. First of all, the back walls are assembled. Why do you need to attach the rear wall connectors to it? First, the connectors are attached to the rear wall from the rear surface with a self-tapping screw, aligning the bracket along the bottom edge.
The second self-tapping screw in the upper part is screwed in from the end. For this purpose, there are wide holes on the sides of the connectors.
After this, the side walls are attached to the connectors of the rear wall, clicking on the sides. The bottom is inserted into the grooves of the side walls.
The bottom is wound in all the way, aligning along the front edge with the sides. The drawer is turned upside down and the bottom is secured with self-tapping screws (I usually put three on each side).
This completes the main part of the box.
All we have to do is attach the façade and the rails attached to it to it.
To do this, it is necessary to secure fasteners to the facade. They should be installed in 10 mm holes, which can be conveniently drilled with a Forstner cutter of the appropriate diameter.
For correct marking, we return to the first diagram. Considering that we have a bottom drawer, then to the size of 40.5 mm we add the thickness of the lower horizon of 16 mm, which gives a total of 56 mm. The remaining values correspond to the diagram. On the sides you need to set aside size A, which is 23 mm. That is, we retreat 23+15 mm from the edge of the facade (the thickness of the vertical pillar minus the inter-facade gap, which I usually make 1.5 mm - on each side. The lost millimeter is easily compensated by the adjustment capabilities of the system, but if you are a perfectionist, then on one side you need to add to size A 16 mm, and on the other 14 mm, or make 4 mm gaps between the facades).
Using a Forstner cutter, we drill these holes to a depth of 1.2 cm. We do this carefully so as not to drill through the facade. It is advisable to use a drilling machine or at least a stand with a drill depth limiter for this, but a simple hand drill can do the job.
We press fasteners into the holes, which, after pressing, are fixed with screws (they spread the jaws of the futor, tightly securing the fasteners in the holes).
Now we install the roof rails. First, we attach them to the rear wall connectors, snapping them into place.
We repeat this manipulation on the second side. It turns out something like this.
We snap the facade onto the side walls.
The front part of the railing is mounted on the fastening elements of the facades. They are inserted into the groove from above, after which they are closed with decorative bushings.
In the next photo I showed the position control panel.
Now we mark the guide. Let's focus on the first diagram again. To do this, we set aside 3.6 s from the bottom of the facade (remember that the lower facade will be lowered by another 1.6 cm). We draw a perpendicular and mark the traditional 3.7 cm on it.
We lay the guide on the perpendicular so that the line passes through the centers of the top row of holes. The attachment points of the self-tapping screws (at least three pieces) are pricked with an awl.
We assemble a furniture box. In my case, this is a box with lower drawers.
We place the box on the guides and push it until it clicks. It is not necessary to remove the façade.
But I dismantled the facade so that it would not be scratched during transportation and therefore put them in place.
Tilt in the frontal plane is produced by rotating the roof rails. At the same time, as they lengthen, they tilt the façade forward, or when rotating back, they tilt it backward.
The façade is shifted left and right by rotating the screw (which is located on the right side). You can move it up and down by rotating the wheels (they are on both sides of the box). To dismantle the facade, you need to press the blue button in front of the window.
All that remains is to close the technical window with a plastic plug with the Hettich logo.
That's it, the work on installing the box can be considered complete.
To conclude the story, I will provide a file from the manufacturing company, which contains installation information presented in official language. See here:
Furniture pull-out fittings InnoTech (1.7 MiB, 366 hits)
Some advantages of telescopic guides
Sometimes problems arise with such structures during operation, but these are just minor drawbacks compared to the characteristic advantages of telescopic drawer guides. Among the main advantages of retractable systems:
- Increased reliability of boxes of this type compared to roller mechanical systems.
- Long service life of structures.
- The quality of metal parts made from alloys that are durable. This ensures that the guides will not “twist” under the weight of the box.
- Easy and quick drawer extension completely or to the desired depth, combined with reliable fixation of the device.
- This option is more accessible due to its low cost compared to its analogue - tandem box.
Knowing how to remove a drawer from the guides and how to easily mount it back, you will not have problems using telescopic structures. With simple instructions on hand, consisting of just a few steps, you can dismantle the box yourself and just as easily return it back.
Disassembling the roll-out box mechanism
If such a need arises, rest assured, you can do everything yourself - remove the box and install it in place! This has been done several times at our house. The first time I removed furniture drawers was when the cabinet was completely new. The furniture company's specialists incorrectly set the position of the roll-out drawer guides in the children's room set. Because of this, it (the box) constantly moved out and opened spontaneously. First I’ll tell you, and then I’ll show you in video instructions how to fix everything...
Disassembling the roll-out box mechanism
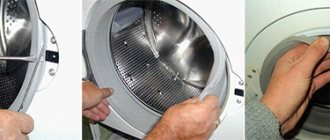
So: at first we called the furniture company, but we couldn’t persuade them to have a master come and adjust everything. Therefore, we said goodbye once and for all to this organization and decided to do everything on our own. I didn’t immediately understand how to remove the box from the “guides”. It turned out to be simple! It is necessary to pull the drawer out as far as it will go, then the plastic “tongues” will come out.
Roll-out box repair
Drawer mechanism repair
Box removed
The tongue “sits” on a bolt, much like a clock hand, only of a very interesting shape. The protrusions of this “arrow” block the movement of the guides and prevent the box from falling out when assembled. To disassemble the mechanism, you need to pull the “tab” counterclockwise and pull out the drawer.
Left side of drawer with roll-out mechanism
On the left, pull the “tongue” up...
Roll-out drawer mechanism - right view
And on the right we pull the tongue down... The roll-out drawer (also known as a drawer) easily comes off the holding guides.
Using a “level,” I measured the position of these same guides. As expected, they were installed crookedly. First, I unscrewed a couple of screws, those in the depths of the frame. Again, using a “level,” I set it in the correct position, made sure that nothing would interfere with the movement of the box, screwed it on and assembled the furniture.
If you repeat this, make sure that the “guides” fall into place in the receiving glands. If it closes tightly, then perhaps something is crooked. Better check it again! If everything is in its place, it works fine! This same disassembly and reassembly method will come in handy if something falls from an overloaded box behind the back wall and you need to quickly get it out. This principle applies to shelves of computer tables, etc., etc.
Video instructions on how to remove the box from the runners. I filmed it with my phone, it’s better, of course, to use a normal video camera>>>.
Votes statistics
Visitor voices
[Total: 70 Average: 4.1]
Disassembling the roll-out drawer mechanism reviewed by admin on 02/03/2012 rated 5.0 of 5
Repair tool
The required set of tools for working with a chest of drawers depends on the nature of the problem, therefore, first carefully inspect the product and make a list of breakdowns. But it’s a good idea to keep the following on hand:
Show hidden content
| Tools | Consumables |
|
|
DIY drawer frame repair and replacement
Summarizing all of the above, we can identify several repair methods to return the drawer to its former strength and smooth operation:
- Strengthening the structure itself . It is necessary to add rigidity by installing strips along the back wall. You can also level furniture that is standing unevenly so that its geometry becomes correct. After checking all the corners, you can repair the drawers and replace the fittings (if required).
- Strengthening the drawer frame and strengthening the bottom . If during operation it becomes clear that the fiberboard bottom is not able to withstand the load and is expected to fall out even after replacement, there is a reason to strengthen it. To do this, install a stiffener horizontally or vertically along the bottom - a partition. You can additionally attach the bottom to this part. This method will also help make a large box more rigid without warping.
- Replacement of drawer boxes. Sometimes wooden tenon boxes that have fallen apart are easier and cheaper to replace than to repair. For example, make them again from chipboard. You can read how to calculate the dimensions of the drawer parts for replacement here. It is also worth doing if it turns out that the dimensions of the drawers were initially calculated incorrectly, and therefore fall out of the guides. Or the fittings themselves are already outdated and are no longer available (such as some types of guides with an insert into the groove of the drawer).
For roller and telescopic guides, the optimal clearance for smooth extension is 13 mm on each side.
Repair and replacement of guides in drawers
It happens that the guides quickly fail because the box is large and heavily loaded. Telescopic (ball) guides allow installation in two rows. In this case, the drawer will be endowed with greater load-bearing capacity and will last longer.
With such an “upgrade,” it is quite possible to replace the bottom made of flexible fiberboard with chipboard or plywood in order to store, say, tools in such a box.
It is better, of course, to replace the metal guides. They don't cost that much. However, if upon visual inspection the rollers are intact, have an even shape, and only the metal of the runners is bent, you can try to return it to its original shape. To do this, use a vice, pliers and other hand tools.
How to remove drawers with rail guides step by step
In order for you to understand the mechanism of operation of this system and independently, without the help of a wizard or any tools, pull out and insert the drawers into place, we offer a step-by-step guide. By performing each action sequentially, you can easily pull them out of the guides without damaging the structural elements.
- Pull the drawer out all the way until you see special plastic strips resembling a clock hand in the special slots.
- On the right side, release the arrow down, and on the left - up if the system is mirrored or down if the system is symmetrical.
- Having lowered the plastic holders on both sides and holding them in this position, begin to smoothly push the drawer to the end, pulling it out in this way.
- Done, we have achieved the desired result.
In order to return everything to its place, follow the steps of this instruction in reverse order.
To slide the cabinet, insert into the guide rails and push firmly but gently all the way. If everything is done correctly, you will hear a characteristic click, which indicates the structure is closing.
IMPORTANT! You can only understand which model you have by trying to release the arrow. If it does not go down, then do not press harder, otherwise you will break and damage the structure. Just lift it up and everything will work out.
Source: setafi.com
How to remove drawers with rail guides step by step
In order for you to understand the mechanism of operation of this system and independently, without the help of a wizard or any tools, pull out and insert the drawers into place, we offer a step-by-step guide. By performing each action sequentially, you can easily pull them out of the guides without damaging the structural elements.
- Pull the drawer out all the way until you see special plastic strips resembling a clock hand in the special slots.
- On the right side, release the arrow down, and on the left - up if the system is mirrored or down if the system is symmetrical.
- Having lowered the plastic holders on both sides and holding them in this position, begin to smoothly push the drawer to the end, pulling it out in this way.
- Done, we have achieved the desired result.
In order to return everything to its place, follow the steps of this instruction in reverse order.
To slide the cabinet, insert into the guide rails and push firmly but gently all the way. If everything is done correctly, you will hear a characteristic click, which indicates the structure is closing.
IMPORTANT! You can only understand which model you have by trying to release the arrow. If it does not go down, then do not press harder, otherwise you will break and damage the structure. Just lift it up and everything will work out.
Modern design furniture is often equipped with telescopic runners. This is a simple design, convenient and reliable, but, like any mechanism, it can fail. If a part becomes unusable during operation, it must be replaced. This is where the owner has questions about how to remove the drawer from the guides.
At first glance, this seems incomprehensible, but if you follow the simple instructions given below, then everything will become extremely clear. The process itself will take no more than 1–2 minutes. So what is the procedure?