There is a completely justified reluctance to drill into the walls in the bathroom or kitchen to attach a shelf, soap dish, glass for toothbrushes, hooks and other accessories and fixtures, and using all these devices that have a suction cup may face the problem of securely fixing these bathroom and kitchen attributes to a smooth surface. tile surfaces.
- Advantages of attaching objects with suction cups
- Factors influencing the strength of attachment of the suction cup to the surface
- Mounting methods
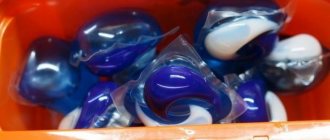
Suction cups securely attach to smooth, flat surfaces such as tile, mirror, metal or glass
What needs to be done to securely glue a soap dish and other accessories on suction cups to tiles, glass or mirrors? There are several methods for attaching a suction cup so that it holds firmly on any smooth surface and does not fall off at the most inopportune moment with an object attached to it.
Advantages of attaching objects with suction cups
The main area of application for objects that have a suction cup for attaching them to a smooth tile or glass surface is the bathroom or kitchen. If previously, almost the only accessory that could be stuck to the wall using a suction cup was a hook, today the list of such items is quite extensive and is constantly growing. On sale you can find the following products with suction cups:
- hooks;
- soap dishes;
- glasses for toothbrushes;
- shower head holders;
- toilet paper holders;
- towel holders;
- decorative items;
- shelves for bathroom accessories and cosmetics.
Most often, suction cups are used in the bathroom.
The growing popularity of products with this type of fastening is due to a number of advantages that the suction cup provides:
- a soap dish, hook or any other object can be quickly, within a few seconds, attached to the desired location on the ceramic lining;
- In order for the device to be securely held on the tiles, the use of mechanical and electrical tools and drilling of walls for installation of various brackets and clamps is not required;
- if necessary, the product can be easily dismantled without leaving traces and transferred to another location;
- small price.
This type of fastening is intended for mounting oversized products and items that are light in weight.
A simple tip to prevent the suction cup from falling off
Experienced drivers have a lot of tricks and worldly wisdom for all occasions. For example, everyone has encountered the need to stick some kind of device with a suction cup to the windshield, but it tends to fall off at the most crucial moment.
A navigator, radar detector, telephone and a host of other things needed on the road can be attached to the suction cup. But due to imperfect fastening, the device may fall off all the time. This prevents the driver from concentrating on the road, and is annoying, especially when he needs to look up the route, but the navigator has come unglued and floated under his feet. Due to such “flights” the device may be damaged. And to put it in place, you need to stop the car. Gluing on the go is a bad idea. It’s only blondes who can drive a car, put on makeup and answer calls at the same time, or minibus drivers who can pay passengers, talk on the phone and turn the steering wheel.
Factors influencing the strength of attachment of the suction cup to the surface
There are several factors that can affect the quality of the suction cup attachment.
The reliability and strength of the connection between the suction cup and the tile depends on three factors:
- From the material from which the surface is made and its condition and quality. The base must be absolutely smooth and clean, free from chips and potholes, and it is better if the tile has a glossy front side. On matte ceramics, the adhesion of the suction cup to the surface drops significantly, and on embossed tiles it is unlikely to be able to stick anything.
- From the total weight of the device with a suction cup and the weight of the object located on it.
- On the quality of the device’s material and the presence of flaws on it. When purchasing a fastener with a suction cup, you need to pay close attention to the inner working side of the device so that there are no bumps or growths on it that will not allow the device to be securely glued to the tiled surface.
Lumps and growths on the inside of the suction cup can be cut off with a sharp knife or blade.
How to glue a suction cup onto tiles: tips and tricks
Very often, various accessories with suction cups are used for the bathroom, so the question of how to stick them to the tiles is extremely relevant. These items are convenient, but installing them can be a challenge. There are several reliable methods that will allow you to fix the product on the tile surface without a single trace.
As a rule, suction cups do not stick well to tiles, so to securely attach them you have to resort to various tricks
Suction cup accessories and their advantages
Most often, suction cups are used in the bathroom. But there are many similar accessories for other rooms. Such products have a number of advantages:
- They can be fixed to the surface in just a few seconds, without the use of auxiliary tools.
- They do not leave a mark on the tile surface.
- If necessary, the suction cup can be removed or moved to another location.
- The cost of these accessories is low.
Thanks to these properties, as well as many other positive factors, suction cup accessories are incredibly popular. Today the following products are produced with this mount:
- soap dishes;
- hooks;
- shelves;
- cup holders;
- shower holders;
- decorative items;
- holders for toilet paper, towels, cosmetics, etc.
Products with suction cups have proven themselves to be durable, cheap and convenient accessories for bathrooms
We'll look at how to attach a soap dish and other products with suction cups to tiles below.
Surface quality and suction cup
First of all, you need to make sure that the product you buy with a suction cup will not be unsuitable for fastening. High-quality material must have an absolutely smooth inner surface. It is this factor that determines the choice. Be sure to run your fingers over it. If you feel a depression or bump, it is better to refuse such a product.
Please also note that the shape of the suction cup must be correct. Another important aspect is the assessment of the tile surface
It must be perfectly flat, since it will not be possible to glue the suction cup onto a textured tile. Smooth gloss is best suited for this purpose. Pores on the matte surface can weaken the bond. And raised protrusions, various surface defects, particles of glue or putty are not at all capable of holding a suction cup
Another important aspect is the assessment of the tile surface. It must be perfectly flat, since it will not be possible to glue the suction cup onto a textured tile. Smooth gloss is best suited for this purpose. Pores on the matte surface can weaken the bond. And raised protrusions, various surface defects, particles of glue or putty are not at all capable of holding the suction cup.
In order for the suction cup to adhere well to the tile, you need to make sure that the product is of high quality, and that the tile is even, and preferably glossy
It will not be possible to securely attach the suction cup to a chip or crack. Unfortunately, it will not be possible to disguise these flaws in this way. The only way out is to fix the object hanging down a few centimeters above this flaw.
Mounting methods
Let's move on directly to the issue of installation. There are several ways to stick objects with suction cups to tiles. Of course, they will hold up well and perform their functions only if the above conditions are met. The most popular fastening approaches are:
- using alcohol for degreasing;
- the use of petroleum jelly or other similar products;
- PVC film backing on a self-adhesive basis;
- strengthening the suction cup with silicone sealant.
Methods for strengthening the attachment of suction cups to the surface
The first method is suitable for objects that are small in size and weight. For example, this can be used to secure a plastic soap dish. The essence of the method is to completely clean and degrease the surface of the tile. In other words, you need to thoroughly clean it of any contaminants: dust, dirt, limescale, rust, grease, soap, etc.
Mounting methods
Whatever option you choose for attaching the suction cup to the tile, before gluing it, you need to prepare the surface of the ceramic. The work consists of degreasing the installation site using any available method. This can be either treatment with special compounds such as acetone, or regular cleaning of the tiles with soap solutions, followed by thorough rinsing of the surface with water.
in the bathroom, help maintain order, because this accessory allows you to place each item on its intended place
There are several ways to attach a suction cup, the most common of which we will present for consideration:
- Degreasing the gluing area. To obtain a better result, use alcohol or acetone. The method is used to attach devices that have a low total weight along with an object that will subsequently be placed on it: a soap dish, a hook for a small kitchen towel.
- Treat the working surface of the suction cup with Vaseline. This option allows you to slightly increase the load on the device and use the mount in aquariums.
- Using polyethylene circles. If this device was not included with the device with a suction cup, then you can easily make it yourself from a special film for lamination, or self-adhesive film, one of the sides of which has a sticky layer. Having cut out circles of the required diameter from the film, they are glued to the tile, and only after that the suction cup is glued.
- Bonding using silicone sealant. This method is used if the suction cup mount is subject to significant loads or the surface to be glued is not glossy. After gluing the device with silicone, it needs to be given time to harden within 24 hours and then the hook or shelf can be subjected to loads.
If necessary, the suction cup, fixed to silicone sealant, using a thin knife or blade, can be cut off and moved to another place.
Thus, by correctly using the listed gluing methods and following the recommendations on the selection of suitable products and methods of surface preparation, the suction cups, which are not entirely reliable and constantly fall off, will serve for a long time and faithfully, fulfilling the duties assigned to them.
How to attach: instructions
A couple of tricks will help you cope with the task. These are not exactly standard methods of attaching suction cups, but they give long-lasting results.
How to glue Velcro securely, all stages:
- First, degrease and wash the surface. Remaining dirt significantly reduces the stickiness of the suction cup. To degrease the tile surface, use a regular soap solution. Another way is to wipe with alcohol.
- Degrease the Velcro surface as well.
- If the suction cups come with mugs with a sticky side, do not neglect them: they will make the attachment stronger.
- Place the suction cup on the cleaned wall and apply maximum pressure.
You can attach suction cups to bare tiles, but the result will be short-lived. It is better to make additional mugs yourself or look for them complete with suction cups. To make it yourself, you will need self-adhesive polyethylene film, which is used for office purposes - for laminating paper without heating. Just cut out circles of the appropriate size, stick them on the tiles, and only then attach the hooks.
An easy way to improve the quality of adhesion is to apply an additional layer of Vaseline or a cream of similar consistency to the inside of the suction cup. This substance is safe for various surfaces. The method is used for further placement of light objects on suction cups.
We use sealant
Transparent silicone sealant will be invisible under the hook; it is much more convenient than a drill or a suction cup that constantly comes off. Sealant is a last resort; this method is recommended for future heavy loads on Velcro. It is worth considering that the sealant will not allow you to move the suction cup - it becomes disposable.
How to attach a hook to tiles without drilling holes
How to attach a hook to a tile without drilling holes is of interest to anyone who wants to create additional space for household items quickly, without extra effort. There are many alternative ways to make a space comfortable and not spoil the appearance of the finishing material. The fastening without drilling allows you to change the location of the suspension at any time. Take advantage of our tips and suggest your own methods.
Suction hooks
The most common type. It's cheap and doesn't always hold up well. Let's figure out how to choose. First, look at the tiles: matte surface, uneven masonry at the attachment point, chips, cracks, relief pattern - all this does not speak in favor of the suction cup. On a smooth, glossy, grease-free surface, without any flaws, the product will easily withstand a load of about a kilogram.
Determine the quality of the suction cup. Some manufacturers write on the packaging what weight it is designed for. You can check the manufacturer’s promises in the following way: run your finger along the inner surface of the elastic band. If it is smooth, the transition to the narrowed part is smooth, without noticeable grooves, then the product is of high quality.
For a more durable connection, you can use double-sided adhesive tape. This method will allow you to use the hook for heavier objects. Stick a piece of tape slightly larger than the diameter of the suction cup on the wall, now attach it.
The most reliable way is to use a sealant. But it will be quite difficult to remove the hook. Apply sealant to the inner surface of the suction cup and press it against the tile. It will take about a day to dry completely.
How does the suction cup work?
Actually, there is nothing magical here, remember the school physics course. If we describe the essence of the phenomenon in a few words, it turns out that almost zero pressure is created under the suction cup, since we pressed the surface to the windshield and pulled it towards ourselves. But we have atmospheric pressure, which always puts pressure on us and on the objects around us, and since it is quite high, it presses on the surface of the suction cup on the other side, pressing it to the surface (it seems to try to fill the internal vacuum under the suction cup).
Thus, if the suction cup is working properly, it will stick very firmly to the windshield. But why does it fall off?
Glue "Moment"
If the tape and suction cups cannot withstand the necessary loads, use Moment glue. Apply a layer of glue to the wall and wait 10 minutes for the hook, then press it firmly to the wall. After 24 hours the grip will be at its maximum. If you use glue in the bathroom, pay attention to whether the fastening will be strong in rooms with high humidity.
In addition to the proposed methods, various types of glue can also be quite effective - epoxy, super glue, liquid nails. The main thing is to understand what the humidity is in the room, the load on the hook, and how to dismantle it if necessary. You can fasten metal hooks into the gaps between the tiles - a blank in the shape of the letter T is made from stainless steel 1 mm thick, the length of the “top crossbar” is 15-20, the “legs” are approximately 25-30 mm, the width is 5. The seam is cleared with a piece of a hacksaw, the crossbar is inserted into a horizontal seam, covered with joint compound, after drying, the end is bent upward with a hook. If necessary, you can pick out and rub the seam again. The advantage is that no marks remain. Withstands more than 5 kg. What methods do you use to hang heavy and not so heavy objects?
Suction cups for the bathroom - how to glue the device and the best ideas for use (65 photos)
Vacuum suction cups are designed to attach to tiles without the need to drill holes for plastic anchors in the tiles. There are a variety of design options for bathroom products with suction cup mounts, and there are numerous photos of them on the Internet.
Examples include decorative items, shelves for cosmetics and shower accessories, towel holders, toilet paper boxes, soap dishes, hooks, and toothbrush holders.
Advantages and disadvantages of bath suction cups
The main advantages of mounting on vacuum suction cups include:
- No need to drill into the wall to attach any accessory. If you drill into tiles with a drill that is not intended for it, it can be very easily damaged. In addition, the tiles are afraid of using a hammer drill in impact mode - vibrations can cause them to move away from the wall and collapse.
- Quickly attach bathroom accessories with suction cups, the ability to attach them to the wall wherever it is convenient.
- Low cost of suction cups due to the low price of the material from which they are made.
- Possibility of quick and painless dismantling and fastening of objects mounted on vacuum suction cups in tiles.
The disadvantages of such fastening include the low weight of the attached accessories - you cannot hang a large and massive cabinet on suction cups; it will not hold securely even on smooth tiles. Also, vacuum suction cups have certain requirements for the surface to which they will be attached.
What determines the reliability of the suction cups?
The main factors influencing the adhesion strength of the suction cup to the wall are:
- The quality and cleanliness of the surface to which the fastening is carried out. The suction cup clings best to a smooth, glossy surface without gouges or chips. A matte, lumpy or embossed surface is not suitable for mounting vacuum suction cups; you will have to drill into the tiles.
- The weight of the item being mounted on the wall.
- The quality of the suction cup - the working surface must be smooth, without unevenness or roughness. As a last resort, you can remove the existing bumps mechanically using a blade or a stationery knife.
To enhance the sticking effect of the suction cup, you can take additional measures:
- Degrease work surfaces using alcohol or acetone; this method is suitable for light-weight objects - soap dishes, towel hooks.
- For mounting in aquariums, you can treat the suction cup on the working side with Vaseline.
- If the package did not include a polyethylene circle with the suction cup, cut it out yourself from a self-adhesive film with one working side or from a laminating film, and then stick it on top of the tile.
- Gluing suction cups to silicone, liquid nails, transparent bathroom sealant.
This radical method is used for matte and corrugated tiles, as well as when it is necessary to install an object with significant mass. After gluing the suction cups, you must wait 24 hours before using them.
Products with suction cups for comfortable bathing
Bath pillows are mounted using suction cups on the bathtub itself or on the tiles and make bathing much more comfortable. Instead of holding your neck in a tense vertical position while swimming, you can comfortably tilt it back and relax to the fullest.
Such pillows are made from PVC, rubber, and fabric materials. There are even options with a built-in MP-3 player and massager.
For elderly people and children, to make bathing easier and safer for them, there are suction cup grab bars for the bathroom, which provide for both vertical and horizontal attachment to the tiles. They can withstand forces of up to 50 kg, but before use it is better to make sure that the handrail is securely fastened.
If the tiles on the bathroom floor are glossy and slippery, there is a risk of slipping and falling. To avoid such troubles, you can lay a suction cup bath mat on the floor with a surface made of acrylic, silicone, microfiber, rubber or polypropylene.
On such a rug, the chance of slipping is much less, in addition, under your foot there will be not a cold tile, but a warm and comfortable material to the touch.
Height above sink
General principles when placing a mirror reflective element inside a bathroom are:
- the upper edge is 10 cm higher than the tallest member of the family;
- width equal to the size of the plumbing fixtures or slightly less;
- glass thickness from 2 mm, otherwise the mirror will be too fragile, but no more than 10 mm, so as not to make the structure heavier.
the lower edge is at a level of 15 - 20 cm from the side of the sink to avoid constant splashes, streaks, stains;
However, there are nuances in which even these principles are not correct:
- a reflective element can be used in the interior to visually increase the work space;
Expanding the bathroom space with a large format mirror.
Small-format makeup mirrors with a magnifying effect must be attached taking into account the degrees of mobility and the number of hinged elements.
Even with a slight tilt of the canvas in the vertical plane (the lower edge is pressed against the wall, the upper edge moves away from it at some distance), the viewing angle sharply increases. To do this, you need to use either a suspension on a cord or fastening with a plate holder on hooks.
The nuances of installing mirror elements in bathrooms
To ensure a high service life of the mirror and user safety during installation, some nuances should be taken into account:
- type of enclosing/dividing structure - concrete wall, plaster or plasterboard on a profile frame;
- weight, dimensions of the mirror element;
- reflection angle - the mirror can be placed in the same plane with the wall, its upper edge can be tilted outward, and hinged fasteners can be used to provide several degrees of mobility.
Concrete walls and plaster under a layer of tile adhesive have high strength and, accordingly, load-bearing capacity. Plastic dowels for self-tapping screws and anchor hooks are held securely in them. Standard installation technology is used here - drilling, driving in dowels, screwing in hardware.
On drywall covered with tiles, which has normal load-bearing capacity but is extremely thin, a special plastic or metal anchor will help you hang a mirror element, as in the bottom photo.
Heavy reflective sheets are best fixed with holders, through holes drilled through with self-tapping screws, or glued to a neutral sealant. For lightweight, small-sized mirrors, you can use the other mounting methods indicated in this manual.
Advice! If you need bathroom renovation specialists, there is a very convenient service for selecting specialists from PROFI.RU. Just fill out the order details, the experts will respond and you can choose who to collaborate with. Each specialist in the system has a rating, reviews and examples of work, which will help with the choice. Looks like a mini tender. Placing an application is FREE and does not oblige you to anything. Works in almost all cities of Russia.
If you are a master, follow this link, register in the system and be able to accept orders.