Required Tools
Replacing the cuff of a washing machine hatch with your own hands is possible; no special skills are required.
Therefore, you can avoid calling repairmen and save money. The main thing is to approach this process confidently and carefully.
Before replacing, prepare a new seal, a screwdriver, detergent (soap) and a marker.
Advice: in order not to make a mistake when buying a new cuff, take your old one with you and select the same model specifically for your machine.
Causes of damage
The cuff is most often replaced due to the appearance of ruptures or cracks in the seal that allow water to pass through during washing. As a result of the formation of such damage, the owner of the machine will see water leaks under the hatch, and upon examining the cuff itself, he will notice cracks or tears, which may have different sizes. The reasons for this situation are the following factors:
- Natural wear of the seal. During operation of the machine, the cuff is constantly subject to friction between the drum and the laundry. It heats up during washing and then cools down. In addition, it is affected by detergents. Over the years, this leads to brittleness and brittleness of rubber.
- Poor quality washing powder. Under the influence of cheap powder and detergents of dubious quality, the rubber of the cuff begins to deteriorate, so saving on powder leads to expenses for replacing the seal.
- Excessive dosage of detergents. If you use an excessive amount of powder or liquid, the structure of the sealing rubber may also be damaged, which will require the cuff to be replaced.
- Parts of clothing that could damage the seal. Such elements can be metal and plastic fittings. In addition, screws, nails and other objects can get into the machine from clothing pockets, which can cause tears in the cuff.
Over time, if the sealing collar is not cleaned, mold may grow on it. Therefore, it is necessary to periodically clean the washing machine. You can see how to do this in the following video.
Related article: How to remove air from a heating system
Replacing the hatch cuff of a washing machine: step-by-step instructions
The seal is attached to the tank and to the front wall of the machine with two clamps. The replacement process involves removing the clamps from the damaged cuff and putting them on a new one, placed in a shrinkable place.
Step 1: Preparing for removal
Unplug the machine and turn off the water supply.
Open the hatch door of the washing machine.
Step 2. Remove the outer clamp
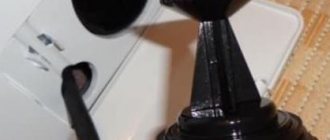
If the clamp is plastic, you need to pull the elastic band at the junction of the latches towards you.
The clamp can be attached to the body with a screw. Loosen it with a screwdriver and pull it towards you.
If there is no screw, pry up the spring with a screwdriver and pull it out towards you.
There is a mark on the top of the cuff that should be opposite the mark on the tank. If there is no mark on the tank, draw it with a marker so that later you can correctly install the new seal.
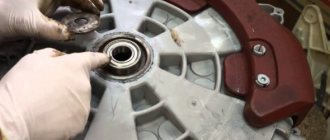
Step 3. Pull out the inner clamp
To get to the second one, remove the top cover of the machine. To do this, you need to unscrew the bolts holding it.
In some machine models, access from above is closed; in this case, we unscrew the front wall of the machine.
We unscrew the tightening screw, pry up the spring with a screwdriver and tighten it.
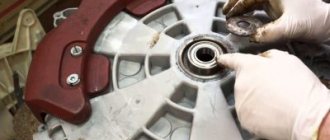
Step 4. Clean the area and install a new cuff
We wash away dirt from the installation site with detergent. We apply a soapy layer for slipping to make it easier to put on the purchased cuff.
We combine the marks on the tank and the elastic band, and pull the cuff over the edges.
Important! The elastic band must fit snugly to the edges, otherwise there will be leaks.
We put on the inner clamp first. With a screw - put it over the elastic band and tighten it. We stretch the spring along the entire opening. We snap the plastic ones.
We fix the elastic band on the outside of the washing machine in exactly the same way.
Attention! When putting on new cuffs, we do not use a screwdriver so as not to damage the rubber.
Step 5. Close the top cover and connect the washing machine
We install the cover in place and tighten the bolts.
Turn on the water and insert the plug into the socket.
We turn on the machine and start washing without clothes.
We check whether water is leaking, whether the drum is rubbing against the rubber band during washing, and inspect the area under the machine after washing. If everything is dry and the wash went through without any unnecessary sounds, the cuff is installed correctly.
Removing the cuff
Before removing the seal from the washing machine, you must first purchase a new one, identical to the original one. There will be no problems with the purchase, since a new cuff can be purchased almost anywhere: in a service store or online store. The main thing is to choose an identical part. Therefore, before visiting the store, carefully write down the full name of the washing machine model and its serial number. The new seal should bend well and be soft to the touch.
Now let's move on to the question of how to remove the cuff. The procedure for removing a part in all automatic machines basically follows one step-by-step scheme:
- Removing the fixing front clamp connecting the hatch cuff to the outer casing of the SMA.
- Removing the front panel of the washing machine.
- Removing the second clamp that secures the seal to the washing machine tank.
Removing the first clamp
Removing the cuff should begin with dismantling the first (front) clamp. Follow the recommendations below.
- Unplug the CM power cord from the outlet.
- Take the tools. You only need screwdrivers (in most cases, two are enough: a Phillips and an asterisk).
- Find the latch (if it is a plastic clamp). Grab and pull the place where the latches are located. In the case of a wire rim, which can be tensioned using a spring or a screw, you will have to either unscrew the screw or lightly pry the spring with a screwdriver. Most often, the spring is located on the side near the locking lock or at the bottom of the loading hatch.
- Unclench and pull out the metal/plastic rim.
- Place the rubber inside the tank.
Before removing the rubber band from the washing machine drum, pay attention to two special triangle-shaped marks. One is located on the seal itself, the other on the drum. It is important that they are placed parallel and coincide. If there is no mark, put it yourself. This will be useful to you in the future when you put on a new part.
Removing the front panel
To completely remove the seal from the washing machine, in most cases you will have to remove its front panel. This should be done as follows:
- Unscrew the bolts from the back wall of the SMA and remove the upper part of the washer.
- To remove the screws holding the front panel in place, pull out the powder tray.
- Unlock the latches that hold the control panel in place and carefully remove the control panel.
- Remove all bolts from the front of the housing.
After these steps you can easily reach the second clamp.
Step-by-step removal instructions
The procedure for removing the rubber cuff is not difficult. For accuracy, we will provide a step-by-step algorithm of actions:
- disconnect the device from electricity, water supply and drainage pipes;
- using a flat screwdriver, remove the metal or plastic clamp from the door cuff, which in most models is removed in the same way;
- find the latch or clamp spring on the fastening circle (it is located at the bottom of the door or near the lock);
- Using a flathead screwdriver, pull the spring towards you and loosen it. If there is a bolt, unscrew it from the groove and also release the locking latches;
- remove the ring by prying it up with a screwdriver, but try to avoid punctures and damage;
- Unclench the metal ring on the water fill hole and remove it;
- remove the sealing collar and tuck it in the direction of the drum;
- Locate the triangular mark on the rubber band and drum.
These marks must strictly match to avoid leaks and other malfunctions.
- To completely separate and remove the rubber cuff, disassemble the front panel of the washing machine;
- remove the cover by unscrewing the bolts at the back;
- remove the powder container;
- Unclench the latches securing the control unit, remove the panel and carefully place it on the body;
- remove the lower closing panel and unscrew the bolts, provide access to the inside of the seal;
- To completely remove the cuff, remove the fixing clamp from the back using a flat-head screwdriver;
- after this, the cuff can be easily removed, and a new sealing rubber is installed in the vacant space.
To help you understand the cuff removal procedure, watch the video below.
What materials and tools are needed?
In order to put on the cuff of the washing machine drum, you only need two tools: pliers (preferably small ones) and a small flat-head screwdriver. And the list of materials is not long, but we need to talk about materials in a little more detail.
- Cuff. When purchasing a new cuff, make sure that it is identical to the old rubber band that was previously put on the drum or at least compatible with your model of washing machine.
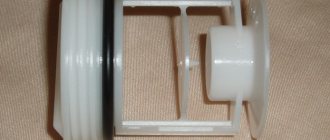
- Internal and external clamps. If, after removing the old cuff, your “original” clamps remain intact, that’s good. If the clamps are damaged, you need to throw them away and instead buy a set of cheap plastic clamps for the hatch cuff of a front-loading washing machine.
- Fine-grit sandpaper, soap, water and sponge. These materials will help prepare the seat for the rubber band. Clean the metal edges of the hatch from tightly dried dirt and wash them with soapy water.
With the help of soap, we will not only wash the seat under the cuff, the soap will act as a lubricant that will help place the elastic where needed. Just don’t think of using WD-40 or machine oil as a lubricant - it will then get on things during washing.
Preparing the seat
To make the process of installing the washing machine cuff easier, it is better to first remove the front wall from the washing machine. Doing this on purpose is tedious and time-consuming, but if, for example, you were repairing a part and the wall was removed, it is better to first install the hatch rubber, and only then return the wall to its rightful place. How to properly remove the front wall is described in the article Disassembling a washing machine, which is published on our website.
You can install the cuff without removing the front wall of the washing machine, but this will be somewhat more difficult. First, let's inspect the seat. After 3-4 years of using the washing machine, a layer of water stone, powder residues and other rubbish accumulates under the cuff. We try to wash the seat using a sponge, soap and water. Making sure that all the dirt cannot be removed in this way, we take up sandpaper. We clean off the dirt, and then wash off the remaining residue with soap and water, the preparation is complete.
Getting ready for work
To change the door rubber on a Samsung washing machine with your own hands, you do not need to have any special tools or skills. To properly remove the cuff, you just need to understand the order of work, what and how to do at a certain stage, and also prepare a set of tools available in every family:
- screwdriver;
- Phillips and flathead screwdriver.
If you still don’t have a screwdriver at hand, all manipulations can be done without it, but then the process will require a little more effort from you. Having prepared the necessary tools and turned off the power to the washing machine, you can begin the replacement procedure.
We carry out installation
Installing a cuff on a washing machine is a simple process. Follow our recommendations to quickly finish assembling the machine and change the sealing collar:
- Inspect the new part, especially the grooves that will lock into the grooves. If there are burrs, remove them.
- Turn the elastic with the desired side down. To avoid confusion, focus on the holes through which water passes.
- Lubricate the grooves with soap solution.
- Pull the cuff over the tank.
- Install the outer wire tie. Tighten it firmly.
- Put all panels back on.
- Reinstall the drainage hose and secure the detergent receptacle.
- Lubricate the outside of the sleeve with soap to easily snap it into the groove.
Important! To ensure that the clamp holding the elastic on the inside is well tightened, when tightening the fastener, press on the part as if it were a lever. When it is securely installed, the movement will stop.
All that remains to be done is to connect the machine to the communications and run a test wash to make sure that you did everything correctly and the machine is not leaking.
Checking work
After installing the rubber cuff and the door into the latches, you need to check whether everything is fixed correctly and whether there are any leaks during the washing process. To do this, run the wash in test mode and make sure there are no leaks under the door.
If there is a leak, it is necessary to disassemble the door again, remove the cuff and reinstall it, observing all the requirements. Check around the entire perimeter to ensure that the rubber fits snugly and does not bulge. The new rubber band should provide a complete seal.
Tools needed to replace the cuff
Replacing the cuff is a fairly simple process, especially if you follow simple instructions. The first thing to do is check the product for damage. Only after this can you insert it into the device. To do this, you need to remove the old part by removing the clamp that held part of the cuff attached to the wall in front. After inspection, a decision is made as to whether the rubber will be repaired or replaced. The tools that are required for this are few:
- flat-type screwdriver;
- slotted screwdriver;
- new cuff;
- glue (if the part will be repaired and not replaced).
In some situations, additional adaptations may be required. The main thing is that they are used in a certain order and are of high quality.
Installing the cuff
Align the installation mark. Then you need to, using two thumbs, take the cuff by the inner side and try to pull it onto the circumference of the edge of the tank.
We put on the inner clamp:
When equipping the clamp with an adjusting screw, it must be unscrewed to the required diameter, moved to the required position and tightened by tightening the screw. The spring clamp must be fixed where the starting point of tension is. To do this, insert the screwdriver all the way into the locking hole of the hatch. After the spring is put on, it needs to be stretched and put on in a circle so that it falls into the seat area. Older models are not equipped with adjusting screws and springs, so tensioning the clamps can be done using special pliers.
What is a cuff
The main purpose of the rubber part installed on the hatch of an automatic washing machine is to hermetically seal the loading tank during operation of the machine. This layer does not allow even a drop of water to seep out.
The location of the cuff and its appearance completely depends on the model of the machine. If loading is frontal, a rubber layer connects the tank to the front wall of the unit and has a round shape.
In models with a vertical method of storing laundry, the part combines the tank with the upper wall and has the shape of a rectangle.
Without a door seal for loading laundry, the machine door cannot be closed tightly. The special composition of rubber or silicone from which the part is made ensures complete sealing of the tank during washing
Previously, seals were made of very flexible rubber. In modern models, cuffs are almost always installed from a similar material of artificial origin - silicone.
It does not lose its elastic properties over a wide temperature range and does not “tan” over time.
Cuffs of different models differ in size and shape. If the washing machine has additional functions, for example, drying and aquaspray, the part may have additional holes.