Share on social media networks:
If you decide to renovate and update the interior of your home, then get ready for serious financial costs. But in order to reduce costs, during the repair process we pay attention to everything that, if used skillfully, can reduce the cost of this difficult undertaking. For example, you came across an interior door. It's not new, but what's stopping you from making it like that? An alternative way to add eccentricity or give your door a classic, strict look is painting. You should never be afraid of updating your old interior. With a skillful approach, you can reduce the cost of repairs and add a touch of extravagance and comfort to your abode.
But, as a rule, old doors are already painted. And here you need to think carefully about how to remove old paint from a wooden door. To achieve a good result, you need to prepare the door for painting; to do this, you need to wash it off the paint and sand it. And we will now tell you how to do this with a minimal investment of money, energy and your precious time.
Let's start repairing the door ourselves
To understand the complexity of this procedure, you first need to determine the nature and type of paint materials. Specifically, you need to know the answers to the following questions:
- What material was the paint applied to?
- How many layers of paint and varnish were applied to the door?
- What type of paint was used?
- How long has it been since the last update of the product's appearance?
You need to take all these factors into account and, using various paint removers, bring the surface of your door to a uniform structure.
Important! If you decide to apply new paint to old paint, you will not achieve the desired result. You will not achieve contrast in color and shine. It is for this purpose that it is necessary to remove old layers of paint.
Preparatory work or basics
The entire process of updating the door will be divided into 3 stages:
- direct paint removal;
- preparatory surface cleaning and repair;
- new door paint.
Why remove old paint?
Try to remove the old paint efficiently. To do this, below we will offer you several ways. There should be no previous paint or varnish materials left on the work surface. This is a very important point, otherwise all your work will go down the drain.
The old paint under the new layer will begin to swell and the surface will be damaged. You will do all this preparatory work yourself, so approach the process with integrity and enthusiasm.
Why strip the door?
After completing the procedure for cleaning your door from paint, proceed to the pre-painting preparation of the wooden product. The quality of the work performed at this stage will determine its smoothness, strength and aesthetics upon completion of your work.
For this:
- Use a spatula to remove the remaining pieces of paint from the surface.
- Remove all unevenness and roughness using sandpaper.
- Fill cracks and potholes with putty.
Important! When sealing cracks, pay attention to the color of the putty and the color of future doors. There should not be a large discrepancy in the color scheme. Otherwise, the putty will appear from under the paint.
Heat treatment
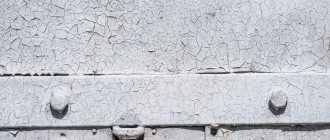
The essence of this process is to heat the wooden surface, due to which the varnish adheres less firmly to the surface. In other words, the varnish begins to crack, after which it can be pryed off with a tool (a chisel or spatula will do) and slowly removed.
Please pay attention to the following nuances:
- During work, you need to use protective equipment (gloves and goggles), and also ventilate the room. The fact is that when heated, the varnish releases toxic substances, and when the material is mechanically separated, pieces can bounce off of it. Also, do not forget about fire safety.
- If the varnish is heated up, but does not peel off, but becomes charred, you need to change the cleaning method and you cannot do without chemicals.
Required tools:
Gasoline or gas burner. Such devices are quite inexpensive
However, the burner must be used with extreme caution, as the work will be carried out with an open flame. Care must be taken when working with the burner
Construction hairdryer. The device is similar to a household hair dryer, but has significantly greater temperature capabilities, heating up to 600 degrees.
Note! A standard household hair dryer is not suitable for removing nail polish. The main advantage of the thermal method is its high speed of operation.
However, we must not forget about the danger of overheating the varnished surface, since in this case it may catch fire.
The main advantage of the thermal method is its high speed. However, we must not forget about the danger of overheating the varnished surface, since in this case it may catch fire.
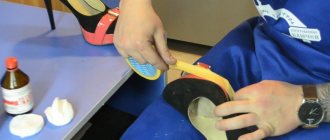
The work is done with both hands: one holds the hairdryer, which heats the surface, and the second holds a spatula for removing nail polish.
Several ways to remove old paint from a door
There are three main ways to remove old paint from a wooden door:
- Thermal.
- Mechanical.
- Chemical.
If the door was painted in one layer, then this will make your work easier. You only have to lightly “sand” the surface and you’re done. But we will also consider a more complex option, with several layers of paint, where an integrated approach is needed to bring your door into proper shape.
Method 1 - Thermal
It is reasonable to use this technology if you need to remove old paint from a wooden door, and 2 or more layers of paint were previously applied to the surface. When exposed to high temperatures, the paint softens and becomes pliable.
Therefore, take an industrial hair dryer and heat the surface of the wooden door. Modern construction hair dryers are equipped with a temperature regulator. This will be useful if you have glass on the door and you cannot or do not want to remove it.
Then use a putty knife to scrape off the old paint from the wood.
Important! Manipulate carefully, without damaging the wood structure in difficult areas.
Method 2 - Mechanical
A very good way to remove old stubborn paint. Scraping and sanding will get your door looking great. This way you will achieve the desired result, but in return it will require your diligence and effort. To implement this method, you need to have a few tools:
- Knife.
- Chisels.
- Scraper.
- Grinder machine.
- Sandpaper.
The whole essence of this method is to scrape off thick layers of paint and then sand it. Please take into account the following features:
- When using sandpaper on a sander, it is better to start with a coarse grit and move on to a finer one. This will eliminate roughness on the surface of the wood.
- In hard-to-reach places, use a knife, chisel, or scraper, depending on the complexity of the area.
- If the paint is applied in several layers and holds well, then you simply won’t find a better way than using an angle grinder with special paint brushes. This is truly a killer option.
- At the end, using light sandpaper, bring the surface of the wooden doors to the desired condition.
Important! In some cases, an ordinary piece of glass works very well, especially if there are no other tools at hand and you are not going to buy them, as well as special chemical removers. After all, all this costs money, sometimes a lot.
Having an abundance of unwanted glass on hand will allow you to remove old paint cheaply and efficiently. Just be very careful not to damage the tree or injure yourself.
Method 3 - Chemical
100% method that does not require large physical and time losses. In every hardware store you can purchase special chemicals for removing old paints and varnishes.
The best paint removers
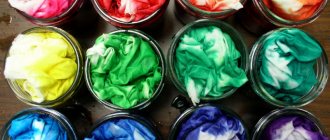
You don’t have to limit yourself in choosing their range; these are Denalt, Marshall SET, Gunter Gut Umsetzer, Graffi Guard 2030.
They contain various chemical elements that, when applied to old paint, soften it and it is easily removed with a spatula.
Tools for work
Before you start removing paint using special tools, you need to prepare some tools:
- The solvent itself.
- Brushes for applying special products.
- Putty knife.
- Gloves.
- Safety glasses.
Important! For this procedure, select a suitable room or utility room. Chemical elements negatively affect the environment and the smell of most products is far from the most pleasant.
General cleaning scheme
To remove old paint from a door, prepare the action area as follows:
- Remove everything attached to the doors - locks, handles, curtains. For convenience and maneuver space.
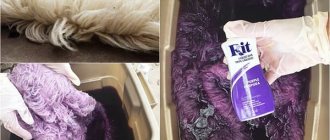
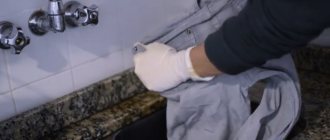
- Then apply the chemical reagent evenly to the surface of the door using a brush, first observing safety precautions when working with chemicals.
- Protect your hands, eyes, and exposed skin by wearing protective gloves and goggles.
- The method and nature of applying the remover depends on its characteristics and method of application.
Features of using different paint removers:
- Application of Graffi Guard 2030. Apply to doors using light circular movements using a brush. Let it brew for 5-10 minutes. The reagent reacts with paint at the molecular level. The old paint will split, after which you can easily wash off the dried old paint from the surface of the door. If you need to repeat this procedure, maintain a time interval of 10-15 minutes. This will finally take away all the paint you don't need.
- Application of Gunter. Using a brush or spatula, apply a layer of remover 1-2 mm thick. Depending on the thickness of the paint being removed, leave it to dry for 15-25 minutes. Finally, remove the old paint with a spatula and degrease with white spirit or solvent. Re-application of the remover is allowed for old surfaces.
- Application of Marshall. The product is applied with a brush. After 10-15 minutes, scrape off the swollen old paint with a scraper or spatula. Then wipe the entire treated surface with a rag moistened with cellulose solvent. Dry the surface to be painted. Repeat the procedure if necessary.
Heat treatment
To clean wood, you can heat it. As a result, the paint material will adhere to the base much worse. Cracks will appear on the coating, and it can be removed using a special tool (spatula, chisel).
When carrying out heat treatment, there are several important points to consider.
- If the coating begins to char instead of peeling off, the cleaning method will have to be changed. In this case, you can use chemicals.
- Goggles and protective gloves must be used. Also, thorough ventilation is required during and after work. When varnish heats up, it can release substances that are hazardous to human health. It is also worth considering that pieces of paint and varnish material may bounce off the base. You should also remember about fire safety.
The work may require special equipment.
Construction hairdryer. Such a device can heat surfaces much more than a conventional household appliance.
Gas or gasoline burner. The price for such devices is quite reasonable
However, it should be borne in mind that you need to work with the burner as carefully as possible, otherwise you can be seriously injured.
Heat treatment has one important advantage - the work is carried out very quickly. However, the varnished base should not be allowed to overheat, otherwise a fire may occur.
You should work using both hands. One needs to hold the device, the second - a spatula, with which you will remove the paintwork.
See below for a master class on removing varnish from a wooden surface.
Preparing for painting
After you have successfully managed to remove the old paint from a wooden door, we move on to another stage of painting the old door:
- Take a grinding machine and carefully bring your door panels to perfect condition.
- If the sander is missing in some places, then sand it by hand or use a block with sanding material glued to it.
Important! When sanding wooden surfaces, always carry out any movements, whether by hand or with a machine, in one direction. This way you will avoid roughness in those places where this rule was not followed.
The machine will remove all irregularities, chips, scratches, dents, cracks. But with such stripping, some problems may arise:
- If you find blackening of the wood under the old paint, then you can eliminate this by applying putty to the damaged areas. Apply putty, let dry and rub.
- If dark spots have become widespread, then there is a “miracle solution” to eliminate them. A 1:3 combination of chlorine and water when applied with a soft brush to damaged areas removes blackness.
You easily and naturally managed to clean the old paint, and your door leaves are in good condition. It has no unevenness or roughness, all cracks have been repaired. The putty is dry and sanded. The door is dry and dust free and ready for painting. We move on to the next stage of painting the old door.
How to paint a wooden door?
First of all, you need to make the right choice of paint. Basically, to protect wood from external influences, oil-based paint is used. It is deeply absorbed into the structure and protects the wood very well from humidity, cold, and frost. Protects from inhabiting and eating shashel.
Regarding the tools:
- The paint on the door can be applied with a brush. It’s somewhat labor-intensive, but you’ll be sure that you’ve carefully painted every small depression and every protrusion.
- If the door is not paneled, but smooth, use a roller.
- The most effective way is to use a spray gun. A very convenient and economical option, it applies even layers of paint without drips.
Paint the door with a brush or roller
Consider the option with a brush or roller. Everything here is banally simple:
- Stir the paint thoroughly before painting.
- Apply paint in an even layer with a brush or roller.
Important! Be careful with paint drips. If you notice smudges, then do not put it off, but fix them immediately before the paint reacts with the wood and oxygen and begins to thicken.
Option with spray gun:
- Shake the paint well before use.
- Since it is thick for spray gun use, dilute it with solvent type 647. Determine the density of the solution individually (it all depends on the viscosity of the paint itself).
- Fill into the expansion tank of the gun.
- Set the air pressure to 2-3 atmospheres.
- Wear protective clothing - a respirator, gloves, or even better - old unnecessary clothes or special overalls, a robe.
- Use smooth movements to paint the product from top to bottom.
- After finishing painting, rinse the spray gun with solvent.
Important! Repeat the painting procedure after 15-20 minutes (as soon as it is absorbed), since with this method the paint is applied in a thin layer, and may not evenly paint the entire plane of your wooden door the first time. After applying two or three layers you will achieve the desired result.
Helpful Tips:
- What base your new paint will be on is not only your choice, but also your previous choice of material. If you used an oil-based solution, then you shouldn’t take risks - you need to use just such a base. In the varieties of paints, there is incompatibility of one or another base. And when painting with a different composition, your door will appear with pimples.
- When purchasing varnish or paint for a restored door, choose paint cans of the same serial number to avoid discrepancies in the color palette.
Simultaneous use of three technologies
You can remove paint from a door decorated with small fragments or from another complex surface as follows:
- scrape off the swollen areas of the coating with a scraper;
- “walk” along the door with a drill with an attachment, not completely removing the coloring composition so as not to touch the wood;
- warm up square by square, simultaneously applying remover to the hot surface;
- wipe off dissolved material residues with a worn cloth;
- wipe with a cloth soaked in solvent;
- Sand the door with fine-grain sandpaper.
Delicate application of each method in the specified sequence will ensure gentle, non-traumatic removal of all layers of old paint to the tree.
When planning to paint structures made of natural wood, you should not neglect priming the surface. It not only provides reliable protection of natural material from dampness, mold and pests, but also facilitates the removal of outdated coatings for possible restoration in the future.