Bird feeders
Winter is just around the corner, which means it's time to take care of our little brothers. Let's start preparing a feeder that even a small child can easily make (under your guidance, of course).
To make a feeder you will need:
- toilet paper roll;
- tape or cord;
- honey, peanut butter, paste or other edible sticky substance;
- seeds, grains, cereals, etc.
Take a toilet paper roll and thread a ribbon of the length you need through the through hole. Tie the ends together. It is on this that you will then hang the finished feeder on the tree. Instead of tape, a tree branch can serve as a holder for the feeder. Simply choose any branch that grows horizontally and thread it through the cylinder.
Coat the outer part of the sleeve with honey or other adhesive substance. Sprinkle the coated surface generously with the birdseed you prepared. To keep the seeds more secure, roll them lightly. Now all that remains is to hang the feeder and admire the birds that will definitely flock to your treat.
- What to feed birds in winter - do no harm!
What you can and should, and what you absolutely cannot give to birds in the cold - write down simple instructions!
Containers for seedlings
Very soon the time will come to sow seedlings of various vegetables. Some people buy ready-made containers (boxes, peat tablets, decomposing pots, etc.), while others prefer to make do with improvised means. This is where toilet paper rolls come in handy. The more you can collect at the time of sowing, the more healthy seedlings you will grow.
Take the sleeve and carefully cut the bottom (about one-quarter of the height of the sleeve) into 4 equal pieces. Then fold them in the same way as the bottom of boxes is folded: placing each part behind the adjacent one. Place all cylinders in any waterproof (plastic or metal) container. After this, you can pour soil into the resulting containers and sow the seeds. Instead of toilet paper rolls, you can use cardboard paper towel cores. Only in this case, cut each part in half.
Cardboard is a biodegradable material, so you will not need to remove the plant from the sleeve when replanting. You can plant it in the garden with it - this way you will protect the roots of the seedlings from damage.
- 13 unusual ways to grow seedlings. Which one will you choose?
Still growing seedlings the old fashioned way in familiar containers? And many summer residents are not shy about experimenting!
What can you make from toilet paper rolls?
Crafts made from toilet rolls, which remain after all the paper has been rolled up from them, can be very useful in the household; for example, you can make convenient organizers for storing various items and small items. For example, if you glue several sleeves together, and then fix them on a cardboard base and paint them using a spray can or regular paints, you will get an excellent desktop device for storing stationery. It can be further decorated by using buttons, various accessories, items made of polymer clay, etc. It turns out quite beautiful! And it is also a very convenient thing.
If you glue several sleeves together, you can get a desktop device for storing office supplies
An organizer for storing various small items is another option for crafts made from toilet paper rolls, a photo of which can be seen below. But for this you will have to prepare a box. The rolls are tightly inserted into the box so that they do not dangle there. It turns out to be a box with a lot of cells. You can store sewing accessories or small construction supplies such as nails, screws, etc. in them. It is very convenient when everything is sorted and in its place.
You can use the sleeves to make an organizer for storing various items
In addition to crafts from toilet paper rolls, you can make pots for seedlings. This makes it as easy as possible to plant it in the ground without the risk of damaging the existing roots of the plant.
Briquettes for ignition
Another interesting use of toilet paper rolls - briquettes for ignition - will appeal to those who have to light stoves or light fires from time to time. To make briquettes you will need toilet paper rolls and any material that can be used for kindling. These can be either well-dried twigs or anything that is suitable at hand: paper, dry grass, seed husks, bark, nut shells. The main thing is that this filler flares up easily.
Take the sleeve and fill it with the prepared material. You shouldn't push it too tightly, because... “firewood” will burn poorly. After this, use an awl to make several holes in the cylinder from different sides. Thanks to them, air access will improve, which will make combustion more energetic. To ignite, it will be enough to place just a few briquettes prepared from bushings on top of the firewood.
Now you don’t have to rack your brains about how to light the stove or fireplace.
Required Tools
To work you will need:
- a pack of paper towels;
- PVA glue;
- acrylic paints;
- frame;
- hot glue;
- decor (buttons, ribbons, bows, pebbles).
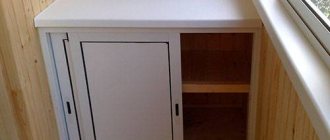
Any box will do as a frame. If you don’t have anything suitable at hand, you can make it yourself, for example, from cardboard. To make the finished product look beautiful, you should cover the box with paper towels.
There is no need to worry about the towels crumpling - after painting, the product will look very impressive.
Wire organizer
Every year there is more and more equipment in the house, and with it the number of different cords that come with it is growing. Tangled with each other, lying here and there, endlessly disappearing - this is a constant headache for their owners. How to organize eternal chaos? The answer is obvious - using toilet paper rolls.
Take any box that is approximately equal in height to the bushing. Place as many bushings in it vertically as it can accommodate. Now it's time to work with the wires. Take the cord in your hand and carefully fold it so many times that it becomes the size of the grommet. Place it in the first cell. Continue this way until all your cords are neatly arranged in their places. To prevent the bushings from moving inside the box, glue them together. If you wish, you can then glue the entire structure to the bottom of the container - then it will become even more stable.
You can make a vertical wire rack in a similar way. To do this, place the bushings glued together not in a box, but, for example, on a shelf - this way the cords from the equipment will always be in front of your eyes.
Unusual uses for paper towels
It would seem that all the options for using paper towels have long been known - they can be used to blot moisture from hands or food, wipe spilled coffee from the table and... and, perhaps, that’s all. But human imagination has made it possible to expand the range of applications of these products.
Interesting ideas: use in the kitchen
Most often, filters for coffee makers are replaced with towels - this becomes possible because the paper from which they are made allows water to pass through without getting wet or falling apart. Simply place a towel in the container through which the coffee passes, and the output will be a clean drink without any leftover coffee beans.
Also, paper towels will come in handy in the following cases:
- when storing greens and lettuce - to keep them fresh longer, you need to wrap them in damp paper and place them in the refrigerator;
- when cooking asparagus in the microwave, to prevent it from turning out dry or rubbery, you should wrap the stems in several layers of towels soaked in water;
- when softening lump cane sugar - if it has dried out and turned into a kind of stone, just put the pieces in a glass container, cover with a damp towel and place in the microwave for 30 seconds.
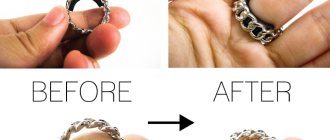
Beauty: curls without a curling iron
Using paper towels, you can curl your hair without damaging it at all. Those who are afraid to often use curling irons or curlers will undoubtedly like this method.
To get beautiful curls, you need:
- Wash your hair and dry it, but not completely, but so that it remains slightly damp.
- Divide the hair along the central parting into two equal parts, and then each of these parts into three more. Secure with rubber bands or bobby pins.
- Unwind several towels from the roll without separating them. The length of the paper “tape” should be equal to the length of the hair plus five centimeters. To get larger curls, the number of towels needs to be doubled, and for those with very thick and thick hair, the number of towels should be tripled. A total of six such blanks will be needed.
- Take one part of the hair (the one closest to the forehead - it doesn’t matter whether it’s right or left). Comb and divide into two equal strands. Next, take a “ribbon” of towels and crumple it along the width, so that the result is a long strip. If it is double or triple, it should first be folded in two or three layers along its length.
- After this, it’s time to start cheating. A paper strip should be placed between two strands so that its end protrudes upward by 2–3 cm. Wrap one of the strands around the strip, then the second, but in the opposite direction. For example, if the first strand was turned clockwise, then the second should be moved counterclockwise. This action must be repeated until the entire length of the strands is wrapped around the towel. Wrap the rest of the paper around the curled hair in the form of a skirt and secure with an elastic band.
- Starting from point No. 4, repeat the steps with other parts of the hair.
We recommend: How and with what can you quickly wash your hands from traces of green walnuts?
Curls will form when the hair is completely dry. This can happen either naturally (in this case it is more convenient to curl at night) or with the help of a hairdryer (then everything will take no more than 10–15 minutes, but after drying with hot air you need to give the hair a chance to cool and only then untwist the curls).
Crafts: basket for candies, jewelry or cosmetics
Paper towels are a cheap and multifunctional material from which you can make various crafts.
The easiest way is to make a basket for storing small items. The following will be used in the work:
- any quick-drying transparent glue, as well as PVA;
- two round tassels;
- deep bowl or flower pot;
- spray bottle with water;
- cling film;
- towels
Before you start making the basket, you need to prepare paper strands. To do this, two towels are torn from the roll, leaving them connected to each other, moistened with a spray bottle, crumpled lengthwise into a thin strip, which is twisted into a rope. The number of strands required to complete the job depends on the size of the plate that was chosen as the base.
Step-by-step instruction:
- The bowl or flower pot is turned upside down and covered with cling film.
- The tourniquet begins to be twisted in a spiral so that the center of the circle coincides with the central point of the bottom. When one harness ends, another is connected to it, coating the joints with PVA glue. The work continues until the entire area of the base object is wrapped with plaits.
- To prevent the structure from falling apart, fill the gaps between the strands with PVA glue and spread it with a brush, after which the basket is left to dry.
- When the outer layer of glue has dried, remove the basket from the base, remove the film and coat the inside with PVA. The inner layer should also be allowed to absorb into the paper and dry.
- You can make a lid for the basket in a similar way.
We recommend: Making a bath mat with your own hands
The finished basket can be decorated with napkins with a beautiful pattern. To do this, the layer with pictures is separated from the napkin and placed on top of the glue at the stage of application to the outer part of the product. Immediately after this, the napkin is smoothed with a clean brush dipped in water, and after drying, it is varnished.
Another option for decorating a basket is to paint it with stain after the PVA has dried, leave it to dry and varnish it. This will give it a similarity to products made from wicker.
Cache for valuables
Do you have money, but don't have a safe place to store it? In this situation, what will help again is what remains after using toilet paper - the sleeve.
To make an inconspicuous storage unit for your valuables you will need:
- toilet paper roll;
- glass jar with screw cap;
- grain or any inconspicuous cereal.
Take a glass jar. It is desirable that it be equal in height to the bushing. Place it inside and carefully pour grain or cereal into the space between the walls of the jar and the sleeve. When the jar is filled to the top, the sleeve will be completely hidden behind the layer of grain. Now place your savings inside the sleeve and screw the lid on tightly. You can place the cache in the most visible place. Rest assured: even the most cunning and hungry thieves will not be interested in a can of cereal.
What can be made from bushings from wipers?
Attention! The rolls left over from paper towels are twice as large as those from toilet paper, so they can be reused to create other healthy and interesting things.
For example, from this material you can create an original and convenient pencil case for a schoolchild.
It's easy to make a panel from toilet paper rolls with your own hands
For this craft from paper wiper rolls, in addition to the main material, you will need fabric, thread, scissors, a zipper and very good glue. First of all, you need to measure everything clearly. We cut off spheres about 3 cm from the sleeve. Next you need to sew the cover. To do this, we sew a pipe from the selected material, sewn at the bottom, which should completely accommodate the sleeve. At the point where the piece of roll was cut off, you need to make an incision in the fabric and sew a zipper into it.
A garland of toilet paper rolls will decorate your wall
The cut point must be firmly secured with glue in those places where the zipper will leak, so that the sleeve does not come out through the hole every time the pencil case is opened. It turns out to be a very useful thing in which you can store stationery, drawing pens, etc.
You can use toilet paper rolls to make a painting with paints.
You can also make a cat toy from paper towel rolls. To do this, you need to glue various threads, feathers, bows on strings, etc. to it with high-quality glue. A strong rope is then threaded through the sleeve to hold the entire toy in place. It can be secured, for example, under a table. The cat will be interested in rolling his toy with his paw. But you need to glue everything carefully, since cats have very sharp claws. The sleeve can first be wrapped with a strong rope, on which the animal can sharpen its claws.
You can make a one-piece puppet theater from toilet paper rolls
A lamp is a rather original craft made from paper rolls from cleaning utensils. But for this work you need to be patient and very sharp scissors. To begin with, a drawing is applied to the surface of the bushing, a sample, wood, or a more complex composition. The main thing is that it does not consist of very large elements, since too much light will shine through them.
Using bushings you can decorate the wall with various figures
Next you need to very carefully cut everything out using scissors or a breadboard knife. After this, the lampshade is placed on an energy-saving light bulb. It turns out very beautiful if you create a whole composition in this way. Shadows on the walls will look especially fascinating.
You can grow seedlings in the bushes
Organizer for a young artist
If you are raising the future Picasso or Shishkin, then in the house there are probably tons of all kinds of pencils, felt-tip pens, brushes, markers, etc. necessary things. They are all different heights, which makes purchasing an organizer difficult. This means that you need to build an exclusive structure that will definitely meet your needs.
You will need:
- toilet paper and paper towel rolls in the required quantity;
- plywood or corrugated cardboard for the base;
- glue for cardboard;
- materials for decorating the organizer.
First, decide on the number of bushings you will need and how you will decorate your structure. If you want to cover it with colored paper, fabric or decorate it, for example, with lace, then this must be done at the very beginning of work. If you plan to simply paint the organizer, then this can be left until the end.
Prepare the bushings of the required height and cut the stand to the required size. After this, you can proceed to connecting the bushings. Do the work in rows. First, glue together all the bushings of one row, then the second, then the third, etc. For work, you can use any glue that is suitable for cardboard. After complete drying, the rows need to be secured on a stand.
First, wait until one row is completely glued, and only then proceed to the next one. To glue a row of grommets to a stand, apply a generous amount of glue to the bottom of each grommet and the area on the stand where you will attach them. After installing the cylinders, place a book or other heavy object on them so that they are pressed as tightly as possible to the stand. Leave in this position until completely dry.
Do the same with all rows. When gluing the 2nd and subsequent rows, apply glue not only to the bottom, but also to the side surfaces of the cylinders in order to more reliably connect them with the previous row. After complete drying, the organizer is ready for use.
Childish crafts from bushings
Attention! Toilet paper rolls are an excellent material for creating children's toys.
Toilet paper rolls will be an excellent material for creating children's toys.
Working with cardboard rolls is very simple, but you will definitely need scissors and glue, so the entire process of creating toys should take place exclusively under the supervision of adults. To work, you need to stock up on colored paper, glue, scissors and, in fact, the bushings themselves.
To make crafts from bushings you will need glue and paints.
There can be a lot of ideas for making children's crafts from toilet paper rolls, but it is better to start with simple options. For example, you can invite your child to make a racing car with his own hands. To do this, take a cardboard sleeve and cut out a small oval on one side of it, which will be a place for the pilot of the car. After this, the hub can be painted in the desired colors, not forgetting to show the car number, because we are talking about racing.
It's very easy to make a racing car from bushings.
Next, cut out 4 mediocre circles from black colored paper, approximately the size of the diameter of the sleeve. You will also need 2 small gold circles, which will symbolize the headlights. We glue the black wheels and headlights onto their spots and wait for the racing car to dry completely. You can make 5 or 6 of these machines to organize real competitions.
You can make a lot of other equipment from toilet paper rolls. These could be airplanes, rockets, etc.
It’s easier to make animals from paper tubes
In addition, the material of this image makes simply excellent little animals. You can make a whole puppet arena out of them. There is nothing easier than making a hare, bear or fox from a cardboard roll. To do this, the base must be painted in a suitable color, and then parts cut out of colored paper (ears, tails and eyes) must be glued to it.
A train made from bushings will amuse children
For Easter you can make a themed craft from a sleeve. To do this we only need 1 roll, paint, colored paper and glue. From half a sheet of colored paper, cut out an oval and make cuts along its edges to make a fringe. Then we cut the sleeve at one point lengthwise. On the side opposite to this cut we make 2 small cuts. We paint everything gold and glue the sleeve to the base so that the edges of the cut diverge by a centimeter.
Step-by-step process for making chicken from a toilet paper roll
After this, you need to cut out the head with neck, wings and tail of the bird from double-sided colored paper. The head and tail must be inserted into the cuts prepared in advance. They should just be at the top. We glue the wings on the sides, draw the beak and eyes. It turns out that the chicken is sitting in a nest of hay. This sleeve craft will be relevant not only for Easter, but also for the New Year, which this time will be the Year of the Rooster.
How to quickly wind yarn on a toilet paper roll
Every knitter knows what a long and tedious process it is to wind yarn into balls. It’s hard to believe, but in this case, toilet paper rolls will come to the rescue.
Take a mixer and attach one cocktail attachment to it. Place the bushing on it. On the outer part, use scissors to make a small - 1-1.5 cm - incision into which secure the tip of the yarn. Use your hands to make a few turns around the sleeve (first check which way the attachment will turn).
Turn on the mixer. The yarn will begin to wrap itself around the hub. All you have to do is guide it slightly with your hands. Be careful not to put your hands too close to the nozzle to avoid injury.
Everything ingenious is simple. But sometimes it’s ideas like these that can make our lives a lot easier.
Making a dragon figurine from a toilet roll
Children who are interested in the theme of magical creatures from fairy tales will surely love the idea of having such a dragon at home. It’s not at all difficult to make; you don’t need any special materials:
- Once again, the main tool is the toilet paper roll.
- Thick green cardboard.
- Colored paper: green and yellow sheets.
- A standard set for making original crafts with your own hands from paper: scissors, glue, a black felt-tip pen and a simple pencil.
Making a dragon from a bushing step by step:
- We cut a square from green paper, the dimensions of which will be comparable to the dimensions of the sleeve in height and volume.
- Glue the cut rectangle onto the sleeve roll.
- We draw and cut out paws for our wonderful dragon. We will have them in the form of elongated triangles, the corners of which will be rounded.
- Let's also prepare two triangles for the dragon's nose, only small ones.
- We cut out two pairs of eyes from yellow paper in the form of semicircles.
- We make the wings of the dragon into one piece. You can make them by placing the sleeve on a sheet of paper, and then completing the wings. Let's cut them out!
- From green thick cardboard we cut out the faces of a two-headed dragon. Be sure to use thick cardboard!
- We connect everything together using a glue stick. Using a felt-tip pen, we add the pupils of the dragon’s eyes, nostrils on his nose, and of course a smile. After all, our dragon is kind and not at all scary!
Using these and many other ideas, you can show your child a good example of the artistic use of the most ordinary objects. In addition to having a great time, your baby will have the opportunity to please his loved ones with original gifts for the holidays. By making a figurine from a sleeve, using our instructions, or working with photographs from the Internet, your child will be able to find many ideas for his creative expression.