For compact and convenient placement of washed laundry, the Liana ceiling dryer is very helpful. The simple, convenient, lightweight design of this dryer allows you to hang it in any suitable room. Thanks to the well-thought-out layout of the control elements, drying clothes will be accessible even to children.
The ceiling dryer "Liana" has a simple, convenient, lightweight design.
Installing “Liana” on the balcony is not a complicated procedure at all, but still some points should be taken into account in advance, so that later you do not have to carry out the installation again.
In order to hang the dryer, prepare the necessary tools: a pencil, a tape measure, a drill, a screwdriver, and a sufficient number of reliable dowels.
Features of the Liana dryer
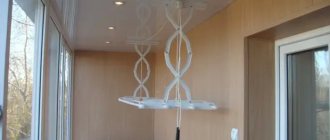
Regardless of the type of model, the main part of the dryer is attached to the ceiling, and the adjusting part is attached to the wall. Reliability, practicality and strength are determined by the material from which it is made, but regardless of this, its service life ranges from 5 to 10 years.
Dryer device
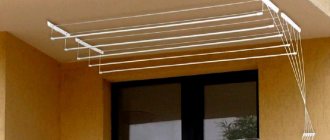
The product is shaped like a frame, which consists of connected tubes. The height of the parts is adjusted on the block; it is attached to the wall in a free form.
The dimensions of the tubes depend on the type of model and can vary from 50 cm to 2 m. They are located at different heights, which helps to quickly dry the laundry.
Both the main structure and its regulation system can be installed at any height. This allows people of any height to use the dryer.
Advantages and disadvantages of the design
The ceiling dryer helps clothes dry quickly, is compact and roomy. In addition, “Liana” has a number of other advantages:
- Affordable price.
- Mobility.
- Ease of installation.
- Classic design.
- Small but detailed instructions for installing the dryer.
- The need for a minimum number of tools.
- Installed on a ceiling made of any material.
- There are no time restrictions on the period of use.
The tubes can hold up to 15 kg of laundry, but the weight depends on the material from which it is made. This product has few disadvantages: installation of dryers (causes difficulties for the fair half) and a ban on attachment to suspended and suspended ceilings.
Price
The big advantage of this brand's design is its cost. The amount depends on the type of model, configuration and material from which it is made. The minimum price for a dryer is 355 RUR.
Advantages
The reliability of ceiling dryers has been tested by time, since many have been using them for more than 20 years. What do housewives like about vines? First of all, compactness. Even the largest dryer in the folded position takes up virtually no space on the balcony or loggia, does not clutter it up and does not spoil the interior. The metal parts are painted white, the products have a modern design and do not stand out against the background of the ceiling. The only detail visible is the ropes assembled in the holder.
The dryer is convenient to use: to hang things, you don’t need to climb onto a chair and reach the ropes with your hands. They easily fall down, after which, together with the laundry, they rise again to the ceiling and are fixed at the desired height. Removing dried items from the crossbars is also easy.
Another advantage is that round rods are used for hanging laundry. Because they are made from metal or plastic hollow tubes, their diameter is much larger than the thickest ropes. Thanks to this, there are no traces of ropes left on things, and in some cases you can do without ironing.
Product installation instructions
The correct choice of model is a guarantee of accurate fastening of the structure. When purchasing a product, you should pay attention to:
- Dimensions of the place where the item will be installed.
- The amount of laundry that can be hung on tubes.
- Material. It is best to choose steel fasteners. Their use guarantees the absence of possible staining of the laundry.
- It is better to purchase products made domestically or in Europe. Constructions in other countries are made from low-quality materials and will not last.
If you adhere to all the rules described above when choosing a product, then you can assemble the dryer without any difficulties.
Choosing a mounting location
The ceiling device, depending on the type of model, has a different type of fastening and size. These features are taken into account to ensure that the design fits seamlessly into the interior.
The quality of installation of the product is influenced by the design features of the room and the size of the room. Mandatory conditions for installing dryers:
- presence of sunlight;
- warm air;
- good ventilation.
After installation, the structure should not touch the heads of residents. Windows and doors that are located near the device must open and close without any obstructions. “Liana” is suitable for drying clothes on the balcony, kitchen or loggia.
Required Tools
Installing dryers requires the availability of tools that will help with accurate measurements, high-quality drilling, easy tightening and correct adjustment of rope tension. Experts include the following products in these parameters:
- perforator;
- Boer;
- screws and dowels;
- screwdrivers of various sizes;
- hammer;
- roulette;
- felt-tip pen.
It is better to apply marks with a marker or felt-tip pen; with a pencil they may be invisible. Experts do not recommend using a drill. While working with it, the holes may come out larger than the required size.
Equipment
The constituent elements must be studied before assembling the clothes dryer; the ceiling installation is distinguished by a minimum number of them, the total number of which depends on the type of model:
- 2 brackets;
- ropes;
- tubes;
- control side panel;
- caps.
The components of each kit are described on the product packaging. Before purchasing it, you need to check the contents for all parts.
Installation of the structure
First you need to remove all dirt from the surface on which the product will be attached. After this, prepare the necessary tools and remove the device from the packaging. Step-by-step assembly of the liana dryer looks like this:
- Make notes with a marker in the places where the brackets will be located. There should be the same number of centimeters between them as the tubes have.
- Drill holes in the required places.
- Secure the supporting parts with the rollers.
- Close them with special plugs (caps).
- Attach the fixing brackets in the same exact way. The arrangement of parts is chosen arbitrarily.
- Pull the ropes through the supporting parts and secure them with caps.
After the procedure, the required height of the device is adjusted and tested. The maximum amount of laundry should be placed on the rods. If the structure has withstood the required weight, then the installation of the Liana dryer was successful and you can begin to use it for its intended purpose.
Conclusion
"Liana" is practical in all respects. Being a separate structure, it does not take up space. Even with hanging laundry, it does not interfere with the owners’ ability to move freely around the balcony. Linen dries faster on Liana. The aesthetics of the house facade are not spoiled. From inside the apartment, the hanging laundry is also not particularly noticeable.
We recommend:
- How to remove scratches, chips, cuts from kitchen...
- DIY furniture made from pallets step by step, photos,…
- How to organize space in a closet: useful...
- Where and how to properly store a hair dryer and curling iron in the bathroom? |…
- Do-it-yourself bed with a lifting mechanism:…
- Do-it-yourself vegetable garden on the balcony: how to arrange it and what to plant
Related posts:
- How to decorate an empty wall in a room
- Bright room: choice of colors and furniture, photos of interior examples
- Stretch ceilings: photo for the hall, two-level options in the interior of the room
- Apartment interiors in a modern style: beautiful renovation design, real photos
- Design of a small apartment: interior solutions and ideas for modern renovations with photos
- Wicker furniture simple master classes
- Bed built into a closet, pros and cons, types and their characteristics
- Blue sofa in the living room interior - color psychology and beautiful combinations
Common mistakes when installing a dryer
Errors during installation of the product can lead to deformation of its parts. Avoiding possible errors that occur during installation will help to properly prepare the product for work:
- Not very thorough measurement of the required parameters. Incorrect measurements will result in too strong or, conversely, weak tension on the rods.
- Failure to comply with the diameter of the hole and fasteners. The parts must be exactly the same diameter as the drill; when installing the product, they must be completely adjacent to the wall of the hole, otherwise it will not be possible to hang the ceiling dryer correctly.
- Use of dowel nails. These fastening elements are unreliable and the structure may collapse after the first use.
If all of the above points are observed, the installation of a ceiling-mounted clothes dryer will follow all the rules and will not cause any inconvenience.
Video
After watching the video, you will become familiar with the procedure for installing a ceiling dryer-liana on the balcony:
Electronic engineer with many years of experience. For several years he was involved in organizing the repair of household appliances, including washing machines. Loves sport fishing, water tourism and travel.
Found a mistake? Select it and click the buttons:
The expression “soap opera” (“soap”) did not arise by chance. The very first series and shows that had a female audience were broadcast on television at a time when housewives did cleaning, ironing and laundry. In addition, to attract female viewers to the screens, commercials for detergents: soaps and powders were often played on air.
In the 19th century, washing ladies' toilets took a lot of time. The dresses were first ripped open, and then each part was washed and dried separately so that the fabric did not become deformed. After washing, the clothes were sewn again.
Washing machines equipped with the “No Iron” or “Easy Iron” functions can wash clothes with little to no wrinkling. This effect is achieved through a special approach to spinning - it is performed at low speeds, with long pauses, and a small amount of water is retained in the tank.
The first officially patented washing machine was made of wood and was a box with a frame, half filled with wooden balls. Laundry for washing and detergent were loaded inside and the frame was moved using a lever, which, in turn, made the balls move and grind the laundry.
For washing small items on the road or in a hotel, it is convenient to use a regular plastic bag. Socks or tights are kneaded inside a tied bag along with water and a small amount of detergent. This method allows you to pre-soak things and wash them without damaging the fabric or wasting a lot of powder and water.
Astronauts, while in Earth orbit, solve the problem of dirty things using an original method. Clothes are dropped from the spacecraft and burn up in the upper atmosphere.
There is a washing machine “for bachelors”. Linen washed in such a unit does not need to be ironed at all! The thing is that the device does not have a drum: some things can be placed inside the container directly on hangers (for example, jackets and shirts), and smaller things (for example, underwear and socks) can be placed on special shelves.
Washing machines have something to do with the origin of the expression “money laundering.” In the 1930s, American gangsters used a network of laundries as a cover for their illegal activities. By passing off the proceeds of crime as proceeds from cleaning clothes, they turned “dirty” money into “clean” money.
History knows the fact that a kitten fell into the drum of a washing machine and, after going through a full wash cycle on the “Wool” program, got out of the unit unharmed. The only trouble for the pet was an allergy to washing powder.
Source
Operating rules
The lifespan of the dryer will help prolong its proper use. Experts recommend regularly using the following tips:
- In a timely manner, monitor fraying cords and wear of other parts.
- Wipe plastic tubes after each use of the dryer.
- As the bracket or gear wears out, replace the parts with new ones in a timely manner.
Creaking of the rods can be avoided if you regularly lubricate them with technical oil. You can replace gears and other similar parts yourself. The necessary components are sold in any specialized store.