How to glue correctly at home
Difficulty in gluing a toilet cistern arises due to the fact that cracks and chips on the surface of earthenware and porcelain do not have a smooth texture. Because of this, the adhesive composition holds the parts of the broken device together less well. Therefore, this procedure often has to be carried out two or more times.
What you will need
To glue porcelain and earthenware products you will need:
- fine sandpaper;
- acetone (gasoline), which is needed to remove grease from the toilet;
- glue;
- scotch.
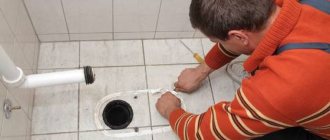
You will also need wipes to remove excess adhesive. Before you begin gluing, you must turn off the water supply and drain the tank.
Surface preparation
The procedure for preparing the surface for restoration work depends on the nature of the defect. This procedure will require more effort for deep cracks that run on both sides of the tank.
Unilateral damage
In case of one-sided damage, the cracks must first be cleaned of dirt (a brush with stiff bristles is suitable for this), and then wiped of grease using acetone or gasoline. Similar actions need to be carried out in relation to the breakaway part.
Bilateral cracks
Before you start cleaning the surface and gluing the tank, it is recommended to use a thin ceramic drill to make a hole at the end of the crack. This is necessary in order to prevent further divergence of the defect and splitting of the plumbing fixtures. Then you need to use a grinder to widen the crack and process the internal surfaces according to the described algorithm. Subsequently, the damaged area is repaired using two-component epoxy resin.
Bonding technology
The procedure for gluing earthenware and porcelain cutlery depends on the size of the defect. The algorithm within which this procedure is carried out is the same for all formulations used.
Universal waterproof adhesive
Adhesive compositions of this type are recommended to be used to eliminate defects in places that are not constantly in contact with water:
- the junction of the tank and the bowl;
- toilet rim;
- the outer side of the tank and others.
The gluing of the tank is carried out in three stages. First, debris and other foreign particles are removed. Then the material is cleaned of fat. And after that, glue is applied and the broken fragment is pressed. The period during which the material must be held is indicated in the instructions for the glue.
This method is suitable for restoring those parts of the toilet cistern that are not subject to increased stress.
Epoxy resin
Epoxy resin is used to seal one-sided cracks. This product removes defects better than all-purpose glue. To restore a damaged tank, you need to mix the two components of this product (hardener and resin) and apply it to the problem area. After this, you need to press the gluing area. In this case, any means will do, including tape. After the resin has hardened, it is recommended to clean the gluing area using fine sandpaper and felt.
Silicone sealant or liquid welding
Both products are suitable for repairing small cracks and gluing broken fragments. Surface preparation for this case is carried out according to a similar algorithm. If a sealant is used, then you first need to saturate the surfaces with silicone, removing the excess with a spatula, and then walk with a soapy hand, thereby smoothing the composition. This restoration option is convenient in that the tank can be used 20 minutes after completion of the manipulations.
Liquid welding gives the same result as sealant. This product must first be rolled out in your hands and then applied to problem areas, compacting it into the cracks. After the four hours required for the paste to harden, you need to sand the surface with sandpaper.
Final finishing
It is recommended to treat the surface with fine-grained sandpaper in each of the above cases. If the crack was large, then after sealing the gluing area should be painted over in the appropriate color. Otherwise, the area where the defect was located will stand out against the background of the rest of the tank.
It is recommended to seal the internal seam with tiled grout.
The main causes of cracks in the toilet tank
Plumbers identify three common causes of damage to toilet cisterns;
- mechanical impact;
- installation errors;
- temperature changes.
Toilets are made mainly from earthenware or porcelain. Both materials have increased maintenance requirements. Therefore, regardless of operating conditions, toilets begin to leak over time. In some cases, it is impossible to eliminate defects using the methods described. This, in particular, applies to large fractures in the base of the bowl.
The last plumbing defect is not recommended to be eliminated using improvised means. In this case, you should replace the broken toilet with a new one.
Mechanical influences
Chips, cracks and other damage to the toilet occur when any dense object falls onto the plumbing fixture from a sufficient height. Often, defects arise from even a bottle of shaving foam hitting earthenware or porcelain. In this regard, it is recommended to install cabinets in which household chemicals and other items are stored, if possible, away from the toilet.
Temperature difference
Cold water is used to flush the toilet. This choice is due to several reasons (including saving on utility costs). When exposed to hot water, earthenware and porcelain begin to expand. Moreover, this process occurs only in a certain zone. Due to uneven expansion, stress occurs within the material, resulting in cracks.
Installation defects
When tightening the bolts holding both the toilet and individual parts of the plumbing, it is not recommended to use excessive force. Because of this (against the background of increased pressure exerted by the fastening element), tension also arises inside the material, as a result of which porcelain and earthenware become covered with cracks.
See also
Reasons why a washing machine does not wash well, how to check the water quality
Glue selection
The product that will be used to solve the problem with the toilet must have good adhesive strength. Therefore, preference should be given only to special mixtures, avoiding simple universal options that will quickly lose the stability of the compound when exposed to water. Perfect for this:
- glue (waterproof, silicate);
- cold welding;
- sealant (waterproof);
- epoxy resin with hardener;
- liquid Nails.
The products have similar properties, and some of them even have slightly similar composition. The last option differs most in terms of effectiveness - liquid nails will only help glue the toilet tank lid. They do not give the desired effect when gluing frequently used elements under high pressure.
It is recommended to purchase gluing products from trusted manufacturers who have managed to prove their reliability by producing high-quality products. It is recommended to buy one of the following brands:
- "Rapid";
- "Mars";
- "Moment Epoxylin";
- "Unicum";
- MC-1;
- BF-2;
- EDP;
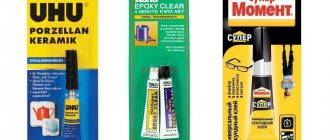
- UHU Porzellan;
- EpoxyMax;
- Bliz Steel;
- "Poxipol";
- "Almaz-press".
If it is not possible to purchase glue for a broken toilet, you can prepare a special mixture for gluing yourself. This requires a few specific ingredients. However, the final result will not be worse. There are 3 main options for homemade solution:
- Mix borax, water and casein in a ratio of 1:2:10, add a couple of drops of formalin or aluminum alum, mix thoroughly. The mixture sets within two hours.
- Pour turpentine and light shellac into one container in a ratio of 1:2, put on fire. After melting, you need to mix everything well. When hardened, the mixture can be reheated before gluing.
- Mix chalk, quicklime and liquid glass in a ratio of 10:1:2.5. The mixture must be prepared immediately before installation, as it hardens quickly.
There are other folk recipes, one of which even uses crushed glass.
How to repair a crack in a toilet?
The plumbing fixtures seem to be very reliable and nothing can damage them. But in fact, its strength is quite comparable to the fragility of porcelain cups. And any “disrespectful” attitude towards the toilet can lead to the appearance of unpleasant chips and cracks on its surface. Depending on the extent of the damage, the owner either repairs the toilet cracks or replaces the equipment with new ones. If everything is very clear with the second option, then the first can seriously puzzle the owner of the house, because not everyone knows how to repair a crack in the toilet.
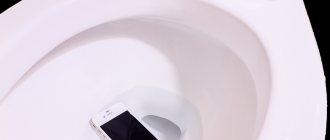
Photo 1. Crack in the toilet base.
Causes of cracks in the toilet
The most common reasons for the formation of all kinds of cracks and chips in earthenware include:
- In all multi-storey buildings and in modern apartments, the bathrooms are quite small, so to make the most efficient use of space, many people hang shelves and nightstands above the toilet. When you need to get some household chemicals or cosmetics, very often it all falls from a height into the toilet, and cracks immediately form.
Cracks in the toilet bowl
These are the most common reasons why cracks occur. Now let's figure out how these troubles can be avoided.
What is needed for repair
The selection of adhesive for the toilet is a crucial moment on which the strength of the seam and the further use of plumbing depend.
How to choose glue
It is possible to glue the surface so that the seam is invisible. Silicate glue is often used, as it is resistant to water, temperature changes, has a long service life, and prevents the spread of fire.
To secure the seam, you can resort to using liquid nails. Ready-made adhesive mixtures are also purchased:
- BF-2 is a viscous reddish liquid containing an alcohol solution of polyvinyl acetate with a resin complex. Waterproof, does not form fungus or mold on the surface. The composition is flammable, for this reason it is necessary to operate away from direct flames and heat devices, in a thoroughly ventilated area. Bonds ceramics, glass, plastic, etc.
- Unicum is a one-component adhesive containing rubber and reinforcing additives. Scope of application: gluing ceramics, glass, leather, rubber, etc. viscous mass of beige color. The seam can withstand temperature changes from –40 to 70 degrees. Method of application: the surface of the toilet bowl is cleaned, the glue is applied in a thin layer, after 10 minutes a second layer is applied, after 10 minutes press the surfaces to be glued. The product is put into operation within half a day. The operating temperature should not be less than 10 degrees. The mixture is flammable, for this reason it is necessary to operate away from direct flames, heat devices, and in a thoroughly ventilated area.
- Rapid is an adhesive in the form of a solution of nitrocellulose with resins and organic diluents. Used for gluing leather, wood, porcelain. During operation, the planes are degreased, dried, a layer of glue is applied and dries for up to 20 minutes, after which a second layer is applied, the planes are pressed firmly and secured. Complete drying is achieved after two days.
Homemade adhesive composition
For the purpose of gluing a toilet bowl or toilet cistern, an adhesive mass is made independently. To do this you need to follow these recipes:
- Durable, but not easy to use, proportions: one part of crushed glass, two parts of sand (pre-sifted), six parts of sodium silicate.
- Durable, but hardens quickly, for this reason it is prepared directly before use, applied to cleaned surfaces: one part lime, ten parts chalk, two and a half parts sodium silicate.
- Glue mixture: one part turpentine, two parts shellac. Mix well, melt over low heat, cool. The mass is divided into parts. Melts before use. Apply a thin layer to the prepared surfaces, press tightly and fix. If excess mixture appears through a seam, it must be wiped off immediately.
- Gypsum composition: gypsum is soaked in alum for 24 hours. Afterwards it is dried, calcined, and crushed. To prepare the glue, the dry mixture is diluted with clean water until a creamy mass is formed.
Preparation of glue
If you need to glue a toilet bowl, you don’t have to buy glue in hardware stores and prepare it yourself. In this regard, you can use different recipes. A fairly strong composition, but difficult to use, can be prepared by taking one part of crushed glass, two of sand and six of sodium silicate.
A durable composition is one that is prepared from such components as one part lime, ten chalk, two and a half sodium silicate. The composition turns out to be quite durable. The only thing is that it hardens quickly, so it only needs to be prepared just before use. The mixture should be applied exclusively to a cleaned surface.
You can get the result by preparing a composition based on one part turpentine and two shellac. All these components must be thoroughly mixed, melted over low heat and cooled. The prepared mass must be divided into two parts. To use it, it must be melted. The composition must be applied in a thin layer to the prepared surfaces and pressed firmly. If excess mixture appears through the seam, you need to wipe it off immediately.
To reliably glue the toilet, you can prepare a gypsum composition. For this purpose, gypsum should be soaked in alum for 24 hours. After this, it needs to be dried, pierced and detailed. To prepare the glue, you need to dilute the dry mixture with water.
Bonding plumbing fixtures
Repair work involving gluing plumbing fixtures is simple. In this case, you must do everything carefully. It is not difficult to notice a crack on a toilet bowl. Damage appears on the tank due to mechanical stress. Some of the most dangerous damage is at the base of the toilet. Damage of this nature can increase, making it difficult to repair. The crack must be repaired immediately to extend the service life of the plumbing fixtures. If you follow all the rules of the experts, you can achieve success.
Subtleties of preparing the surface of the toilet
The first step is to start cleaning. The chip must be cleaned thoroughly and carefully. The work is carried out using sanding paper. After this, the surface must be thoroughly wiped to get rid of small particles. Degreasing allows the glue to adhere well to the material. In this regard, gasoline and acetone are suitable. You also need to evaporate moisture from the surface of the plumbing and warm it with a hairdryer. Preparation is the best option if the cracks are simple in shape.
In the case where the damage has a complex fault topography, a different procedure must be followed. In this regard, repair work requires the need to strongly trim the bulges
Plumbers warn that fractures of this shape must be handled with caution. Small debris should be blown out with a hairdryer
After this, the surface must be degreased and dried.
Seam gluing procedure
You can understand the procedure by studying the user manual that comes with the glue. If you follow the recommendations written in it, you can do everything correctly. Basically, the procedure is identical, it involves applying glue to the surface of the toilet and after it dries. Having completed everything, you need to firmly press the elements together. The result is affected by the compression force. This must be done as strongly as possible to achieve maximum seam strength. The use of an elastic tight tourniquet or clamp will help in this matter.
Final finishing procedure
Plumbers have determined an algorithm for performing work regarding the seam located inside the plumbing. In this regard, strengthening is a prerequisite. The dried seam must be cleaned using sandpaper. You need to degrease well and dry with a hairdryer. After completing this work, it is necessary to coat the seam with glue. The reinforcement is a padded strip of soft metal or thin plastic. After this, you need to thoroughly dry the area that was to be glued.
If the damage was outside, it should be treated with grout. Builders advise using grout designed for tile joints. If this is not available, then you can alternatively use a solution that contains epoxy resin. The compositions are available for sale in different shades, so you need to choose the most appropriate tone in relation to the product.
Where do cracks mainly form on the toilet?
If you don’t yet know how to repair a cracked toilet, don’t despair and don’t immediately run to the shops to buy new earthenware. The gluing procedure is simple, you can do it yourself.
First of all, you need to determine the location of the damage. Most often, cracks form in three places:
Chip with cracks on the toilet
- On the toilet bowl, such cracks become immediately noticeable, and identifying the location of the leak is absolutely no problem.
- On the tank, the formation of such cracks is mainly associated with mechanical stress.
- Based on the toilet. These damages are the most dangerous; they occur after boiling water is poured into the toilet. Such cracks increase in size over time and are difficult to repair.
Having decided on the place where the crack formed and the leak appeared, we will figure out how to seal the crack on the toilet. This must be done as quickly as possible, this will help prevent water leakage and prevent the chip from becoming even larger.
Which glue to choose?
It is known from practice that to securely fasten ceramic fragments, you can use so-called liquid nails.
If you need to restore the drain tank, then the gluing technology is exactly the same. Sanitaryware and porcelain adhere well to ready-made compounds, which are freely sold in the retail chain.
Among them, we must mention the BF-2 glue, which has proven itself for a long time and has proven itself. The abbreviation BF stands for “butyralphenol”.
The numerical value indicates the percentage of polyvinyl buteral. The higher the number, the higher the elasticity of the adhesive joint. Therefore, BF-6 is not suitable for gluing a toilet bowl.
In order to glue a toilet bowl or cistern, you can use epoxy resin. It glues reliably, but handling it is not very convenient.
It is preferable to use Rapid or Unicum glue. Any of these compounds can also be used to glue the toilet seat together.
In the process of choosing an adhesive composition, each master has to rely on his own experience and advice from those closest to him.
Often you have to prepare such a composition yourself from individual components.
Using liquid nails, you can prepare a high-quality adhesive mixture by adding chalk and a little quicklime. At the same time, you need to know that this composition “sets” very quickly.
It is prepared immediately before gluing. During the gluing process, excess composition must be immediately removed using a rag or soft cloth.
As practice shows, cracks or chips on the toilet often occur. No one living in the apartment is insured against such a nuisance.
Video:
If the seat is cracked, it is easier to replace it than to glue it. The glued toilet will, of course, still serve for some time.
At the same time, we must remember that the restored plumbing fixture (including the tank) no longer has its original strength.
And after some time it will have to be replaced with a new one.
Precautionary measures
Plumbers note that the work associated with gluing is temporary. Repeated repair may cause further damage. The device must be handled with care, following certain rules.
It is better not to place shelves with objects above the toilet. This will prevent them from falling and being damaged. Construction tools must not be used near ceramics. In cases where this is necessary, precautions must be taken that involve covering the product with soft cloth in several layers. After installation work is completed, no additional fastening can be carried out. When assembling the product, be sure to loosely tighten the bolts. You also need to be careful to avoid possible distortions.
It is forbidden to pour boiling water into the toilet. This precaution will prevent the appearance of cracks inside the plumbing. You also need to make sure that the toilet lid is closed, which will prevent foreign objects from getting in. Following these rules will avoid possible damage to the toilet and extend its service life. If damage is detected, you can repair it yourself. Repair work must be carried out competently to prevent repeated damage. If you do everything following the recommendations, you can get the desired result.
Source
how to glue a toilet
Forum / Smoking room / how to glue a toilet bowl
Ask a question you are interested in on our forum without registration
and you will quickly receive an answer and advice from our specialists and forum visitors! Why are we so sure of this? Because we pay them for it!
Find out details
Velov
Rating: 19
September 10, 2016 at 11:15 pm I have experience gluing ceramics, in particular the broken base of a toilet in the area of the hole for its fastening, with ordinary construction mounting adhesive Moment. Sold in the same packaging as silicone sealant, for a mounting gun. The glue works effectively. I mounted the toilet on a glued ear and have been using the device for more than three years without any problems.vitas64
Rating: 85
September 11, 2016 at 7:21 am If a toilet bowl breaks, there are usually chips at the cracks, so in such cases I would advise using epoxy glue.
How to glue a toilet and a cistern
The choice of glue and gluing method depends on the location of the defect and its nature (one-sided or two-sided crack, complete chip).
If a fragment breaks off
When a fragment falls off the toilet, for example, a piece of the base, and its tightness is not affected, you can glue the element with universal mixtures. The fallen parts of the cistern (the fastening elements of the shelves or lid) are also attached. “Supermoment” made by Henkel or any other trustworthy company will do.
Gluing instructions:
- clean the chipped surface from dirt and dust crumbs;
- wait until the surface is completely dry;
- degrease it with gasoline or acetone;
- Apply a layer of glue and press the broken fragment. Fix in a stationary position for the time specified in the glue instructions.
If the crack is only on the outside
To seal a crack in a toilet that is only visible from the outside, or a broken cistern lid, use a two-part epoxy resin.
- Prepare both components of the product (resin, hardener) and a container for mixing them.
- Clean and thoroughly dry the surface you plan to seal.
- To seal the toilet tank, you must first turn off the water supply to it, install forced ventilation and remove all drops from the broken area.
- Degrease the surface.
- Mix the resin and hardener according to the instructions on the package.
- Apply the compound to the cracked surface.
- Fix the treated area using any available method. For example, tape or tape.
- After the resin has completely dried, the remaining seams can be carefully sanded, then the crack will become invisible. Use M20 or M40 sandpaper and then felt. Without sanding, dirt may collect in the bonding area.
If the crack is visible on both sides
With such damage, the tightness of the toilet bowl or cistern is compromised, so the adhesive seam must be waterproof and prevent the defect from spreading over a large area.
To repair a crack in a toilet cistern or a burst bowl, you will need:
- epoxy with hardener;
- drill with drill bit for ceramics;
- grinder with a disc for stone;
- sandpaper and felt for sanding seams.
The principle of gluing a double-sided crack will be as follows.
- At the ends of the cracks you need to drill two thin holes through. This will stop them spreading.
- Use a grinder to make a depression along the entire length of the crack, going halfway down the thickness of the earthenware. During operation, the material must not be allowed to overheat, otherwise the toilet may burst in another place. The side of the recess does not matter (inside or outside), because the crack will still remain noticeable.
- Carefully fill the prepared recess with the resin mixture. Remove excess resin immediately so that you have to sand the surface less later.
- Wait until the resin has completely hardened and sand the seams.
The process is well shown in the video.
If the toilet bursts at the base, then even a waterproof adhesive composition does not guarantee its tightness. It's better to replace it with a new one.
Regardless of the cause of the defects, the questions of what to do when the toilet tank is cracked, and what can be used to glue the damaged plumbing fixtures together, are resolved using a single algorithm
It is important to choose a product that can not only remove the defect, but also withstand constant contact with water. Both store-bought compositions and adhesive mixtures prepared at home are suitable for this purpose.
Causes of cracks and chips
- Falling weights. Often, wall cabinets are installed in small bathrooms for the convenience of users. They store household chemicals and other small items. There are cases when, due to negligence, the contents of cabinets fall onto the toilet bowl or tank, causing cracks, chips or complete damage.
- Strong temperature changes. When the bathroom is combined, the toilet is often exposed to temperature changes. The air in the bathroom heats up and cools down quickly, and internal tension arises inside the porcelain or earthenware. The consequence of this is uneven expansion of the material, it cracks and crumbles.
- Incorrect installation. Damage can be caused by over-tightening the bolts that secure the toilet to the floor. Do not allow strong distortions in the push, do not apply excessive force in the work.
Often toilets are made of porcelain or earthenware. Any overload or mechanical damage can cause cracks. Even dropping a bottle of detergent or a can of powder onto the ceramic bowl can cause harm.
Work order
For preliminary surface preparation you will need materials: sandpaper, clean rags, degreaser.
First, the breakage site is cleaned with sandpaper. Then wipe with a clean cloth and degrease. The solvent used as a degreaser is acetone.
The surface is dried with a hairdryer. One of the split parts is coated with glue and immediately pressed against the second with maximum force (but you need to feel the pressing force so that further cracking does not occur). The interlocking parts are fixed.
These steps are used for gluing small chips and cracks. If a split occurs inside the toilet, it is better to use epoxy resin for gluing.
If the fragments occurred on the tank, then they can be sealed in the same sequence. Only the material of the tank is thinner and it undergoes gluing much faster.
When using resin for gluing, after sanding, the surface is wiped with felt material and dust is not allowed.
Gluing large cracks: methods and materials
What to do if the toilet or cistern is cracked and the crack is through? For gluing you will need a two-component epoxy resin. To carry out the work - a drill with a drill for ceramics and a grinder with a diamond-coated disk. The sequence of work occurs in the following order:
- Holes are drilled at the ends of the crack - this is necessary in order to stabilize the load and prevent further propagation of the fault;
- Next, you need to walk along the contour of the fault with a grinder so as to widen it. You need to act carefully so as not to aggravate the problem with additional chips;
- The fault area is cleared of remaining particles after cutting and drilling, and degreased with acetone;
- Next, epoxy is applied - the mixture is added in small quantities and spread with a spatula to eliminate the appearance of excess. If the resin is liquid, and a crack has formed in a vertical section, you can seal it with tape to create a recess for the resin, which will not spread over the surface.
- After complete drying, you can sand the surface with fine sandpaper.
Using the methods described above, you can repair a toilet with a flush cistern with minimal investment and in the shortest possible time.
Source
If the toilet is cracked
Repairing a toilet, at first glance, may seem complicated, so many people simply call a specialist who will do everything, but will definitely charge you a certain amount of money. This may seem like the only way out, especially if you have never encountered such problems before. And many people simply don’t know how to seal a toilet. But you shouldn't make hasty conclusions. Try to fix the problem yourself, especially if the problem is that your toilet or tank is cracked. After all, the crack can be sealed. The main thing is not to panic and do the work carefully.
So, if you are faced with the fact that your toilet has cracked, then first you need to find out where exactly the breakdown occurred. And it’s not at all necessary to count how much money you have left in your wallet and remember where there is a plumbing store nearby, because you can fix this problem yourself using improvised means. Let's consider the moments when you have a crack in the toilet, flush cistern, or if a piece of ceramic breaks off from them. All this can be fixed if you approach this matter correctly.
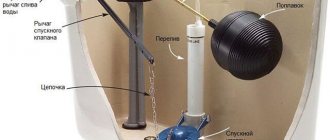
Toilet drawing.
If your toilet has a crack, it needs to be sealed as soon as possible. Firstly, so that it does not become even larger, and secondly, so that water does not leak out. To seal a crack that has formed on the toilet, you need to have glue. It must be waterproof. You can also use cold welding or silicone sealant. Find some sandpaper and a putty knife. It's good if you also have a hair dryer.
When you have found everything you need for repairs, you can proceed directly to it. Take a hair dryer and heat the crack. This must be done not only outside, but also inside. Such actions are necessary to ensure that excess moisture evaporates. It is necessary to degrease the surface on both sides. To do this, use either acetone or solvents. Next, carefully coat the surface with epoxy resin. Then stick strips of plastic on both sides and wait for everything to dry. And at the very end it is necessary to apply waterproof glue to the crack.
But it happens that a piece of ceramic simply breaks off from the toilet. Then you will need glue, which should be waterproof. Apply a thin layer of glue to the broken piece, press it to the place from which it broke, and after about four hours it will stick. Next, treat the seam that you have formed with joint putty or epoxy resin with filler. After this, it is better to clean the area with sandpaper.
Restoration work
The instructions for repairing a damaged toilet are very simple. Even an inexperienced person can cope. The first step is to prepare all the tools that will be needed in the process of restoring ceramics or porcelain.
Note! These include an adhesive solution, sandpaper, a thin spatula, acetone, a cloth and a hair dryer.
Surface preparation
Preparing the surface is easy. You just need to find some fine sandpaper and rub it over the chipped areas. Next, you will need to treat the same areas with acetone or alcohol to degrease the surface. Then you just have to wait for it to dry.
Gluing
The most important stage is gluing. If you make a mistake at the moment, it will be fraught with weak fastening of the elements, which is why the attempt to repair the toilet will end in failure and, possibly, lead to new problems.
You need to perform the steps step by step:
- Apply a layer of adhesive to the cracked area of the toilet and the fallen element and wait until it dries.
- Reapply another layer of adhesive, achieve good adhesion by waiting the time indicated on the glue package.
- Press the parts to be glued together as tightly as possible so that the seam is absolutely even.
As is the case with conventional glue, the greatest importance for the effectiveness of gluing is the force of action on the elements, and not the duration. Therefore, it is much more correct to sharply and strongly press one part against the other, rather than hold them for a long time with moderate force.
Final finishing
After gluing both elements, it remains to carry out final steps aimed at strengthening the structure and improving the appearance of the toilet. This is all done in 3 stages:
- The internal seam is rubbed with sandpaper, treated with acetone and glue, and then covered with a line of metal or PVC.
- The external seam is treated with tile grout.
- The entire surface is cleaned with a soft cloth.
After completing all the steps, the toilet will be ready for use. However, caution should be exercised, since for glued elements the first days after repair are the most dangerous.
If the crack is small
The situation when the toilet tank cracked, but nothing broke off, deserves special attention. The procedure will be as follows:
- Drill small holes at both ends of the crack.
- Use a grinder to make a depression along the entire crack, widening it.
- Fill the space with epoxy resin with added hardener.
- After the mixture has dried, remove excess with sandpaper.
The importance of the first action is that such holes will stop the formation of continuation of the crack. They should be small so as not to damage the toilet. If no action is taken at this moment, the crack may soon grow significantly larger.
Important! There is no point in covering the crack with glue, since it will not be able to hold the part that is breaking off well and will simply ruin the appearance of the toilet.