Share on social media networks:
On the eve of the holidays, we often have to puzzle over the issue of gifts. However, if you know the preferences and desires of a loved one, then there is still a chance to guess with gifts, but as for the high-quality and original packaging of this very gift, then problems may arise with this. It’s not for nothing that there is a saying: if you want something done well, do it yourself. In today’s article, you will learn how to design the original packaging of a shirt with your own hands, and you will be able to please your men with your creativity.
Gift wrapping for a man
If you need to pack a woman's gift, then here is where your imagination can run wild. An incredible variety of paper, ribbons, decorative elements - and all this from delicate pastel colors to bright colors. The same cannot be said about men's packaging. The assortment of discreet colors of wrapping paper and ribbons is, of course, large, but I want something unusual, I want to surprise the stronger half of humanity. Knowing their attitude to various decorations and decor, we often come to a dead end.
Of course, you can always choose plain paper, ribbon of a suitable shade in subdued colors, use craft paper or a brutal reaper in dark shades. But what about originality? In this situation, the idea of wrapping a gift for a man with your own hands in the form of a shirt can be a great help. A shirt is a wardrobe item that is perfectly associated with the stronger sex. You will definitely surprise your loved one with such original packaging.
How to pack a gift in a shirt-shaped box?
If your gift is relatively small and fits in a box, then you can wrap it in paper and decorate it under clothes. How to make a shirt-shaped box with your own hands:
- Pre-place the gift in a box, wrap it in plain wrapping paper, or use neutral, subdued colors that are as similar in color as possible to those commonly used in men's wardrobes.
- The seam of the joint should not be located on the side edge, as is usually the case when packing a box, but in the center of the largest side. This side will be the front side and on it we will attach all subsequent decor.
- Take a strip of paper of the same color and fold all the edges inward to make a neat rectangle. Its finished length should be equal to the length of the package. The width is several centimeters, depending on the dimensions of the package. This will serve as the placket of the shirt where the buttons sit. Glue it in the center of the box, covering the joint.
- Next, you should start making the collar. To do this, take another paper strip. It can be a different shade or contrasting color with the base of the product. We also bend the edges of the rectangle to make it look neater, and fold it in half along the long side. This is necessary so that there is no wrong side on both sides.
Important! The length of the finished rectangle should be approximately equal to the width of the box, and the width of the finished collar should be about 5 centimeters.
- Next, you need to form a collar from a paper rectangle. Visually divide the length of the rectangle into three equal parts. We place it in front of us, bending the outer parts at a slight angle to the bottom. They should touch with their inner top points. This way we will form the future collar.
- Glue the finished collar to the box on top above the button placket.
Important! It should protrude slightly, a centimeter, above the top of the box.
- Now it's time to start making parts. You can cut a tie out of beautiful paper, place it under the collar in the center and glue it. A homemade pocket would look great. Small buttons glued to the placket will add completeness to the packaging.
This packaging is very simple in execution, but, despite its simplicity, it can surprise any man.
How to fold a shirt correctly
There are several detailed folding patterns for men's or women's shirts. The methods depend on the situation, sleeve length, and quality of fabric.
How to quickly fold a shirt
Consultants and salespeople don't have time to carefully roll up every item, especially when there is an influx of clients. At the same time, most clothing stores have strict requirements for folding goods quickly and perfectly:
- Place the product face down on a smooth surface.
- Fold the left side of the shirt to the middle of the shoulder, fold the sleeve in three layers, leaving the cuff open.
- Repeat for the right side of the product.
- The second sleeve does not need to be folded; it is packed parallel to the shirt, turning the cuff up or straightening it.
- Fold the bottom of the fabric and fold the item in half.
Once folded, the shirt is placed in a bag for the buyer, in a bag for transportation, and placed back on the shelf.
How to fold a shirt without wrinkles
The simplest method can be called traditional. This is how things are folded in stores, when traveling, when organizing wardrobe space:
- Fasten the ironed shirt with all the buttons and turn the back upside down.
- Fold the sleeves opposite each other so that they are parallel to the rest of the product.
- Fold the shirt to the sides and straighten out any wrinkles.
Advice! To make ironing shirts easier and faster, it is recommended to purchase a special device for steaming items.
Perfectly ironed shirts are a man’s adornment
How to Fold a Long Sleeve Shirt
Most office dress codes require that a work shirt have long sleeves, but these are the types of items that wrinkle more often than others. The capricious product must be folded in the following way:
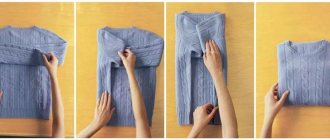
- place the shirt face down on a flat surface (table, bed);
- figuratively divide the thing into three equal parts, wrap one of these parts and bend it to the middle of the shoulder;
- fold the sleeve in three turns, leaving the cuff open;
- repeat the same with the other sleeve;
- fold the part of the shirt that is usually tucked into trousers approximately the width of an adult’s arm;
- lift the item from the bottom and fold it up to the collar, put it in a closet or duffel bag.
Detailed algorithm for folding a shirt
How to Fold a Short Sleeve Shirt
Visually, this item of clothing is similar to a T-shirt, so you can use the standard folding pattern.
We recommend reading: What mode to wash jeans in an automatic washing machine
Method 1:
- lay the shirt with the neckline to the right, face up;
- With your eyes, divide the shirt into two parts across and along the shoulder seam;
- imagine the point of intersection of these lines and grab it with your left hand;
- with your right hand, hold the place near the gate where the second mental line passes;
- holding the shirt, wrap your right hand behind your left;
- Without letting go of the top edge with your right hand, grab the bottom of the shirt, your left hand continues to hold the middle of the product;
- lift the item with outstretched arms and shake it slightly, straighten it, then turn up the opposite edge and put the short-sleeved shirt on the shelf.
The process of folding a T-shirt or short-sleeved shirt
Method 2:
- Place the product on a flat surface with its back facing up;
- fold the shirt into thirds, taking the sleeve and a little more fabric towards the center;
- repeat for the other side;
- mentally divide the item into three parts along the length and bend it from the bottom edge three times;
- turn the shirt over onto your face, it is neatly folded.
Method 3:
- lay the shirt on a horizontal surface with either side up;
- divide into three parts and tuck along mentally drawn lines;
- the small sleeve should be on top of the product;
- place the opposite edge of the shirt overlapping the previous one;
- fold the folded part in half.
The latter method helps fold short-sleeve shirts so that they can be stacked in the closet while standing. This is a Japanese system that helps to maximize space in the closet.
It is much easier to understand how to fold a man's shirt if you watch a detailed video.
How to fold a Polo shirt
The folding process is approximately the same as in the previous methods. It is necessary to lay the polo face down. In the place where the collar comes into contact with the sleeve, you need to grab the fabric with your hand. The other hand aligns the bottom edge so that it forms a straight line from the collar.
Next perform the following steps:
- Fold the left sleeve of the product along this contour.
- Repeat for the opposite side.
- Raise the bottom edge first to the center of the polo, then to the collar.
- Turn the item over to face you and straighten out any wrinkles.
It may not always be possible to fold a shirt beautifully and neatly the first time. You need to practice and repeat the process several times, choose the most convenient option for yourself.
We recommend reading: How to clean an iron from burnt soles: ways to remove burnt clothes
Package in the form of a shirt
If it happens that you do not have the opportunity to put your gift in a box and pack it, you can make a shirt bag with your own hands.
Important! If you have never made paper bags with your own hands before, then you need to download the template so that you can then cut and glue it from cardboard yourself.
In order to make it yourself, you need:
- Trace the template of the future package on cardboard.
- Cut the template along the lines.
- According to the fold lines, bend it in the right places, apply glue and glue at the gluing points.
- In general, making a bag is not such a difficult task; after the manipulations, you should end up with a beautiful paper bag made by yourself.
- Next, you should decorate the finished package with decor. These steps have been described previously. You can glue a homemade collar onto the bag, you can make a paper bow tie or tie, and decorate it with buttons.
Important! If making a bag seems too complicated for you, just buy a beautiful plain bag and decorate it yourself under your shirt. Using the same homemade tie or bow tie, collar, pocket and buttons, you can create creative holiday packaging.
Packaging in the form of a shirt
If your gift is very small, you can pack it in an original way in paper that folds into a shirt.
How to make a shirt-shaped package:
- Take paper twice the size of the gift, both in width and length, add a little extra and place it with the wrong side in front of you.
- Fold the sides towards the center, so that it looks like you have a shirt with two front fronts. Now the front side will appear in front of you. The halves are the fronts of the future shirt, and the reverse side is the back.
- Turn the product over to the other side, the back will be in front of you. Fold a small part of the top towards you.
- Turn the product over again with the front part facing you and bend the upper corners towards the center, forming a collar.
- Turn the lower part of the halves outward so that they protrude beyond the boundaries of our clothes.
- Fold the entire product in half upwards, placing it under the collar. Those edges that we folded outward ended up on top and now serve as sleeves.
The packaging in the form of a shirt is ready, all you have to do is add details to your taste!
Important! This packaging is perfect if you are giving clothes or fabric products as a gift. So you simply wrap them in paper, forming a shirt out of it.
Preparation
Before packing your things for a business trip, you need to prepare them: wash and iron them thoroughly. It is important to do this at least a day before departure. It is highly undesirable to fold only an ironed men's shirt, and under no circumstances should you pack wet items. They will have a large number of creases that will be difficult to remove.
The fabric must cool completely and then hang on hangers for several hours so that even small wrinkles are completely smoothed out and new ones do not form. Before hanging them on hangers, you need to fasten all the buttons from top to bottom. And only after that, having made sure that the clothes are in impeccable condition, you can start packing your suitcase. It must also be perfectly clean, and most importantly, free of foreign odors, which will certainly penetrate deep into the fabric during the journey. Some of them (for example, smoked meats, fish, some spices) cannot be removed even after washing.
