07/17/2018Category: Ironing and dryingAuthor: navseruki
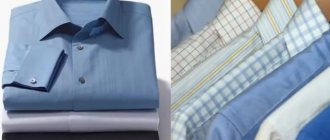
If someone in the family works for a company that has a business dress code, then the owner is forced to regularly iron office-style clothes. And its main element is a well-ironed shirt. In this case, it will be useful to study the technology and features of ironing different types of shirts.
- 2 Necessary ironing equipment
2.1 How to iron a shirt without an iron
- 4.1 Video: how to properly iron a long-sleeve shirt
Exploring shortcuts
The first thing to start with is studying the label on the product. If you do not read this information, you may damage the fabric. After all, for each material there are certain temperature limits, which are not recommended to be exceeded. Iron symbols are often printed on labels to indicate the acceptable temperature range for the product.
It is important to follow all instructions on the tag attached to the shirt to avoid damaging the fabric.
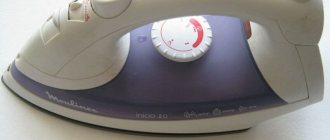
The interpretation of these icons is simple: the more dots are drawn on a small iron, the higher the heating temperature can be set on the adjustment wheel of a real iron.
Decoding the icons on the labels tells you which ironing mode to choose for specific clothes
Sometimes the tag inside the clothing is uncomfortable to wear, so it is cut off.
If you receive a product without a label, it is better to first set the temperature to low. Then add it little by little until the fabric begins to yield to the iron. If the iron begins to glide poorly and stick to the material, you should reduce the temperature slightly.
Necessary ironing equipment
To properly iron clothes, it is important to prepare a workplace with the necessary equipment. These include:
- iron - for the standard ironing method it is necessary;
- ironing board - if you don’t have one, you can simply lay a thin blanket on the table, covering it with thick cotton cloth;
- sleeve holder is a special device on which sleeves are ironed if they want to avoid smoothing out the creases. It can be replaced with a homemade roller made of thick fabric;
- a spray bottle with cool or room temperature water to moisten the fabric. It is especially necessary if the iron does not have a steam function or top spray function.
For convenience, you can use an armrest and a spray bottle with water.
How to iron a shirt without an iron
If you urgently need to iron a shirt, but don’t have an iron, you can use the old ironing method: pour boiling water into an iron mug (or saucepan), wrap a towel around it on top so as not to get burned, and carefully iron the clothes with such a device, straightening the material.
Sometimes you have to come up with a way to iron clothes if there is no iron in the house, and then even a saucepan with boiling water will do
And steam from a boiling kettle will help smooth out small wrinkles: you just need to hold the shirt over it, and then dry it straightened out, hanging it on a hanger.
Steam from a boiling kettle will help heat the shirt material and smooth out small wrinkles
Some people also use this method: water and vinegar are poured into a spray bottle (spray bottle) in equal proportions. Then place the shirt on a flat surface (or hang it on a hanger) and apply the liquid in an even layer. After this, simply dry the clothes.
How to iron a short sleeve shirt
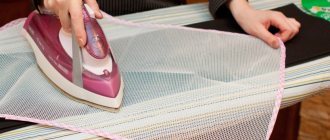
The principle of caring for blouses and shirts with short sleeves is almost the same as described above, but the process is much faster. The unironed sleeve must be pulled over the edge of the ironing board, which has a narrower part. Also, some devices are complemented by special armrests that will help you iron every centimeter of fabric efficiently and remove wrinkles.
Look to see if there are any wrinkled areas on the shirt. If everything is in order, hang it on a hanger and place the shirt in your closet.
Table: iron temperature conditions for different types of fabrics
| Textile | Temperature (oC) | Steam | Pressing the iron | Peculiarities |
| Cotton | 140—170 | wet | strong | needs to be moisturized |
| Cotton with polyester | 110 | a small amount of | ordinary | iron gently: like polyester |
| Silk | 60—80 | do not use | ordinary | iron with a dry iron through a damp cloth (not gauze), do not dampen |
| Chiffon | 60—80 | No | lung | through a damp cloth, do not use a spray bottle - stains may remain |
| Polyester | 60—80 | No | lung | low ironing temperature, the fiber melts |
| Viscose | 120 | A little | ordinary | do not moisten so as not to leave stains; iron slightly damp, from inside out or through fabric |
| Crinkled cotton | 110 | No | ordinary | depends on the composition of the fabric |
| Wool | 110—120 | steaming | lung | through a damp cotton cloth, steam the embossed parts |
| Linen | 180—200 | a lot of | strong | iron inside out, use a spray bottle |
| Cotton with linen | 180 | a lot of | strong | like cotton, linen |
| Knitwear | minimal or medium, depending on fiber composition | ferry in vertical position | light, do not press | in the direction of the loops, from the wrong side |
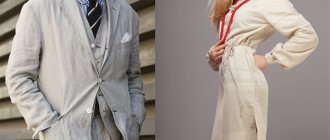
About arrows on a men's shirt in etiquette
Even taking into account all fashion trends, the rules of good manners say: there should be no arrows on the cuffs of a man’s shirt. However, it should be understood that a shirt and a shirt are different items of men's wardrobe. What is the difference?
The shirt cuffs have a loop and a button. In this case, the bottom of the sleeves of the shirt is secured with cufflinks, so there are only two loops. This item has a classic simple cut without any complex details and is included in the basic wardrobe. The shirt is worn only with a jacket, pullover or vest. It is not customary to roll up her sleeves.
Since a shirt is an element of a formal wardrobe, there should be arrows on its sleeves. The same rule applies to dress shirts that a man wears with a jacket and tie.
If you see arrows on a man's shirt, this indicates that it was recently worn.
According to the rules of etiquette, arrows should not be on the sleeves of fitted, sports or summer shirts. In addition, arrows are not suitable for everyday shirts: plain, printed, striped.
In what cases are arrows needed on the sleeves of a men's shirt? As you know, this is an integral element of the wardrobe of those who work in law enforcement or military structures, as well as in the Ministry of Emergency Situations. When this item is uniform, according to the rules of etiquette, it should always have arrows.
The same applies to those men who work in political organizations, own businesses, and hold leadership positions. Thus, arrows on a men's shirt can be seen in situations where negotiations are being held with large clients or an important meeting is coming up.
In life, it often happens that it is not possible to change business clothes. For example, after a business meeting with a business partner, you went to celebrate the deal. Your friends are unlikely to appreciate the arrows on a men's shirt, because they are not at all suitable for an informal setting. Fortunately, there are several tricks to hide them.
For example, keep your jacket on. All you need to do is take off your tie and undo the top couple of buttons. This will make you look informal and make you feel comfortable and relaxed.
You should read this!
How to choose your style: universal rules and recommendations November 27, 2020
688
688
Types of men's shirts depending on the model, material, sleeves and collar November 19, 2020
4335
4335
However, if for some reason you are forced to take off your jacket, roll up your sleeves a few turns to hide the creases on your shirt.
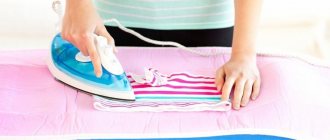
Ironing instructions for shirts with different sleeve lengths
First, let's look at the difference in ironing different models of shirts, namely: with long and short sleeves.
Ironing a long-sleeved shirt will require more time and care.
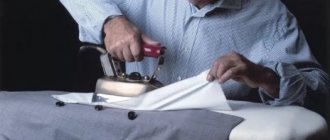
You need to start ironing long sleeves by smoothing out the longitudinal seam
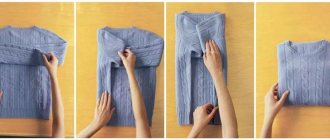
First, small and paired parts are ironed. To smooth out the sleeves of such a shirt, you need to fold them in half, placing the longitudinal seam line in the center. Afterwards the fold lines are ironed. If arrows on the sleeves are not needed, then ironing should be done along the middle part of the sleeve, without touching its outer edge.
Algorithm for ironing a long sleeve shirt
Video: how to properly iron a long-sleeve shirt
A short-sleeved shirt is easier to iron because it doesn't have complicated sleeves with cuffs.
Ironing a short-sleeved shirt is very easy and quick.
In general, such a shirt is ironed in the same way as a long-sleeve shirt. But if usually on long sleeves there are almost always arrows on the outside, then on some shirts with short sleeves they try not to leave them. Shooters are not done only in one case: if the material is too soft and the sleeves are narrow and almost fit the arm.
Video: how to quickly iron a short-sleeve shirt
Detailed description of the process of ironing a men's shirt
So, let's consider the sequence of actions.
Step 1 - Collar:
- Start ironing the collar from the inside out - move the iron from the edges of the collar to the center to prevent wrinkles from forming at the corners.
The collar is ironed first - Turn the collar right side up and gently iron it in the same way.
- Iron the stand.
If the collar is difficult to iron out, you can use the steam function of the iron or lightly dampen the fabric. If creases have formed on the collar, then they need to be smoothed out from top to bottom. Do not bend the collar along the stand and iron it along the fold - this leads to rapid abrasion of the material.
Step 2 - sleeves and cuffs:
- You should start ironing the cuffs from the wrong side - iron them from the corners to the center to avoid wrinkles.
- Iron the other side of the cuffs without touching the buttons (the plastic may melt if it comes into contact with a hot iron). It is convenient to iron them laid out on a board or put on an armband.
Do not touch the buttons when ironing the cuffs - Fold the sleeve, placing the longitudinal seam line in the center. Iron it, pulling it slightly, without bringing the iron to the edges. It is recommended to iron the bottom of the sleeve, departing a few centimeters from the cuffs.
Before ironing the sleeve, the longitudinal seam should be placed in the center in order to steam it thoroughly - If you want to make “arrows” on the sleeve, then fold it so that the seam is on the edge and smooth the sides thoroughly.
Typically, long-sleeved shirts are made with pleats, as this allows them to retain their shape longer when worn. - Next, you need to iron the central part again, carefully reaching the cuff with the tip of the iron. But don't touch the buttons.
Pull the sleeve slightly when ironing to avoid ironed creases. - If there are still small folds, put the sleeves one by one on the armband with the cuff forward and iron them.
If the shirt material is too difficult to iron near the cuff, then it is better to use a special device - a sleeve holder
Step 3 - yoke and shoulders:
- Place the shirt one shoulder over the narrow edge of the board. Start ironing the top of the shelf, then move on to the yoke. Place the iron along the collar. Then put the shirt on the other shoulder and iron it with the same movements.
In order for the top of the shirt to be ironed well, the material needs to be leveled and slightly stretched - Iron all connecting seams.
When ironing the yoke and shoulders, hold the iron parallel to the collar.
Step 4 - back and front:
- Place the button rack (the front of the shirt) along the board and iron over the entire surface.
- Use the tip of the iron to gently work the areas between the buttons on the front of the shirt without touching them.
Iron between buttons carefully, gently pulling the material with your hand. - Iron the seam at the collar and gradually lower, moving the iron from the back to the front.
When ironing a shelf with buttons, it is important to ensure that the hot iron does not touch them. - Then slide the shirt over the board and press the side seam. The side seam of the shirt should be ironed from top to bottom, starting from the sleeve
- Iron the back, paying special attention to the seam connecting to the yoke.
When ironing the back, you need to once again pass the iron along the seam where it connects to the yoke - If there are decorative folds or gathers in the upper part of the back, they should be ironed especially carefully.
Sometimes you need to iron decorative folds on the back from the front and back sides of the shirt: when the material is too thick and difficult to iron - At the end, iron the left shelf - first run the iron along the bar with the fastener holes. Then, if there is a pocket, iron it using upward motions. After this, iron the rest of the shelf.
On a buttonless shelf, special attention is paid to ironing the pocket if there is one on the shirt
Step 5 - correct errors:
- Examine the shirt carefully. It often happens that the central areas are poorly ironed. Or some places wrinkle a little when ironing other parts of the clothing.
- Correct any errors by ironing the problem areas again.
Back and second part of the front
For thorough ironing, you should first wet the fabric. This does not mean that water should flow from the shirt; at the preparatory stage, the material should look as if you were caught in the rain a couple of hours ago. The easiest way to distribute water is from a spray bottle. Wet fabric will be ironed better and retain the cumulative effect of the procedure for a long time.
- Place the back of the shirt on the ironing board. Iron the entire back area, paying special attention to the collar area. Do not iron stripes and labels located on the back of the collar. Otherwise, the edges of the label, made of synthetics, will melt from high temperatures and begin to scratch or prick your neck.
- Once you've done the back, move on to the second front part that doesn't have buttons (the right side of the shirt). Iron the pocket area, if present, and the part under the collar.
Immediately after ironing the shirt, hang it on a hanger or on the back of a chair. Do not place it on an uneven surface or a soft sofa if you do not want to ruin the whole result.
Helpful Tips for the Perfect Shirt
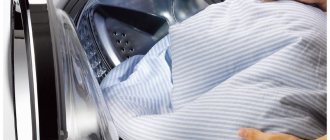
You can only iron a clean shirt, because under the influence of high temperature, even a slightly perceptible smell of sweat can intensify many times over. But it’s even worse if, after ironing, yellow spots appear on the material. It will be impossible to wash them off.
You can only iron a clean shirt
To make it easier to iron a dry shirt, you can lightly spray it with a spray bottle in advance or briefly hang the shirt on hangers in a bathroom filled with steam from hot water.
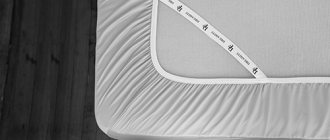
To prevent your shirt collar from getting wrinkled even in the closet, cut out a cardboard rectangle and secure it under the collar.
What is the difference between ironing male and female models?
Women's shirts and blouses are often decorated with decorative elements: embroidery, appliqué, sewn beads or buttons, metal overlays, etc.
Often the collar on a women's shirt-blouse is decorated with different types of stripes and overlays
Therefore, it is necessary to iron such products more delicately:
- Ironing should begin from the collar. If it has soft stripes made of fabric, braid or lace, then gently iron them with the nose of the iron through gauze or thin cotton fabric. If there are hard linings, then they should be bypassed without touching the hot base.
Any smooth embroidery on a shirt should be ironed carefully, choosing the appropriate heating mode for the iron. - If the material of the stripes throughout the blouse is too delicate (or, for example, the embroideries are made with shiny threads), then the sleeves and back of such clothing should be ironed from the inside out.
It is better to iron sleeves with embroidery from the wrong side so that the colored threads do not fade or stick to the hot iron - Next, you should iron the seam at the collar and gradually lower it, moving the iron with the back side forward. Iron the shoulders of the blouse and the yoke, if there is one.
The shoulders and yoke of a woman's blouse are ironed in the same way as a man's shirt. - When ironing shelves, start with small parts, carefully ironing darts and pockets, and then iron larger parts.
Darts and pockets on women's shirts should be thoroughly ironed so that the material does not bulge in the most visible place - Finally, the back of the shirt is ironed - if there are darts at the bottom of the back, then they need to be ironed separately, smoothing the ends of the darts with the nose of the iron. And then iron the top of the garment up to the collar.
When ironing darts on the back of a woman's blouse, slightly stretch the material, smoothing their ends with the tip of the iron
What kind of machine is this?
The iron was invented quite a long time ago . That is, initially a heavy metal object was stuffed with coal, heated on a stove, and then this weight was moved over the fabric.
The modern tool differs from this prototype; it has a steam generator, lighter weight, so the process has become easier.
Over time, it was found that there was no need for mechanical work. You can smooth the item only with the help of hot air ; it is not necessary to move the item on the surface of the linen to achieve smoothness.
In industry, large steam generators are used to iron clothes, for example, in clothing production, dry cleaners or laundries. Recently, manufacturers have been thinking about adapting these devices for domestic use. That is, reduce the size, energy consumption, simplify the process of working with the machine.
The principle of operation is that a strong stream of hot air is supplied, with the help of which the item dries and smoothes out. This steam treatment quickly irons and dries the item, additionally carefully cleaning and refreshing it.
Here the process is much simpler than with classical ironing:
- put a shirt on a mannequin or secure it with clips;
- turn on the device;
- remove dry, ironed clothes.
In terms of time, this process takes from 5 minutes to half an hour , the time depends on the material and operating mode.
Another time saver is the fact that there is no longer any need to wait for the laundry to dry before ironing it. The device does two things at once.