Ceiling preparation
To repair a ceiling, you must first identify all its shortcomings and understand how to work with it. One of the most common situations has the following signs: the plaster has crumbled abundantly, there are noticeable darkenings in the corners, and the ceiling itself has practically no differences in height.
In this case, preparing the ceiling for painting will consist of the following steps:
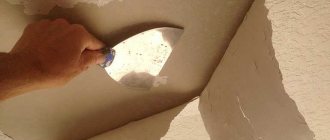
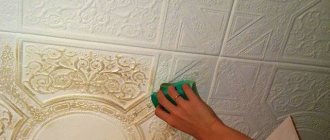
- First you need to remove the old coating. If the ceiling was previously covered with whitewash or plaster, then the ceiling will need to be cleaned. To do this, the ceiling is moistened with water and left in this state for some time.
- When all the water has been absorbed into the coating, you need to scrape it off with a metal spatula. The need for preliminary wetting with water is due to the fact that in this case the coating peels off from the concrete floor much more easily. In the case of wallpaper, the technology will look the same, but you will have to remove not only the wallpaper, but also the glue that held it in place.
- If the ceiling was previously covered with a water-based composition, then not only water will be required, but also wind - the room will need to be exposed to a draft after wetting the ceiling. The combination of water and air will swell the emulsion, making it much easier to clean up. An alkaline solution with soda is best suited for rinsing.
- After cleaning the ceiling, you can proceed to the next stage of work - applying a primer with an antiseptic. Today, there are many variations of primer compositions - for example, some of them contain chlorine, which is an excellent antiseptic. However, such compositions do not fully perform their functions for long. When choosing a primer, you must make sure that it is compatible with the paint used to cover the ceiling.
- When the base layer of primer has dried, you need to cover it with a primer - a polymer primer that improves the quality of the coating. The standard technology for this stage consists of applying the first layer of starting putty, sanding, another layer of starting solution, finishing putty and final sanding, during which you need to level the surface of the ceiling to a perfectly smooth state.
Having completed the preparation of the ceiling, you can begin painting it with water-based paint.
Which roller to paint the ceiling with - tool classification, prices and useful tips
Painting is one of the simplest ways to update a ceiling surface. This simple but very effective type of home renovation is accessible to almost everyone who knows how to hold a roller and a can of paint in their hands. However, sometimes the obvious elementary nature of a process hides multiple pitfalls, and the final result directly depends on how you overcome this barrier. Which roller should I use to paint the ceiling? A simple and complex question at the same time, the price of which is your satisfaction from the work done. We offer the most useful tips for choosing and some painting secrets.
What does the choice depend on?
"Don't look down on tools"
— a paraphrase of a rather tired quote from a famous song couldn’t come at a better time here. Most people who start a renovation take a very careless approach to choosing the necessary tools. Especially when it comes to painting. Here the entire philistine fantasy comes down to purchasing the first roller that comes into view at a hardware store.
It’s also good if before buying a person holds it in his hands, checking for ease of grip. However, often this moment is happily dissolved in the hasty desire to purchase everything necessary and begin (finish) the repair.
Most recommendations take into account the following factors:
type of surface to be painted; quality of paint used; the nature of the prepared surface.
The ideal type of surface for uniform painting with a roller is drywall
. It perfectly absorbs any type of paint, stably maintaining the chosen color. True, before painting directly, it would be a good idea to go over the entire ceiling surface with an acrylic-based primer, which will somewhat reduce the absorbency of the cardboard sheet. And in this article you can learn in more detail about the features of painting the ceiling with water-based paint.
Most often, ceilings are painted with water-based or water-dispersion paint, which brilliantly retains color, is not afraid of moisture and is generally absolutely safe for humans.
Depending on the type of ingredients used, it can be acrylic, silicate, or latex. The answer to the question of which roller is best to use for painting the ceiling, in each individual case, will directly depend on the choice of paint type. Thus, water-dispersion paint is excellent for painting plastered surfaces, which means that we will select the tool taking this fact into account.
In addition, the choice of roller is also influenced by the overall quality of the prepared surface. How ready is it for coloring? Are all cracks repaired? What are the gaps between the sheets when it comes to gypsum plasterboard ceilings? What primer was used to finish the ceiling surface? All this is just a small part of the questions, knowledge of the answers to which allows you to correctly determine the tool in each individual case.
What kind of rollers are there?
Trying to sort all the rollers on sale into shelves is a gamble. The fact is that a variety of criteria can serve as a starting point for classification. Starting from the type of fur coat used and ending with the size of the drum. All this ultimately affects not only the speed of work, but also the immediate convenience of doing so. Let's try to systematize the accumulated experience and go through each of them sequentially.
Handle size
As a rule, in domestically produced rollers this figure ranges from 30-50 centimeters
.
Experts note that these dimensions allow you to confidently hold the roller in your hands and carry out uniform painting. If the task is to paint individual elements, and not the ceiling as a whole, then you can choose a roller with a smaller handle - 15 centimeters
. As a rule, the producers of such products are foreign companies.
An excellent option is a tool with interchangeable handles, one of which is short and the other, on the contrary, long. This roller can be successfully used to perform a number of completely different tasks.
Drum size
The standard drum size in modern rollers is from 20 to 40 centimeters
.
Of course, you can always find options, both smaller and larger, but such tools cannot be called universal, since they are not very convenient for general painting and are more suitable for use in solving a local problem associated with painting visible decorative elements of the ceiling surface . We recommend: Repairing the floor in an apartment with your own hands step by step
Drum design
The drum can be attached to the roller body on both one side and the other. In all respects, the first option is preferable, since it allows you to change the drum coat over time, making the tool suitable for solving other problems.
The double-sided design, alas, significantly limits your “user interface” and you will not be able to change the coat.
Fur coat type
Probably one of the most important indicators that should be taken into account when deciding on a tool.
fur; foam; polyacrylic; polyamide.
The advantage of a fur coat is that it saves paint and distributes it evenly over the entire surface. The natural fibers used to make such fur coats have standard absorbency, but are easily wrung out during the dyeing process. Of course, the final ease of use is correlated with the length of the pile.
A longer pile allows you to absorb more paint and apply a much thicker and more thorough layer. It uses strong and thick thread. In rollers with short or medium pile, the thread is much thinner, and the surface of the ceiling after processing with a roller will be covered with a thin and uniform layer of paint.
Now compare the information received with what you want the ceiling surface to look like in the end - and make the right decision.
Foam rollers are best used when your goal is to create some texture or relief on the ceiling. They work well with oil paint, which has the most dense, high-quality structure.
As for polyacrylic and polyamide paint rollers, their main area of use is decorative work. To highlight some interesting detail on the ceiling, refresh the color mood, diversify a fragment - this is exactly the kind of roller that should be used to paint the ceiling if your goal lies in this plane.
Current prices for ceiling rollers
The most popular rollers for painting ceilings and their costs are shown in our table.
| Name | Price per piece |
| Faux fur roller assembly with handle 250mm SIBRTECH 80114 | 93 rubles |
| Natural fur roller 200mm SIBRTECH 80128 | 53 rubles |
| Foam roller with handle STRUCTURAL, MATRIX MASTER, 80221 | 288 rubles |
| Polyacrylic roller FIT mini 02693 | 102 rubles |
| Roller with plastic handle, 250 mm, pile 18 mm, D 40 mm, MATRIX 80887 | 128 rubles |
| Roller ANZA PLATINUM Antex 250/38 mm 580025 | 379 rubles |
Helpful tips for choosing
Avoid using rollers with a plastic handle - as a rule, it is not particularly durable and cannot withstand high pressure; complex relief patterns can be decorated with a velor roller - for this you need to perform intermittent and sharp movements during the painting process; You can also use special rollers with ready-made patterns on the surface of the drum to decorate the ceiling surface; when purchasing a roller in a store, buy several replacement elements right away - this will allow you to save time later, when the roller becomes unusable and you will hastily select a handle or coat for the undeformed parts; rollers for painting the ceiling are often equipped with a special container, which is fixed on the axis of the tool - this is where all the excess paint flows, which makes the painting process as convenient and non-irritating as possible.
Conclusion
When deciding which roller to paint the ceiling with, think first of all not about how to save money on purchasing suitable tools, but about the convenience of future repair work.
Still, a task that is done easily and freely, with pleasure, has a much greater chance of ending with a result that will bring real satisfaction, rather than negative polar emotions. To some extent, the choice of a roller is a trifle, especially when compared with the selection of paint for decorating the ceiling, but it is precisely such little things that add up to the overall result, the success of which you are most interested in. Is not it? Photo: vk.com
Making a spatula with your own hands for suspended ceilings - tips and 13 photos
Source: masterpotolok.com
Features of water-based paint
Since in most cases water-based paints are used to treat the ceiling, it is worth considering their features in order to know how to work with them. The material is really very good - it does not smell, can be cleaned with wet water and is easily applied to the surface of the ceiling, as a result giving it a rather attractive appearance.
In short, the main advantages of water-based compositions can be reduced to the following list:
- Environmentally friendly composition - the paint does not contain synthetic and toxic impurities;
- The paint has no characteristic odor;
- After application, the paint forms a uniform coating, i.e. we can talk about the high visual qualities of the material.
Water-based paints are classified depending on the main component into the following types:
- Acrylic;
- Silicate;
- Silicone;
- Mineral.
Each option has its own characteristics. For example, after hardening, acrylic paints are almost impossible to wash off - they contain adhesive and latex components that improve adhesion to the ceiling surface and ensure its waterproofness.
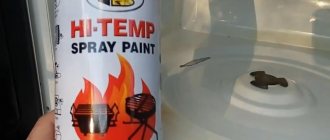
In turn, silicone paints are resistant to temperature changes, without losing the other advantages of water-based paints. This material is excellent for finishing surfaces in kitchens and bathrooms.
Choosing a roller for water-based paint
To work with water-based paints, you need the appropriate tools. Such a tool is a roller - and you need to be very careful when deciding which roller is best to paint the ceiling with. The main goal when choosing a roller is this: a good tool should have long and soft bristles made from natural materials.
It is worth considering the classification of rollers in order to understand the differences between the main types of such tools:
- Fur or velor
. Such rollers show excellent results. The material captures exactly the amount of paint that is needed for its normal application. The disadvantage is the cost - fur products are more expensive than their foam and nylon counterparts. - Painting
. Rollers in this category have a high degree of absorption, so you have to dip the tool in paint much less often. The most noticeable drawback is that if you press too hard on the roller, the paint will come out of it. There are situations where this shortcoming turns out to be critical. - Long-haired
. Such products use long pile, the rigidity of which is ensured by an woven metal thread. Rollers with long pile are expensive, so they are used relatively rarely. - Embossed
. Relief-type rollers are designed for applying paint in a specific pattern. Such rollers have a fairly narrow specialization, so they are used extremely rarely. - Foam rubber
. Rollers made of foam rubber are quite cheap and simple, but they are not used for painting ceilings and walls due to uneven paint application. The main area of application is the protection of indoor pipelines. - Terry
. Quite simple and affordable rollers. However, they are used only for working with synthetic compounds.
When figuring out which roller is best for water-based paint, you need to take several parameters into account. For finishing large and flat surfaces (and the ceiling is such a surface), it is best to use wide rollers. It is also worth paying attention to the weight of the product - the smaller it is, the easier it will be to work with such a tool. There are no special requirements for the handle - they are always quite comfortable, which is achieved due to the correct shape.
The size of the roller directly depends on the area that needs to be painted. The point here is not only in the speed of work, but also in its quality - reducing the number of strokes will create a more uniform coating. Most often, paint rollers are used to finish the ceiling, and small brushes work well for painting corners and awkward areas. You don’t have to think for long about which roller to paint walls with water-based paint either - the rules for choosing a tool come down to the same points as in the case of ceilings.
There are three standard roller sizes:
- Small – no more than 100 mm;
- Medium – from 100 to 200 mm;
- Large - from 300 mm.
There is no clear answer to the question of which roller is best to paint the ceiling. However, the most popular option is medium rollers, which are great for most situations. However, if you need to paint a large area, you can always purchase a larger roller.
In any case, if you use long-pile products, you need to squeeze them out properly and make sure that the pile does not fall out. However, with proper use, the rollers can last quite a long time.
Polyamide or velor
The advantage of velor fur coats is their resistance to chemical components of paints and varnishes. Rollers can be used with any dyes, including emulsions for painting ceilings.
A tool with a velor coat is convenient because when using it, the paint not only does not splash, but also does not roll off. The only drawback of the devices is the rapid absorption of liquid and the need to repeatedly lower the roller into the paint tray.
The polyamide version of the device is a textile pillow stitched with strong threads. Its main area of application is decorative work, during which you need to ensure that the paint does not splash around.
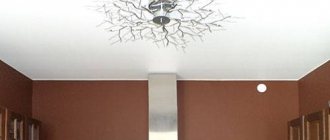
Ceiling painting technology
Regardless of which roller you use to apply water-based paint to the ceiling, the finishing of the latter must be done correctly, because the quality of the coating and its decorative properties depend on this. You need to apply the paint in several layers, with the last one applied in the direction away from the window - this allows you to mask small errors. In addition, each layer should be applied in one pass, so that areas with different colors do not appear in the future.
You can check the uniformity of paint application by looking at it at a slight angle. If you look closely, you won’t be able to notice the difference, but if you look at it from an oblique angle, all the problem areas will be in plain sight. To remove fresh deposits, use a dry sponge. Of course, after this you need to paint the area again. After applying each layer, you need to wait until it is completely dry and only then continue working.
The painting technology itself is as follows:
- The roller is moved in one direction and paints the entire surface of the ceiling in stripes;
- The next layer will be applied perpendicular to the previous one;
- Then these operations are repeated as many times as required layers of paint.
The movements of the hand with the roller when painting should be slightly zigzag. Each subsequent stroke should overlap the previous one by 2-3 cm. You should try to make the layers as thin as possible. For uniform painting, you can purchase several rollers and change them each time you apply a new layer.
It is also worth using a number of recommendations that can significantly simplify the process of painting the ceiling:
- The work is best done with an assistant, whose role is to observe from below the quality of the painting. Often, when applying the first layer, noticeable spots appear that need to be covered with a liquid paint solution.
- The ceiling must be prepared very carefully before painting. As a sanding tool, you can use fine sandpaper mounted on a wooden block. If you have little experience, you should practice on surfaces that will not be so noticeable.
- Only one brand of paint can be used for painting. If the paint has frozen several times, or if there are noticeable lumps in it, then it is better not to use it, but to purchase a new one. The composition used must be stirred before use so that it is extremely homogeneous.
- Some types of paint are not suitable for use in certain conditions - for example, low humidity. If there is an inscription on the can of paint that says this, then such a coating is not suitable for kitchens. You can also find paints that are resistant to dry abrasion - and these should be preferred because they are the most reliable. Paint that has not yet cured should not be exposed to drafts, otherwise the coating will peel off as a result.
- Before painting, you need to figure out which roller is best to paint the ceiling with paint. The best option is rollers with long retractable handles - then you don’t have to bother with stepladders, ladders or tables. You need to make sure in advance about the quality of the roller you are using - damaged or deformed products are not suitable for the job. Immediately before painting, the roller must be rolled out in a paint container or on some material (but not on the ceiling surface).
How to choose a roller for painting walls
Painting is the final stage of finishing. Which roller is best for painting walls over a large area? How much time will be spent on the entire process and the quality of the final result depends on the correct solution to this issue.
The market offers a large selection of tools for painters. You should choose time-tested options. A roller is one of them, allowing you to quickly apply paint in an even layer. Well-painted surfaces give the room an aesthetic appearance.
What types of rollers are there?
Today the market offers consumers a large number of different types, differing in purpose. How to choose a roller for painting walls is greatly facilitated by the presence of a clear classification.
It is based on the following characteristic features:
- type of material for the paint roller surface;
- its texture;
- tool dimensions;
- forms.
High quality tools are marked on the packaging with Latin letters. The manufacturer thus emphasizes its class by indicating the materials used for its production.
| artificial | RE | faux fur, foam rubber (regular, reinforced) |
| RA | perlon, nylon | |
| RS | polyacrylic derivatives | |
| natural | N | rubber, natural fur (e.g. fox, goat, sheep, llama), felt (thick, thin, medium) |
Among artificial ones, the PE type is the softest.
Fur roller is the most expensive
Products made from natural fur have the highest price. Prices for felt and rubber types are at the level of artificial rollers. You should choose them according to your needs, carefully examining them.
In practice, it is recommended to use a tool with a natural finish when painting expensive surfaces or using expensive paint. Natural ones have better contact with the surface.
Soft faux fur is used for painting a wide variety of surfaces, while natural wool is usually used for expensive ones. The choice depends on your needs. Simpler cases involve the use of less expensive devices.
The above division contains additional subspecies. Rollers covered with natural or artificial fur are divided into ordinary ones for the floor and corners.
Conventional fur is successfully used for walls with minor defects (irregularities). The floor subtype is intended only for horizontal surfaces, because paint runs off strongly.
Rollers for painting corners differ only in shape. This is done for ease of use. Foam rubber is used when working with adhesive compositions.
We recommend: How to screw in a self-tapping screw
Choosing a roller for walls
For smooth surfaces, use rollers with polyamide bristles
The choice depends on the paints and adhesive solutions used. To ensure that the chosen roller lasts a long time, it is better to rely on the advice of experts:
- medium-thick foam roller - the best option for water-based paints, liquid adhesives, primers;
- fur with short, medium pile - used on smooth walls;
- The polyamide thread base is perfect for smooth surfaces;
- Rubber and foam bases are suitable for textured painting;
- velor ones are used for all types of coloring compositions.
When choosing, the width of the tool is also taken into account. For an apartment, a 30 cm sample is enough. You should also purchase accessories: additional attachments, an extension handle, a grater (removes drops).
Preparing walls for painting, painting with a roller
Prepare the base before painting
To use a roller to paint walls, you first need to prepare the room. It is necessary to remove curtains and furniture (or move them, cover them with film or special covers).
If necessary, cover the floor with cardboard paper, cover the doors and windows with plastic film (you can use cloth, but there is a possibility of leakage), and cover the baseboard with paper tape.
Preparing the walls comes down to a number of operations:
- after turning off the power supply, remove the covers from switches and sockets;
- Cover the remaining “insides” with masking tape;
- if necessary, remove heating radiators;
- cleaning and making the surface smooth: removing wallpaper (if any), hiding defects with putty, sanding dried walls.
Pallet for paint
The work requires the availability of basic and auxiliary equipment:
- screwdriver, knife, paint tray;
- set of rollers, sanding accessories.
After all the preparations, having chosen a roller for the walls, you can start working:
- the tray is filled with a small amount of dye;
- the roller is dipped and rolled out to remove excess and distribute the coloring matter evenly over its surface;
- painting begins from the corner, then spreads in any convenient direction;
- to avoid the appearance of streaks, move the tool smoothly, without pressure, from top to bottom and back;
- The corners are painted with a brush. For information on the types of rollers, watch this video:
The remaining layers are applied only after the first has dried.
Roller care
Rinse the instrument with water or solvent
Upon completion of all work, he needs to be cleaned of used dyes, varnishes, and adhesives. After which it should be stored. In order for the tool to serve for a long time, it is necessary:
- Wash water-based paints, wallpaper paste with clean water and dry without squeezing;
- Solvents are used to clean varnishes and acrylic paints immediately after completing work so that the surface being treated does not dry out;
- storage should be in a dry place. For more information on how to care for your instrument, watch this video:
The widespread use of rollers is due to their practicality. Being on the floor, you can complete the treatment of areas in a short time. The disadvantages of this method are the impossibility of normal painting of corners and joints and the absorption of large volumes of paint by some working coatings (require squeezing).