This article contains instructions on how to clean your boiler.
If there is no centralized heating in your region of residence, then you probably use a domestic water heater or, as it is popularly called, a “boiler”.
- With the help of such a device, the living space is provided with hot water and heating.
- It can be bought at any home appliance store, but few people think that this unit requires regular maintenance.
- How to clean a boiler at home? We will tell you how to disassemble and reassemble it correctly in this article.
Is it necessary and how often to clean the boiler?
Boiler
Everyone knows that the water in the electric tank is heated by special tubes of the heating element. Over time, they become covered with a layer of calcium deposits and scale.
- The heat transfer of this part becomes negligible, and the energy consumption is high.
- The boiler takes longer to heat the water. Therefore, the question of whether the boiler needs to be cleaned can be answered unequivocally: yes, it is necessary .
- Small scale deposits do not affect the operation of the electric heater. But when a thick calcium crust appears, the device first needs to warm it up, and then the water.
How often should the boiler be cleaned?
- In the first year of operation, maintenance of the heating element may not be necessary, but subsequently, every 1.5-2 years, it is necessary to completely disassemble and clean the device.
- Many people turn to specialists to clean the surface of the heating element. But you can do this yourself if you follow special instructions.
- There is nothing difficult about cleaning the electric heating element.
Below you will find all the necessary instructions to quickly deal with scale on the heating element.
Causes of scale
In order to clean the water heater less frequently, owners install filters on the incoming water pipe. They trap coarse particles and dirt, but the water hardness remains the same. Modern cleaning systems are not affordable for everyone and they also do not guarantee 100% results. Due to increased water hardness, lime deposits – scale – accumulate in the water heater. A hard crust first covers the heating element, and then the inner surface of the storage tank.
With a scale thickness of 1 mm, energy consumption increases by 10%. If the heating element is overgrown with a hard coating 10 mm thick, then the consumption will increase to 70%.
How to drain water from a boiler: instructions
Water supply taps on the boiler
Disassembling and cleaning the electric tank is not a difficult job, but the device itself is heavy. Therefore, it is better to remove it with another person who will help and support the device during dismantling. Here are instructions on how to drain the water from the boiler:
- Disconnect the device from the power supply and remove the plug from the outlet.
- Disconnect the cold water hose from the water pipe and lower it into any container (basin, bathtub, etc.). The tube supplying hot water can be left untouched.
- Place the hose that you removed onto the safety valve. Place the free part of the hose into a container.
- Open the taps of the device and release the check valve fuse.
- Open the hot water taps in the bathroom and kitchen. First, you will hear a sound as if the tank is drawing in air, and then the liquid that was in the device will be released. To do this, it was necessary to lower the hoses into the container.
- After all the liquid has come out, blow air through the cold water hose. If there is no gurgling, you can continue further.
Now unscrew the hose that supplies hot water to the faucet. Remove the boiler from its place and place it on the floor with the taps up. Proceed to the next stage of dismantling.
Pemolux
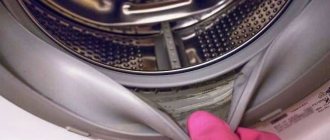
Pemolux and other powdered descaling agents, such as DALLI or COMET, are perfect for automatic machines. This is a safe household chemical, but you should still use it with rubber gloves.
How to descale your washing machine:
- After the next washing process, take one of the suggested products and an old toothbrush, but with soft bristles.
- Use a brush to scrape off any deposits from the entire surface of the drum.
- Then apply the cleaner to it and go over the walls. Try not to miss a single place and get into all the cracks.
- The procedure must be repeated until all limescale has been removed.
Then remove the loose deposits with a damp cloth and set the machine to wash on idle.
After this, wipe the drum dry.
How to disassemble a boiler: instructions
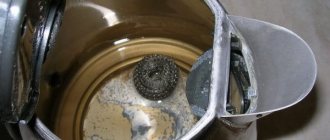
Scale when disassembling the boiler
After you have drained the water and removed the boiler from the wall, you need to disassemble it. Then you can remove the heating element and clean it. Instructions on how to disassemble the boiler:
- Take a screwdriver and unscrew the bolts that hold the front cover of the device. When the bolts are unscrewed, use a screwdriver to pry the panel near the thermostat knob from the back side.
- Pull gently until the latches engage. They will come out of the door fasteners. Do not use too much force, otherwise the fasteners may break.
- Now you can remove the panel and remove the thermostat holder.
- Then proceed to removing the protective door. Unscrew the remaining screws and carefully remove it.
At this point you will see a diagram. Draw it or take a photo with your smartphone so that when assembling there are no questions about where the parts should be and how everything looks when assembled. Now continue disassembling:
- Disconnect the electrical wire.
- Remove the ground wire.
- Then remove the rubber seal and the heating element itself.
- Take out the flange along with the electric heating element.
Now you can proceed to the next step - cleaning the heating element.
Remember: The magnesium anode, which is located near the electric heating element, is sensitive to damage. It is unacceptable to forcefully remove scale or use sharp metal objects.
If you scratch the anode, it may become unusable. Often, when cleaning the heating element, the magnesium anode is replaced with a new one. But it happens that there is no anode in the tank, then you need to change the entire heating element.
Removing the flange
The heating element is attached differently depending on the manufacturer. In Ariston boilers, you need to unscrew the fastening nut with a 13mm wrench and remove the small metal corner. The lid with the heating element must first be inserted inside the tank. If this cannot be done easily, you need to tap and loosen the lid. The heating element inside the boiler is turned over and removed sideways, as it is curved.
In some models of Ariston water heaters, the heating element is unscrewed counterclockwise (read this article for how to disassemble an Ariston water heater to change the heating element). This is indicated by the edges for the key on the brass part of the flange. In Termex and Atlantic companies, you need to unscrew the nuts around the circumference and remove the fastening washer. After this, the flange is pulled down.
It is important to carefully remove the flange, as the spiral may be too heavily coated with scale. The heating element is removed carefully and slowly with loosening movements.
Cleaning and flushing the inside of the boiler heating tank
Clean and working boiler
Remember: When cleaning the boiler, waste and dirt that accumulate inside the tank should not be washed down the drain. The system may become clogged. It is better to throw the hard scale in the trash or flush it down the toilet.
Instructions for cleaning and flushing the inside of the boiler heating tank:
- Wear protective gloves and use your hands to remove large pieces of dirt from the tank.
- Connect the cold water pipe and turn it on slowly. Place a bucket under the hole, otherwise all the water and scale will spill onto the floor.
- Water will wash away accumulated dirt.
You can simply pour water into the tank and shake it. Then pour out the water and repeat the procedure. But do this process with an assistant as the water tank is too heavy.
Mechanical cleaning of the device’s water heater with disassembly
If the boiler is heavily soiled, the only way to descale the boiler is mechanically. The water heater will have to be disassembled. This is done carefully so as not to damage the electronic unit and heating element, otherwise there is a risk of a short circuit. The process consists of two stages: cleaning the heating element and the storage tank of the water heater.
To descale the device mechanically, you will need to dismantle the water heater. After disconnecting the device from the network, proceed to disassembly:
- first close the cold water supply tap, then disconnect the pipeline from the boiler fitting;
- the storage tank is emptied through a mixer or an additional drain valve;
- disconnect the hot water pipeline from the boiler fitting;
- remove the lower decorative cap by unscrewing all the screws;
- if the handle of the mechanical thermostat protrudes, it is also removed;
- use a screwdriver to unscrew the contacts that clamp the power wire;
- the boiler is removed from the wall and placed upside down in the bathtub;
- the flange with the heating element and the thermostat are unscrewed, removed from the tank, and then mechanical cleaning begins.
The procedure for dismantling boilers from all companies is almost the same. Some nuances of attaching the flange and decorative cap may differ.
Cleaning products and tools
To descale your water heater you will need the following tools:
- adjustable wrench and set of wrenches;
- straight and curved screwdriver;
- pliers;
- knife, sandpaper.
Cleaning products for descaling are bought in the store. A solution is prepared from citric acid by dissolving 500 g of crystals in 2 liters of water. Instead of citric acid, you can dilute 40 ml of vinegar in the same amount of water.
Store-bought cleaning products can destroy the rubber seals of the boiler. Before using the solution, you must carefully study the instructions on the package.
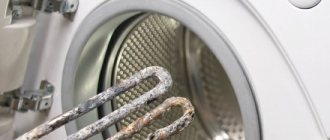
Cleaning the heating element
When disassembling for the first time, a person does not know how to clean the heating element of a water heater so as not to damage it. You will need to be careful in your work. You need to know that the heating element of a water heater comes in wet and dry types and they are cleaned in two ways.
Wet heating element
Mechanically descaling the heater can be done by scraping it with a knife. Thick growths are crushed with pliers, and the remains are rubbed with sandpaper. You cannot overdo it so as not to damage the copper shell of the heating element.
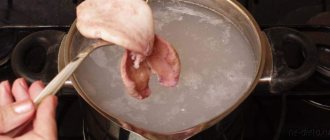
If you feel unsure, it is better to place the heater in a cut-off plastic bottle filled with a solution of water and citric acid. Approximately 5–6 hours after the scale has completely dissolved, the heating element is removed and washed with clean water.
Dry heating element
Dry heating elements are handled with care. Do not scrape, break or rub hard accumulations with sandpaper. Dry heating elements can only be cleaned chemically by immersing them in a solution of citric acid or a factory-made cleaning agent.
When cleaning the heater, inspect the magnesium anode. If it has worn out and become thin, then replace it.
Cleaning the storage tank
To remove dirt or scale from the walls of the water heater storage tank, do not resort to rough action. Sandpaper or scrapers will damage the protective coating. The mucus is simply washed out with a soft sponge, using water under pressure from a shower head.
If there is a thick layer of scale on the walls of the water heater tank, use a factory-made cleaning solution. Citric acid or vinegar diluted with water will do. The water heater tank is filled with solution and left overnight. In the morning, the liquid with the fallen plaque is drained. The tank is washed with clean water.
Reassembling the boiler after cleaning
After cleaning and disassembly is completed, the water heater is reassembled. All actions are performed in reverse order:
- The thermostat with heating element is put in place and the flange is screwed on;
- the boiler is hung on the wall;
- cold water and hot water pipelines are connected to the nozzles;
- the storage tank is filled with water and tested under pressure to ensure there are no leaks;
- if the test is successful, connect the electrical cable, put the decorative cap in place, and then try to heat the water.
During reassembly of the water heater, it is important to carefully inspect the gaskets. They are well cleaned from dirt, but it is better to buy new ones. To prevent leakage, the gaskets are lubricated with sealant.
How to reassemble the boiler after cleaning?
Boiler diagram
Above there are instructions for disassembling the tank. To reassemble the boiler after cleaning, you need to follow these instructions, but in reverse. You should also have taken a photo of the diagram. So, follow these steps:
- Insert the cleaned heating element with the flange into its place.
- Connect the ground wire and electrical wire.
- Replace the protective door and fasten it with screws.
- Install the thermostat holder and panel. It should snap into place, this will be confirmed by the characteristic clicks of special latches. Guide the latches into the grooves with your hands to avoid breaking them.
- Use a screwdriver to tighten the fastening bolts that hold the front cover of the boiler.
All that remains is to hang the boiler on the wall. Also do this with an assistant. Then connect the boiler and if hot water comes out of the tap, then everything is done correctly.
Features of cleaning a dry heating element
A dry heating element is a special analogue of a traditional element with a ceramic coating. The approach to cleaning it at home is not much different from that described above, but still has a number of nuances:
- In this case, cleaning the water heater prohibits the use of a mechanical pre-treatment method. The appearance of even the smallest scratches on the surface of a product can negatively affect its functionality.
- To soak an item to remove scale, you can use not only citric acid, but also a concentrated vinegar solution. In addition, you can choose the appropriate household chemicals from a specialized store. The main thing is not to deviate from the rules set out in the instructions.
Recommended: Guide to rescuing a phone that has fallen into water
After all work is completed, the heating element is washed in clean water and installed in its place. No need to dry it! The device is ready for further work.
Features of disassembly and assembly of water heaters Termex, Ariston, Polaris FD, Gorenye, Hotlex
Ariston boiler
Boilers of different brands have their own assembly and disassembly features. This should be taken into account so as not to accidentally break one or another element. Here are the features of disassembling and reassembling water heaters:
- Ariston. When disassembling a water heater of this brand, pay attention to the mounting method and the shape of the flange. To remove it, push the flange towards you, turn it over while it is still inside and only then pull it out. The heating element in Ariston boilers is located at the bottom, so it is not necessary to remove the device from the wall. This is convenient, since you can disassemble the structure without removing the tank - simply and quickly.
- Gorenje. It is difficult to remove the front panel in boilers from this manufacturer. But this seems only at first glance. It is important to press the bottom edge of the panel and pull it slightly towards you. The panel can be easily removed as it is held in place by two latches. Also keep in mind that the device from this company is very heavy, so you won’t be able to remove it yourself; you need an assistant.
- Termex . Disassembling the boiler and cleaning the heating element of a device from this manufacturer is carried out in the same way as for devices from other manufacturers. But the difference is that the magnesium anode quickly becomes unusable. It needs to be changed almost every year.
- Polaris FD . You will have to tinker with disassembling this device, since it is difficult to get the heating element out of it if you do not know the nuances. Once you have disconnected the taps and thermostat, you need to remove the heating element. Unscrew the holding bracket and remove the heating element from the tank at an angle. If you pull out the element in a straight line, then nothing will work; it will seem to be stuck inside. It is important to do this at an angle, moving your hand to the side.
- Hotlex. In this water heater, the heating element can be reached easily, without effort. The only thing is that the tank will have to be removed from the wall, since this cannot be done by weight.
Cleaning the broiler yourself is easy. Follow our instructions and you will be able to do this without difficulty. Read below for tips on using a heating tank to ensure the boiler lasts a long time and works properly.
Reviews
Storage water heater
It is recommended to choose cleaning services for heating structures and household chemicals for their cleaning based on reviews on the Internet, since otherwise there is a risk of encountering unfriendly services that can damage the mechanism, or it will be impossible to cope with the chosen product.
Dmitry Yur, St. Petersburg: “My boiler was always washed by a specialist. He did it quickly and always replaced the heating element if necessary. Usually this was required 1-2 times a year. I managed it quickly: poured in the acid, waited, drained it, washed it. I decided to try it myself, it turned out that even I could cope. Everything there is on flexible lines, so you can easily clean it with acid.”
Galina Dyatlova, Syzran: “When installing the boiler, the craftsmen advised installing filters so that less scale would settle on the walls of the water heater. I listened to them, ended up changing several cartridges over the course of a year, and a bucketful of scale still pours out of the boiler when I wash it. I solve the problem using Alpha Phos. It turns out to quickly get rid of unpleasant odors and dirt. The boiler is already several years old, I have never changed the heating element or anode during this time.”
Ilya Smirnov, Volgograd: “I watched a lot of videos on this topic. Everyone complained that it was difficult to remove both the boiler itself and the heating element. I don’t have any extra screws on the heating element, it’s easy to remove, even my grandmother could figure it out. When I purchased this particular water heater, I was advised so that I could then clean it of scale with my own hands. I didn’t bother buying professional products: regular vinegar and citric acid do a great job with this. Over the years of use, there have never been any leaks, no unpleasant odors, or overheating of the boiler itself.”
When questions arise about why the boiler takes longer to heat water, why there is an odor coming from it, and why energy bills have increased, it is worth paying attention to its insides. Most likely, they are covered with a thick layer of scale and rust, which no one has removed for a long time. Neither product has a cumulative effect, so regular cleaning is required to maintain the functionality of the water heater.
Tips for using water heaters
Correct operation of a boiler
A boiler is a simple device. But if you use it incorrectly, this can lead to it becoming unusable ahead of time. Here are the nuances, subtleties and tips for operating water heaters:
- Unplug your device if you are going to leave home for a long time . A boiler connected to the network constantly heats the water and works hard. Why waste resources if hot water is not needed in the near future. Many users turn off the device after each use.
- Before turning on, make sure there is water in the tank. If you turn on the boiler without water, it will burn out.
- Install water purification filters throughout your entire apartment or house . This will help clean and soften the water and extend the life of the heater.
- If the water pressure in the system is low, do not turn on the heating tank at full power . The device may not turn on.
- In the device instructions you can often see advice on setting the device’s economical operating mode at a temperature of 30-40 degrees. In fact, this mode is not very economical, since energy is still spent heating the water. There is also a risk of creating favorable conditions for bacteria and fungi. They reproduce well in lukewarm water.
- Regardless of what water temperature you use, sometimes turn the tank to 90 degrees to sanitize it from the inside.
A water heating tank is an excellent helper in obtaining hot water for the kitchen and bath if there is no central heating. Monitor the condition of the heating element, clean it promptly and follow the operating instructions. This is the only way the device will last a long time and function properly.