The “Tatyanka” skirt is such an old skirt model that probably even our great-grandmothers sewed them. However, the popularity of such a skirt is not decreasing, and even vice versa, since full pleated or gathered skirts (mini and long) are back in fashion and knowing how to sew a “tatyanka” skirt with an elastic band comes in handy. Moreover, such a skirt can also be used for sewing a dress, which means it will be easier to create a dress pattern, since a pattern for a “Tatyanka” skirt is not required at all, and all calculations and markings are made directly on the fabric.
In this article you will learn how to make calculations for constructing a “Tatyanka” skirt pattern, how to sew such a skirt with your own hands, and also how to make other skirt models based on this simple and fluffy skirt.
In this video you will learn how easy it is to make a skirt pattern for a girl directly on the fabric. The technology of sewing a children's skirt with an elastic band instead of a belt is also shown.
Pattern for a full Tatyanka skirt
The pattern for the Tatyanka skirt needs to be drawn directly on the fabric, since the drawing is very simple and more like a rectangle. You also need a few measurements for such a pattern, or rather two: measuring the volume of the waist and the length of the skirt. Next, pin the fabric folded right side along the edge and draw a rectangle, where one side will be the length of the skirt, and the other will be the half-circumference of the waist. The skirt will have one seam, so it needs to be cut on the fold of the fabric. By the way, it is not necessary to cut such a skirt in the longitudinal direction. If the width of the fabric is not enough for the huge folds or gathers provided, you can unfold the fabric and lay out the length of the skirt across. The same applies to the belt.
The inscription on the diagram “+ folds” means that this section (doubly) will be used for gathering or folds. Decide in advance how much extra fabric you will need for folds or gatherings, and set this distance from the vertical line to the left.
If the belt has an elastic band, then set aside twice the width of the belt and a hem allowance (1.5 cm) from the waist line. If the belt is cut-off with a zipper, then the length of the belt should be equal to the waist size plus an increase for a loose fit (1-2cm) and a ledge for the fastener (1-2cm). But the easiest way is to cut out a belt 10 cm longer, and then cut off the excess when sewing.
Don't forget to leave an allowance for the hem of the bottom of the skirt (4-6cm) and an allowance along the waist line (1-1.5cm) for the belt.
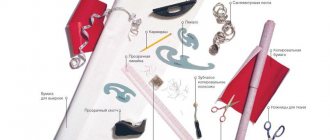
Fabric set
Before you begin, you need to select and select the required amount of fabric. So, the product can be sewn from anything, you just need to take fabric according to the time of year when it will be worn. Pattern and coloring also do not matter much. Everything in this option will be appropriate: the cell will not “go” and the drawing will not “break”. In order for everything to work out in the best possible way, you need to take fabric twice as large as the woman’s hip circumference (if you want the finished product to be a little less fluffy, you can multiply the hip circumference by 1.6). This is necessary in order to make folds or gathers.
As for the length, you need to take into account the length of the finished product (for example, 60 cm) plus seam allowances (10 cm each, to be sure with a margin). The result will be 80 cm. However, if you are also planning a belt (it should be cut in the same way as the skirt, along the length), you need to calculate it too: 25-30 cm (depending on its height) plus allowances again, 10 cm. Total for a skirt with a belt with a total length of the product of 60 cm, you need to buy 110-120 cm of fabric.
Technology of sewing a Tatyanka skirt
“Tatyanka” skirts come with a stitched belt with a fastener or simply with an elastic belt. “Extra” fabric is laid in gathers or folds. There is one more addition, this is a lining. But it is most often used for fabrics that are too transparent, such as chiffon, so we will not consider this option. Depending on these structural elements, the technology for sewing this fluffy skirt differs. Exactly fluffy, because if you need a tight-fitting skirt, then you need to build the basis of a straight skirt on paper and model it on its basis.
Here is the most common version of the “tatyanka” skirt, just above the knee length and with a wide belt with a clasp. Let's see what the features of sewing it are and what you need to pay attention to, especially for a novice seamstress.
You have already figured out the pattern and probably cut the fabric taking into account all the allowances. Now you need to start sewing the skirt. And now the first question immediately arises: where to place the only seam of the skirt panel? Since the skirt will have a hidden zipper, it is better to place the seam at the back, but if the fabric is too thin, then at the side. Next, how to process the seam, should it be pressed? If the fabric is suiting or wool, then the seam needs to be ironed. If you have chosen a light summer fabric for a skirt, then press it.
Bottom of the product
Now it has come to the final stage - processing the bottom of the product. What does a Tatyanka skirt require? How to sew it neatly? As for processing the bottom, there may be several options. The simplest one is to tuck and sew on a machine. To do this, you can take a thread that matches the tone of the product, or a contrasting one, depending on the color. If you don’t want the seam to be visible, you can hand-stitch the product with a hidden seam. You can also glue the bottom with a special tape, this is also possible. That's all, the skirt is ready.
How to sew a hidden zipper
After you have connected the sections of the skirt panel and left the area for the fastener unsewn, you now need to insert a hidden zipper. To prevent the hidden zipper from moving, you have to sweep away the zipper tape before stitching it on the sewing machine. More experienced seamstresses, instead of basting, pin it to the fabric with pins. You can sew a hidden zipper without shifting or basting if you first sew the zipper braid with an additional seam, departing 0.5 cm from the edge. Do not make too large fabric allowances for sewing the hidden zipper. The zipper tape should run next to the overlock seam. Firstly, it will be easier for you to stitch the tape exactly along the edge, and secondly, allowances of 2.5-3 cm are already outdated technology. Wide seam allowances may be printed on the front side of the product. And also, from the top edge of the product, the zipper fastening should be lower, approximately 1.2. By the way, the plastic, molded fastener often interferes with the foot when sewing on the zipper. To prevent it from getting in the way, bend it back with your fingernail.
What to wear with and who suits tatyanka skirts
In fact, many stylists often argue about two important fashion issues that have not lost their relevance in 2021: what to wear with a tatyanka skirt and who is it suitable for. For example, they say that short products should never be worn with high heels, and it is better to prefer a platform, when others note that it all depends on how revealing this model is. Let's also try to argue with fashion stylists, because we managed to find photos of beautiful summer looks where girls, although they combine incongruous things, still look simply stunning.
First of all, it’s worth talking about who exactly the style suits. In fact, he may be just a godsend for some girls. This is especially true for those who have an ideal hourglass figure. The fact is that such a body is already practically ideal and feminine, and a “Tatyanka” model skirt can make it even more attractive and desirable. Many girls who have an hourglass figure have many different variations and shapes.
Also, stylists recommend wearing a tatyanka skirt for girls who have small breasts. In this case, you get a very cute doll image. Which will definitely appeal to young fashionistas in 2019. There are several ideas from designers that will help you understand what you can wear with such a skirt, they can be seen in the photo below.
You should completely abandon this model, and it doesn’t matter whether it has a yoke or an elastic band, this is for girls with a triangle body type. But at the same time, stylists insist that this is a good thing that will help correct the inverted triangle figure. But as for girls with an “apple” body, they are generally contraindicated from wearing such models. In the photo below you can see a few more interesting ideas about what you can wear with a tatyanka skirt in 2019 and with what it will look most advantageous.
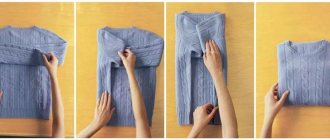
How to put pleats (gathering) on a skirt
This photo shows how to make pleats using pins. But if this method does not seem very reliable to you, and you are afraid that the folds will move under the foot of the sewing machine, then sew a stitch and fix them. Remember to remove the pins in time, otherwise the needle may hit the pin and break.
I hope you can figure out how to evenly lay the folds around the entire circumference of the skirt, but I’ll tell you how to make a gather on the skirt. You don’t always need such large folds, and even more so, they don’t suit everyone, but a neat gather around the skirt will suit every woman. To ensure perfect gathers on the skirt, set the stitch length on your sewing machine to 3-5mm. Now, along the edge of the upper edge of the skirt (from the edge 0.7) stitch along the entire circumference. Do not fasten the stitch. Next to this line, at a distance of 0.5 cm, lay another line and also do not fasten it. Now these lines need to be pulled together at the same time by one thread, for example the top one, and as a result you will get a uniform and beautiful fold.
Video on how to make a counter pleat for a skirt.
Features of the cut
“Tatyanka” is often confused with a circle or half-circle skirt; outwardly, these styles can really be similar. The main difference is in the cut. The circle skirt is cut in the shape of a circle with a waist hole in the center.
A half-sun is, accordingly, half a circle; such a skirt will have at least one vertical seam. The Tatyanka skirt is cut in the form of a rectangle, the upper edge of which is pulled together with an elastic band or draped under a belt.
The longer the rectangle of fabric, the fuller the skirt will be. The fabric itself also plays an important role - a tatyanka skirt made of dense material will be more voluminous than one made of thin and flowing material.
“Tatyankas” are made from checked suit fabrics, from staples and chiffon with floral prints, from bright knitwear or satin in pastel shades - in any case, the product will look harmonious.
How to sew a belt and loops
The belt must first be prepared, glued with adhesive fabric and ironed in half. Then stitch along one of its sides, being careful not to undercut the fabric. Now bend the belt up and fix this position with an iron. Next, all that remains is to make a hem and add a finishing stitch along the front side. But the truth is, first you need to make a ledge for the belt, the area where the button will be sewn. It is small, but requires carefulness. To make a ledge, you simply need to turn the belt inside out at that point (face to face), secure the cut edge, and then turn it back inside out. Straighten the seam with a ruler, fix it with an iron together with a hem, and add a finishing stitch.
If your full skirt will have belt loops, then in this photo you can see the easiest way to make them. And if you need to learn more about the technology of making belt loops, read this article Processing Belt Loops.
How to make a one-piece belt with a wide elastic band for a children's skirt or pants.
Sewing
Since our “Tatyanka” skirt has pleats, first of all it is necessary to secure them. To do this, it is enough to sew one seam on the machine along the entire width of the product. Now you need to sweep the top of the skirt so that it does not fray. This can be done using an overlocker. However, if there is none, you can get by with an overlock foot on a sewing machine or simply overcast the top manually with a “zigzag”; it also holds the threads well and does not allow them to roll.
Since the “Tatyanka” skirt will have a belt, now you need to sew it on, but first sew in a lock, which can be either secret or regular (it’s better to match it to the color of the product). The belt (the edges of which are necessarily overlocked) is sewn first with the side that is adjacent to the girl’s body. It is necessary to fold one edge of the belt and the top of the folds (face to face) and stitch from the wrong side, and also process the overlap on the fastener. Next, the front part of the belt is sewn in. To do this, you need to tuck it in and sew along the top with a neat millimeter stitch. That's all, the belt is sewn in. All that remains is to make a loop using a special foot on a machine and sew on a button.
Modeling the Tatyanka skirt
If you need to sew a regular “Tatyanka” skirt with an elastic band, then on our website we have an article on How to sew a skirt with an elastic band. It discusses various options for sewing a skirt with an elastic band, including the option when the elastic itself serves as a belt for the skirt.
As for other options for the Tatyanka skirt, there are many of them. And to a large extent they depend on your imagination. You can make a skirt with side pockets, then the skirt panel will have to be cut into two parts and pockets inserted into the seams. You can sew a “tatyanka” skirt with folds only on the front, asymmetrical folds, etc.
Even this version of the skirt can be sewn based on the “Tatyanka” skirt pattern. Only this is a complex skirt model and you will need knowledge of the technology for processing a codpiece with a button fastener. The pattern itself will have to be adjusted along the waist line and a belt of a different shape will have to be cut out.
Skirt pattern - pencil. Very simple construction, accessible for beginners. The video is in English, but you can choose captions in any other language. If you like to sew, be sure to subscribe to this video channel. You will learn a lot of useful things. The channel was created by professional tailors.
Greetings friends!
Today, I want to bring to your attention another master class “How to sew a Tatyanka skirt ? To sew this skirt, I used 1 meter of linen with the addition of stretch. This amount of fabric is enough for a skirt up to (and slightly below) the knees.
Why did I choose this particular skirt model for the next master class? I believe that this particular skirt model is perfect for another “experiment” called pockets. All the elements of the Tatyanka skirt have already been found in my previous posts, for example, how to sew a belt to a skirt or how to sew a skirt with an elastic band . But I haven’t had a chance to “work” with pockets yet. You have a great opportunity to rate my attempt at working with pockets by using the comment form at the end of the post.
I would also like to add that this is my second attempt to sew the Tatyanka skirt . The first time, I used too thin and slippery fabric, and it didn’t work out. But, on the other hand, it turned out very well the second time. So, don’t be afraid to ruin the fabric, and expect that everything will work out :).
Below, I offer you step-by-step instructions on how to sew a “Tatyanka” skirt with an elastic band .
What we need:
- Fabric – 1m (in my case, linen with added stretch, width 1.50m);
- Elastic band – 1 m;
- Pocket pattern;
- Sewing supplies;
- Padding material (for example, non-woven thread-stitched edge . It is used to strengthen parts that are subject to heavy loads when worn, in our case these are pockets. I didn’t use it, I forgot).
Before you start working with the fabric, rinse it in warm water and dry it.
To sew this skirt, we will need three measurements: hip circumference and waist circumference, as well as the length of the skirt. For hip circumference = 90 cm, I used the entire width of the fabric - 1.50 m.
Skirt details:
- belt – 1 pc. = 10 cm,
- front – 1 pc., and back of the skirt – 1 pc.,
- 2 pockets,
- 2 pocket facings.
Fold the fabric edge to edge (in this horizontal position the fabric should stretch more). We measure the desired length of the skirt on the fabric. My skirt is just below my knees. Measure the width of the belt on the remaining piece of fabric. Its length will be equal to the width of the skirt. The width is given taking into account hem allowances. Of course, the width of the belt can be different, at your discretion.
The remaining piece of fabric, after all the manipulations done, was still enough for me to have roomy pockets . Place your palm on the edge of the fabric and, adding another 2-3 cm + allowances of 0.5-1 cm, outline an arc, thus connecting the upper points of the corner.
You can cut out two patterns, one will serve as a pocket pattern, and the other will serve as a facing for the pocket, on which we first cut off the “corner”.
We cut the fabric for the main part of the skirt into two parts of equal width. On the part for the front of the skirt we make cuts for pockets. That is, we place the facing piece on top of the front panel of the skirt and transfer the top edge of the facing onto it.
Having placed the facing part face to face of the front panel of the skirt, with an allowance of 0.5 cm, we lay a stitch along the bend of the entrance to the pocket. Do not forget to reinforce this cut with cushioning material so that the entrance to the pockets does not pull back later.
We turn the pocket facing inward, iron it thoroughly, and then lay a finishing stitch over and along the entrance to the pocket with an indent of 0.2-0.3 cm.
We do the same with the second pocket.
We attach the pocket piece to the front panel of the skirt so that the front side of the pocket lies to the front side of the pocket facing. Align the top cut of the pocket with the top cut of the front of the skirt. Having processed the edges of the pockets with an overlock or zig-zag stitch, with an indentation of 0.5 cm we lay a straight stitch along the bottom bend of the pocket. Voila, we have a pocket!
Repeat the same steps with the second pocket.
We process the sides, bottom and top of the back and front panels of the skirt with an overlock or zig-zag stitch.
Fold the front and back panels of the skirt with right sides facing each other. We pin them together or sweep them away. Sew the sides of the skirt with an allowance of 1 cm.
Let's start with the belt.
Folding the edges of the belt to the center by 1 cm, iron them, then fold the belt in half and iron it again. If you don't remember how to properly sew a belt to a skirt , check out the video below:
When attaching the belt to the skirt, leave a small hole to thread the elastic through. With an indentation of 01-0.2 mm from the bottom edge of the belt, we lay a finishing stitch on top. We put on an elastic band. Sew up the left hole.
Let's start working on the bottom of the skirt. We make 2 folds about 0.5-1 cm wide. Baste, iron, and then lay a straight line along the entire perimeter of the skirt.
We turn our skirt right side out and iron it.
Congratulations on your new look! Now, you know how to sew a “Tatyanka” skirt with pockets and elastic .
Have a great mood!
PS If you have anything to add on this topic, leave comments using the form below, I’ll be happy to read them :).
PPS Subscribe to blog updates, join our groups on social networks VK (add your work here) and Facebook so you don’t miss anything.
PPPS Friends, if you subscribe to the newsletter and have not received an activation letter, check your Spam folder, it is quite possible that the activation letter ended up there.
Author: Anna.