Every bathtub cannot last forever; over time, various kinds of problems and troubles arise and it is necessary to either change the bowl or deal with the damage yourself. But, as often happens, finances do not allow you to buy a new hot tub, so chips in the bathroom, cracks or rusty spots have to be repaired yourself.
But first, you need to understand what types of problems exist and only then think about how to remove a chip on the bathtub, repair a gap or hole, and in general, what you need to have on hand “just in case.”
Restoration using enamel
If you choose this option, you need to make the right choice of how to cover the old bathtub.
In stores, two-component enamels are available for sale, packaged in jars and aerosol cans. Only the coloring composition in jars should be used. The fact is that the enamel in aerosol cans will last on the surface of plumbing fixtures for no more than one year. If you decide to do the restoration of a cast-iron bathtub yourself, it is advisable to purchase a repair kit. In addition to enamel, it contains all the accompanying materials necessary for the work - special primer, napkins and more. Having such a kit will make the repair much easier. True, some kits do not include the coloring composition and in this case it is purchased separately.
There is a certain sequence on how to restore a cast iron bathtub:
- First, primer is applied to the surface and dried. Then the entire internal area is wiped again with lint-free wipes. Next, the bath is covered with the first layer of enamel. For these purposes, it is advisable to use a spray gun, but not all craftsmen have this device at home, so most of them use a brush.
- When the choice has been made as to what is best to restore the bathtub in a particular situation, they begin to apply enamel in a minimum of two and a maximum of four layers. But between paintings you should take breaks of at least one hour. As a result, the job of updating the plumbing takes about the entire day.
- After completing the application of enamel, the last layer is coated with gloss. An hour after painting, the surface is wiped with solvent and left to dry. The enamel dries in 24 hours, but you can take water procedures in the bathroom after a week.
This method of repairing a cast iron bathtub is not very popular, since its advantage lies only in its affordable cost. Enamel manufacturers promise that it will last at least 5 years, but in reality the coating lasts for 3 - 4 years.
This coloring composition has a strong smell and therefore, when working with it, it is not enough to use a protective mask; you need to work in a respirator, or better yet, a gas mask. If we add 7 days of drying to the above disadvantages, it becomes clear why this method of restoration is not popular.
Typically, the decision to renovate a bathtub at home is made in favor of enamel when a residential property is being prepared for sale and it needs to be put in order, or the property is going to be rented out.
Cast iron bathtub repair
Repair of a cast iron bathtub is carried out according to the described algorithm. The difference between these procedures can be seen in the fact that in this case other reducing compounds are used.
Removing shallow scratches
It is recommended to repair any scratches on the surface of the bathtub immediately. Otherwise, rust will form in this place over time, which is more difficult to get rid of.
Fine sandpaper
You cannot repair a bathtub with sandpaper. This material is used to repair damage, after which you need to apply acrylic or another product used to treat the bowl.
Fine abrasive car polish
This material is used in the second stage of scratch removal. It is recommended to apply car polish to a damp surface, ensuring that the surface acquires a matte finish. To do this, you need to treat the problem area first vertically and then horizontally.
Wax polish without abrasive
This polish is used at the finishing stage. Wax has water-repellent properties and adds shine to the treated surface. After applying this polish, the bowl should be washed with a liquid cleaner.
Methods for eliminating chips and deep scratches
To get rid of deep chips and scratches, you will need more expensive products. Moreover, in each of the described cases, the surface is prepared according to the specified algorithm (rust removal, degreasing, and so on).
Applying a porcelain patch
This option involves using a piece of porcelain and epoxy resin. The first material must be crushed to a powder state. After this, you need to apply epoxy resin to the problem area and pour porcelain on top. If necessary, the defect is closed in two layers. In this case, the material must be applied after two hours. At the end of the procedure, the repaired defect is polished.
Application of BF-2 glue
BF-2 glue contains a polymer that forms a smooth surface at the site of a chip in the metal. Before fixing the problem area, this product is mixed with tooth powder, dry whitewash or chalk. After preparation, the material is applied to the place where the defect is located and left for a day. If necessary, scratches and chips are treated in two layers. In this case, you need to wait at least three days.
Using automotive putty and enamel
Body Soft or NOVOL Fiber putties are used to cover the bathroom. The material is applied to a previously prepared surface using a rubber or plastic spatula. The putty during the procedure should fill all voids.
Spot filling of the chipped area
To eliminate minor defects localized in a small area, enamel is used for restoration. The material is applied to the problem area in a thin layer. After four hours, the procedure must be repeated. You can use the bathroom after a day.
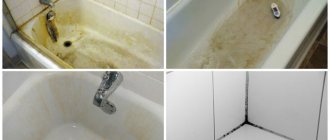
Types of damage to the bathtub
Everyone knows that the bathtub is used quite often. Each family member needs to visit her at least twice a day. We need to wash ourselves daily. It is logical that with such frequent use and a careless attitude, visible damage may form on the bathtub, spoiling its appearance. What are they?
Advice! If you experience any of the damage listed above, you need to take immediate action to restore it. Don't think it's not scary. If you don't act, you will only make things worse.
So, let's find out how to deal with most of these defects.
Eliminating minor scratches on a bathtub
The work is not difficult, you can do everything yourself. All you need to do is polish the surface. Everything is done according to the following plan:
- To begin, thoroughly wash the surface of the bathtub and then wait until it dries. If the room is warm, it will dry faster.
- Now take the finest grit sandpaper and thoroughly sand the damaged area. Work carefully so as not to multiply scratches.
- Work until the surface is smooth and matte and the scratches have disappeared. Then polish everything with a fine abrasive polish. Rub the surface with felt until the area on the bathtub is smooth.
- Next you need to apply a wax polish without an abrasive. Rub the area again with the microfiber cloth until a shine appears.
- After all manipulations, rinse the bathtub with liquid detergent and wipe with a soft cloth.
That's all, now you know how to remove a scratch on a bathtub.
Note!
You can purchase a repair kit for an acrylic bathtub specially designed for this purpose. It contains two types of polish, wipes and waterproof sandpaper.
We eliminate chips and deep scratches on the bathtub
It is clear that sanding with sandpaper is not quite suitable here. There are special kits for acrylic bathtubs that can be used to remove defects. This kit includes:
- sandpaper;
- polish;
- napkin;
- applicator for acrylic.
The cost of such a set is from 500 rubles. This is much cheaper than hiring specialists. So, your task is to repair the chip with acrylic and polish the bathtub area.
Now everything is in order:
That's all, your bath is ready and looks like new. Minimum effort required. It's important to take it and do it.
Removing cracks in the bathtub
It also happens that the bathtub is simply cracked and begins to leak. What to do in this case? Is there a solution? Yes! To do this, you will need the same repair kit that was used in the previous methods. In general, we can say that the work is carried out according to the same scheme as with scratches and chips. The process is similar, but there are some subtleties.
So, the elimination technology is as follows:
You should know that such cracks must be repaired immediately as soon as they appear. Then everything will get worse, and elimination will require more money and effort. The crack will spread, becoming even larger. It is important to note that this method is suitable for small cracks. When they are launched, reinforcement will have to be done. The photo below shows how this work is done.
In order to avoid scratches and various types of defects in the future, you need to follow some rules. It is important to take good care of the surface so that its appearance is preserved for a long time. Overall these are simple steps to know. Here are the main ones:
- Acrylic bathtubs should be washed with a soft brush. The use of rigid devices is not recommended. The same goes for detergents. They should not be aggressive, containing alkali and chlorine. Otherwise the surface will be damaged.
- Please also keep in mind that if you use acetone solvents, the bath will have a cloudy tint and will begin to deteriorate over time.
- For quality care, use gentle products such as dishwashing detergent, liquid soap, and a mixture of lemon juice and vinegar.
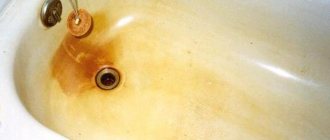
- If you have hard tap water, with a lot of iron and salt, it can have a detrimental effect on your bath. To prevent defects from forming, it is enough to prevent the liquid from drying out from the coating.
- And finally, you need to carefully use bathroom items so as not to accidentally damage the acrylic coating.
Removing shallow scratches
The use of multi-component cleaning products, cleaning the contaminated surface with a stiff brush, careless handling of metal objects during repairs - all this leads to the formation of shallow scratches.
Such scratches must be eliminated immediately, since the penetration of moisture and caustic chemicals into the resulting gap leads to the formation of rust, the proliferation of moisture-loving microorganisms and an increase in the size of the scratch. Which will lead to further destruction of the bathtub surface.
Shallow scratches include damage that does not expose metal. These minor damages can be repaired even without priming the surface.
The factory enamel on the bowl of a cast iron bathtub is very durable, so a screwdriver is needed to remove shallow scratches. If it has already been restored with acrylic or epoxy enamel, sanding paper will be suitable for treating micro-scratches.
In addition, to treat microdamages you will need:
- fine-grained sandpaper marked P1200, P1500 or a screwdriver with an attachment for attaching an abrasive wheel;
- fine abrasive car polish - economical polishes for one-time use are pastes from WILLSON and RUNWAY;
- wax polish without abrasive, for example, Golden Wax.
At the first stage, it is necessary to wash the surface with Pemolux, Comet, Sorti or baking soda to degrease. After removing the product, you need to dry the bath.
Next, the surface is polished with fine-grained sandpaper or a screwdriver with an abrasive wheel - zero, until leveled. When processing a scratch with a screwdriver, the minimum speed is set.
The treatment area must be constantly damp to prevent cracks from appearing when heated. Therefore, during the entire stage of primary polishing, it is necessary to pour a thin stream of water onto the damage.
After the treated surface becomes smooth and matte, it is necessary to apply a grainy polish to it. Treatment with a low-abrasive composition is carried out vertically, then horizontally, until a smooth, uniform surface is obtained.
The final stage of eliminating minor scratches is finishing the coating with car polish and wax. Wax-containing polishes are water-repellent and add a sparkling shine to any surface.
The polishing cloth should be soft and lint-free. Therefore, it is better to use flannel, calico, felt or microfiber cloths
After obtaining a shiny surface, it must be washed with soapy water or a non-aggressive liquid cleaning agent: Tersi, Oda, Sarma. Immediately after this, the bath can be used.
Crack repair
Small cracks
Cracks no more than a millimeter thick can be repaired somewhat easier than wider ones. This is a little easier than fixing a chipped bathtub enamel. All work must be carried out in a ventilated area and using protective equipment, since epoxy putty is hazardous to human health.
- The area around the crack is cleaned with sandpaper.
- Small holes are drilled at both ends of the crack with a drill to prevent it from spreading.
- The repair area is thoroughly washed, degreased and dried.
- Epoxy putty is applied with a spatula to the crack itself and the drilled holes. The mixture is leveled and the excess is removed with a spatula.
- After sitting for 12 hours, you can start sanding. The result should be a smooth surface, which must be free of unevenness.
Deep cracks
Initially, as in the previous case, the surface is cleaned with sandpaper, holes are drilled, and the degreasing and drying procedure is carried out. You can speed it up using a regular hairdryer. Then a piece of construction tape is cut off, slightly larger than the crack. The tape needs to be glued to it and smoothed out well, removing excess air from under it.
Restoration of a bathtub from chips
Through holes
A through hole in a bathtub is serious damage, but it is not worth replacing the bathtub. You can repair it yourself. To do this, the first step is to drill holes at the ends of the damage. If it does not have the shape of a crack, then this is not necessary. After this, using an electric drill, the damaged area is processed to the shape of a crater. In this case, the metal of the bathroom should be visible. For convenience and better quality repairs, such a “crater” should be as flat as possible. Now this place is thoroughly washed, degreased and dried.
How to properly repair cracks and chips in a bathtub - do-it-yourself restoration
Epoxy putty is used for sealing. After mixing all the components, the mixture is applied to the edges of the hole. After this, it is sealed with reinforcing tape, and another layer of putty is applied on top. This procedure must be repeated until the hole is completely sealed. Dried putty needs to be sanded with sandpaper. After this, the surface should be perfectly smooth. If desired, the surface can be painted using special enamel or aerosol in the same way as when repairing a chip.
How to get rid of scratches on acrylic
Buy an acrylic bathtub
- this is only half the battle. It is also important to preserve its beauty and gloss for years of use. If this does not work out, you can use some professional advice and folk wisdom, which will not fail to appear in the face of any trouble in life.
So, first of all, you can use professional kits for restoring acrylic coatings, which often come complete with the bathtub or are sold separately in plumbing stores. They usually include a small package of liquid acrylic or a special epoxy putty and a spatula. Using these products you can cover up any, even deep damage on an acrylic surface, regardless of whether it is an acrylic corner bathtub
, a shower cabin with an acrylic tray or a classic-shaped bathtub. To do this, the surface near the damage must be treated with medium-sized sandpaper and then degreased. Then a layer of epoxy putty is applied on top, leveled with a spatula and dried for 24 hours. After this, the area is sanded with fine sandpaper and polished with a special product. When using liquid acrylic, the scratch should be covered, and then a piece of polyethylene should be glued to this place, which should be removed after a few days of drying.
If the scratch is very shallow, then treating the surface with sandpaper (sequentially from coarse-grained to the finest) and then polishing with the same universal product may be enough.
How to avoid scratches on acrylic
To prevent such manipulations from becoming your habit, you should immediately follow simple but important rules for its operation immediately after installing an acrylic bathtub.
- Do not clean acrylic surfaces with powders, hard brushes or other abrasives. Acrylic is very soft, and even a large 160 160 bathtub
is not designed for rough handling and will break down very quickly. - To sanitize acrylic bathtubs and showers, use special products for acrylic surfaces or regular dishwashing detergent or liquid soap. Such solutions will not harm your bathtub, unlike aggressive chemicals based on chlorine or alkali. Stubborn stains from acrylic are best removed with a mixture of vinegar and lemon juice, as well as a soft toothpaste without hard granules.
- Try not to let the water dry on the surface of the acrylic. Hard tap water can negatively affect acrylic coating, gradually leading to its destruction.
- Do not allow acrylic to come into contact with hot surfaces (for example, curling irons, straightening irons or unextinguished cigarettes) - they will leave burns on the acrylic.
- Make sure that heavy, sharp and hard things do not fall into the acrylic bathtub. If you wash pets, bicycles or furniture there, place a rubber mat on the bottom.
When to repair damage
Before you begin to decide what to do if the enamel on the bathtub has chipped, you need to understand whether such measures are required.
There are several opinions on this matter:
- There is no need to repair the chip, since a quality result will still not be achieved.
- If you repair the chip, the bathtub will begin to rust under the patch.
- It is necessary to repair the damage, but this procedure is quite complicated and will take a lot of time.
We can say with confidence that it is imperative to take action to restore the enamel if a way to solve such a problem is known. Of course, a perfect restoration will not work, since such events are carried out at a special temperature and under certain conditions, but you can make the bathtub attractive with your own hands.
It is worth mentioning one mistake that some home craftsmen make when repairing chipped bathtubs. To eliminate chips on an enamel container, they heat the problem area using a gas torch or blowtorch. According to such craftsmen, the patch will be better fused with the main coating. Professional plumbing equipment repairers do not recommend performing such measures, as in the future this may cause the entire enamel coating to peel off.
As for the pockets of corrosion that can form in the damaged area, they can form if the question of how to repair a chip in the bathroom is incorrectly decided. In most cases, rust forms when using a regular sealant on stains. This situation leads to the need to solve the problem of removing rust stains.
Restore shine
Long-term use of an acrylic bathtub leads to gradual abrasion of its surface. Because of this, the bowl loses its original shine and becomes dull. In such circumstances, a wax composition can be used to eliminate the defect.
In addition to this method, special pencils are used to restore shine and eliminate minor scratches in the bathroom. Their composition includes polishing particles, which soften it upon contact with acrylic. This effect causes the polymer to spread, fill the problem area and eliminate the defect.
Means for sealing cracks, potholes and chips
If to eliminate minor scratches it is enough to perform high-quality grinding and polishing with felt, then repairing cracks and potholes is a process that requires a lot of effort. To eliminate such defects with your own hands, you will need a special repair kit for working with acrylic bathtubs, which consists of the following components:
- Liquid acrylic, which comes in a variety of shades. Therefore, choosing the appropriate material for a particular bathtub is quite difficult, especially if there are no documents for the sanitary product.
- A hardener, without which it is impossible for liquid acrylic to harden.
- Sandpaper to create a rough effect on the damaged area.
- Polishing paper used to finish the restored acrylic section of the bathtub.
- A special solvent used to degrease the damaged area of the pallet.
- Epoxy adhesive composition, which eliminates minor scratches up to 1 mm deep.
Naturally, the repair kit may also have a minimum set of the most necessary things - liquid acrylic and hardener. In turn, related materials can be purchased separately at a hardware store.
Fighting delamination
Sometimes the acrylic layer comes away from the fiberglass. Because of this, bubbles appear in the bowl, which eventually burst, exposing the inner surface. To eliminate such a defect, you will need a special glue with which the polymer layers are connected.
Work with damage begins with drilling a small hole in the center of the bubble. Through it, the space between acrylic and fiberglass is filled with glue. It can be administered using a regular syringe.
Next, the swollen part must be pressed down so that it comes into contact with the fiberglass. Any adhesive that appears should be removed immediately. The hole made in the acrylic is eliminated according to the scheme described above.
Repair of cast iron bathtubs with acrylic and liner
To complete this work you need:
- liner made of sanitary acrylic, which corresponds to the size of the bathtub;
- polyurethane foam made of two components or special mastic;
- silicone sealant.
This method is considered the simplest and most effective. To implement this, you need to purchase a special acrylic liner for the bathtub. However, a good result will be achieved only if the liner is of high quality. Therefore, when purchasing it, request the appropriate quality certificate.
Repairs are carried out in the following order:
- the liner is prepared by making holes for draining and overflowing;
- near the holes it is necessary to lubricate with sealant;
- using two-component foam or mastic, the liner is strengthened;
- Foam should be applied over the entire surface, otherwise acrylic will begin to sag in voids, which may cause cracks.
Advantages of the method:
- quite fast and low-cost method;
- Using a high quality liner, the bathtub will serve for many years;
- the shiny surface of the acrylic liner, as well as its wear resistance.
This type of work must be carried out before the walls are finished, otherwise tiles will have to be removed along the perimeter of the bathtub.
Method 2: bathtub restoration with liquid acrylic
This method of restoring a bathtub appeared relatively recently, thanks to the advent of a special material - glass acrylic.
How do we restore?
Stacrylic is a two-component acrylic material developed specifically for the restoration of bathtubs. It consists of acrylic itself and a separately supplied hardener. When acrylic and hardener are combined, the polymerization process begins, and when applied to the surface, the composition turns into a high-quality acrylic film with a thickness of 4 to 6 mm.
Advantages of glass
Stacryl has three remarkable properties that help it quickly and effectively restore a bathtub:
1. Viscosity
The optimally selected glass viscosity coefficient helps to easily create an acrylic coating with a thickness of 4 mm on the walls of the bathtub and 6 mm on its bottom.
2. Fluidity
The fluidity effect allows the glass to independently envelop the surface of the bathtub and lay down in an even layer.
3. Delayed polymerization
Thanks to this quality, you can calmly and relatively comfortably carry out work on the restoration of the bathtub, without fear that the acrylic will harden too quickly.
Once polymerized, the acrylic surface has mechanical and impact strength far superior to an acrylic liner or enamel layer.
1: Surface preparation
This stage is no different from the restoration of an enamel surface. Repeat the same steps. Then disconnect the siphon and place a container under the bathtub drain where excess acrylic will drain.
2: Applying liquid acrylic
- prepare the acrylic mixture according to the manufacturer's instructions;
- slowly pour the finished mixture onto the upper edge of the bathtub; as soon as the stream reaches the middle, we begin to smoothly move the stream of glass around the perimeter of the bathtub;
- when the circle is closed, repeat the procedure, starting from the middle.
The process of pouring restoration must take place continuously; for this you need to take a glass container of a suitable size. You shouldn’t skimp – it’s better to pour out a little more acrylic than not have enough of it; the excess will go into the container under the drain hole.
Acrylic polymerizes, depending on the type, from one to four days. Choose glass acrylic with a long drying time; in this case, the acrylic surface will be of higher quality.
The service life of the restored bath will be about 20 years.
Additional Information
The method for eliminating defects on the surface of acrylic bathtubs is selected taking into account the nature of the damage. To remove small scratches, no special compounds are required: just thoroughly wipe the problem area with a piece of felt. If the depth of the defect exceeds 0.5 mm, then they are eliminated using special pastes. The latter must be matched to the color of the bowl.
Scratches appear if users do not follow the instructions for using bathtubs. To avoid the formation of defects on the acrylic surface, a number of requirements must be met:
- Do not use aggressive detergents or hard bristled brushes for cleaning. It is also not recommended to use substances that contain chlorine and alkaline compounds.
- Do not use powders with large particles. Upon contact with them, fairly large defects appear that require liquid acrylic to eliminate.
- Treating acrylic with acetone leads to darkening of the surface of the bowl over time. Similar effects occur due to ammonia
- Regularly clean the bowl of dirt using liquid soap, lemon juice, and vinegar solution.
- If the tap water is too hard, the bathtub must be wiped dry after each bath.
If the bathtub is used for washing animals, you must first place a mat or other material on its bottom that protects the acrylic from claws.
Applying enamel
You can enamell not only a bathtub, but also a shower tray made of steel and cast iron, a washbasin, and a kitchen sink. Both the entire surface of the plumbing fixtures and individual areas are restored, if necessary.
This method of restoration is short-lived, but quite economical. A painted bathtub will serve you for another couple of years, after which you will again have to think about painting or replacing it.
Step 1. Open the enamel and hardener. Pour them into a convenient bowl and mix with a mixer until smooth (see the exact proportions on the package).
Mixing paint
Step 2. We begin to apply the enamel with a brush, making first horizontal and then vertical strokes. Carefully paint the entire bath.
Bathtub staining
Step 3. Without waiting for the first layer to dry, apply the second. Gently stretch out the smudges with a brush.
Bathtub staining
Step 4. Paint the bottom of the vessel again.
The bath will be ready for use in about 5 days. Until this point, it is advisable not to turn on the water and prevent dirt from getting on the painted surfaces.
Features of repairing chips and holes
If chips have formed on the acrylic layer of the bathtub from the fall of heavy objects or a hole has appeared in the body, then even such complex defects can be eliminated with your own hands. For very deep problems, repair work consists of several stages and involves the following manipulations:
- As always, the first stage involves high-quality cleaning and degreasing of the damaged area.
- At the next stage, coarse putty is used, forming a uniform layer that is not subject to shedding.
- After the first layer has dried, it is thoroughly sanded using sandpaper.
- The following actions involve finishing treatment using a finely dispersed repair compound.
- After the composition has completely dried, the surface is sanded with fine-grained sandpaper.
- At the final stage of repair work, the acrylic bathtub is polished.
As you can see, every homeowner can do the repair of an acrylic bathtub with their own hands. The main thing is to have a suitable repair kit, read its instructions and, of course, not be afraid of physical labor.
Removing small cracks
Any scratches on the bathroom must be removed. Constantly in contact with water, the damaged surface will begin to quickly deteriorate. And in the future you will have to purchase a new product.
You can remove scratches on the bathroom by polishing. Stores sell specialized kits designed to restore damaged acrylic. They include:
- putty knife;
- epoxy resin or liquid acrylic.
Attention! Bathtub restoration materials are toxic. When working with them, you must open a window in the room for ventilation and use a mask (respirator) with gloves.
Before removing scratches from an acrylic bathtub, its surface must be cleaned. The defect is removed using sandpaper, first 80 grit and then 200 grit. When the surface acquires a matte tint, it should be degreased. Putty is applied to the scratch using a spatula. The bowl must dry for 24 hours before it can be filled with water.
If liquid acrylic is used to remove a scratch on a bathtub, the material is first applied to the damaged area. Then it must be covered with plastic wrap and left in this form for several days. After the specified period, the problem area is sanded using fine-grained sandpaper.
At the end of all work, a polish is applied to the acrylic, which returns it to its former shine.
Important! Acrylic is a homogeneous material. Sanding does not change its color.
How to repair a bathtub using a liner
Working with the liner is simple, but requires adherence to gluing technology. You will need to follow the steps below:
- It is necessary to remove all unnecessary and interfering elements along the edges of the bowl.
- When the coating is glossy, it is sanded with sandpaper for better adhesion, and then the bath is cleaned of dust.
- Drains and overflows are eliminated.
- It is necessary to find the correct places for the overflow and drainage, this is done by rubbing them with a stylus, the new bowl is placed in the bathtub and the necessary marks for the holes appear on it. You can also do this with the edges if the bowl is larger. Fitting is done with a jigsaw, as well as a drill with a round attachment.
- A large amount of sealant is applied along the edges and areas of the holes, and special foam is applied to the rest of the area.
- A new liner is installed, the edge areas must be secured with clamps under which the plates are placed. The drain and overflow are returned to their place.
- The bathtub is filled with water up to the overflow mark, 2-3 cm below it. The weight of the water will secure the bowl well. The water does not drain for days.
The weight of the water will hold the bowl well.
Restoration methods, their advantages and disadvantages
There are several basic methods for repairing the enamel layer. They can be used for different stages of defects. If you choose the right option, the result will be high quality and will last a long time.
There are several basic methods for repairing the enamel layer.
Enamel painting
Applying new enamel is suitable when there are no large flaws and a layer cannot hide them. The method is not difficult and inexpensive. But the result is short-lived, the average service life of enamel is 5 years. There are aerosol enamels, or regular enamels, which are applied with brushes or rollers.
Applying new enamel is suitable when there are no large flaws and a layer cannot hide them.
Liquid acrylic
Acrylic is a suitable option for treating the surface of a bathtub; it is more durable than enamel, lasting up to 10 years. Does not acquire a yellow tint over time, there is no chance of getting bubbles when applied, the layer will be smooth. When using, do not forget about the operating rules.
Drying lasts 1.5 days, but the layer is covered. The downside is that it requires experience from the master to apply it well, or preliminary training is required.
Acrylic is a suitable option for treating the surface of a bathtub; it is more durable than enamel, lasting up to 10 years.
Acrylic insert
There are special bowls on sale that duplicate the shape of the bathtub. They are simply attached to glue and serve for many years, up to 15 years. The choice of colors is also varied.
This option is easy to implement and does not require additional skills from the master. The only thing you need to do is choose the right liner so that it fits the cast iron bathtub perfectly. It is not possible to find the desired form in all cases.
This option is easy to implement and does not require additional skills from the master.
Grouting tiles
Defects in the bathroom are formed not only on the surface of acrylic. Scratches often appear on tiles. She, like acrylic, does not tolerate mechanical stress well.
It is not possible to answer the question about scratches on tiles and how to remove them. Unlike acrylic, it cannot be completely restored, regardless of the size of the defect. There are two ways to return the wall to its original appearance:
- replace damaged tiles with new ones;
- erase the defect.
The first option is less practical, as it requires complex work, during which you have to remove several tiles from the wall.
The second method involves treating the damaged area with mastic or a special pencil. The material must dry completely, after which it is sanded.
It is relatively easy to remove defects from an acrylic bathtub. Most minor damage can be repaired and does not require professional intervention.
New times require a modern approach, including to hygiene products and plumbing. Experienced housewives have long appreciated the household advantages of acrylic bathtubs: they are slightly susceptible to contamination, maintain the water temperature well and always look great.
However, many housewives neglect the rules for using beautiful but fragile acrylic bathtubs, continuing to clean them with harsh powders and brushes out of habit. This inevitably leads to abrasion of the acrylic layer and the appearance of sometimes small and sometimes very noticeable scratches on its surface. If such trouble has befallen you, then you will be interested to know how you can get rid of them with the help of simple means, direct hands and some diligence.
Features of cast iron baths
Cast iron bathtubs are distinguished by their practicality and are not so expensive, for this reason they are used in many apartments and houses. The base of the bathroom lasts up to 50 years, but the enamel layer is subjected to heavy loads and quickly loses its attractiveness, the coating becomes thinner. Then it is necessary to restore the surface if there is no desire to replace it.
You can restore the enamel of a cast iron bathtub yourself, but you need to understand the intricacies of the process. If you restore the coating on time, the bath itself will last longer, and its appearance will delight the owners.
The base of the bathroom lasts up to 50 years, but the enamel layer is subjected to heavy loads and quickly loses its attractiveness.
How to fix holes?
A hole can form due to a heavy object falling onto an acrylic bathtub. If it has sharp edges, then the likelihood of a through hole increases. Only small holes must be eliminated.
Repair instructions:
- the bathtub must be cleaned, dried and degreased on both sides: internal and external;
- fiberglass is attached to the reverse side using epoxy glue - its diameter should be 5-6 cm larger than the hole;
- the second fiberglass overlay is attached 2 hours after fixing the first one - its size should be even larger by 5 cm;
- the third segment exceeds the second by another 5 cm, it is also glued after 2 hours;
- after 1.5 hours, the inside of the bathtub is degreased and sanded;
- the damaged area is puttied and leveled;
- when the putty dries, it is sanded again.
If the hole exceeds 5 cm in diameter, then it will not be possible to repair it. The bathtub will have to be replaced.
When filling a hole, cracks may extend from it. To prevent them from spreading, they need to be drilled. Otherwise, they will go further, making the repair ineffective.
Removing deep damage
It is more difficult to remove deep damage and chips than a small scratch. Special kits, which include:
- applicator for applying polymer;
- sandpaper;
- polishes.
Such kits cost 500 rubles or more. Work with damage begins with its expansion. To do this you will need a mounting knife. With its help, the chip expands so that the polymer can get into it.
The acrylic surface around the chip is cleaned with sandpaper. The total width of the treated area should be approximately 1 cm. After completing the work with sandpaper, the problem area is degreased. Invisible stains can be removed from acrylic using alcohol or other solvents.
Next, a restorative composition is applied to the acrylic bath using an applicator. Using a spatula, the material is leveled so that no small protrusions remain on the bathtub. After the restoring composition has dried, it must be sanded with fine-grained sandpaper.
Attention! The color of liquid acrylic is slightly different from the bathtub. It is almost impossible to choose a monochromatic material. However, discrepancies in color can be identified if the previously damaged area is carefully examined.
Operation of acrylic models
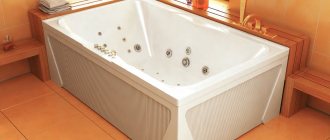
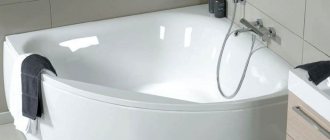
Acrylic is a polymer material that has high performance characteristics. It is durable, wear-resistant and lightweight. Bathtubs made of this material have low thermal conductivity and a beautiful glossy shine. Acrylic models are produced in rectangular, oval, round, angular shapes, the width of which is 70-170 cm, and the length is 120-190 cm. The operation of acrylic products requires compliance with special conditions, if ignored, repair of acrylic bathtubs may be necessary:
- Acrylic melts at a temperature of 150 degrees, so it is not allowed to pour boiling water into bathtubs made of this material to avoid deformation.
Method 1 ordinary enamel
Cast iron and steel enameled bathtubs are the most common types of bathtubs in our apartments. They are produced according to GOST 18297-96, which has been in force since 1997. According to this GOST, the warranty on bathtubs is 2 years. But as practice shows, the enamel on them lasts no more than 10 years of use.
Enamel is applied quite simply to bathtubs in the factory. First, the outer surface is heated red-hot, then enamel powder is sifted onto the inner surface and left for some time to sinter the powder with the metal. Heat the outer surface again until the powder melts. The result is a smooth, glossy enamel coating. It is clear that at home, this method of restoring a cast-iron bathtub, just like a steel one, is not suitable.
Why does enamel usually wear out?
Wear of the enamel surface occurs as a result of two factors:
- The use of cleaning products containing abrasive powders or substances with chlorine inclusions.
- The use of chemical reagents when cleaning water supply networks.
As a result of many years of exposure to these factors, the enamel surface of the bathtub becomes thinner, becomes rough and begins to rust.
Restoration of an enamel surface
Restoring enamel with your own hands is a fairly simple process. It consists of two stages: preparing the surface and applying a new layer of enamel.