April 15, 2020
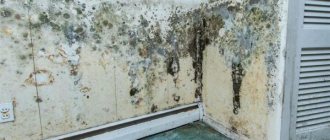
Even the cleanest housewife can develop mold in her bathroom. Why is this happening? The answer is simple - constant humidity in the bathroom is a good environment for the formation of mold and rapid growth of fungi.
“So what, you have to put up with this blackness in the corner?” - the inquisitive ones will ask incredulously. The answer, of course, is no. This cannot be tolerated and must be removed.
The fact is that mold is not only an aesthetically unpleasant sight, but also a potentially dangerous situation for human health.
It is worth approaching the issue of removing mold responsibly and getting to the root of the problem.
Causes of mold in the bathtub
There are five main reasons for the appearance and proliferation of fungus.
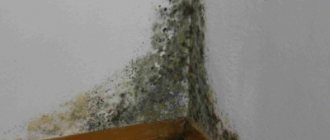
High humidity is the main condition for the formation and reproduction of fungus. As soon as the air humidity rises to 90%, fungal spores on a damp surface begin to germinate and form entire colonies. Over time, the black spots increase in size and turn into large lesions.
Lack of natural light. Sunlight does not penetrate into the bathroom, which suppresses the development of fungus.
Warm. The operation of a heated towel rail and the circulation of hot water create a warm microclimate necessary for the development of mold.
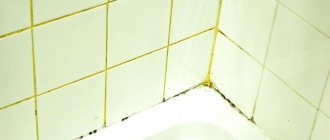
Presence of gaps. There are many cracks in the bathroom where water accumulates. Typically, mold appears in hard-to-reach places, at the joints between tiles, under plastic panels.
Air stagnation. Poor condition of ventilation systems contributes to the growth of mold.
How is the processing carried out?
Bathroom disinfection is carried out according to an algorithm when the work is divided into several stages. Compliance with them guarantees a positive result.
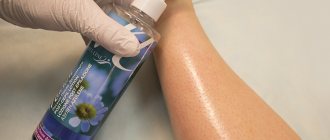
Disinfection is carried out in different ways, suitable for a particular case. Professionals come to the site. Assess the situation. Select a suitable method. They use drugs of safety class 4 (low toxicity). They do not harm animals or people. It is mandatory to process cracks and joints between tiles, pipe risers, wall surfaces, sanitary facilities, door openings and baseboards.
The work is performed using the following methods:
- Wet disinfection using insecticide solutions.
- Processing using special equipment: fog generators (cold and hot). With this method, chemicals are generated into a cloud of microscopic particles. They penetrate into the most secluded corners.
- To prevent the occurrence of fungus, preventive actions are carried out (the affected surfaces are dried).
The experience of our sanitary and epidemiological station has shown that it is impossible to get rid of mold on your own. Mycelia appear again. Professional disinfection of the bathroom for fungus is carried out using products and equipment that are not sold in retail outlets. An arsenal of such equipment makes cleaning quick and efficient. We will find the reasons that caused the mold to appear and advise you on taking measures to avoid mold contamination in the future.
Why does grout darken over time?
Ceramic tiles are almost ideal because they are very easy to clean. However, grouting is more “capricious”: sooner or later, it becomes the cause of headaches for most owners of finishing with snow-white seams. Therefore, they have to correct the situation; more often they do this work themselves. But not everyone knows which means guarantee results.
Before wondering what and how to clean the seams between the tiles, you need to find out why it changed its color. It is the reason that can give a hint on how to act in a particular case. Pollution can be caused by several factors:
- ventilation system, the operation of which cannot be considered effective;
- constant high humidity, temperature changes in the room;
- seams that were forgotten to be properly treated before grouting;
- irregular or complete lack of tile maintenance;
- the kitchen hood does not work well;
- purchasing grout of questionable quality;
- violation of technology during work.
All issues can be resolved, since cleaning the seams between the tiles is a very real task. There are several ways to fix the problem. The simplest is the use of one or another product for bleaching, cleaning, and antiseptic treatment. But this is not the only way out. In some cases, when the dirt has ingrained itself very deeply, only one, drastic method of combating it helps - completely replacing the grout. It is better to mentally prepare for both options at once.
Drastic measures
This is the last answer to the question of how to clean the joints between tiles if all previous methods failed to help. There are two radical ways: you can either remove only the top layer of grout, or say goodbye to it, removing it not partially, but completely. Which one is preferable? Of course, the first one is a little easier. However, it is not always effective.
Removing the top layer
In this case, they are armed with a special scraper, a sponge with an abrasive side, or sandpaper, with which the contaminated top layer is removed. Other potential tools are a screwdriver, putty knife, knife, narrow chisel. But they need to be handled extremely carefully, since ceramic tiles are very easy to damage.
If mold was initially detected, the remaining grout is treated with an antiseptic. Since some grooves remain after getting rid of some of the seams, they are closed by covering them with a new layer of compound.
Removing all grout
This method promises a complete transformation of the seams and no problems in the near future, but the master will have to prepare for the fact that the operation will be relatively long and also very dirty. In this case, hand or electric tools are used to remove the old composition.
It is better to use the latter option: it will take a long time to wield a screwdriver or knife; a renovator, grinder or grinder, on the contrary, will cope with the job much faster. But both methods require maximum care from the master so that the tiles remain unharmed. After removing the grout, the space between them is degreased with a solvent, then primed, and after the product has dried, the seams are grouted again.
SES leaves no chance for the existence of fungus
If you contact the sanitary and epidemiological station, you will not have to deal with toxic organisms yourself, and the consequences of their existence will not affect your health. SES is chosen by those who are focused on long-term results and affordable cost. We know how to remove mold in the bathroom:
- Reliable. We provide a guarantee for services up to 4 years. During this period, disinfection is carried out free of charge.
- Safely. The drugs are non-toxic for people and have certificates.
- Profitable. SES offers the best options for getting rid of pathological growths, and also offers discounts and promotions.
- Instantly. A minimum of 60 minutes of our work, and you won’t have to think about what disinfection of a jacuzzi is.
- Qualitatively. After disinfection, there are no fungi, odors, or stains left in the apartment.
Call. We work around the clock.
Help from folk remedies
How to clean the grout between tiles? Where to start? Typically, owners of “discolored” seams proceed from simple to complex. There are quite a lot of remedies used, but it is possible that one of the folk recipes will be effective. In this case, the owners do not even have to go to the store, since most of the necessary products are already in the house or apartment.
Using "lemon"
If the grout has darkened over time, then citric acid will help restore it to its original appearance. To make the solution, take a suitable (enamel) container, pour 2 liters of water into it, then heat it slightly. Pour 2 sachets of citric acid into the liquid and stir. The seams are first treated with this solution, then the product is left for another 40-50 minutes. After this, the grout is wiped several times with a damp cloth.
Laundry soap
This is a life-saving remedy that is always available in any home. There are two options for using soap. The difficult way involves preliminary chopping the piece on a grater. In this case, prepare a fairly concentrated solution, into which you dip a toothbrush, and then treat the tile joints with it.
Not all owners will like such lengthy preparations, but there is an alternative, as simple as possible way: a toothbrush (or other small tool) is first moistened with water, and then soaped with a bar of soap.
Using Baking Soda
This is one of the most undemanding methods. To carry out the “Cleaning” operation, you need to prepare a small container for soda, and also find an old toothbrush. The work is as simple as possible:
- First, the seams are moistened generously (several times) with warm water from a spray bottle so that the surface of the material can swell.
- After a few minutes, the tile joints are treated with a toothbrush, but without any product yet.
- Then soda is applied to it, after which the main cleaning begins.
After the operation, the entire surface is wiped. If the area being treated is in the bathroom and allows for water procedures, then it is better to use a shower head to wash off the soda and dirt.
Using baking soda and vinegar
In this case, instead of the traditional component, it is allowed to use any acidic product: it can be lemon juice or a solution of citric acid. You can make a remedy from several acidic ingredients. To treat surfaces, you will need to prepare a spray bottle, a brush and a soft cloth (rags).
- Prepare a cleaning product: mix 7 glasses of water and ½ glass of soda, add a quarter glass of vinegar and a third of lemon juice (acid solution).
- Mix everything thoroughly, pour some into a spray bottle. Generously spray all seams (and tiles), allow the liquid to absorb, leaving the surface alone for 15 minutes.
All seams and tiles are brushed. After completing the procedure, the surfaces are washed several times with clean water and then wiped dry.
Multi-component product
Often, individual products are not able to do the job efficiently. Therefore, in difficult cases, it makes sense to try to make a composition that contains many ingredients, since in this case the chance of getting rid of contaminants increases. This method is often used to clean floor tile joints.
- A liter of oxen is poured into the pan and it is heated.
- Add 100 g of soda, 50 ml of lemon juice, 30 g of mustard and 5 g of toothpaste to the warm liquid. All components are thoroughly mixed.
The mixture is applied to the grout with a toothbrush and lightly rubbed into the seams. After 30-40 minutes, the composition is removed with the same brush dipped in clean water. Then the areas are wiped with a cloth: first damp, then dry.
Mustard is a universal product because it can be used to clean everything from dishes to the face. Therefore, it can be used separately to restore the color of seams. In this case, mustard is mixed with water, making a fairly thick paste, which is used to clean the most problematic areas with a brush.
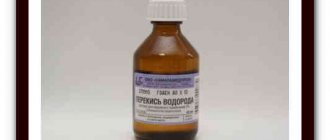
Help from hydrogen peroxide
This indispensable antiseptic is found in any home. Peroxide is used to clean various surfaces. It will help in restoring the original appearance of tile joints. The advantage of this option is that there is no need to subsequently rinse off the peroxide. In addition, it successfully fights mold.
This operation is as simple as possible. Hydrogen peroxide is mixed with water (1:2). All seams between the tiles are treated with this solution several times. This completes the work, since the product does not need to be washed off. Yes, peroxide may not cope with stubborn stains, but it will definitely destroy mold.
Cleaning with ammonia
Ammonia can “get rid” of mold fungus that has settled in the seams between the tiles. To do this, mix 20 ml of the product in 2 liters of warm water. The solution is poured into a spray bottle, then it is sprayed onto areas that have changed color. After half an hour, the tiles and seams are washed with water. If you decide to use this “fragrant” drug, then you need to ensure the room has good ventilation: both during the operation and after it.
Ammonia and washing powder
This duo will help get rid of stains caused by tobacco smoke. In this case, first, ammonia and powder are mixed in an unnecessary container so that a fairly thick paste is obtained. Then, using a brush, scrub off the yellow stains. Cleaned surfaces are washed and then wiped with a dry cloth. You can get rid of yellowness on the tiles using a solution of any detergent.
Using a steam generator
This method can be classified as a folk recipe, but it is also often used by professionals - employees of cleaning companies. Cleaning of tile joints is carried out with steam, which is supplied to the contaminated surface under pressure. During the operation, the contaminants quickly soften and then come off along with the mold. After the “steam room,” the seams are washed with warm water and then treated with an antiseptic.
Help of melamine eraser sponge
These “magic” products are capable of many things, so you can try using them to clean grout that has lost its attractiveness. The only condition is high-quality moisturizing of the sponge. It is possible that after such work it will become unusable.