What could be the reason?
- There is no vacuum between the walls of the flask and the body. Despite the fact that the modification of the device changes over time, the basic principle of its operation remains the same. For more than 100 years, it is the vacuum layer that has made it possible to provide sufficient heat conservation to the food or drinks contained in the thermos. Depressurization is almost impossible to fix at home. You need a special pump that can pump vacuum into the thermos. Special workshops can best handle this task.
- Damage to the lid can also be the reason why a metal thermos no longer holds heat. Cracks in the lid break the complete seal of the vessel, and air begins to flow into it, which cools the contents. Now manufacturers have begun to produce individual elements of devices for sale. For example, it sells not only thermoses, but also components for them. If you couldn’t buy the cover separately, you can try to repair it.
- And the most common reason why a metal thermos stops holding heat is damage to the bulb. If it is glass, then any careless movement can cause its damage. The steel filling can also fail over time. The causes of breakdowns in this case may be microcracks or damage in the weld seam. In this case, you can only try to replace the flask. If this cannot be done, you will have to buy a new thermos.
A slight heating in the area of the lid and upper part of the body, as well as the plug itself, is acceptable and is not considered a breakdown or defect.
Reasons for the loss of the main property of a thermos
In total, you can count only three reasons why your thermos no longer retains the heat of food or liquid in it. Some of them are reversible and the problem can be solved. And others will lead you to buy a new thermos.
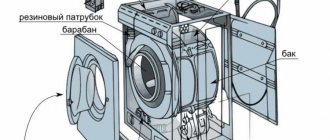
To figure out what the problem is, you need to understand the product's design. The thermos is, in fact, the simplest invention. Comprises:
- Inner flask. It can be glass coated with silver, stainless steel or stainless steel with an additional ceramic coating.
- External flask (housing). There are thermoses with bodies, again made of stainless steel and various types of plastic.
- Inner cover. There are thermoses with a solid lid and a valve built into it.
- External, body cover. As a rule, it plays the role of a cup, but also additionally insulates the neck from cooling.
Additionally, air is pumped out between the inner and outer walls of the thermos. The vacuum further insulates the contents of the inner flask and helps retain heat.
Based on how many components are in the device of thermoses, we can assume a breakdown of each of the listed elements. And this is what causes them to no longer retain heat.
Three possible breakdowns of a thermos:
- The inner flask has lost its seal. It is difficult to test this thermos disease. Rather, it is a method of excluding other problems. But one can assume a disease in this particular component of the thermos if it has a wide weld seam (applies to stainless steel products). Due to the temperature difference, microcracks could form in it, which led to the filling of the space between the walls with air. The glass bulb, unless it has broken, may no longer retain heat if the silver coating does not appear solid. Places appeared like on an old mirror.
- The outer bulb has lost its integrity. As with the first breakdown, it is difficult to determine this problem if it is not visually visible. However, if you dropped a thermos, even on a soft bed, a microcrack could form. Through it, the vacuum space was filled with air, which caused the loss of the ability to maintain temperature.
- Inner cover leaking. Most often, this problem occurs in thermoses with a valve. And this problem is the easiest to identify. Fill the container, close and invert. Droplets of water appear - the problem has been found.
The first and second reasons for the breakdown of a thermos are practically impossible to correct. In the third case, it might be worth trying to find a similar cover.
Tips for use
- Do not immediately pour boiling water into household metal thermoses with a glass flask. It is better to first pour a little hot water so that its walls warm up. The glass flask does not tolerate sudden temperature changes.
- Handle the thermos carefully - do not hit or throw it, no matter how soft the surface may seem to you. A glass flask, like any other glass object, will simply break.
- Periodically clean the lid and valve of the thermos from dirt and deposits using gentle products.
- Do not use powders or other aggressive products for washing. It is better to wash the thermos with baking soda, soapy water or lemon juice.
- Do not over-tighten the plug during use. After use and cleaning, it is recommended to keep it disassembled until next use. It is better to wash by hand rather than in the dishwasher.
- Do not pour boiling water right up to the neck.
- Do not place the thermos in the microwave, heat it, or leave it near an open flame or other high temperature sources.
Another principle of using a vessel: use different thermoses for different contents. Do not store tea, coffee, and soup alternately in the same container. Moreover, thermoses differ in their purpose.
- For drinks. Classic, with a narrow neck, available in different sizes.
- For food. As a rule, these are metal thermoses with a wide neck of almost the same diameter as the body itself. You can store both first and second courses in it.
- Universal. A thermos with a double neck, that is, with an additional narrower hole for drinks.
The remaining modifications can be called variations of the above.
How to restore a stainless steel thermos - Metalist's Guide
A thermos is a practical and useful household item. Hot tea or coffee will be a real salvation on a picnic, on a hike, or when staying outside for a long time in cool weather.
It’s not always possible to heat up lunch at work, so a thermos is indispensable in such situations.
To make flasks, most manufacturers use stainless steel, which has high consumer characteristics: it does not break, does not deform, and is wear-resistant.
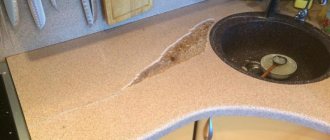
Unlike glass analogues, steel containers become dirty faster - a tea deposit forms on the inner surface of the flask, and if the thermos is used for first or second courses, sooner or later an unpleasant smell of food appears. This causes the taste of drinks and dishes to deteriorate. If this happens, effective folk methods will help you clean the thermos at home.
Safety and Precautions
To avoid unwanted consequences when cleaning a thermos, follow the rules:
- Do not place the container in the dishwasher either completely or unassembled.
- Do not immerse completely in water to prevent liquid from leaking into the space between the body and the bulb.
- It is unacceptable to use chlorine-based bleaches to clean a stainless steel thermos, so as not to damage the seams of the vessel.
Cleaning a stainless steel thermos from tea stains and odors
Modern housewives have tried many means for cleaning flasks. Among them there are both very simple and very original. I suggest you familiarize yourself with the most effective of them.
Rice and pearl barley
Three tablespoons of rice are enough to return the inside of the thermos to its original cleanliness. To do this, pour the cereal into the flask, add 100 ml of boiling water, and close the lid. In just half an hour, rice will do everything you need. At the end of the process, shake the thermos several times, drain the contents and rinse.
In the case of pearl barley, you will have to work a little. Pour half a glass of cereal into the flask, add 2 tablespoons of soda and 100 ml of cold water. Seal the container tightly and shake it vigorously for 10-15 minutes. After the specified time has passed, open the thermos and, after making sure it is clean, remove the contents and rinse the flask.
Table vinegar
Pour vinegar into the flask 25% of the volume, and fill the remaining 75% with hot water. Within a few hours, under the influence of the substance, the plaque will dissolve and the unpleasant odor will disappear. Remember, vinegar itself has a rather pungent aroma, so after use, rinse the container several times with warm water and leave it open until completely dry.
Carbonated drink "Coca-Cola"
Heat the Coca-Cola well (almost to a boil), fill the thermos with it and leave it open overnight. In the morning, drain the liquid and rinse the flask with warm running water. Active chemical compounds contained in the drink guarantee high-quality cleaning of the walls from various types of contaminants.
Lemon acid
If the plaque layer is not critical or a slight unpleasant odor emanates from the flask, use lemons or citric acid. Cut the citrus into cubes and place at the bottom of the flask.
Bring water to a boil, fill the thermos to the brim and leave for 12 hours. Wash the flask with ordinary soapy water and rinse thoroughly - the inner walls of the vessel will become as good as new.
The same effect can be achieved by pouring one and a half tablespoons of citric acid in boiling water overnight.
Baking powder
Pour two bags of powdered mixture into a thermos and fill with warm water. Let the solution sit for 2 hours. Drain the liquid and rinse the container.
Baking soda
Dissolve baking soda in water at the rate of 1 teaspoon per 200 ml of liquid, add the solution to a thermos and leave overnight. The next day, drain the contents and rinse the container.
Bleach
Buy any non-chlorine bleach in powder, paste or gel form at the hardware store. Fill the flask 1/3 with the product, then fill it to the top with boiling water. Seal the container tightly and shake it well. All pollution will disappear without a trace.
Please note that bleach is toxic, so wash the flask first with detergent and then rinse several times with warm water.
Ammonia
With the help of this product with a very pungent odor, housewives remove contaminants that could not be dealt with in other ways.
Take an unnecessary plastic cap (which will fit freely at the bottom of the flask), make small holes in the walls and stretch threads through them with a length significantly exceeding the height of the thermos.
Fill the cap with ammonia and lower it into the flask, securing the ends of the strings with masking tape on the outer wall. Close the thermos loosely and leave overnight.
In the morning, take out a plastic container with alcohol by pulling the strings, wash first with detergent, and then rinse with water.
Professional chemicals
If you are not a fan of using traditional methods, seek help from highly effective means. They are easily applied using a sprayer, washed off without much difficulty with ordinary warm water, and most importantly, they completely restore the cleanliness and shine of the surface. Pay attention to products such as EcoVita, CLINOX, DenkMit, Passion, San Clean cleaning cream, etc.
How to clean thermoses made of plastic and glass
Glass flasks, compared to steel ones, retain their original cleanliness much longer, but still the time comes when a coating appears on them. There is no point in resorting to aggressive means. The desired effect can be achieved by choosing the most gentle of the previously listed methods for cleaning stainless steel flasks.
As for plastic containers, everything is much more complicated. They are less easy to clean, absorb harmful substances more easily, accumulate various odors more quickly, and are also unstable to aggressive environments. The best way to extend the life of a thermos with a plastic flask is to wash it frequently (to prevent the formation of a permanent coating) with products that have a neutral taste and odor, for example:
- "rice + water"
- “barley + salt + water.”
- "baking powder + water".
How to disassemble a metal thermos
In order to ensure the integrity of the flask, you first need to remove it. When you have already made sure that the metal thermos does not retain heat, how can you fix it without damaging it even more? Some craftsmen advise carefully cutting off the bottom, but... this is exactly the case when the cost of repairs will then be much higher than buying a new one.
In order to carefully disassemble the vessel, and this means both metal thermoses for food and thermoses for drinks, you need to take a sharp knife, insert it into the seam and, carefully tapping with a hammer, separate the inner part from the body. That's all - you don't need to saw anything, and therefore, then you don't have to solder anything or come up with a new bottom.
How to brew tea in a thermos
When brewing tea in a thermos, it is important to remember that this popular drink greatly loses its beneficial properties and taste if stored for a long time. This is especially evident when tea is brewed in a flask, and not poured from a teapot into a thermos for storage. Long-term soaking of leaves dulls the aroma of tea, adds bitterness, and provokes the oxidation of vitamins. Nutritionists advise brewing the drink in a teapot, and only then pouring it into a thermos.
If you have to prepare a drink in nature, then you need to remember that the proportion of dry leaves to the amount of water should be less than in the case of a regular teapot.
Before brewing, add a little boiling water to the thermos, close the lid and shake several times. Then the leaves are added to an empty flask and filled with boiled water, cooled to a temperature of about 80 degrees. It is advisable to let the drink brew for some time. You can also use tea bags; some thermoses have a special hook on the inside of the lid for this.
In any case, you should not store tea brewed in a thermos for more than 6 hours.
How to fix a vacuum at home
As mentioned above, the reason why a metal thermos no longer holds heat may be damage to the vacuum. This can be corrected by specialized workshops, for example, for the repair of refrigeration equipment. In any case, they have a vacuum pumping device in their arsenal. But the question is: will they want to tinker with your thermos and at what cost will such repairs cost? Most likely, it will cost you less to buy a new one.
But from time immemorial in Russia there have been folk craftsmen who tried to solve seemingly insoluble problems. So let's find out what they came up with in case of vacuum damage.
- If you take out a glass flask and find that it is intact, you can wrap it with isolon, and then with tape or strong twine and place it back in the body. At the same time, it would be a good idea to change the insulating rubber. This thermos will not keep warm as before, but it will still last for several hours.
- If the thermos has a metal flask and it is also not damaged, the problem may be with the rubber seals. They can be replaced by taking them from another device or cutting them from a suitable piece of rubber. You can also find rubber bands of the appropriate size at hardware stores.
- If, after removing the metal flask, you find microcracks in it, then you can fill the gap between the flask and the body with polyurethane foam or granulated foam. Those who are especially resourceful advise filling this gap with Christmas tree tinsel, as it will also impede the movement of air. But unfortunately, all these methods can solve the problem only temporarily, and such a thermos is unlikely to serve its intended purpose.
- In cases of damage to the body, when they are on the outside, the thermos can be repaired in a car repair shop using liquefied gas. The only question is whether the cost of repairs will be comparable to the price of a new vessel. If perfect appearance is not important to you, then you can remove the flask and gently tap the body from the inside with a hammer. There is no need to achieve an ideal appearance, it is only necessary that the walls of the flask do not touch the body from the inside.
How reliable is a modern thermos?
There are things that can serve even if they are not in very good condition. If this applies to a thermos, it is to a very small extent - as soon as the integrity of the flask, valve or its other parts is damaged, it begins to lose heat, which means it becomes unable to perform its main function. But how likely is it that your assistant will quickly fail and how can you understand that trouble is just around the corner?
Earlier models - with glass bulbs - presented a rather serious difficulty if you decided to take them with you, for example, on a hike. After all, made from such material, they were very vulnerable to falls. Today this problem is becoming less pronounced, as new technologies make it possible to obtain more durable glass. In addition, if the issue of strength is of fundamental importance to you, you can purchase another model - with a metal flask.
This type is a serious competitor to glass models, but it should be noted that each will be appropriate in a certain situation and has both advantages and disadvantages. However, regarding the topic of our material, a metal flask definitely wins. True, if you managed to damage the thermos so that the outer part of the body came into contact with the flask, it will most likely lose its ability to retain heat.
Another serious potential source of heat loss is insufficient vacuum between the coating and the bulb. If you trust the manufacturer, you should not worry about this problem. But if you are used to checking everything yourself or just want to make sure once again that you have made the right choice, you can conduct a small experiment. Pour boiling water into the newly purchased thermos and touch the outer wall after 10-15 minutes - if it gets hot, there is a violation of the vacuum insulation, you have the right to return the thermos to the store.
It is also worth checking the O-ring between the body and the neck of the flask for accuracy of fit - if the closed stopper does not fit tightly to the flask, heat loss will occur.
Those who plan to buy a thermos
with a metal flask - will drinks and food experience harmful effects from contact with metal, and how safe is it? For modern models, materials that are not harmful to human health are usually used, for example, stainless steel for food use. But not everyone is characterized by integrity, so you should choose models only from brands that you trust. Check the passport - it should indicate the name and address of the manufacturer.
A thermos does not last forever, and sometimes it can break at the most inopportune moment. What to do? Should I take it for repair, throw it in the trash, or try to fix it myself? It all depends on what specific problem caused the breakdown.
You should give up the idea of fixing it yourself if the problem is in the vacuum tube. Although there are craftsmen who advise finding a hole in the flask and sealing it under vacuum conditions. It is difficult to judge how feasible this is. In addition, you will need equipment for working with a vacuum, which in itself will cost more than a new thermos. Also among popular ideas is the use of foam (the main thing is that it does not expand when it hardens) between the flask and the body, and even placing a thermos first in the sleeve of a warm coat, then in a cover made from thermal underwear. They say both of these methods increase the heat retention time.
Thermoses "Arctic"
Recently, these vessels from domestic manufacturers have become increasingly popular. The product line includes not only various thermoses and thermal bags, but also accessories for them. A large selection, interesting colors, affordable prices and excellent quality - all this has won the love of buyers from all over Russia: from tourists and hunters to truckers and railway workers.
And most importantly, the high quality of the products will not soon make you think about why the metal thermos stopped keeping warm.
Thermos does not keep warm - causes of breakdowns, what to do?
Published by kachlife on 10/28/2020 10/28/2020
Progress does not stand still and today an impressive number of devices have been invented that can significantly make a person’s life easier. One such device is a thermos.
The market offers a wide range of different devices, differing from each other in general characteristics, volume, price and quality.
It is very important not to get lost in all this variety of brands and make the right choice. But what if the thermos, which served faithfully, suddenly stopped keeping warm? Let's take a deeper look at this issue and try to find ways to solve the problem.
How to fix a thermos?
join the discussion
Share with your friends
Repairing a thermos only makes sense if it is a fairly expensive, exclusive stainless steel model designed to last for many years. These thermoses often come with a lifetime warranty, and an authorized dealer with a service center to repair their products would help.
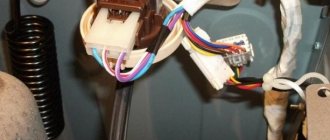
How to repair the cover?
There are two types of covers: with and without a button. The lid with a button can be either collapsible - with replaceable parts, for example, with a removable spring, or with a completely cast or glued structure. The former are easy to disassemble and clean, while the latter are cleaned using powerful reagents that soften food deposits and preserve plastic, metals and rubber. Push-button lids are equipped with a valve.
To remove or disassemble the screw-on cover completely, do the following:
- unscrew the ring with the button;
- remove the valve;
- remove the pressure washer and spring;
- remove the oil seal - spacer ring.
Wash all parts to remove deposits. What is petrified and firmly adhered can be cleaned with a plastic brush and any detergent, for example, abrasive powders for cleaning sinks. Then wash the parts with dishwashing detergent to remove chlorine-ammonia reagents, and reassemble the lid in the reverse order.
Some Chinese thermoses are disassembled as follows:
- using force, pull out the valve;
- insert a self-tapping screw into the gap for its top;
- pull out the push-button device;
- remove the gaskets, washers and spring;
- wash the parts and put everything back.
Repairing a thermos lid with a button - step-by-step instructions
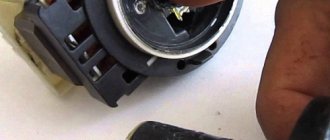
Let's consider three options for constructing a lid with a button. The first design is the simplest, with a minimum of details and everything is intuitive.
Here, repairing the thermos button will consist of the usual disassembly and cleaning of the valve from deposits:
- Unscrew the clamping ring counterclockwise. We apply sufficient force, but without using a metalwork tool. The ring is quite fragile and if there are signs of the part sticking, then soak the lid in hot water for a couple of minutes.
- Remove the valve from the body.
- We push out the valve mechanism to begin further disassembly.
- We get three large fragments of the mechanism; all that remains is to get to the spring, button and other auxiliary parts.
- We increase the set of parts when further disassembling the button itself (usually it is fixed with fasteners).
- Carefully push out the valve stem so as not to damage the retaining ring; we will still need it for further assembly of the cover.
And here we have all the parts that need to be washed to remove deposits. As we can see, there is practically nothing to break here, unless the spring or retaining ring bursts due to wear. These spare parts can be picked up from other mechanisms or purchased at a hardware store.
VIDEO INSTRUCTION
The next version of the cover is complicated by the presence of a second button, but here too the manufacturers have provided for the possibility of disassembly. Or rather, they did not seal the mechanism, as happens when company marketers want to sell as many products as possible.
- In this case, it is necessary to pry off the cover with a thin metal blade or other object.
- The device has hidden latches that can be damaged if handled too harshly. Be careful.
- As soon as you remove the cover, all parts will be freely accessible. To ensure that reassembly does not cause difficulties, we recommend taking a photograph of the parts in the assembled state.
But why did you need to clean the valve? These are deposits that have accumulated over the year of operation of the thermos. Follow simple rules, and your health will be completely safe, and the thermos will last for many years.
Flask repair
If the thermos no longer holds heat, it means that something is wrong with the vacuum between the inner and outer containers. Glass flasks that are cracked in at least one place cannot be repaired. The fact is that a crack is a defect that begins to let air through. Its width is much larger than the atoms and molecules of air that make up the atmosphere. They pass freely even through microcracks, filling the vacuum to normal atmospheric pressure in a maximum of a few hours. The thermos is heated from the outside to a warm state, since air, unlike a vacuum, conducts heat.
Even slightly cracked glass and plastic flasks are thrown away - there is no point in repairing them. And glass chips swallowed by a person pose a threat to life.
If you are repairing a steel thermos with your own hands that has lost its vacuum due to a hole, then do the following:
- Drill a hole in the bottom and solder a metal capillary tube into the hole. It is advisable to take copper, these are produced for repairing refrigerators and air conditioners. Steel is soldered using zinc chloride or another soldering flux - the solder spreads smoothly over it, not to mention the soldering of copper.
- Pump up air using a car or refrigeration compressor. Do not exceed a pressure of 2 atmospheres.
- Find and solder all defects in the case. If the inner flask is damaged, then it is difficult to repair a narrow-necked thermos - using a soldering iron in a narrow space is extremely inconvenient. It is impossible to pour sour and salty drinks into a thermos sealed from the inside, as well as to store, for example, canned food in an open jar: tin and lead react with acids, turning into salts that are poisonous to humans. This thermos is only suitable for water. If the defect is external, but the flask is intact, then use the thermos as before the breakdown.
- Evacuate the air. Use a pressure gauge to see if the pressure in the interwall space increases after the compressor stops. If so, then the breach is not sealed properly. If not, then leave the compressor and thermos under vacuum for several hours.
- If there is no vacuum leak, air is not sucked in, then the gap is sealed properly . Bend the tube, squeeze it, for example, using wire cutters, walking them over an area a centimeter or more long. Bite off the excess end, leaving a fold. Air will begin to be sucked in through the micropores of the bend. Before the vacuum is seriously disrupted, solder the bend and cut of the tube. You need to act quickly - use flux so that the solder instantly spreads over the cut end and reliably seals the place where the tube is bent and cut, until the air completely displaces all the vacuum.
Thermoses
What could be more pleasant when traveling, fishing or hunting than enjoying a cup of aromatic tea on a cold winter morning or a cold drink on a hot summer day? With a simple bottle, such pleasure is unlikely, so all travelers and lovers of extreme recreation should definitely buy a roomy, good thermos of sufficient volume.
Thermos Arctic
Cooler bags- Universal
- Thermoses for food
- Thermal mugs
- Thermoses for drinks
- Thermal containers
Where and what kind of thermos to buy in Moscow?
The main task of cookware with a thermal effect is to maintain the required temperature (heat or cold) for a long time in any weather conditions. To buy a truly high-quality thermos, as well as choose one suitable for long-term use, you need to take into account the material of the inner flask, the company and the capacity. Good thermos flasks come in different flasks depending on the material they are made of. Our online thermos store has a wide selection of glass and food grade stainless steel thermoses from well-known manufacturers such as Arctic, El Gusto, Thermos, Stanley, Zojirushi.
- A glass flask is an excellent environmentally friendly material. In such dishes, food perfectly maintains its temperature due to rapid heating or cooling of the flask. The cost of a thermos with a glass inner element will always be cheaper than its counterparts in the product group. The only drawback of such options is increased fragility, so you should protect the container from falls and damage.;
- Metal thermos - stainless containers made of food steel do not have a negative effect on the food product and retain heat well, but to maintain normal properties, high-quality rinsing and drying is required. Before use, we recommend pouring hot water into the thermos, which will allow the flask to warm up, then pour out the water and place the food or drink. Otherwise, to warm up the flask, heat will immediately be taken from the product or drink, since it is initially at ambient temperature. This type of thermos is suitable for tourists, army units and military personnel, young mothers as it is considered shock-resistant and easy to use;
Large selection of thermal mugs.
In our company’s online store, thermal products are provided in different versions. The range of manufacturers includes models with plastic or metal flasks. It is worth choosing the option that is suitable for yourself, taking into account the optimal cost, sufficient capacity, type of neck, wishes regarding use and care. The thermal mug is considered the best option for the driver; it is made to fit the shape of a car cup holder, with a volume of 200 to 500 milliliters. Why is she good on the road while driving? It is made of durable materials, and some have a valve lid to prevent the drink from spilling during transportation. It maintains the initial temperature for a long time, unlike a paper cup from a coffee shop. A worthy option for children and students who take hot drinks with them along with lunch boxes. Nowadays, it is more profitable and convenient to take coffee, tea or another drink from home with you than to buy it in specialized establishments.
What is a cooler bag for?
Keeping food fresh, chilled and frozen without the help of a heavy and large refrigerator is very easy, thanks to a thermal bag or refrigerator bag. For those who do not yet own such an easy-to-transport refrigerator, it will be interesting to know how it works and why it is so effective. Such a mobile assistant will always help you out if you want to eat ice cream on the beach and treat your friends, just don’t forget to first put a special cold accumulator in your cooler bag, thanks to it the low temperature will remain for a long time. This cooler bag can not only maintain low temperatures, but also retain heat, with this you can enjoy hot food during the cold season. As a rule, such bags are easy to transport; they come with a special strap that allows you to hang the bag on your shoulder or behind your back. Any trip to nature, the forest or just to the park for a picnic, in winter or summer, will not be complete without a thermal container or refrigerator bag for drinks or food. They perfectly maintain the cold temperature of drinks on the hottest day, and also perfectly maintain the hot temperature of food in the cold. Containers and bags have a volume of 10 liters or more, are made of high-quality thermal materials, one of the most famous companies for thermal products is the Arctic company. Buying a thermos, thermal mug, thermal container or refrigerator bag is very simple.
By placing an order on our website you receive original products and fast delivery. After filling out the form with personal data, our managers will contact you to clarify the details of the order. We work with various transport companies such as: SDEK, Business Lines, PEC, ZhelDor, DPD, Boxberry and Russian Post. For detailed advice on the product, you can call the store or contact us through social networks.
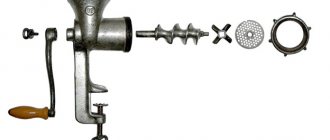
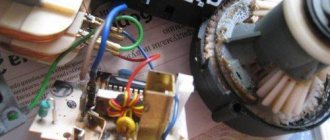
Other malfunctions and their elimination
In thermoses, the button, valve, stopper and other parts that do not affect the inter-wall vacuum often break. To make a new plug to replace the old one, which does not have a thread, you will need a piece of wood. From it, in the image and likeness of the old plug, a new one is turned on a lathe (or using a milling machine). The rubber gasket is cut from rubber of a similar diameter and inserted into the technological recess (groove). It prevents liquid from spilling if the thermos is accidentally tilted or turned over.
The seal can be made from a thick rubber band from a balloon, or by cutting out the desired strip in the form of a ring from an old inner tube.
To fix the button at home, do the following:
- if the button and valve are dismountable, then disassemble the cover according to the previous instructions;
- if the button is so broken that it is impossible to glue its parts, then use a machine to machine a new button from a piece of plastic;
- insert it instead of the broken one and assemble the thermos.
The spring is changed only to a similar one, of similar stiffness and diameter. Spare parts can be found by advertisement or in the hardware aisle of the local market, where they sell all kinds of spare parts for old equipment. Dents in the outer vessel are straightened with a hammer from the inside, with the flask removed, and only if the thermos was non-vacuum.
To release the flask, the holder rings located between the vessels are first removed.
Detailed instructions for repairing a thermos can be found in the following video.
Source
How to clean a thermos from tea deposits and scale?
Homeowners and housewives have accumulated many ways to clean the thermos flask from various deposits. When it comes to a thermos with a glass flask, there are usually no difficulties. The most proven method that does not fail is a soap solution, which you just need to pour into the container for a while, gently swirl, rinse with clean warm water and dry. But as for a stainless steel thermos, you will have to use other means. Let's look at them.
- Lemon method - both pure lemon and citric acid crystals are applicable here. Cut the lemon into slices, place in a flask, add water and leave overnight. Fresh citrus is good for light deposits on the walls; for heavier stains, a well-known fighter against various types of deposits – citric acid – will come to the rescue. Pour a tablespoon of powder into a thermos, add boiling water, screw on the lid and leave until it cools completely. After the solution is drained, rinse the flask twice more - with hot and cold water. The procedure can be repeated if the plaque and scale are stable.
- Baking soda – this household assistant will help you here too. There are options when using an inexpensive and accessible product. One of them is to pour two or three tablespoons of soda into a thermos, pour boiling water over it, after an hour add coarse salt or dried chicken egg shells, close and stir, shake the mixture. Salt or shells remove hard scale due to their gentle abrasive properties, and soda completes the process by dissolving tea plaque and suspensions. Another method involves using not only soda (also a couple of tablespoons), but also barley (half a glass, can be replaced with the same amount of rice). After mixing the ingredients, add boiling water to the flask and screw the lid on tightly. Baking soda and cereal will absorb dirt, playing the role of a sponge or washcloth.
- Traces of tea leaves or coffee are also destroyed by table or apple cider vinegar, which you have in the house. To do this, mix a teaspoon of vinegar and a glass of water in a thermos. If the plaque does not give in, you can try a more concentrated acidic solution: add vinegar to a quarter or a third of the volume, add boiling water to the middle, and let it brew for several hours. Rinse with cool water.
- Surprisingly, this is true. The popular carbonated drinks Coca-Cola or Fanta can be used as a cleaning agent. They need to be heated well, almost to a boil, and poured into a thermos for a long time. It is not recommended to screw the cap all the way to avoid surprises.
- A sure, fast, although not very environmentally friendly way is to use special compounds, for example, “Whiteness”. Take a few tablespoons of bleach, dilute with boiling water, and shake. Pour out the remaining cleaning solution, thoroughly and repeatedly rinse and rinse the thermos flask.
Video: how to quickly and easily clean a thermos?
Repairing a thermos at home
A thermos is an indispensable device for any trip, allowing you to keep any liquid, be it tea, coffee or compote, hot and tasty. Despite the simplicity of its design and simplicity, it fails quite easily. Let's try to figure out what malfunctions exist, why they occur, and how to repair this device yourself at home.
What causes a thermos to lose its heat-saving properties?
This dishware is very delicate and requires careful handling. During operation, it is strictly forbidden to drop the device or allow strong impacts on other surfaces. This is especially true for dishes with a glass flask, which can burst if used improperly.
In addition, you should remember that you should not immediately pour hot drinks into a thermos brought from the cold. It is necessary to let the cookware warm up and only then use it. The manufacturer, as a rule, prescribes this nuance in the instructions for the cookware.
Possible faults
Considering the simplicity of the design of the device in question, there may not be many possible malfunctions:
- The thermos does not hold the temperature, that is, it cools down quickly;
- it gets very hot outside;
- broken button on the lid.
Some other problems may be caused solely by physical damage - chips, cracks, dents, that is, solely by physical factors.
Causes of problems
Now let’s try to understand in more detail the reasons for the problems described above.
If a stainless steel thermos stops holding heat, this usually happens after using the device for some time. The causes of poor thermal insulation can be:
- damage to the plug;
- poor quality or deformed silver plating;
- there is no vacuum layer between the walls of the body and the cylinder.
If we talk about the first problem, it often happens that the plug was already defective from the very beginning. But it could also happen that the owner of the thermos screwed it too tightly, and after a while the connection simply cracked, and therefore the device stopped holding heat. It’s easy to check – just tilt a closed metal thermos. If there is such a defect, hot water will leak out.
If the thermos has a glass flask, then inside it there is a damaged or poor-quality silver coating. Usually we are talking about a manufacturing defect.
The problem may also be the lack of vacuum between the body and the walls of the cylinder. Almost any thermos that exists today, even any Chinese one, has a double bottom. A copper tube passes through it inside, the end of which is flattened. It is through this tube that the manufacturer pumps out air using a special vacuum pump.
It also happens that the thermos gets hot. This is bad, because then the phenomenon of thermal conductivity appears . The hot liquid inside transfers heat to the body, which releases it into space.
Manufacturers often use inert gas as insulation. It is especially often used in Chinese models, instead of creating a vacuum layer. It's easy to fix - just take it to a workshop, where the technician must use a special pump to restore the vacuum or add gas. If the problem is a cracked bulb, it should be replaced.
To prevent problems from occurring, the thermos, despite its simplicity, requires careful handling and careful operation.
Why doesn't a thermos keep warm?
There is quite a bit of information on the Internet about why the thermos suddenly stopped keeping warm - just assumptions and reasoning.
A large number of people note that at first the product did an excellent job of its direct responsibilities, but then suddenly stopped retaining heat. Why is this happening? There may be several reasons for this.
- A failed plug. The most common cause of device malfunction. Either the cork was initially of mediocre quality, or it was twisted too much, which caused deformation and cracks. It is very easy to check how tight the lid is. It is enough to turn it over and see if liquid leaks through the closed lid.
- As for dishes with a glass flask, the cause may be poor-quality silver plating. In most cases, this is a manufacturing defect, since it is quite difficult to scratch due to its location. The silver coating is located on the outside of the inner cylinder and is protected by a vacuum and a housing.
- No vacuum. If you look at the issue in more detail, then underneath the outer bottom there is also an inner one. At the inner bottom there is a thin copper tube with a rather flattened end. It is through this hole that air is pumped out of the thermos in production using a special pump.
How to disassemble a thermos?
But if you decide to do the repairs yourself at home, you should first disassemble the device being described. Most often on the market there are models with a lid in which the button is located. There are several instructions for disassembling such devices. The first one will be the simplest:
- You should carefully unscrew the clamping ring counterclockwise so as not to break this plastic element;
- remove the valve from the thermos;
- we take out the valve mechanism for further disassembly;
- now it turns out to be divided into 3 parts - we find a spring, a button and other auxiliary parts;
- we disassemble the button itself by pushing out the valve stem so as not to damage the retaining ring;
- We wash all the parts and check their integrity.
Now the button should be assembled in reverse order.
The second instruction will differ in that the lid is complicated by the presence of a second button:
- the lid is pryed off with a thin metal blade or any other similar object;
- the device has hidden latches that should be carefully bent so as not to break them;
- after this, a view of all the details that are inside opens up.
Assembling such a cover will be carried out in the reverse order.
Let's move on to disassembling the thermos itself. First, let’s make sure that the thermos flask is intact; to do this, you need to take it out.
To carefully disassemble an iron thermos, you should take a sharp knife, insert it into a special seam and very carefully, by tapping with a hammer, separate the inner part from the body. This will complete the disassembly process.
Operating rules
Now we should say a little about how to use a thermos correctly. It seems that everything is simple, but many people, for some reason, manage to use even such a simple device incorrectly.
Before purchasing, you should inspect the product as carefully as possible for physical external damage. You need to see how tightly the lid fits, and whether the thermos makes any extraneous sounds. You can also sniff it to check for any unpleasant odors. If they are, then it is very possible that it is made from not the highest quality materials.
If the materials from which the thermos is made look suspicious, then it is better to refuse to purchase such a product. If you are often on the road, it is better to purchase a large-capacity thermos. This will not only allow you to take more warm drinks with you. Such models retain heat much better than their smaller counterparts.
If you purchased a model similar to a siphon, you should know that it has a significant drawback. It lies in the fact that heat is retained worse here due to certain features of the cork, due to which it is not completely sealed.
It is preferable to buy thermoses made of stainless steel . They retain heat better than plastic solutions. The flask will also be important. It would be good if the flask was made of thermal glass. This will allow the liquid to cool more slowly due to the silver coating.
It should also be noted that metal thermoses that have a glass flask should not be immediately tested by pouring boiling water. It is better to first pour a little hot water to warm the walls. The fact is that glass really does not like serious temperature changes.
In addition, the thermos should be handled with the utmost care. It should not be thrown onto a surface, no matter how soft it may be. A glass flask can break even if thrown lightly onto such a surface.
And also from time to time you should clean the thermos valve and lid from dirt and deposits, using various gentle means. In this regard, it is better to wash the thermos with lemon juice, baking soda or soap solution.
And also, you should not pour boiling water into the thermos right up to the neck. You don't need to put it in the microwave to try to warm it up. If the boiling water inside has cooled down, you should not heat it over an open fire or any other sources of high temperatures. Also, do not over-tighten the plug when using this product.
In addition, after use and cleaning it from residual liquid, it is better to keep it disassembled until the next use.
In addition, to avoid any deformation, you should wash a product such as a thermos by hand and not in the dishwasher.
In general, it is possible to repair a thermos at home, but the set of measures is limited to just a few actions due to the presence of certain design features of the product in question.
To learn how to repair a thermos, see the following video.