Although Samsung washing machines are considered the most reliable and durable in operation, after several years of uninterrupted operation, a breakdown can still occur.
If a bearing fails, repair is required. Dealing with it on your own is difficult, but possible.
To learn how to replace the bearing in a Samsung washing machine with your own hands, read the article.
When is it necessary to change?
Signs that indicate the need to replace bearings:
During washing, metallic grinding, creaking and crunching is heard. The faster the engine rotates, the louder these sounds become.- The machine does not wring out things well, they remain wet.
- The device vibrates strongly.
- The rubber seal wears off.
With broken bearings, the machine will not work properly, so parts need to be replaced.
Dismantling and installing bearings in a Samsung car
Before replacing the bearing on the washing machine, you need to remove it. Proceed as follows:
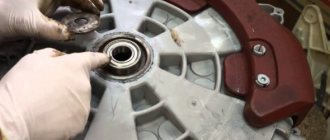
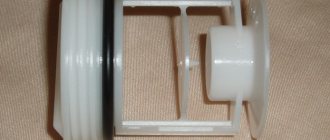
- In the tank bushing you will find 2 bearings of different sizes.
- To get a large one, you need to knock it out from the outside towards the tank using a pin.
- The smaller one is knocked out from inside the tank.
- Take a pin, place it against the edge of the bearing and lightly tap it with a hammer. Place the pin against the second edge and lightly tap again - go around the entire circumference of the bearing until it pops out.
Attention! When knocking out a part, never hit in the same place. There must be at least 3 points for hitting. Otherwise, the bearing will come out crooked or may get stuck in the bushing, and you will have unnecessary problems.
By the way, you can remove the bearings at any auto repair shop - mechanics have special pullers. Therefore, if possible, you can contact specialists. They usually do this kind of work for a nominal fee.
Don't forget about the seals:
- remove the used elements;
- take a clean cloth and wipe the inside of the bushing;
- lubricate the new oil seals with the grease that comes with the bearings;
- install the seals.
After this you can seat the bearings. Do it this way:
- install the part into the bushing and use your fingers to seat it there;
- Place a wooden block on the second bearing;
- hit the part several times until it sits.
How to remove and replace with a new one?
To replace the bearings yourself, you need to strictly follow the instructions, observing the sequence of actions. You need to stock up on tools and patience in advance , since the work ahead is complex and time-consuming.
Preparation
A broken bearing cannot be repaired; it can only be replaced. Before you begin this procedure, you need to purchase a new part.
To carry out the work you will need the following tools:
- small hammer;
- lubricant, for example, WD-40;
- hex wrench;
- metal pin;
- pliers;
- adjustable wrench;
- marker;
- screwdriver;
- sealant.
This kit is essential for DIY repairs.
Before you begin to implement it, the washing machine needs to be moved away from the wall. It’s good if you can take it out of the narrow bathroom. In a spacious room, the labor-intensive process of replacing a bearing will be easier.
Analysis of the Samsung machine
You need to disassemble the washing machine according to plan. In order not to get confused in the details and their location, you can record the entire process on a photo or video camera.
Procedure:
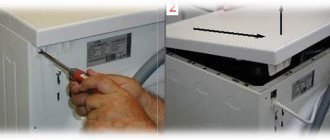
Remove the top cover.
To disconnect it from the body, you need to unscrew 2 screws located on the back wall of the device. When they are unscrewed, take the lid with both hands and pull it towards you and then up. The removed panel must be moved to the side so as not to damage it during work.- Remove the receiver intended for adding powder.
To do this, pull the tray towards you until it stops, and then press the middle valve. Holding it in this position, gently lift and pull the tray with your other hand. With the correct sequence of actions, it will pop out. - Water supply hoses and a pipe, which is designed for pouring soapy water into the tank, lead to the receiver. They are fixed with clamps that need to be released. To do this, use pliers. If everything is done correctly, the receiver can be disconnected and put away.
- Next you need to deal with the counterweight. It is located above the tank and looks like a stone, which is attached with bolts. They need to be unscrewed with a screwdriver. This is done as carefully as possible, holding the counterweight. It is very heavy and cannot be dropped. The dismantled part is removed to the side.
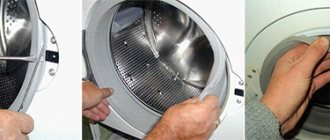
- The next step is to remove the rubber cuff. To remove it, you need to unscrew the bolts securing the hatch lock. To avoid damaging the integrity of the wiring, remove the sensor. Use a thin screwdriver to pry up the clamp; the tool must be guided until it rests against the fastener. When the found bolt is loosened, the clamp can be removed. Use your fingers to pry up the cuff and carefully remove it, working systematically around the circumference.
- To unscrew the bottom of the washing machine, you need to lay it on its side. The bottom is fixed with 4 bolts. The removed cover is removed to the side.
- The wires are disconnected from the drain pump and motor. To avoid confusion during assembly, you can take several photos or label all the wires and parts to which they are attached. There is no need to remove the pump itself, only the motor is removed.
- The next step is to remove the struts. Without them, it will not be possible to get to the bearing. They are attached with screws to the tank and to the body of the washing machine. They need to be unscrewed.
- The wire connected to the valve sensor is removed, then the bolts that secure it are unscrewed. The valve is set aside, after which the springs on which the tank hangs are disconnected.
The tank is practically free; all that remains is to remove the wall and the front cover. The wall is held on by 10 bolts, they need to be pressed out and unscrewed. Another small counterweight is hidden under the front cover; it is also dismantled.- You must remove the control panel carefully, being careful not to damage the wiring. Now you can get the engine and tank.
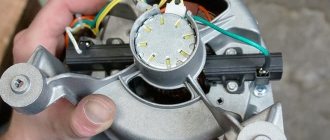
When he is free, they turn him over, take off the belt, and unscrew the pulley. To do this you need to use a hexagon.Sometimes it comes off very tightly, but for this purpose WD-40 lubricant was stored in advance. It is impossible to twist a heavy bolt, there is a risk of stripping the thread. This completes the work on disassembling the washing machine.
You need to work with wiring carefully . It is weak, so it is easy to damage. The wires must not be bent or twisted. If burnt out contacts or broken units are found, they are replaced immediately.
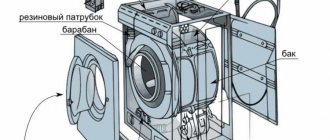
Removing a spare part
Once removed from the washing machine, the tank must be disassembled into 2 parts: the upper half with a hatch in the central part and the lower half with the heater. The drum and axle should remain separate from them.
Since you have gained access to the heating element, you need to clean it of scale and dirt by soaking it in a solution of citric acid. This helps extend the life of the device by several years.
Before replacing the bearing, it must be removed. Procedure:
There are 2 bearings in the tank sleeve. One is big and the other is small.- To get the large bearing out, you need to knock it out from the outside towards the tank. To do this, it is recommended to use a hairpin. The small bearing, on the contrary, is knocked out from inside the tank.
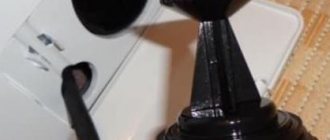
- The pin is placed against the edge of the part and lightly tapped with a hammer, then it is moved to the other edge and the procedure is repeated. In this way, you need to systematically process the entire bearing until it flies out.
You should not hit the same place twice. There must be at least three points of application of force. Otherwise, the bearing will come out crooked or may get stuck in the bushing. This will complicate dismantling.
If you are unable to remove the bearing from the tank on your own, you can contact a mechanic . Workshops and garages have the necessary equipment to safely remove the part. The price for such services is minimal, as a rule, 100 rubles is enough, but you will have to carry the tank yourself.
Installation
After the old bearings are removed, the seals need to be removed. Using a clean soft cloth, wipe the bushing from the inside. The seals themselves are lubricated with a special product that comes with the kit, after which they are installed in place.
The next step is to install the bearings:
- the part is inserted into the sleeve and pushed deeper with your fingers;
- a wooden block is placed on the larger bearing;
- the block is hit from above with a hammer;
- The procedure may need to be repeated several times until the bearing fits into place.
Properly installed parts should fit tightly, just like their predecessors.
Assembly and testing after repair
After installing the bearing, you need to reassemble the washing machine by performing all the steps in reverse order.
Before closing the back cover, you need to check the functionality of the device. It is plugged into the network and washed in several modes .
In this case, you need to arm yourself with a flashlight and check for water leaks. If everything is in order, return the lid to its place and continue to use the washing machine.
Video instructions for disassembling a Samsung washing machine and replacing the bearing: