How to attach a cornice to drywall
September 28, 2020
Reading time:
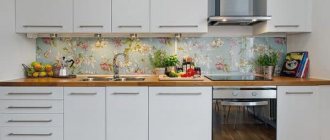
When, after completing the repair work, it comes to decorating the window opening with suitable curtains (curtains), a hitch arises. Non-professionals consider attaching decorative elements to the plasterboard covering the ceiling and walls either a very difficult or completely impossible task.
Even massive cornices can be fixed to plasterboard without any problems.
But this is an erroneous opinion, because if you choose the right method and materials, you can easily cope with such a task as attaching a curtain rod to a plasterboard ceiling. In this article we will analyze the available options, tell you what you need for the job, how to do everything correctly, analyze the nuances of the process and what to pay special attention to.
- How to choose a cornice for a plasterboard ceiling
- How to hang a cornice on drywall
- Methods of fastening cornices (types of fasteners)
- The process of installing a cornice Fixing the cornice on load-bearing walls
- Attaching the cornice directly to drywall
Choosing methods for attaching cornices
Which technique to use when installing curtain rods on drywall will depend on the specific situation.
- Lay wooden embedded slats at the stage of finishing the room.
- Use dowels if the plasterboard sheets are mounted directly on a load-bearing wall using mounting adhesive.
What rules should be followed in each specific situation, and how to attach a cornice to drywall by selecting the right materials?
Hanging cornice with mortgages
Regardless of the type of curtain rod (ceiling or wall), installation can be significantly simplified even at the stage of finishing the walls with sheets of plasterboard. To do this, you need to lay wooden mortgages in the frame.
Placing a mortgage
They are made from slats or timber of the appropriate cross-section, but several rules should be followed:
- the wood must be well dried and treated against external influences (painting, varnishing or impregnation);
- the cross-section of the mortgage must correspond to the weight of the fastening of the future element;
- the wooden batten should not be fastened too deeply into the frame so that future fasteners can be securely fixed in the mortgage, and the gypsum board sheet itself does not bend under the fasteners;
- You should definitely choose the right fastening material for the rail itself. For example, in gas and foam concrete blocks, a standard plastic dowel will not provide rigid fixation; for this, so-called “crocodiles” are used; if the beam is quite heavy, then it is worth using anchors.
After installing the embedded slats, the frame is sheathed with plasterboard, simultaneously marking the location of the embedded components on the diagram.
Fastening cornices to drywall with such mortgages is not difficult; you can use standard self-tapping screws of the required length, combining them with dowels, if such a need arises.
To hang a curtain rod in this way, make markings on the ceiling or wall, and install the cornice brackets at the mounting points using a screwdriver or screwdriver.
Fixing the cornice to load-bearing walls
Today, it is quite common to use frameless wall finishing with plasterboard sheets. In this case, individual elements of the gypsum board are fixed with gypsum assembly adhesive, with a small number of screws. In this case, the distance of the sheet surface will be minimal from the load-bearing wall, which means you can use the classic method of hanging cornices.
Classic cornice mount
To perform such work, you will need to select fastening material.
It is important to choose the right type of dowel for the wall material!
Fastening is carried out according to the following algorithm:
- First, markings are made on the finishing surface.
- Holes are drilled at the attachment points. This must be done in one step so as not to damage the surface on the drywall.
- Next, the dowels are driven in, and the cornice bracket is placed on them, securing it with a self-tapping screw. When tightening the screw, do not press too hard and press it against the surface, otherwise you may damage the gypsum board itself.
In this case, the fastener will perform two functions, in addition to the cornice itself, it will provide additional fixation of the finishing sheet.
Attaching the cornice directly to drywall
However, often the finishing surface can be located at a considerable distance from the load-bearing wall; standard fastening methods are not suitable. They will simply push through the cardboard sheet and will not provide proper fixation.
In this case, you can attach the cornice to the drywall using special fastening materials.
- Butterfly dowel. The structure of such fasteners is as follows. When a self-tapping screw is screwed in, the “wings” of the dowel itself open under the surface of the drywall, they rest against the surface, thus distributing the pressure on the material. Butterflies can be used to hang light curtain rods on plasterboard ceilings, or light wall options.
- Drives. Such a dowel has a screw thread on its surface, and when screwed in, its sides securely adhere to the sheet. Using such fastening material, you can install curtain rods that are not too massive.
- Dowel moth. This is the most reliable way to attach a ceiling cornice to drywall or any wall option. Each dowel is designed for a load of up to 25 kg, and will withstand even heavy decorative elements hung on the wall.
Sequence of screwing in the butterfly dowel
However, there are some subtleties when using special fastening material for plasterboard surfaces.
Using a butterfly dowel, you must initially drill holes of the appropriate diameter according to the markings. At the same time, it is important not to flare the walls, that is, you need to drill in one step without unnecessary movements with the drill.
A plastic dowel is inserted into the resulting hole, and the bracket is hung by screwing in a screw.
Drives can be of two types with or without a drill. In the first option, such a dowel is mounted without drilling drywall, using a cross-shaped attachment on a screwdriver. If the drive does not have a drill, it must be attached as follows. Drill a hole with a diameter of 6 mm, set the dowel, and screw it with a cross-shaped nozzle.
When the drive is installed, fix the cornice brackets using the appropriate self-tapping screw.
The procedure for attaching the dowel
The moth dowel is installed with preliminary drilling of holes according to the markings. In this case, you must not damage the walls of the hole for future fasteners. Before installation, you need to slightly bend the dowel walls with a knife and unscrew the bolt. After that, a metal dowel is inserted into the hole, and the cornice bracket is placed on top, which is secured with a bolt. You need to screw in the fastener until it stops.
Using the described methods for hanging cornices, you can easily solve this problem. It is only important to follow the technology and choose the right method and material.
Installation algorithm
- First you need to determine the location of the cornice. This could be a wall, a ceiling, or the space between two walls. You need to check whether the cornice will become an obstacle to opening the window. It is recommended to place it 10-15 cm above the window.
- After determining the height, take a level and a ruler with which to draw a line. On the left and right sides of the window, mark the areas where the brackets will be attached.
- Attach the brackets. They must be fixed as tightly as possible and aligned in length.
- When fixing the cornice to the ceiling, the places where the brackets will be fixed are marked at an equal distance from the window (15–20 cm). When attaching the brackets, they should be aligned with the window for the correct placement of the curtains.
- Before attaching the cornice between the walls, you need to measure the required distance with a ruler both from the wall to the corner and from the ceiling to the window. Next, use a pencil or marker to mark the attachment points of the brackets on which the cornice will be supported.
- The cornice is attached to the corners in the same way. This option will look a little worse than the others, but for a heavy cornice this is the best solution due to the high strength of such fasteners.
- In order to disguise the fastening of curtains, it is possible to install a lambrequin if necessary. Due to its low weight, it can be mounted on cornice brackets using additional hangers. It is possible to carefully seal the lambrequin from the ends, bending it towards the wall.
- Next, curtains or tulle are secured. Even curtain folds can be achieved by placing the rings at a distance of 10 centimeters from each other.
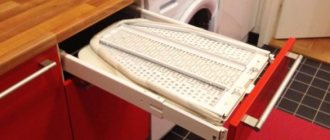
Installation of a ceiling cornice to a concrete floor
The procedure for attaching a ceiling cornice is not too complicated, but if the length of the product is more than two meters, an assistant will be required. In addition to the fasteners, you only need a drill and a screwdriver with a suitable slot.
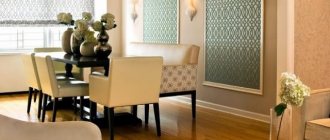
This is what an installed ceiling cornice with curtains should look like
Preparation
Before attaching the ceiling cornice, it is necessary to carry out some preparatory work. The first thing we do is adjust the length. If everything suits you, great. If you need to cut off excess, you will need a hacksaw. It is advisable to use a cloth for plastic, but it is also suitable for metal. If the cornice is assembled, remove the plugs and turns (if any), cut off the excess, then return everything to its place - the turn, the plug.
If the holes for the fasteners are not drilled at the factory, you will have to make them yourself. Let's start with the markings. Mark so that the distance between adjacent screws is no more than 50-60 cm. If there are joints, then retreat 5-10 cm from the joint on both sides. For better load distribution, it is better to stagger the mounting holes.
After the marks are set, we drill mounting holes in the plastic. Use a drill that is equal in diameter to the size of the fastener. More is undesirable, but less is also not good - when twisted, the plastic may crack.
Even for a single-row cornice, it is better to place the holes in a checkerboard pattern
After all the holes are ready, if the cornice is prefabricated, assemble all the parts. You don't have to install the decorative trim (if any). For now she will only get in the way.
How to attach
In most apartments and many private houses the ceiling is a concrete slab. Accordingly, we take a drill for concrete. The diameter of the drill should be taken according to the size of the dowel. Then we proceed according to plan:
- We apply the assembled cornice to the ceiling and level it.
- Use a simple pencil or marker to mark the attachment points.
- We drill holes, trying to hit exactly the marks. The depth is equal to the length of the plastic insert. To make control easier, you can stick a strip of electrical tape on the drill.
Already fixed, but without curtains
That's all, actually. You know how to attach a ceiling cornice to a concrete floor. If the floor is wooden, everything is even simpler: there is no need to pre-install dowels. After all, wood screws are usually used. In this case, the cornice is leveled and screws are immediately placed in the mounting holes. It’s more convenient to follow the same order: along the edges and in the center, and then - as it turns out.
Mounting options
Let's not waste time and start considering specific solutions. Each of them has its pros and cons and can be used in certain conditions. Do not listen to anyone's advice until you are familiar with all the options for carrying out the work. Often advisors have no idea that the job can be done much easier.
Method 1 - special strengthening of the base
This option is suitable for those who have not yet made a ceiling, or at least built a frame, but have not yet covered it with gypsum board. Its essence lies in the fact that in the place where the cornice will be attached, the surface is reinforced from the inside using any suitable element.
Most often, one of two solutions is used:
- You can fasten a wooden block with a thickness of 30 mm or more along the structure. It is fixed to the wall, ceiling or secured through hangers, it doesn’t matter, the main thing is that you get a solid base for the entire length of the window. Subsequently, you can easily fasten the cornice - the drywall is simply screwed on with a wood screw and the fasteners are firmly fixed in the reinforcing element, this is easy and at the same time reliable;
This option allows for fastening with conventional wood screws.
- The second option is to reinforce the surface with a drywall profile; for this you just need to add a separate element that will be located along the line of the cornice. Everything is quite easy and quick, the main thing is to place the element in the required place. In the future, the cornice is fastened using metal screws.
You can not attach the additional element to the frame, but fix it on hangers
The advantage of this solution is its simplicity, you don’t need to invent anything, you just screw in the screws and securely fasten the structure. But this option also has a disadvantage: if you have already installed drywall, you will not be able to strengthen the surface . That is why this technology is not suitable for everyone; more often people think about attaching cornices not in advance, but when the repairs have already been made, and they need to somehow get out of the situation.
If you do everything in advance, you can do it even simpler and make a hidden curtain rod from plasterboard. In this case, you need to build a frame so that there is a niche about 20 cm wide along the window. Then you can hide the structure, and the curtains themselves will look very interesting, because the place where they are attached will be hidden from view; the photo below shows just such an option.
A plasterboard cornice for curtains is very simple to make, but you get a very unusual end result.
Method 2 - using a butterfly dowel
This option assumes that it needs to be attached to an existing structure. The main working element is a special butterfly dowel. It got its name because of its special shape and operating principle: the fastener opens from the back of the plasterboard sheet and thereby reliably fixes any structure on the surface; one element can withstand weight up to 16 kg, so there is no point in worrying about reliability.
Butterfly dowel is designed specifically for hollow structures
Let's figure out what is needed to carry out the work. For convenience, the information is presented in table form.
| Necessary materials and equipment | Method of application |
| Dowels | Their number is calculated simply: count how many mounting holes there are in the cornice, and purchase the same number of dowels plus one in reserve, just in case. If the butterflies are sold without screws, then additionally purchase hardware with a thickness of 3.5-4.5 mm and a length of 55 mm, this is the option that provides the most reliable fastening |
| Drill | With its help we will make holes for fasteners; you need to have a drill with a diameter of 10 mm on hand. It is best to use the metal option; such equipment passes through both drywall and metal profiles without problems, if it gets in the way |
| Screwdriver or screwdriver with bit | To secure the fastener, you need to tighten the self-tapping screw until the dowel rests against the surface on the reverse side. For work, you can use either a screwdriver or a regular screwdriver; as for the type of attachment, it depends on the type of screws used, most often it is PH2 or PZ2 |
It is best to attach the cornice after painting the surface; this will simplify the work and the structure will look much neater.
This is what the mount looks like from the back when tightened - everything is very secure
Let's figure out how to secure a cornice to drywall using butterfly dowels. You can easily carry out the installation yourself using this simple scheme:
These actions make up the workflow
- Before starting work, it is imperative to assemble the cornice; without this, installation is impossible, since even a professional cannot calculate all the distances and position of the fasteners by eye;
- The cornice is carefully applied to the surface and aligned exactly with the walls. When the optimal position has been determined, you can begin marking work; take a pencil or any other device and draw circles through the holes on the drywall at the places of future fastenings. Make sure that the cornice does not move during operation ;
Typically the mounting pitch is 60 cm
- Drilling holes is not very difficult, the material is easy to process, and the whole process usually takes a couple of minutes. Do everything carefully and hold the tool vertically so that the holes do not become skewed or shifted;
When drilling gypsum boards, a lot of debris is generated, so as not to litter the room, you can use a small life hack - just put a cup on the drill, as shown in the photo, and your room will be clean even after finishing the work.
A simple solution will save you from cleaning up after work
- Before screwing the cornice, we need to install the dowels. Everything is quite simple here: take a butterfly, compress the protrusions. After which the element is inserted into the hole until it stops and lightly knocked down with a hammer, the protrusions in the lower part of the support washer prevent the fastener from turning when it is tightened;
You need to insert the dowel before installing the cornice.
- Fastening the structure is best done with an assistant; he should hold the cornice, and you need to screw in at least the outer elements, the system will hold on to them too . The work is as follows: use a screwdriver or screwdriver to turn the self-tapping screw until it stops, after which you can move on to the next point. After installation is completed, plugs are placed on the holes.
Plugs cover the mounting points
If you have a very heavy cornice, you can use a metal version instead of plastic products. The price of such fasteners is much higher, but the reliability will be the highest possible. The structure opens in all directions and can withstand high loads, while the installation process is no more complicated than the option described above.
Metal butterflies are highly durable
Method 3 – using a “Driva” type dowel
Builders call this option “carrot” because of its similar shape, there are three main types of products, let’s deal with them first:
- The simplest option is a cone-shaped element with a wide thread, inside of which there is a cavity for screwing in self-tapping screws. The products are inexpensive (cost 5-10 rubles), which makes them accessible to almost all developers. At the same time, the reliability of fastening meets all standards;
The simplest option is accessible
- An improved solution is a plastic dowel with a drill tip. I like it for the reason that you don’t need to pre-drill a hole for it, it makes it itself when screwing it in. This greatly simplifies and speeds up installation work, because you don’t need a drill and a drill bit, the downside is that if you get on a metal profile, you still have to drill a hole;
This type of product is very convenient to use
- The third option is metal dowels “Driva”. This is the most durable and reliable solution, which is easy to use, because the design also includes a drill. I will say for myself - I used exactly the same fasteners to hang kitchen cabinets, and they are still hanging, so the dowel cornice will hold up without any problems;
Metal elements are very reliable
Let's figure out how to attach a cornice to drywall using this fastening option. The instructions for carrying out the work are very simple:
- First of all, you should assemble the cornice and place it on the ceiling surface as needed; do not make mistakes at this stage, otherwise your structure will be positioned crookedly. When you are convinced that everything is level, you can begin marking future holes, it is important to do everything carefully and not allow the structure to move during the process of marking, otherwise they may not match in the end;
- If you have a regular version of dowels, then you need to pre-drill a hole; for this, use a 7 mm drill. When using products with a drill tip, you just need to put the dowel on a screwdriver or screwdriver (there is a slot in the front for this) and carefully screw it into the intended point . You shouldn’t press too hard while working, as you can break the material; the element itself will go into the drywall thanks to the drill;
The cross-shaped groove is made in order to put the dowel on a screwdriver
- As a result, we get ready-made holes on the surface into which we can screw self-tapping screws. The cornice is attached and secured using self-tapping screws measuring 4x30 mm, everything is very simple: carefully wrap the hardware until it stops and move on to the next point. The work takes a few minutes, but the result is excellent - the cornice will hold very securely and can only fall, tearing out the material.
This is what the general scheme of work looks like
Fastening using an embed
Attaching a ceiling cornice to drywall in this way is suitable for those who are thinking about this stage of work before covering the room. Its peculiarity is the use of an embedded beam as a fastening element. Work on its installation begins with determining the place where it will be located. Then you need to select a wooden beam (the thickness should be more than 30 mm) and treat it with impregnations with moisture-proof properties. Such timber is secured with anchors to the ceiling or wall.
Having completed the preparatory work, you can move on to covering the room. During the process, do not forget to mark on the gypsum board the places where the block was fixed. All that remains is to screw the cornice to the drywall using self-tapping screws in the marked place. Be careful when choosing fasteners, because they must not only pass through the sheet, but also be fixed to the embedded beam.
Required Tools
Regardless of the chosen method, before starting work you need to prepare tools and additional equipment. Therefore, let's look at their full list:
- A stepladder or a stable chair (if using the latter, it must be placed with its back to the wall).
- Safety glasses to help keep crumbs out of your eyes.
- Hammer.
- Hammer.
- Level.
- Screwdriver.
- Tape measure and pencil for marking.
- Test square.
In any repair work, before starting the job, you must prepare all the necessary tools.
Separately, it is worth paying attention to fasteners that will help secure the ceiling cornice to the drywall:
- Butterfly dowel - opens after a screw is screwed into it, which ensures reliable fixation.
- Dowel-umbrella - it is characterized by opening according to the principle of an umbrella after entering the empty space behind the sheet. This allows you to distribute the load over a large area of the gypsum board.
- Self-tapping dowel - there is no need to specially drill holes, since it can be easily screwed into the gypsum board using a screwdriver.
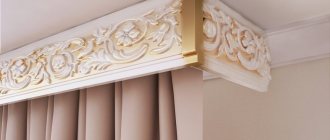
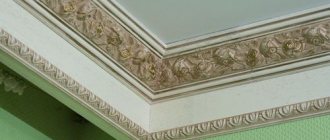
Fastening with glue
This method can be used if you need to attach decorative cornices. The procedure consists of the following steps:
- Trimming the crossbar to the size of the room. To ensure accurate cutting, it is better to use a miter box or a prepared cardboard template.
- Treatment of gypsum plasterboard with a primer for the ceiling. It will promote better adhesion to the glue.
- Applying adhesive mass to the product and fixing it on the ceiling or wall.
After the glue has dried, the process is complete and you can be sure that the structure is held securely.
Glue mount
This option is used when it is necessary to hang a cornice made of polyurethane or polyvinyl chloride, which has a decorative purpose, on drywall. In this case, the technology will consist of the following stages:
- Selection of glue. To attach a plastic ceiling cornice to drywall, you must use “liquid nails” mounting adhesive or acrylic-based glue;
- Then you need to thoroughly clean and prime the surface of the plasterboard in the place where the cornice is supposed to be attached;
- Glue is applied to the cornice, after which it is pressed against the wall or ceiling. When the glue dries, the cornice will hold securely enough.
It is worth noting that this method is not suitable for hanging heavy curtains, so let’s find out how to attach a cornice to a plasterboard ceiling if it has more than just decorative value.
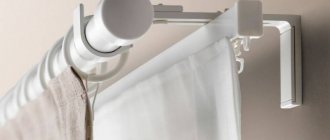
What you need to attach the curtains
Of course, you can nail the curtain to the wall - easy and cheap. But we will approach the matter from a modern and aesthetic point of view. All types of curtains are attached using curtain rods. They come in several types:
- baguette;
- strings;
- profile;
- round;
- rail
Each of them has its own installation and appearance features, which can be seen in the pictures. Once you have decided on the choice of cornice you like, purchase the necessary tools:
- screws;
- drill;
- dowels;
- hammer;
- pencil;
- level;
- roulette;
- stepladder or chair.
Also, be patient and you can get down to business.