Why is it seemingly bad when children have a lot of toys? And the fact that they are scattered throughout all the rooms and their owners do not really like to collect them. Proper storage of toys in an apartment or house is the key to order and peace of mind (mothers first of all), because even simple maintenance of order in this case is a task of increased complexity. It can and should be made easier. To do this, you will need furniture for children's toys - racks, shelves or a closet, as well as a decent number of boxes, drawers, bags and pouches.
Furniture for storing toys in the nursery
Furniture for a child's room is needed from the first days of life. And most often this is a chest of drawers and a shelving unit. Only at first they are occupied mainly with linen and children's clothing, and toys take up little space. But gradually funny things - rattles, bears, cars, dolls, etc. It’s getting bigger, they require a separate place, and sometimes more than one.
The most convenient option is a rack. Not a cabinet with doors, but a rack with open shelves on which drawers can stand. Storing toys in this form is optimal - it’s convenient for the child to get them out and put them away quickly.
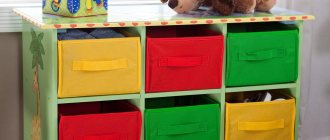
At first, you can buy or make one rectangular rack, preferably with square cells. Now you will understand why...
Rectangular shelving with square compartments
While the child is small, he can be placed “lying” - as in the photo, with the long side on the floor. This is more convenient for a small child - he will first master what is below, then move on to the upper shelves. And it’s safer - older children can use the shelves as a ladder, but in this position they won’t be able to climb high))
In a couple of years, the child will grow up, there will be more toys. You can turn the rack over and put it “in height”, and install a second one in the free space or make shelves. By combining several racks of different heights you will get a children's toy storage system.
Different racks are assembled into toy storage systems
You can increase the volume gradually: buy a single rack or, as they used to say, a bookcase, then another one. The beauty of a nursery is that they don’t even have to be the same color. And if you care, paint them or choose a neutral wood color.
Favorite toys can be stored in the mesh on the headboard
Just a dozen buckets and you have an original toy shelf
Gradually one shelf turns into a wall with toys
Cardboard boxes covered with fabric look great
This is already a whole wall for children's toys
Different baskets - plastic or wicker
Simple and convenient, and the modular system allows you to increase the size as needed
Plastic chests of drawers in the nursery - convenient and hygienic
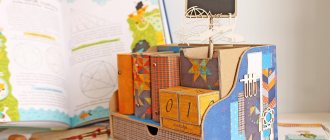
Making a wooden box
The technology is not easy, so you need to be especially careful and work according to the instructions. The photo shows what you can do.
The instructions are as follows:
- First of all, make a drawing. In it, indicate the depth, height and width. Consider the design: it will be with or without legs; supplement it with handles and where exactly?
- Buy everything you need for work: materials and tools. Use MDF board, plywood or OSB boards. You can use parts from an old chest of drawers, cabinet or table. Stock up on screws, angles, wood glue or PVA and hinges.
- If you buy panels in a store, you can ask them to be cut on site according to the drawings. Otherwise, do everything yourself, having previously marked the material. You must have the following parts: 4 walls, two of which are longer, so that you get not a cube, but a rectangle, the bottom of the box and its lid.
- When the elements are ready, start assembling the box. Coat the places where the parts will be joined with glue.
- Place the bottom on a flat surface and install the side walls in their places (those that are smaller). Secure them with two corners.
- Then do the same with the other two walls.
- Using the hinges, place the cover in place.
- Wipe off excess glue with a cloth.
At this stage, the box is ready and can be used for its intended purpose. You can decorate it, attach a handle and legs.
Advice! To protect the material, it can be opened with varnish or stain.
How to organize toy storage: ideas
You can put different boxes in the racks, into which small and not very toys can be loaded. Please note right away that wooden boxes (or made of plywood, chipboard and other similar materials) are not the best option for small children. They are too heavy; children often injure their fingers when trying to reach toys. They also have hard, traumatic corners that can, of course, be rounded a little, but they still remain hard. Such boxes are suitable for schoolchildren. They already have more strength and better coordination. And it is better to organize the storage of toys for children in softer and less traumatic plastic containers/baskets or in thick boxes covered with colored paper or fabric.
It is better to replace heavy boxes with light ones
It’s not so difficult to buy or make furniture for a wound, but teaching a child to put his toys there is a more difficult task. For girls, the rack can be decorated in the form of a house. Then she herself will resettle the “tenants” and create conditions for them.
Rack for toys in a nursery for a girl
This option will not work with boys. They usually have a lot of cars and the main task of storing the boy's toys is to arrange the cars. To do this, you can make an entire wall-mounted garage. These are long narrow shelves on which the entire fleet is located. Other options are transparent fabric pockets (sold as shoe storage systems) or a shelf assembled from plastic pipes.
How to organize storage of cars (wall-mounted garage)
To stimulate the desire to “drive” cars into the garage, you can make markings on the floor with masking tape, along which “after the shift” they drive into the parking lot.
Road to the parking lot
In principle, such pockets can be used to store collections of dolls and soft toys.
Pockets on the wall are convenient for placing dolls and soft toys
When there is no longer enough space on shelves and racks in the nursery, more ideas are needed. In addition to pockets, you can make drawers (large) under a bed or table.
Drawers under the bed don’t take up space, and you can hide boring toys there
To prevent everything from being piled up in large boxes, you can put plastic baskets under small items. This way everything will be found faster than in a general heap.
Toy storage must be organized correctly
Boxes can be installed in racks not only on shelves: it is possible to hang them. To do this, grooves are cut out in the side walls into which the sides of the baskets and baskets are simply inserted. You can take plastic baskets (if you find them with sufficiently rigid sides), or you can take metal ones - from the complete set of dressing rooms or wardrobes.
How to install a toy basket in a shelving unit
The largest free surfaces in a room are the walls. They can be used. For example, attach a strip of Velcro to a wall (the side wall of a cabinet, lamp shade, etc.). Sew small pieces of such tape onto the backs of soft toys. They will be easy to put in place and take off. And the decor will also become more diverse.
Velcro is one of the easy ways to find a place for soft toys
You can hang mesh pots made of wire or plastic on the walls. They also perfectly accommodate small dolls, bears, bunnies or cars.
Place toys in pots instead of flowers
You can borrow an idea from the kitchen: attach different bags to a horizontal pipe. To make the necks tougher, you can tighten them with a hoop or sew in elastic wire.
Pockets or bags on a pipe are another idea for storing toys in a nursery.
Pockets are also made on wooden bases. It can be cut out of plywood, painted, and several hooks, pockets and bags can be nailed on. The mini toy storage system is ready.
One of the options for pockets for toys
But not everything can be attached to the walls. Some items require baskets or boxes. For example, sports equipment - all balls, soccer balls and other equipment. They are conveniently stored in wire bins.
Wire basket for storing sports equipment and large toys
If desired, you can attach baskets to the walls and practice hitting the ball into the basket (away from breakable objects and windows).
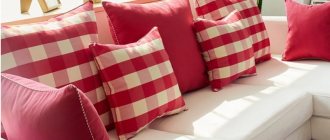
Storing toys from the “cheap and cheerful” category - folding fabric baskets. Of course, they are inexpensive and look good, but they tear very quickly. Especially mesh ones: the toy gets caught, the child pulls it... there is a hole.
Folding fabric baskets for storing toys
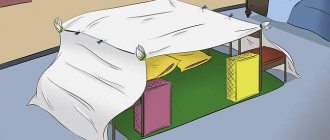
No matter how hard parents try, children don’t really want to put away toys. Or rather, they don’t want to at all. In this sense, a bag-mat is simply an ideal option.
Bag-mat for quick cleaning
This is an ingenious solution: a small “wall” is sewn along the edge of the round rug, and along its upper edge there is a drawstring through which the cord is threaded. To remove the toys, you just need to tighten the cord. The edges of the mat will rise and the mat will turn into a bag.
Easy to assemble toys quickly
Then these bags can be placed somewhere near the wall or hung on special hooks. Really ideal.
DIY toy boxes
Looking at the not childish prices for cute wicker or plastic baskets in stores, you think that the idea of making colored toy boxes with your own hands is not so bad. You will need cardboard boxes made of thick (not corrugated) cardboard, most likely from household appliances. You can try your luck with your friends: many manufacturers provide warranty repairs only if the packaging is present. So people keep the boxes. The warranty period has long passed, and they forgot to throw away the packaging. These boxes are the best option for children.
Another option is to ask in department stores. They also often receive goods in hard packaging. For example, diapers, wipes, etc. come in these.
Cover with paper
Cut off the lid from the found boxes. We cut holes-handles in the side walls (narrow). We seal all joints from the inside with tape.
Cut off the lid of the box and make holes in the sides for handles
Take colorful paper. The wrapping paper used to wrap gifts is perfect. It is dense, there are a large number of different patterns. You can also use scrapbooking paper. If the trim is made of paper of different colors, we cut it into strips of equal width; if we paste it with one pattern, we measure the strip along the height of the box.
Glue the paper
We take glue (PVA), brush the surface of the box and start gluing it from the corner. We try to glue without bubbles, smoothing the paper gradually, from edge to edge. We place the next sheet with a slight overhang, not the previous one. Continue this way until we have covered all the surfaces.
We design handles
After looking at the light, we cut out the handles with scissors. To make the edge more neat, glue the sections of the handle with a thin strip of paper. We also decorate the top cut with a stripe.
Ready-made homemade toy box
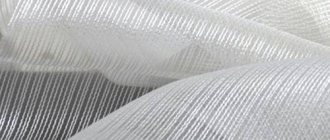
We cover it with fabric
In this case, all corners of the box can be taped on both sides - it will last longer. Next, take the fabric and cut out two sets of blanks to fit the box. One is strictly in size, plus a seam allowance, the second is 1 cm smaller and also with an allowance. Add 0.5-1 cm to the seams on each side. You can cut the workpiece immediately in the form of a cross, but this way the fabric consumption is greater - it is more economical in separate pieces))
We cut out a double set of blanks from the fabric and sew them together
We first sew the parts together in the form of a cross, then make a bag from the blank. Let's try it on the box. We stretch one (the larger one) from the outside, and straighten the second one from the inside.
Fitting
Now we take universal glue and glue the fabric around the perimeter of the bottom, inside and out. Then we glue it in the corners. This way the fabric will not move.
Glue the fabric along the edges of the box
We fold the edges of both bags inward and trim the box around the perimeter by hand.
We trim the top of the toy box, cut out the handles
Using scissors, cut through the handles. Just don't cut out large pieces. You need to leave about 1 cm of “extra” fabric. We wrap it inside, hemming the handle.
Hemmed handle
Having decorated the handles, we get a ready-made box for storing toys.
The box is ready
Decorated with self-adhesive film
Some tips from a professional
If a cardboard box is used as the material for creating a toy storage box, then it is worth checking its bottom and walls for strength. If they are soft, then such a box will not last long.
If you are making a wooden box, you must make holes in its walls or leave gaps so that the toys can be ventilated. For the same purpose, cardboard boxes with filling are not closed.
To attract the attention of a child, a toy box made using any technology must be brightly decorated. For example, you can use the patchwork technique, which involves gluing narrow strips of bright paper onto the entire surface of the box in a chaotic manner. Or square pieces of paper can be used for this purpose. You can go further and purchase ready-made decorative elements, for example, animal figurines or other images, bows, which are glued in random order to the surface of the box.