Icer
1202 0 0
Icer November 10, 2018Specialization: master in the construction of plasterboard structures, finishing work and laying floor coverings. Installation of door and window units, finishing of facades, installation of electrical, plumbing and heating - I can give detailed advice on all types of work.
Today we will figure out how to assemble an office chair yourself. There is nothing complicated in the process, the design of all options is identical, and if you understand the general principles, you can easily cope with the assembly process of almost any model. You will also learn about the main features of this furniture option and its most common modifications.
An office chair is a convenient design for work, which will not be difficult to assemble
Design Features
A high-quality office chair is a complex design, in the development of which various specialists took part - engineers, doctors, designers. The main elements are as follows:
- Back and seat. Provide back support and seat comfort.
- Permanent contact. A component that connects the two previous elements and is responsible for changing the position of the backrest.
- Five-pointed cross. It is the base on which the entire load falls.
- Rollers. Elements at the bottom of the cross, responsible for the ability to easily move the chair without damaging the floor covering.
- Gas lift. A shock absorber that guarantees the elasticity of the structure and allows you to adjust the office chair in height.
- Armrests. They significantly increase the comfort of the seated person, especially if they are supplemented with soft pads, but this element is variable, and not all models are equipped with it.
What unites all types of computer chairs is the ability to adjust the position of the seat and backrest.
Despite the external similarity of all office chairs, they differ in types and models. The adjustment mechanisms also have their differences, which are shown in the table.
| Spring-screw, or Freestyle (SVM) | It is characterized by an elastic spring under the seat, reliability and unpretentiousness. Able to change the position of the backrest and the degree of force when deflecting. The distance between the backrest and the seat can be adjusted. Used in budget models together with piastr. |
| Piastra | The directions of work are only up and down. Used in conjunction with front driving position. |
| Top gun | The mechanism allows you to swing, like a rocking chair. Provides deflection of monolithic seats in the range of 95-130°. Guarantees the stability of the chair even at the maximum angle of inclination. |
| Synchronizing mechanism | The device is reliable and very durable, with precise adjustment of the chair position. The set of functions includes tilting and fixing the backrest, height adjustment, and seating depth adjustment. Under the weight of a person, it automatically changes the angle of the seat. It is considered the most expensive mechanism. |
Assembly of parts
Before assembly, it is necessary to carefully coat each of the parts with a triple layer of antiseptic to preserve the internal surfaces. After processing the material, you can proceed to the next steps.
Drying and varnishing the product is the final stage of production.
Making a structure on three legs
Project
The manufacture of any furniture should begin with the preparation of the project. You can make drawings of a plywood chair with your own hands or use ready-made projects that can be found on the Internet.
Below are drawings of a spherical product. It has an interesting and attractive design, and is also quite easy to manufacture.
To make it, it is best to use. Moreover, you will need sheets of different thicknesses:
All parts of the product can be cut with a jigsaw or. In addition, you will need an electric drill to drill holes for screws or tongues if a tongue and groove connection is used.
Advice! To get the ideal shape of a plywood chair with your own hands, the drawings should be transferred to graph paper and templates should be prepared. Subsequently, these templates only need to be traced with a pencil on a plywood sheet.
Manufacturing process
It is quite simple to make such a design with your own hands; the most important thing in this process is to cut out the parts correctly and assemble them efficiently.
The work is carried out in this order:
- First of all, you need to transfer the drawings onto a plywood sheet. They need to be positioned so that the material is used sparingly;
- then all the parts must be carefully cut out with a jigsaw or other tool;
- the cut area must be treated with sandpaper; if necessary, the cut can be trimmed with a file or processed with a router;
- Next, you should drill holes for the screws and assemble the structure according to the diagram, the heads of the screws should be recessed. Self-tapping screws should be selected that are suitable in size - it is unacceptable for their ends to protrude from the back side of the part. To give the product greater strength, before assembly, all joints must be treated with wood glue;
- after assembling the structure, the screw caps need to be puttied;
- At the end of the work, the product should be treated with stain or varnish.
Advice! Furniture made from bent-glued plywood looks very beautiful and unusual. Of course, it is very difficult to do it completely on your own at home. However, you can order frames and parts of chairs made of bent plywood according to an individual sketch in workshops that do similar work.
When the structure is ready, you can make a soft seat in the form of a pillow.
Making a rocking chair
Project
As in the previous case, first of all, you need to make drawings of a rocking chair with your own hands from plywood. As an example, consider the process of manufacturing a structure whose runners serve as a frame for the seat and backrest. This option is the simplest in terms of implementation.
Of course, you can use any other project you like. The main thing is that the drawings of a plywood rocking chair are accurate and contain the dimensions of all parts.
Advice! If you want to make furniture for outdoor use, such as gazebos or terraces, you should use moisture-resistant plywood. Otherwise, it will quickly become unusable.
What you need to assemble an office or computer chair
As a rule, when ordering an office chair using a delivery service, it arrives disassembled. To make the softest and most comfortable chair from a large number of large and small parts, you need to prepare the place where the assembly will take place. It is best to do this on the editing table, but if you don’t have one, then this is a small problem.
As a rule, assembly instructions come with the furniture.
Before starting work, you need to carefully and thoroughly study the instructions attached to the future product, compare the number of parts and elements described in the provided paper and what is in the disassembled box. To assemble a chair, there must be a complete set of parts, otherwise carrying out such work may be in question.
Before you start assembling, you need to find out if everything is in the package.
The fasteners must contain the following elements:
- large screws with tips (4 pcs);
- medium screws with tips (6 pcs);
- small screws with tips (4 pcs);
- hex wrench.
Important! The number of fasteners may vary depending on the model purchased and its design features.
Take a closer look at the elements. They must be undamaged, without scratches or abrasions.
Modern manufacturers producing office chairs or computer chairs offer to purchase models that consist of two main parts:
- seat with backrest (adjustable);
- supporting part (with a mechanism that makes it possible to adjust the height of the seat relative to the roller wheels).
A person is faced with the task of correctly connecting two parts, as well as accompanying elements, so that the future product can fully function.
If everything is in order, you can begin the assembly procedure.
Seat and back
The first step is to start assembling the seat and backrest. This design can be provided as a monoblock solution with additional elements (armrests) for maximum comfort of the person who will use this chair for its intended purpose. However, most often there are models where the backrest is separate from the seat itself.
In order for the chair to serve for a long time and without breakdowns, during assembly it is necessary to carry out all the steps in stages, as indicated in the assembly manual.
In total we have the following configuration:
- the back as a separately existing element;
- a mechanism by which two elements such as the back and seat are connected, and they are also adjusted relative to each other;
- seat as a separately existing element;
- armrests.
It is these parts that, upon completion of assembly, will form the upper part of the structure.
To carry out all operations independently, a minimum set of tools and basic practical experience in their use will be enough.
Support mechanism
It is the support mechanism that is entrusted with one of the main functions - holding the structure in a vertical position. In addition, the wheels that are in contact with the floor help the chair move without unnecessary movements of the person sitting on it.
Check that all parts, materials and tools are complete. Everything you need should already be available.
The support mechanism has the following components:
- Gas lift - this element performs a supporting function; it has the ability to change the length if necessary, allowing you to make the chair higher or lower.
- Star-shaped cross - it has five ends, each of which is attached to a wheel. It is this detail that distributes the weight of a sitting person around the perimeter and makes it more even.
- Roller wheels - this part is assigned the function of movement. Due to the small wheels that are attached to the star-shaped cross, the future computer chair can easily move around the perimeter of the room.
It is best to start assembling the chair by mounting the casters. It's easy to place them in the slots of the crosspiece.
Correct fastening of each element is very important. After all, thanks to the completion of all assembly work as indicated in the instructions, you can get a full-fledged office or computer chair that will perform all its functions and serve the owner for a long time and with high quality.
An additional hint will be the assembly diagram.
What you need to know about this furniture option
Chairs for office and computer work differ markedly from standard furniture for relaxation, so first of all we will consider the main design features of these solutions and tell you about the most common types of products.
Design
All chairs of this type consist of the following components:
- Backrest . It can have different heights from low to high, and often includes a headrest so that you can lay your head back and relax. The shape and size vary, it all depends on the model and features of use. The element is most often adjusted to provide an optimal sitting position;
Models with a mesh back are a new word in the design of chairs; they are well ventilated and light in weight.
- Seat. This part largely determines the comfort of the chair, so it is always selected carefully. Sizes and shapes may vary, it is important to find the solution that will provide you with the greatest comfort;
In executive chairs and gaming models, the back and seat can be a single unit, this increases the strength of the structure.
A one-piece assembly of seat and backrest is used in expensive models of chairs
- Armrests . A must-have item for those who work a lot on the computer. There are adjustable and non-adjustable, the first option is preferable, since it can be set according to your own preferences. Also, this part can be fixed or removable; the second type is suitable for those who periodically remove the armrests;
- Gas lift and seat adjustment mechanism . The first element provides the springing properties of the structure and allows you to change the height of the chair. The second is designed to adjust the seat and rock the structure so that it takes a comfortable position during use;
- Crosspiece and wheels . The supporting part, which bears the main load. Crosses can have from four to six beams; five-beam modifications are most common. When choosing wheels, give preference to rubberized options; they provide a smoother ride and do not damage the floor covering.
The crosspiece is an important part of the chair design
If we look at the main components, the chair consists of only two elements:
- Seat with backrest . This unit includes a seat, backrest, armrests and an adjustment mechanism attached to the bottom. The comfort of the chair largely depends on this element, so it is important that the design is comfortable and allows you to make the necessary adjustments to your physical parameters;
- Support structure . It includes a cross, rollers and gas lift. This element is responsible for the mobility of the furniture and the ability to rotate it 360 degrees. It is important that all parts rotate easily, without any jamming or blocking. As for the gas lift, it should provide good springing properties and make it easy to adjust the seat height.
Types of chairs
Now let's look at the main varieties on sale:
| Illustration | Description |
| Office models . They primarily value convenience and functionality. The appearance is usually quite simple, most often the upholstery is made of fabric or leatherette. The designs have the necessary list of adjustments to adapt to the characteristics of different people. Their main advantage is simplicity and low cost; there are quite a few models, but they all have approximately the same characteristics. | |
Mesh chairs. This solution appeared relatively recently, but has gained great popularity due to a number of advantages:
| |
| Executive chair. Most often these are premium products, characterized by an attractive appearance and expensive finishing materials. Genuine leather is often used for upholstery, and natural wood, metal or high-quality and wear-resistant types of plastic are used to decorate other parts. This solution is much more expensive than standard models and has an expanded range of adjustments. Often the seat and backrest design is a single unit. The range of models is so wide that you can choose the optimal solution for any interior. | |
| Ergonomic and orthopedic models . This type of product is characterized by increased comfort of use due to the fact that the shape of the backrest is made in such a way as to support the spine in an optimal position. The design is made taking into account the recommendations of orthopedic doctors, therefore it ensures ideal body position, which helps reduce fatigue and prevent back problems that most of those who constantly work at a computer experience. | |
| Child seats . A separate variety, differing in configuration and size and designed specifically for a growing organism. Products are selected according to the child’s age and height and have a wide range of settings to ensure the ideal body position when sitting. Some models are equipped with footrests, so that the child needs to rest his feet on a solid base, and not dangle them in the air. | |
| Gaming chairs . This option is designed for those who spend a lot of time at the computer. The models are distinguished by well-thought-out ergonomics and a variety of settings; they are convenient not only to play, but also to work with. This is an excellent solution for home use, suitable for both adults and teenagers, the main thing is to choose the design in size. There are a lot of options and models, you need to choose the solution that will be convenient for you. |
Checking the contents
Experts recommend checking the package in advance to make sure you have all the parts.
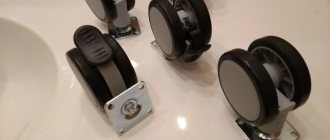
Wheels
Most product models are equipped with special wheels that are mounted on the crosspiece. The diameter of the rollers does not exceed fifty millimeters, and the size of the rods is ten millimeters. Most often, the wheels are supplied separately from the crosspiece and therefore you will have to install them yourself.
If the chair will be placed on parquet or linoleum, it is recommended to buy rubberized casters. They will not damage the surface and will not leave marks on it.
Cross
When checking the package, you need to make sure there is a crosspiece. This is an irreplaceable part on which the rest of the structure is installed.
The crosspiece is made of the following materials:
- Wooden. Wood parts are used in expensive office chairs. The advantages of wooden crosses include an attractive appearance and resistance to high loads.
- Chrome plated. Such products are considered the most reliable and durable. Chrome parts are versatile, as they are installed in both expensive and budget chairs.
- Plastic. Budget chairs are equipped with plastic crosspieces. In terms of strength, they are inferior to products that are made of metal or wood.
Lifting mechanism and casing
The kit should include a special mechanism for raising and lowering the seat. It is installed between the chair support and its cross.
A gas lift is a hydraulic gas device found in every office chair. If it is not included in the package, you will have to contact representatives of the store where the product was purchased.
Seat, back, 2 armrests
In addition to the above components, the kit should include two armrests, a seat and a backrest. These details make the office chair more comfortable. However, sometimes the kit may be missing something. Most often this happens when they buy budget models of office chairs that are sold without armrests.
Set of bolts and other fasteners
The parts from which the chair is assembled are secured using special fasteners. Bolts and screws should be included with the rest of the chair. Most components are attached to each other with small screws about one and a half centimeters long. To attach the side armrests, stronger fasteners are used - bolts.
Special key
Some office chairs have components that are secured not with screws or bolts, but with fasteners with a special hex hole in the head. Such fasteners are not very common, and not every person has a tool for working with hexagons. Therefore, manufacturers must ensure that a special key is included in the kit.
Build quality check
After completing all assembly work, it is necessary to check the structure for strength and correct installation of all parts. This is defined as follows. You need to sit on the chair and press the piastra down, after this movement the chair should lower. Then you should do the following manipulation with the same element - pull it up; if everything is done correctly, the seat rises to its original height. This will indicate that the office chair is assembled correctly.
Fasteners and connection areas between components must be lubricated with machine oil.
If you follow the clear instructions for assembling a computer chair, carefully and carefully follow each step, then assembling the chair will not be difficult. Half an hour of time, two working hands - and the new chair can be used for use.
An office chair is a convenient design for work, which is not difficult to assemble.
Step-by-step instructions for assembling the chair
Assembly will be quick and enjoyable if you follow the sequence we suggested.
Install the rollers into the slots
With a little force, insert the wheels into the holes on the chair legs
First, install the rollers into the crosspiece - to do this, insert them with the rods into the holes on the lower surface of the crosspiece and press firmly until they click. You can use a rubber mallet, but it is not recommended to hit the plastic parts of the parts too hard.
After all the wheels have been inserted, place them on the floor and press the entire body onto the legs of the office chair
Prepare the seat
Attach the piaster to the bottom of the seat using bolts
Attach the backrest adjustment mechanism to the back of the seat and the piastres to the bottom.
IMPORTANT! When installing, make sure that each screw is equipped with two types of washers - flat (it increases the contact area of the inner surface of the head) and lock - to prevent the nut from unscrewing.
Manufacturers offer various options for devices that regulate the position of the backrest and seat to suit the characteristics of the spine of a sitting person. The most common:
- piastra – can only regulate the vertical displacement of the seat and backrest relative to the floor, used in conjunction with the FDA;
Piastre mechanism for office chair
- PVM (spring-screw mechanism) - reliable and unpretentious, adjusts only the angle of inclination and the distance of the backrest relative to the seat, used together with a piaster in inexpensive models;
Spring-screw mechanism for swinging the chair
- Top gun - provides “swinging” of the monolithic seat with an angle from 95 to 130º, but at the same time the legs can come off the floor and the chair can tip over. When choosing such a product, give preference to a mechanism on bearings with a tilt axis shifted to the edge and a working position lock;
Top gun swing mechanism for office chair
- synchronizing mechanism - under the influence of the gravity of a person’s weight, it automatically changes the angle of the seat simultaneously with a change in the seat position, the most expensive solution for top managers.
Synchronizing mechanism for an expensive office chair
The correct location of the socket and adjusting screw is indicated by the arrow
When installing, please note that the seat for the gas lift rod should be directed forward, and the adjacent adjusting screw with a plastic handle should be directed back. Insert the armrest brackets into the side slots and tighten with screws.
Installing armrests on both sides of the chair
Put the backrest on and tighten it with the adjusting screw.
Installing and screwing the backrest of the chair
Install the gas lift into the crosspiece
Assembled casing-cover and gas lift - shock absorber for the chair
Remove the protective caps from the ends of the gas lift and insert it with its base into the upper central hole of the cross. Assemble the casing - it is often made of several parts connected according to the principle of a telescopic pipe and put it on the gas lift. Insert it into the center hole of the cross. You have assembled the load-bearing part.
We assemble the supporting part - insert the gas lift into the cross
We install the casing in place and get the finished lower part
Connect both parts of the chair
Carefully place the office chair seat onto the shock absorber
Place the seat on the gas lift rod and press firmly or sit on it - this is necessary for a strong fixation to occur.
Press with your hands to ensure fixation occurs.
Carry out assembly quality control
We sit down on a comfortable chair and check the success of the assembly
While sitting on a chair, press down on the piastres lever. The seat will lower. Pull the lever up. If there is a return to its original position, then the assembly was successful.
So, you assembled a new office chair without the help of your boss, and now you won’t give it to anyone.
Black office chair assembled
How to assemble: instructions
Before assembling the chair, you must read the instructions, which describe how to do it correctly.
Installation
First you need to install the rollers into the slots located at the bottom of the cross. To do this, the part is placed on a hard surface so that the holes are directed upward. Then a wheel is installed in each of the slots. If the rollers do not fit into the slots well, you can use a small rubber hammer. However, you need to hit with a hammer very carefully so as not to accidentally damage the parts.
Seat preparation
Once the rollers are installed, you can start installing the control mechanism. Mechanical bolts are used for installation and secure fastening. They are screwed into pre-drilled holes on the surface of the cross. Before installation, make sure that each bolt is equipped with a lock washer, which makes the bolting more secure.
Gas lift installation
Gas lift installation is carried out in several successive stages:
- Installation of the cross. First you need to install the cross on the floor.
- Placement of the mechanism. When the cross is placed, a lifting mechanism is attached to it.
- Attaching the casing. This part consists of several parts that are installed on top of the gas lift.
Connecting parts
After attaching the gas lift to the crosspiece, you need to connect it to the seat. To do this, connect the parts using bolts and nuts. However, before this, the gas lift rod must be inserted into the mounting hole on the seat. This must be done carefully, without putting a lot of effort.
Final stage
The final stage of assembling the chair is installing the side armrests. They are screwed to the bottom of the seat with screws. In older models of chairs, bolts were used as fastening elements.
Build Quality Check
After attaching all the parts, the assembly stage of the structure begins, during which its functionality is checked. To make sure that the chair is assembled correctly, you need to place it in front of the computer and carefully sit down on the seat. Then you should pull the lever under the seat, which is responsible for adjusting the height. If everything works without problems, then the design is assembled correctly.
See also
Lighting options in the bathroom, rules for choosing and placing lamps
Assembly stages and diagram
In order for the chair to serve for a long time and without breakdowns, during assembly it is necessary to carry out all the steps in stages, as indicated in the assembly manual. An additional hint will be the assembly diagram. To carry out all operations independently, a minimum set of tools and basic practical experience in their use will be enough.
Installation of rollers in the cross
It is best to start assembling the chair by mounting the casters. It's easy to place them in the slots of the crosspiece.
- For comfort, it is advisable to place the crosspiece on a flat, hard surface, for example, on the floor or table with the holes facing up.
- We put the rollers in the slots - this is done easily: the wheel rod is inserted into the hole on the crosspiece and pressed until it clicks. All remaining elements are installed in the same way. It is not advisable to nail the rollers, since they are entirely made of plastic, you can damage them. If your hand strength is not enough, you can use a rubber hammer, but only without fanaticism.
- After installing the rollers, turn the cross over, place it on the floor and press firmly on each branch to make sure that the parts are firmly in place and in a stable position.
Seat preparation and installation
The seat should be turned upside down and the adjustment device installed. It can be of different designs, but, as a rule, it is a design with an adjusting screw, a gas lift mount (gas spring) and a lever by which the seat height is set. First, attach the part and check that all holes for fasteners line up perfectly.
It is necessary to set the adjusting unit correctly so as not to confuse the location of the fastener for the gas spring and the adjusting screw. Then installation is carried out, 2 washers are installed under each screw - a large one, which increases the pressure zone, and a small one, which serves as a stopper and prevents the screws from unscrewing during use.
Armrests are attached. Everything here is quite simple: the part is installed at the place of fixation and pressed with screws. The main thing is not to confuse the position and install the armrests on the required side. The backrest is being installed. To do this, the cantilever support part (bracket) is installed in its place, then the screws with washers are installed and thoroughly tightened.
Installation of a gas spring in a crosspiece
Before installing the gas spring, the safety caps should be removed from its ends - otherwise they will prevent the normal functioning of the shock absorber. After this, the lower part of the gas spring must be inserted into the central hole of the cross, press on it to fix it in the desired position. A casing is placed on top of the gas spring and secured with a latch on the body of the cross.
The telescopic type casing is intended for insurance; it protects a sitting person from falling if the lifting mechanism fails. In addition, it plays a decorative role, hiding the gas lift. The casing is assembled according to the type of telescopic systems - one part is inserted into another, they are secured by means of protrusions in the body of the housing. When the supporting base is prepared to fix the seat, you can proceed to the final stage.
Combining chair components
You must be very careful when fixing the assembled seat to the supporting base. Our main goal is to carefully place this component on the lifting mechanism.
- The upper part of the chair must be carefully placed on the gas lift rod. There is nothing complicated here, the main thing is to accurately align the rod with the hole so as not to spoil the design details.
- Then press down hard on the seat, or better yet, sit down. At this moment, a strong adhesion of the elements will occur.
It is not advisable to assemble the chair using any other methods. The product is ready for use, all that remains is to test how well the work was done.
Preparatory stage
Before starting work on assembling a chair at home, you need to decide on the basic parameters of the future product. You should start with the appearance. In accordance with the style of the room where the upholstered furniture will be installed, a suitable model is selected.
It is advisable to study the range of finished products in exhibition halls or look at photos in catalogs. In the first case, you can clearly see and touch the planned model, but the search will take some time. In the second case, the time spent will be minimal, but the final appearance may differ significantly from the desired one.
Having studied the range of chairs and decided on the model, you can begin preparatory work. First, you should measure the place where you plan to put the furniture and calculate the dimensions. To avoid mistakes in fitting parts and not to forget anything, competent drawings and diagrams are drawn up.
The generally accepted ergonomic seat height is approximately 45 cm, its width and depth vary from 40 to 45 cm. The height of the backrest from the floor should be about 1 meter. For comfortable sitting, a slope of 3 cm is made from the edge to the back.
To make a drawing of a chair on a sheet of graph paper or graph paper, a completely finished model is initially drawn, after which the following are depicted separately:
- back;
- side detail;
- seat;
- armrests.
When schematically modeling, it is necessary to take into account the thickness of the material from which the chair will be made. Synthetic and natural fabrics have different parameters, which can affect the final collection of parts. After completing the drawing, it is advisable to draw part templates on cardboard and cut them out. This will make it possible to try on life-size dimensions and project the necessary elements on the material.
For components, you can go to the construction market or a specialized store. You can also order materials for delivery, but in this case it will not be possible to visually evaluate their appearance and quality.
Rollers and gas lift
For those who do not know how to assemble an office chair, we offer detailed instructions:
- We lay out all the details in front of us.
- The first step is to install the rollers on the cross. In most configurations, it is not necessary to screw the rollers with screws. Simply turn the cross over with the convex side down, and push the roller cotter pin into the holes of each of the five beams. Absolutely no tools required. All the wheels are in place, turn them over onto the floor.
- A gas lift is a special cylindrical mechanism filled with gas, which is compressed when a person sits in a chair. Remove the protective plug and simply insert it into the hole in the middle of the cross.
The gas lift should not be completely disassembled, as it is filled with gas under high pressure, and its rupture can be harmful to health and cause injury.
DIY home chair
Now let's look at making a regular home chair with our own hands. Unfortunately, there were quite a few photographs; there was no time to take photographs. The main stages were recorded in a timely manner, switching from a tedious workflow.
I wanted to get an ordinary chair, and not just some incomprehensible rookery. So that it is strong and stable, like store-bought options. I had to look on the Internet for views and drawings of chairs in order to correctly assemble my design. I suggest you immediately look at the photographs of the chair assembly process itself.
At the first stage, a base-frame for the future chair in the form of a semicircle is made. Chipboard with timber is used. The base of the chair was 10 centimeters thick. This will be just enough to secure the walls. And the uprights have the same ultimate function.
Hardboard was perfect for the back, and plywood for the front wall. I drew out all the curves and outlines of the future chair by eye from the remaining wallpaper. Children's wooden cubes were used for the base.
The next step was to glue cardboard to fill the interior space. During the work, we even had to change the glue; the initially chosen PVA did not work. The walls swelled and became like a wafer, the glue was replaced with ordinary wood glue. It turned out to be the best choice of all that was offered. There was even an idea for a rocking chair with my own hands, but I will implement the idea a little later.
After looking at the photo, you can immediately easily understand how the finished walls were obtained. For leveling I used a regular knife; the material is easy to cut and can be deformed.
At the next stage, work with instant adhesive and foam rubber, seal the entire surface with a layer of foam rubber, leaving no bald spots or uncovered areas. A cover must be sewn onto a monotonous surface.
Well, we have reached the final stage, when we pull on the cover and get a beautiful finished chair. The product turned out to be quite heavy, but it will be completely safe for children, which can be considered a plus. As for the fabric used, nothing was bought anywhere. We used scraps and sewing scraps available at home.
We wanted temporary furniture; no one planned to make a chair that would last forever. The fabric on the armrests, despite being well tacked with glue, will peel off over time. If we say a little about the design of the chair, it turned out to be simply indestructible.
Varieties by purpose
Chairs are divided into the following classes:
- For the head of a company or enterprise. This piece of furniture is distinguished by a high degree of comfort and convenience, since it is necessary to provide just such conditions for the work of the manager.
- For employees and staff. The chair is less comfortable compared to the previous type, but also does not cause obvious inconvenience to the user.
- For visitors. Due to the fact that such an item is used by many people throughout the day, the products do not particularly stand out for their qualities, but they are very wear-resistant.
If we are talking about home use, then the choice depends on the preferences of the owner
For important people who focus on comfort, of course, an executive chair is suitable, since it has armrests, and the comfort of such furniture is very high
For the rest, budget chairs that have a standard set of functions are suitable.
Tips and warnings
1. Even before you start assembling the chair, prepare enough free space for work. Fold all the necessary elements of the chair in such a way that later, during work, you do not trip over the unfolded parts.
2. And, of course, be careful during assembly so as not to pinch your fingers.
If you follow all the above recommendations, your computer chair will be assembled in just a few minutes. We wish you good luck!
But it’s better to contact us - call right now 8(499)394-03-19! We assemble office furniture.
Tell your friends about us!
Return to list of articles
What does the chair-bed consist of?
In general, there are several varieties of the described device. However, each of them has those components that are similar to each other. Thus, the following aspects can be highlighted:
Frame. It is also possible to consider in several proportions. By choosing steel material, the user is assured of durable operation
If we talk about aluminum, it is very important to emphasize its inherent qualities such as reliability and guaranteed strength
- Folding mechanism.
- Bed.
- Filler. When choosing it, it is recommended to place special emphasis.
- Linen box. Often, manufacturers equip the design with such a product, which adds additional positive aspects.
How does a chair bed function?
The answer to the question directly depends on the model of the bed. Thus, the following can be highlighted:
- Eurobook. The process takes place by pulling out the lower part of the furniture. Due to this, it becomes possible to expand the other part.
- Harmonic. Two sections fold out to reveal a third that functions as a seat.
- Roll-out mechanism. The name speaks for itself. The inverted base forms two sections.
- Click-clack. The main part rises, which means the blockage is removed and a solid mattress is formed.
- Dolphin. The part that folds out is located under the base; after it is pulled out, it transforms into a regular sofa.
Features of children's computer chairs
When choosing a children's computer chair, you should focus on the following categories:
- Regular;
- Orthopedic;
- Orthopedic knees;
- Stools that provide an orthopedic effect.
They have the closest to ideal qualities for use by children:
- Most models are not equipped with armrests;
- Mandatory height adjustment is provided for both the backrest and the seat;
- The backrest is made taking into account the anatomical features of the person;
- If there is a rotation function, it is blocked;
- The wide selection of models is divided into several age categories, taking into account the psychological characteristics of tastes and the decor in the room.
How to do it yourself
To adjust the parameters of the chair, you should carefully study its structure. Some models do not provide for certain regulatory mechanisms. And without them, it is simply impossible to set the backrest to a certain angle, the seat to a certain height, and the armrests to do both.
The delivery package of the furniture product should include instructions that will help you adjust it to your needs. However, you can also use general recommendations. First you need to decide on the height of the workplace and the depth of the chair. After this, you can begin adjusting the backrest. When everything is ready, all that remains is to adjust the angle and level of the armrests.
Height change
To change the height of the workplace, you need to use the lever, which is usually located under the seat on the left side. You should sit in an office chair and pull the handle up. In this way, the furniture is lowered to the required level. Next, you need to place your palms on the tabletop, and if it suddenly turns out that they are higher than your elbows, then the position of the chair needs to be adjusted again. To do this, stand up a little and pull the handle again: without any weight load, the seat will instantly rise.
If the user cannot figure out how to lower or raise his computer chair or office chair, and he is unable to perform the necessary actions, the problem may be as follows:
- This is not a normal, but a pneumonic model. To raise the chair, or vice versa, to lower it, the lever must be swung (pressed several times).
- The design has two regulators, not one. Each is responsible for a specific mechanism (raising or lowering). In this case, it is recommended to carefully study the instructions before making adjustments.
- The rotating arm only turns in one direction. If, when adjusting the seat height, the chair only rises, you must continue to rotate the handle. After a few turns it will start to go down.
In some cases, the problem may be a breakdown of the structure. For example, if the height of a chair changes only under the weight of a person (lowers when he sits down and rises when he gets up), the cause of this phenomenon is a malfunction of the gas cartridge. It will need to be replaced. If the lever of a new computer chair does not have the desired effect (when you press it), it may have been damaged during transportation. It needs to be inspected and adjusted using pliers.
Backrest tilt
If there is a screw on the back of the chair, it will allow you to change the tilt of the backrest. The adjuster should be loosened by turning it slightly counterclockwise, and then you should sit down and lean back and forth until the most suitable position is selected. After this, the angle of inclination should be fixed by twisting in the opposite direction.
Armrest tilt
The armrest adjustment mechanism is usually located on the left side. To adjust the height, you will need to hold down the button, then raise the armrests to the desired level, and then release the held button.
Another question is how to adjust the tilt. This is done using a special screw. When you turn it, the angle of the armrests will change. If such an adjustment mechanism is not provided by the design, the actions can be performed using a regular screwdriver. You must act according to the instructions so as not to break fragile parts.
To work at a computer or any other activity in which a person’s hands are constantly on the table, you need to adjust the height and inclination of the armrests
It is important that the worker's elbows are at a 90-degree angle. If support is not needed, then it is better to remove these structural parts or position them in such a way that they do not interfere (lower as much as possible or tilt at an angle of 45 degrees). Some office chair models also offer other adjustment options.
For example, the armrests can be moved apart and moved in relation to each other. In addition, the user may be given the opportunity to select specific modes, the number of which varies from 3 to 10
Some office chair models also provide other adjustment options. For example, the armrests can be moved apart and moved in relation to each other. In addition, the user may be given the opportunity to select specific modes, the number of which varies from 3 to 10.