You bought a dishwasher, waited for it to arrive, unpacked it, and installed it. It's time to read the instructions and understand the rules of use. In our article you will learn how to properly start the dishwasher, in what sequence to act and which programs to choose.
Preparing for launch
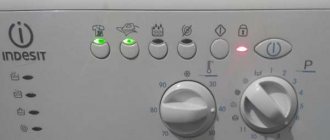
Before turning on a Bosch, Siemens, Ariston, Electrolux, Beko or other brand dishwasher, you need to study the control panel, rules for loading dishes and detergent powder. The first launch is always a test one. He must clean the bunker of dust and small debris that has accumulated during storage and transportation.
Sequencing:
- Check the correct installation of the built-in PMM (level, fastenings).
- Check the quality of the connections, the location of the hoses, and the network connection.
- Open the hopper door. Twist the sprayer at the top and in the pan, unscrew the drain filter, and remove the stickers from the walls of the chamber.
- Prepare a starter or regular launch kit. It includes: detergent (powder, gel, tablets), rinse aid, salt. Everything is clear with the detergent: it removes dirt from the dishes. The rinse aid is used to add shine to appliances, eliminate stains and promote quick drying. Salt softens the water so that scale does not settle on machine parts. Read the article about safe products for PMM.
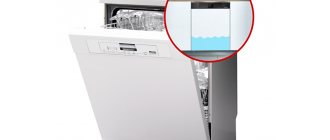
- Take out the salt and pour it into a special container. It is located in the PMM pan, next to the drain filter. Open the lid, fill the container with water and completely fill it with salt. Remove excess water with a sponge.
- Pour the powder into the dispenser compartment. The dosage is indicated in the instructions on the product packaging.
- You don't have to add any rinse aid for the first time.
- Close the door tightly, set a long program with high temperature, press the power button.
What to pay attention to while washing:
- How water is poured into the bunker.
- Does the water reach the required temperature, is the heater working.
- How waste water is drained from the tank.
When you load the dishes, also check the quality of the wash. It usually takes a little time before you find the right dosage of detergents and the right program for you.
Connecting Electrolux to water lines and electricity
Installation begins upon completion of preparatory work. The recommended order of connections is to first ensure drainage and water supply, and then plug it into the outlet and do a test run.
Connection to the sewer
Connecting the drain hose of the machine to the siphon outlet is a responsible operation: incorrect connection can lead to flooding of the neighbors below. It is important that the length is sufficient to ensure free sagging of the sleeve. Installation sequence:
- Remove the plug from the siphon reserve pipe.
- Lay the drain so that the hose goes up from the outlet point of the flow - this will protect the PMM - dishwasher hopper. “>PMM from the discharged liquid.
- Make a bottom bend. It functions as a water seal - it prevents sewer aromas from penetrating into the working chamber of the machine.
- Place the hose onto the outlet and, if necessary, use sealant.
- Secure the connection with the clamp supplied with the device.
If the length of the hose is not enough, it is replaced with a larger standard Electrolux hose purchased additionally. The idea of organizing waste water drainage into a sink is not welcome for several reasons: it is neither aesthetically pleasing nor reliable. The waste pump is forced to work in difficult conditions - supplying liquid to a great height. Excessive load reduces the lifespan of trouble-free operation of the pump and leads to its rapid breakdown.
Water connection
If a backup tap for connecting the dishwasher under the sink is not provided, it must be installed. For this, a pre-prepared tee with a valve is used. Installation sequence:
- Turn off the water supply to the apartment using the tap on the riser.
- Disconnect the cold pipe at the junction of the flexible mixer hose.
- Install a tee with a valve into the connector and restore the flow into the valve on the sink.
- Connect the dishwasher hose to the outlet of the new faucet.
- Open the valve on the riser and check the tightness of the connections.
Expert opinion
I work in the household appliance repair industry. Extensive experience in restoring washing machines and dishwashers.
If the quality of the water is questionable, a cleaning filter is installed at the junction of the tee tap and the inlet hose of the machine. Some dishwasher models can. The connection is made in the same sequence as for a cold pipe.
How to properly start a dishwasher with dishes
If the test run was successful, the machine is ready for long-term use. We wrote in one of the articles how to load dishes correctly.
Let's look at the requirements for including PMM Gorenje, Whirlpool, Vestel, Zanussi, Hansa along with dishes:
- Detergent is added once, before each wash. Rinse aid and salt are enough for several times. The indicators on the control panel will inform you about their completion.
- Clean appliances of food residues before loading.
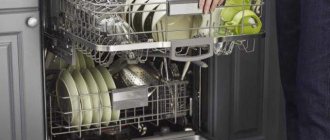
- Place dishes at a short distance from each other, otherwise they will not be washed. Large cutlery is located in the lower basket, plates in the middle, cups and glasses in the upper (depending on the configuration of the dishwasher). Many models have glass holders. It is important not to overload the baskets, otherwise some devices will block others, and water will not get to them.
- Do not place objects in the tray; the sprayer must rotate freely.
- Close the door and select the optimal mode to start working, focusing on the degree of soiling and the type of dishes.
- After washing, do not remove items immediately. Let them cool and dry.
- Every time, clean the drain filter from food debris and check the spray nozzles.
Follow the instructions carefully. The manufacturer indicates which dishes can and cannot be washed in a machine. Otherwise, you risk damaging the devices.
In one of the articles we wrote that it can be washed in the dishwasher. Briefly about what should not be washed:
- Aluminum, wood, tin cutlery.
- Products made of non-heat-resistant plastic. Such vessels and plates must have washing instructions.
- Porcelain, crystal.
- Cast iron, Teflon coating.
- Thermoses, thermal mugs.
Users on forums often ask: is it possible to run the dishwasher without salt? It is not advisable to do this, since over time, white spots will appear on the dishes, and the parts will become covered with scale and deteriorate.
Review of popular models
Among the wide range of Electrolux built-in dishwashers, several leading positions can be distinguished. Each of the presented models has both competitive advantages and weaknesses. Let's understand the features of popular dishwashers, evaluate their technical parameters, functional equipment and read user reviews.
Model #1: BLACK line ESF2400OK – small-sized dishwasher
The choice of miniature fully built-in units is limited. A worthy representative from the Electrolux company is BLACK line ESF2400OK.
The model integrates into the niche of a furniture set without taking up much space. Dimensions for installation: 55*50*43.8 cm. The hopper consists of one compartment, the set includes a basket for cutlery and holders for cups.
Functionality of ESF2400OK:
- 6 basic programs: Eco 55 °C, GlassCare, Intensive, Express wash in 20 minutes, Normal 65 °C, Accelerated 40 °C;
- delayed start – until 1st day;
- salt/rinse aid indicators;
- partial protection against leaks;
- drying class – A.
Among the advantages, users note: good washing quality, the ability to use tablets and a practical set of options. The main drawback is the hum during operation.
Model #2: ESL 94200 LO – easy to use
Narrow fully built-in dishwasher with a capacity of 9 sets.
Functions and technical parameters:
- 5 main programs;
- DryTech drying – forced air circulation through a condenser; drying class – A;
- FlexiSpray irrigation – double rotation of the rocker to increase the spray intensity;
- SensorControl system – determining the fullness of the hopper and automatically selecting washing parameters;
- start delay 24 hours;
- complete protection against leaks.
Electrolux ESL94200LO is equipped with the Favorite option. You can program the machine to perform a specific wash cycle by selecting the temperature and cycle duration.
An EnergySaver function is provided to reduce energy consumption. The temperature of the last rinsing stage is reduced by 25%.
Despite the high level of technical equipment, the machine belongs to the middle price segment.
Consumers highlight the following disadvantages of the ESL94200LO: lack of a half-load option, insufficient effectiveness against dried contaminants. The last problem can be solved by additionally soaking the dishes - there is such a program based on the ESL94200LO.
Model #3: Electrolux ESL 95360 LA – with AirDry drying
Full-size dishwasher for 13 sets. Premium model - the machine is equipped with energy-saving technologies and options for comfortable use.
Features of ESL95360LA:
- maximum loading thanks to ergonomic boxes;
- energy consumption class – A+++;
- minimum hum – 44 dB;
- 4 temperature modes and 7 programs + XtraDry;
- removable tray for cutlery and small cups;
- AutoOff function, SoftGrips/SoftSpikes holders;
- complete security system.
Work based on data from water purity sensors, SensorControl, LCD display and information via TimeBeam.
Natural AirDry drying and adaptive integration thanks to PerfectFit loops. The configuration and functionality of the ESL95360LA received good user ratings. The only drawback of the model is the high price.
Model #4: ESL 95321 LO – balance of price and volume
Like the previous model, ESL 95321 LO is full-sized and is designed to load 13 sets. However, due to the lack of some innovative programs, the dishwasher costs a little less.
Characteristics of ESL 95321 LO:
- 5 programs/4 temperature settings;
- relatively low noise level – 49 dB;
- water purity sensor;
- condensation dryer;
- energy consumption – 0.93 kW/h;
- height-adjustable basket, glass holders, cutlery tray;
- additional options: TimeManager, XtraDry.
The machine copes well with washing; the set of programs is sufficient for everyday use.
Cons of ESL 95321 LO: lack of disinfection mode, half load and child lock. Full protection against leaks.
Model #5: ESL 94320 LA – saving resources
Integrated compact dishwasher, designed to load 9 sets. The model is notable for its relatively low price, good functionality and efficiency.
The touch control panel is concise and understandable - there are no many buttons, all programs are represented by graphic images.
Additional characteristics: camera backlight, water contamination sensor, salt/rinse aid presence indication, Favorite program, start delay.
The hopper holds two baskets, a removable tray for spoons and forks, and shelves for cups. Most users are satisfied with the purchase; the unit is fully worth the money spent. Particularly pleasing is the quiet operation and efficiency - during an express wash, the machine consumes 7 liters of water.
Model #6: ESL 94510 LO – SlimLine basic version
Narrow model with a full range of basic washing programs. ESL 94510 LO operates in five washing modes, with four temperatures to choose from.
Model parameters: delayed start for 1-24 hours, full protection of the housing from leaks, a sound signal for the end of the cycle, automatic shutdown and the SensorControl system.
There is a washing mode at 70 degrees, which is designed for processing cutting boards and children's dishes.
ESL 94510 LO is equipped with salt/rinse aid indicators, display, electronic control. The range of programs includes a pre-soaking mode. Disadvantages of the model: loudness of operation and duration of cycles.
Model #7: ESL 94585 RO – silent operation
A narrow dishwasher from the RealLife series, the distinctive features of which are: very quiet operation, economical power consumption (A++) and variable washing programs.
Unit capabilities and implemented technologies:
- 7 programs, ability to select your favorite mode;
- automatic door opening option - AirDry;
- SoftSpike glass holders;
- Time Manager function;
- FlexiSpray sprayer;
- automatic shutdown option;
- Sensorcontrol – the system determines the volume of loaded dishes, automatically regulates power consumption and water consumption;
- two-color beam on the floor;
- start delay – up to 24 hours;
- FlexiLift adjustable top basket.
The ESL 94585 RO model is equipped with a full AquaStop system and a display. Users note good cleaning quality, low electricity consumption, the convenience of a beam on the floor with a projection of the remaining cycle until the end of the cycle, and quiet operation.
The downside is the lack of a half-load mode.
Model #8: ESL 8820 RA – Premium with ComfortLift
In terms of technological equipment, it largely repeats the previous model. The main design difference is that the bunker is equipped with a ComfortLift lifting mechanism.
Functionality:
- 7 programs + 6 temperatures;
- FlaxiSpray sprayer;
- innovative drying AirDry;
- automatic shutdown, start delay, TimeManager, Favorite, XtraDry;
- complete protection system.
Spacious hopper with a lifting lower basket, folding racks, shelves for cups and glasses, and a removable upper container.
Additional characteristics: dimensions – 82*60*55 cm, electricity consumption – 0.85 kW/h in economical washing mode at a temperature of 50 °C.
Correct choice of mode in PMM
Bosch, Electrolux, Hotpoint Ariston, and Hansa machines will do the job perfectly if the user sets a suitable washing program.
Often the consumer chooses the most convenient mode and uses it constantly. In this case, the degree of contamination and the material of the products are not taken into account.
Whatever PMM model you use - Siemens, Beko, Kerting, Gorenie, Ikea - study the programs in the instructions.
- Express mode. The program time does not exceed 45 minutes.
- Intensive washing at 60-80 degrees. Suitable for heavily soiled utensils.
- The standard program automatically determines the load level, and then selects the duration and temperature of the wash.
- An economical program consumes less water and electricity.
- The delicate mode is set for fragile dishes.
The table will help you decide:
Pay attention to every load of your machine, then it will serve you for many years. After watching the video, you will learn how to properly set up your dishwasher:
Why is an idle start necessary?
As noted in the operating instructions for the Bosch dishwasher, a test run of the device is an inevitable operation before starting regular operation. Only thanks to this procedure can you ensure that the device is operating correctly, and at the same time clean it from transportation dust and dirt.
Some dishwasher parts come from the factory with industrial lubricant. There may be some small debris inside the device, which may clog the filters during further operation.
Many consumers want to immediately load kitchenware when first starting up and check the effectiveness of their new purchase. It is not right.
The first washing cycle is necessary to get rid of technical grease and factory debris that may be inside the unit. Getting these foreign substances on your kitchen utensils can only lead to disappointment for the machine owner. Therefore, it is enough to install all the baskets in the tank.
Important! During the test run, you need to clarify:
- water intake speed;
- degree of water heating;
- is water drained at the end of the cycle;
- drying quality and correct temperature settings.
All listed functions should work properly.
If the dishwasher doesn't turn on
There are many reasons why your dishwasher won't turn on. Many, such as a kinked hose or a clogged filter, can be fixed with your own hands, but others cannot. Most likely, you will have to call a technician, but if the device is new and does not turn on the first time you start it, then you should immediately replace the dishwasher itself or, at least, have it repaired for free under warranty.
That's all. Take care of your “kitchen helper” and use it correctly.
Please rate the article:
Join on Telegram
Instructions for adding cleaning products
All Electrolux dishwashers have a similar structure, which makes it easier to follow the instructions for adding cleaning products. First, you should add special salt, which will soften the water and provide better cleaning.
In Electrolux household appliances, the compartment for the substance is located on the left in the near corner. Unscrew the neck cap and add dishwasher salt. Table salt should not be added, as this will lead to damage to the internal elements. You can add the product only before the next start of washing, otherwise the crystals that have fallen into the pan will cause corrosion.
Suitable detergents for dishwashers
Manufacturers recommend using detergents and auxiliary products intended for dishwashers. Only they will guarantee the functionality of the equipment and a long service life.
What can be used
The use of specialized detergents has a beneficial effect on the operation of the dishwasher. But very often these funds are quite expensive. In order to save money, people are starting to select analogues from a number of “folk remedies”.
These methods will help save your budget, but will not provide confidence in the correct operation of the equipment and its long service life.
Products not intended for use in the dishwasher may cause the mechanism to malfunction or break. If you choose washing powder rather than a special powder as a detergent, this can lead to increased foaming and failure of electronic programs.
And the use of ordinary salt instead of regenerating salt can lead to insufficient protection of heating elements from alkali metals contained in running water. And as a result, the accumulation of deposits and scale will lead to failure of the device.
Another danger that kitchen salt poses is the lack of sufficient purification from natural particles, limestone deposits, and grains of sand. Which can also adversely affect the performance of the equipment.
Convenience is worth mentioning: regular salt needs to be poured into the machine every time you use it. And if you accidentally forget about this, then such forgetfulness will add scale to the heating element.
If you decide to experiment and try kitchen salt as a softener, it is better to choose the “Extra” label. This type undergoes the highest purification and therefore contains the minimum amount of impurities.
Water softening salt
Dishwasher salt is sold in stores and has the appropriate information on the label. It consists of purified compressed crystals that do not contain foreign impurities and slowly dissolve under the influence of liquid.
Using special salt to soften water will help get rid of excessive scale on the heating element, which will significantly extend its service life. Salt helps reduce the consumption of expensive detergents, since water with a high concentration of sodium chloride softens stains and they come off the dishes more easily.
Select the amount of salt individually depending on the recommendations for the level of water hardness in your region, varies from 500 to 1000 grams. This amount is enough for 1 or 2 months; salt consumption in the compartment is again affected by hardness.
Why do you need a rinse aid?
Rinse aid is an aid for washing dishes. Doubts arise about the rationality of the purchase, since many dishwasher owners do not quite understand the point of using it.
Conditioner is necessary to give the dishes:
- mirror shine;
- radiance of purity;
- the smell of freshness;
- characteristic creaking.
The rinse aid removes traces of stains from the surface, it prevents drops from lingering on the dishes. Thus, the dishes come out shiny, as if they had been specially rubbed. In addition, the product plays a protective role and further protects the dishes from stains and hand marks.
Another important function is that the conditioner helps remove all remnants of surfactant aggressive substances contained in the detergent from the dishes, and also neutralizes alkaline acids.
If you want to achieve this effect using natural remedies, use the products at hand. To do this, simply pour 1 or 2 tablespoons of apple cider vinegar into the special compartment.
Special detergents
Such compositions contain solvents that make it easy to deal with dirt and food residues on your dishes. For ease of use, they are available in various forms:
- tableted;
- powdery;
- gel-like.
The most popular compositions
| Tablets | Gel-like | Powdery |
| Finish Quantum | Clean Home | Claro |
| BioMio Bio-total | Five Plus | Sodasan |
| Clean and Fresh all in 1 | Finish | Bravix |
| Minel Total 7 | Fairy | Somat Standard |
| Frosch Soda | Somat | Snowter |
You should select a detergent depending on the type of dishes, degree of soiling and mode. There are several categories.
- Aggressive products containing chlorine have an excellent bleaching effect and can eliminate the most stubborn stains. Not suitable for dishes made from:
- porcelain;
- crystal;
- silver;
- cupronickel;
- with hand painting.
- More gentle substances containing slightly alkaline substances - enzymes. They cannot boast of a whitening effect, but they are able to remove stains from dishes made of fragile materials.
- Safe substances containing natural ingredients are marked with the prefix “Eco”. They are inferior to the first two categories in terms of dishwashing quality, but they are absolutely safe. Do not cause allergic reactions. Includes:
- soda;
- natural essential oils.
Choose the type and form of detergent based on the manufacturer’s requirements and your needs. Eco-friendly products are used for washing dishes in homes where there are small children or people prone to allergic reactions. And if the level of running water in your area of residence is very soft, you can use tablets that combine several functions instead of three products.
Installation of an Electrolux dishwasher
Today, buying a dishwasher can make a big dent in the family budget, and if you add to this the payment of a technician for installation, costs increase. You can get out of this situation and save on installation costs by trying to connect the PMM yourself.
We offer a detailed installation diagram for the Electrolux dishwasher with photos and videos. Simple instructions will help you save money and protect you from common installation mistakes.
Preparing a place for the machine
Many home craftsmen often ignore this important installation stage, starting immediately to install the PMM, without preparing a place for the equipment. This results in problems that arise during the connection - they could have been avoided if the place had been prepared in advance.
Another misconception among users is that the place supposedly needs to be prepared only for the built-in model - even a regular stationary Electrolux dishwasher is difficult to connect without preparing the place.
First, think about how to install the equipment so that the proximity to all communications (electricity, water supply and drainage) is maximum. Please note that the distance to the water pipes should not exceed a 3-meter mark, otherwise an increased load will be placed on the PMM parts.
Also take care of the following points:
- You need to organize a flat and strong base for the equipment - modern PMMs weigh from 17 to 60 kg, depending on their type and dimensions.
- There must be a connection point to the cold water supply nearby.
On a note! If you decide to connect to a hot water pipe, first make sure that this option is provided by the manufacturer.
- Prepare for connection to sewer drains.
- And most importantly, prepare a reliable outlet for connecting to the network. It is not forbidden to connect the PMM directly to electricity, but it is safer to do this through a voltage stabilizer.
Important! Every year in Russia tens of thousands of pieces of equipment burn out due to voltage surges. Even if your power grid is stable, a preventive measure in the form of a stabilizer in the event of a surge will protect not only the PMM, but also other electrical appliances.
You should definitely think about a solid foundation for bulky equipment if the kitchen has weak floors - especially old ones, with creaky and wobbly floorboards. If the floor is quite ordinary (linoleum on a reliable base or tiles) with a minimum of unevenness, you can try installing a PMM.
Cold water intake outlet
Make sure that the tee tap fits securely under the sink between the outlet for the mixer and the water pipe, and that the hose of the machine easily reaches the connection point. We'll talk about the hose installation process later.
Check the distance from the siphon to the PMM location
The drain hose will be inserted into the side outlet of the siphon and it is important that it is long enough to connect correctly. If the hose is not long enough, it is better not to extend it, but to replace it with a longer one (original, from Electrolux).
If the siphon does not have an outlet or a washing machine is already connected to the outlet, you need to change the siphon to a model with an additional outlet or throw a hose over the sink, which is not recommended for reasons of aesthetics and hygiene.
Checking the outlet
The socket itself must be at least not “cheap China” and can withstand the rated load of the device (and have a large reserve). As we have already said, it is better to connect the machine not directly, but using a stabilizer.
And the last thing at the preparation stage - the built-in PMM should be the size of the niche. When buying a machine in an online store, you risk that it will not fit into the prepared place - there are often errors in the characteristics on websites. Therefore, choose one of the options:
- Pick up a car at an offline retail outlet - measure all the dimensions and protrusions and, taking this data into account, prepare a niche.
- First, buy the device, and then start making furniture.
What do you need to connect the dishwasher yourself?
To install an Electrolux dishwasher, you need a lot of tools and parts. If there are usually no problems with the tool (screwdriver, pliers, level and adjustable wrench), then consumables often have to be purchased:
- FUM tape;
- PVC electrical tape;
- sealant;
- siphon with a fitting (outlet) for connecting the drain hose;
- brass or bronze ¾ tee tap.
- a flow filter with a mesh that will trap small debris on its way into the machine systems;
- tee to the sewer pipe, if there is no pre-provided outlet.
If electrical communications are not ready, then the list of what you will have to spend money on expands. If you don't have a suitable outlet, be prepared to buy the following:
- copper three-core cable 2.5 of sufficient length;
- European standard socket with moisture protection;
- difavtomat 16A (for line protection);
- stabilizer (recommended).
If communications have to be redone, then you need to ditch the wall, which means find a hammer drill. Also stock up on tools with wire cutters and an indicator screwdriver.
Important! Zero experience in installing electrical wiring? Do not risk your life, health and property and better contact an electrician. And most importantly, do not plug the PMM into an old (especially Soviet) outlet and refrain from using an extension cord.
If already at this stage it seemed to you that everything was complicated - don’t panic! Despite such a long shopping list, DIY work will still cost less than what the master will ask for. Another thing is if you don’t have the tools or skills, then it’s better to call the service.
Installation procedure
When all the preparatory work has been completed and a location has been chosen, you can begin the main installation steps.
Connecting the waste fluid drain hose
Move the machine closer to the installation site and place the free end of the hose on the sewer outlet (do not forget to remove the plug). The reliability of the connection will be ensured by sealant (if necessary).
Water connection
Turn off the cold water, disconnect the tap to the mixer from the water pipe. Connect the tee tap to the flow filter.
Screw the faucet, simultaneously isolating the connections with a fuser. A pipe connects to the tee at one end, and a mixer outlet at the other. There remains one free exit, onto which the PMM intake hose is put on. The remaining end is connected to the machine.
Electrical connection
When the socket is ready, install the dishwasher in its permanent place (adjust the legs to the level) and plug the plug into the network.
At this point, the work on manually connecting the PMM from Electrolux is completed. If you purchased a built-in model, all that remains is to hang the facade on the door, but this is a matter of a couple of minutes, since the front part is hung using fasteners and no tools are needed.
How to avoid losing your warranty
Please read the instructions carefully before installing the machine yourself. Each manufacturer indicates acceptable standards when connecting equipment. Most dishwashers cannot be connected to hot water. This leads to damage to hoses and filters.
If the PMM breaks down due to connection to a hot water supply, then you can’t count on warranty repairs.
Another dangerous point is connecting to the electrical network. It is prohibited to connect powerful equipment to regular old outlets without a voltage stabilizer, or to connect it to the same outlet as an electric stove. It is not recommended to use tees and extensions.
Source: https://foto-designa.ru/kuhnya/posudomojki/posudomojka-electrolux-ustanovka-i-podklyuchenie-vstraivaemoj-modeli-9450-shirinoj-45-sm