Few owners of washing machines understand their architecture and design. In most cases, the owner of household appliances does not ask questions about the principles of its operation as long as it works successfully. As soon as the car breaks down, such owners call repairmen or take the equipment to a service center where professionals take care of it. However, not in all cases the costs of the services of specialists are justified. The pressure switch of a washing machine is one of the vulnerable components. If it malfunctions, it is quite possible to check and replace the device on your own. To do this, you must first study how this device works and what it is.
About the device
The simplest name of the product is “washing machine water level sensor,” which also describes its main functionality. Each machine has a pressure switch, whose task is to determine the presence of water in the internal tank and its filling level. Without this sensor, the controller will not be able to determine when it is safe to start washing.
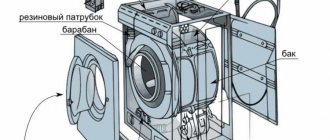
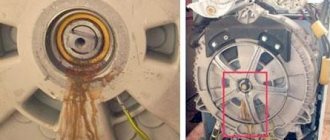
You can determine where the pressure switch is located inside the washing machine if you look closely at the round plastic device to which the wires and tubes of the tank are connected. It is small in size and easy to attach, making it easy to disconnect and connect yourself. The water level sensor includes the following components:
- Sensors The water level is measured using a built-in membrane, which receives a column of liquid. The pressure of the latter is converted into kilohertz, through which the user is informed about the degree of filling of the internal chamber of the washing machine.
- The compression chamber is located at the junction of the pressure switch and the hose through which water flows. Requires regular personal care, otherwise it quickly becomes clogged with waste and the contents of incoming liquid. If it becomes contaminated, measurements of the water level become inaccurate, and subsequently the hose stops pumping it out.
- A diaphragm or membrane that moves under pressure and clicks the core switch.
- Technical components - printed circuit board and coil. They advocate maintaining the functionality of all parts of the pressure switch, as well as converting incoming signals from the diaphragm and converting them into an accurate value.
- Ferrite core. As an alternative, a magnet is possible.
- The adjusting screw allows you to adjust the operation of the pressure switch.
- Springs that support the adjusting screw and return it to its original position.
- The housing includes all the components of the device for measuring water level, protecting them from damage during operation.
As can be seen from the description, the components of the pressure switch are quite simple and are not highly reliable, which requires careful handling of the device during its installation, dismantling and maintenance.
Principle of operation
The operating principle of the pressure switch is based on reading oscillations that are converted into electronic signals. When water is pumped inside the washing tub of a machine, it creates powerful air vibrations that can be measured. These same vibrations reach the pressure switch core through the hose, pushing away the diaphragm and causing it to hit the central magnet of the device. As a result of the impacts, a pulse is generated that pushes the core into the adjusting screw and thereby sends data to the connected controller through the contacts. The electronic pressure switch thus receives up-to-date information about the extent to which the tank is filled with water.
The controller can determine the volume of filling the central container with water by the type of vibrations emitted. The higher they are, the fewer obstacles inside the washing machine for the propagation of sound waves and the lower the water level. Otherwise, when there is a lot of liquid, it begins to absorb any vibrations, which makes it clear to the computer circuit that there is not enough water and it is not recommended to start washing. When the oscillation frequency drops to the minimum specified by the setting, a corresponding signal is sent to the board through the adjusting screw and the machine stops drawing water through the hose.
At the same time, the factory settings for sensors vary from brand to brand, since they are set by manufacturers at the assembly stage and after that do not attract attention until a breakdown or technical diagnosis occurs. However, over time, due to numerous vibrations along the membrane and core, its height is lost, and the transmission of data on the degree of filling with water becomes less accurate, until the operation stops completely. To return it to operation, you need to disassemble the washing machine, which you can do yourself or entrust to a specialist.
How to set up
As described, the initial adjustment of the washing machine pressure switch is carried out by the manufacturer in the factory using ohmmeters, after which the correct operation of the device should be sufficient for the entire warranty period. However, depending on operating conditions and build quality, the sensor core may move out of position earlier and lead to increasingly serious measurement errors. In this case, many owners will be interested in learning how to adjust the pressure switch of a washing machine.
Please note that most repairmen and manufacturers themselves insist that it is impossible to independently calibrate the water level sensor and recommend involving specialists with the appropriate equipment in this task. Therefore, you need to understand that if you carry out any manipulations with the adjusting screw, you risk breaking its seal, which will automatically void your warranty. For this reason, you should interfere with the operation of the pressure switch only as a last resort, when it is not possible to seek professional help. The water level sensor in a washing machine is an extremely vulnerable unit, therefore the precise adjustment of the pressure switch can easily be disrupted by careless manipulation of the adjusting screw or pressure switch with a screwdriver.
Operating principle and location of the pressure switch
In washing machines, a pressure switch is used to determine the water level and control its quantity. The device operates under pressure and is usually located on top of the tank to avoid direct contact with the liquid. Much less often, the manufacturer installs the sensor below, under the tank.
A pressure switch is a small plastic part with a round shape. It communicates with the tank through a tube, and is connected to the control board by connecting wiring. When water is drawn into the completely sealed tank of the washing machine, air enters through the tube into the pressure switch chamber. A pressure is created corresponding to the amount of liquid poured in, due to which the contacts close and transmit to the central board that the required amount of liquid has entered the tank. Thus, if the pressure switch is faulty, no voltage is supplied to the control module, which means the washing machine will not be able to determine the water level and will complete the program or will not perform it correctly.
Methods for checking the pressure switch
If all warranty periods have already passed, and you are sure that your interference with the operation of the pressure switch will not make things worse, you can try to study its condition with your own hands. Before checking the pressure switch on a washing machine, you will need to disassemble it and get to the sensor. This is done this way:
- The washing machine must first be unloaded, drained of water and disconnected from the power supply.
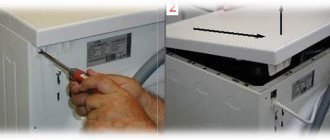
- Disconnect the top cover of the equipment by removing it from the fasteners. These are bolts that can be easily unscrewed with a screwdriver.
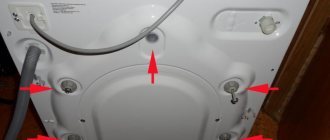
- The pressure switch in the washing machine is located near its side wall, so it will not be difficult to get to it. There you can immediately see the hose and connected wires. Before diagnosing the device, they will need to be carefully disconnected. The hose is screwed in quite well and will require the use of pliers to unscrew the clamp.
- Unscrew two bolts that act as fasteners for the water level sensor.
After this, you can begin checking the pressure switch itself. Take a hose with a similar thickness and a length of at least 10 cm. Having inserted it into the same place, you should listen to the other end for tapping sounds from the air entering the membrane. If there is no response, we can draw conclusions about problems with the diaphragm, the adjusting screw, or a high concentration of dirt in the compression chamber.
A simpler method is to use a multimeter; its terminals are connected to the contacts of the pressure switch. Such a measuring device is also capable of receiving signals from vibrations of the water level sensor, supplied through the adjusting screw. If the multimeter does not show voltage surges when air flows through the hose, then the device is faulty.
Where is the water level sensor located in the washing machine?
Finding a pressure switch in a washing machine is not difficult. To do this you need:
- Disconnect equipment from electricity.
- Shut off the water supply.
- Move the unit aside and on the top of the back wall find the bolts (usually 2 pieces) holding the top cover.
- Unscrew the bolts, slide and remove the cover.
- Find the pressure switch. It is attached to one of the side walls at the top.
In appearance, the water level sensor resembles a plastic disk , to which wires and a hose in the form of a thin tube . The tube, in turn, is connected to a high-pressure reservoir.
Removing the water level sensor is not difficult:
- Unscrew the bolts holding the pressure switch.
- Disconnect the wire contacts (pull out the connector).
- Using pliers, pull apart the clamp holding the hose.
Now you can take a closer look at the pressure switch and start checking it.
Symptoms of a problem
To understand that the pressure switch is gradually failing or has stopped working altogether, it is enough to pay attention to the following points:
- During washing, the spin program stopped working;
- On one or more programs, the machine works with errors or stops altogether;
- The volume of water that is pumped into the tank has recently been insufficient, which causes errors in the washing process, including disruptions in the operation of other systems;
- Water is no longer pumped out of the machine after the washing procedure is completed;
- During the rinsing process, the water is automatically replaced spontaneously, which was not typical for the machine before;
- Now the wash can start even without water in the tank.
Please note that using a washing machine with a broken pressure switch risks causing damage to the heating component with subsequent burnout. Malfunctions of other systems are also possible.
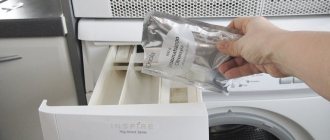
Replacing the pressure switch
In cases where repairing the pressure switch is impossible, the only option is to purchase a new device similar to the previous one. If you cannot trust the services, you can replace the pressure switch in your washing machine yourself. The procedure for dismantling it is similar to that performed when checking the water level sensor. To simplify the installation of a new device, it is recommended to photograph the location of the wires on it before removing the old one, so as not to get confused when connecting them to another pressure switch. The installation procedure for the water level sensor is carried out in reverse order with the hose and all contacts connected in series. In this case, it is recommended to first check the installed device with a multimeter or tube.
Setting up the pressure switch
To supply the correct volume of water to the washing machine tank, the sensor must be configured correctly. The setting is performed by the manufacturer, but having experience in repairing household appliances, you can adjust the pressure switch yourself. If the washing machine is under warranty, take the device to a service center.
The water level sensor in the washing machine is adjusted using adjusting screws. The moment of closing and opening the contacts is set. It is necessary to adjust the sensor only with the device disconnected from the power supply. There should be no water in the tank of the machine during setup.
The adjustment is made by gradually turning the adjusting screw. It is recommended to turn the screw no more than half a turn at a time. After each turn, close the protective cover of the washing machine and turn on the water supply program.
Adjust until the fluid level in the tank reaches the optimum level. After adjusting the sensor, secure the screw in the socket with a sealing compound. This will prevent spontaneous rotation due to vibration during spinning.
[custom_ads_shortcode1]
Preventing pressure switch failure
It is not necessary to allow the water level sensor to fail and require repair. You can extend the service life of the pressure switch by following the rules for proper use of the washing machine and promptly cleaning it from deposits and accumulated dirt. It is washing waste that is one of the main reasons for the failure of the liquid level sensor. It is also recommended not to allow the washing machine to idle or when the tank is empty. Such a process disables not only the pressure switch, but also many other household appliance systems. An equally important point is the temperature of the water that is collected for washing. It is not recommended to serve liquid at temperatures exceeding 45 degrees Celsius.
How to check the pressure switch?
Check the serviceability of the pressure switch yourself by removing it from the washing machine.
Part removal procedure
- Disconnect the device from the network by unplugging the power cord from the outlet.
- Remove the top cover by first unscrewing the fastening bolts located on the back of the machine and slightly sliding the cover.
- Find the water sensor (usually it is located on the walls).
- Disconnect the air compression hose after first removing the mounting clamp.
- Without removing the sensor, try to blow out the hose. If it is clogged, this is difficult or impossible to do. In this case, the sensor did not work because there was no excess pressure entering it. The compression tube is cleaned with an elastic wire. Visible damage to the hose is a reason for replacement: excess air comes out of the tube, and the pressure switch membrane does not work.
- If the reason is not in the tube, continue to remove the pressure switch.
- Disconnect the electrical wire connector. An unreliable (floating) contact at the connector is the reason for the incorrect operation of the washing machine.
Advice
Manufacturers often provide additional fasteners in the form of latches so that the wires do not become disconnected due to vibration during washing. Do not attempt to remove the connector using brute force; this will require replacement of the part.
- Remove the sensor by unscrewing the fastening at the wall of the machine.