How does a Samsung automatic machine work?
Samsung's latest technologies, which are used in the production of automatic washing machines (AWA), make them complex mechanisms. However, upon closer examination, the design of the unit is not difficult to understand.
The body of any model consists of:
- front panel,
- back wall,
- bottom and lid.
The external and internal parts of the unit are located according to the following diagram:
- On the front side there is a control panel, a powder tray, a drain pump, a hose, and a filter.
- On the top panel there is an inlet valve, a level switch, tank suspensions in the form of springs, and counterweights.
- On the front side there is a tank and shock absorbers.
- On the back surface there is a drive belt, motor, pulley, power cord, drain hose.
The internal filling of a technical product includes basic and additional devices. The main ones are:
- control module;
- electric motor;
- tank;
- heating element;
- electric pump
Each large and small part plays a specific role during operation of the machine, and its breakdown entails a deterioration in the quality of washing or a complete blockage of the equipment.
Control module
This unit in the washing appliance is the main electronic part. The control module is a kind of “brain” of the automatic machine ; it includes an indicator panel and the software module itself.
The power unit provides power and control of all functions performed. This is possible due to the connection of all sensors, electronics and actuators to the control module. If defects occur in the machine, a signal is sent to the electronic board and reflected on the panel in the form of blinking indicators or a code on the display.
The electronic board is very susceptible to voltage surges , so for flawless operation of the washing machine you need a device that protects it from voltage surges.
Motor and tachogenerator
These two important components in a washing machine function in pairs. The electric motor provides the drum rotation specified by the mode.
Most Samsung models are inverter-type machines with direct drive. In them, the motor is fixed on the drum from the rear panel. This feature increases engine efficiency and reduces the risk of breakdown.
The commutator type motor is localized in the lower part of the MCA . It manipulates the drum through a special belt that is attached to the motor shaft and drum pulley. This design leads to periodic wear of the electric brushes and the need for more frequent repairs.
The tachometer monitors the number of revolutions. The tachogenerator sends the result of its tracking to the control module, which checks the speed according to a given program.
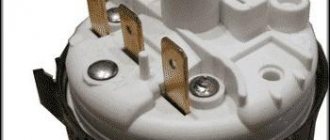
Level sensor and filling valve
These details also work in synergy. The purpose of the pressure switch is to control the volume of water poured into the tank . Externally, this element is a round box with wires, fixed under the cover of the machine body.
The level sensor detects the pressure in the tank and sends information to the control module. The latter, upon receiving a sign of a sufficient amount of liquid, sends an order to the filling valve to stop drawing water.
The valve responsible for the flow of water from the water pipe has one, two or three coils . The voltage that is supplied to them after a corresponding signal from the control module causes the membrane in the inlet valve to open. When the voltage drops, the diaphragm valve closes and blocks the flow of water.
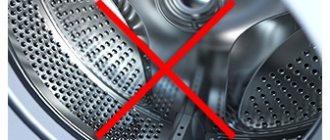
Tank and drum
The washing machine tank is a sealed plastic container that is filled with water. Inside it there is a metal drum into which the laundry is placed.
This part of the unit has special devices to improve the quality of washing:
- grooved protrusions;
- plastic rib punches;
- perforations in the walls.
The maximum loading volume of the machine depends on the size of the drum. This parameter differs in different Samsung models.
The rotation of the drum is carried out due to a bearing built into the tank and a fixed shaft and transmission pulley.
The shape of the drum depends on the type of load. SMAs with vertical supply of laundry have a drum of a closed design. It is equipped with a door through which things are stored.
Heating element and temperature sensor
The heating element (heating element) is located at the bottom of the machine under the tank . This part ensures that the water is heated during washing to a predetermined temperature. The heating element receives a command about the required temperature level from the control module, after which it starts working.
Heating is controlled by a temperature sensor (thermostat or thermistor), which is built into the housing of the heating element. Outwardly, it looks like a metal tube. When the required temperature level is reached, the temperature sensor sends a signal to the control unit, which in turn turns off the heating element.
Thermostats are built into older Samsung models. In bimetallic products, the plate, in contact with the liquid, bends according to the temperature. As a result, the relay closes.
Gas-filled thermostats are connected via a tube to the control panel temperature sensor. The contacts close as a result of the expansion of heated freon inside the tube.
The second type of temperature sensors - thermistors , work by measuring resistance while heating water. These devices are considered more advanced and reliable. They are used in the assembly of technologically advanced modern Samsung models.
Springs, shock absorbers and counterweights
These design elements are designed to neutralize vibration and “bouncing” of the washing unit during spinning. Vibration dampers consist of a piston and a tube. These parts are attached to the side wall of the housing and the bottom of the tank.
Springs hang from the top and keep the tank suspended . The service life of the bearing and belt depends on the quality and condition of the shock absorbers.
Counterweights (or weights in other words) are concrete or plastic stones located at the bottom of the rear panel of the machine. They keep the tank balanced. Despite their massiveness and integrity, these parts can also be damaged during operation.
The cause of failure is often a crack in the counterweights or loose bolts . In the latter case, the rattling of the device is eliminated by tightening the fasteners.
Locking device and cuff
The mechanism that holds the door closed is essentially an electronic lock. The hatch is first closed mechanically by clicking the lock. After activating the specified program, the door electronically locks, which is accompanied by a soft click.
The hatch locking device guarantees accidental opening of the door during operation of the SMA . Unlocking occurs after the completion of the program upon receipt of the corresponding command from the control module.
The cuff also plays a protective role against possible leaks through the gap between the hatch door and the tank. Externally, it looks like a rubber seal. This accessory part must always be in satisfactory condition: clean, dry, without cracks or other damage.
Pump, snail, filter
A pump is provided to pump dirty water out of the tank after washing or rinsing. There are two types of application in Samsung washing machines: synchronous and asynchronous.
There are two main elements in the design of any pump:
- Motor
- Impeller.
A so-called snail is attached to the top (or front) part of the pump. It is necessary to connect the drain hose.
The same part contains a filter that filters out debris. The pump blades, mounted perpendicularly to its axis, begin to move when the rotor starts.
When waste fluid is discharged, small objects remaining in clothing (paper clips, coins, buttons) may enter the pump, filter and hose. This leads to pump failure and the need for repair.
To avoid problems with the operation of the machine, it is recommended to carry out preventive cleaning of the filter more often.
Hoses, pipes
These parts are designed to fill the tank with water and drain the waste liquid. The length of the hoses depends on the location of the machine and its distance from the sewer and water pipes. If it is necessary to reinstall the machine at a distant distance, use longer tubes.
The hoses are located outside the housing, while the pipes are located inside . The inlet and drain pipes work harmoniously and ensure unhindered flow of water.
New hoses and pipes are elastic and flexible. The appearance of cracks, deformations, and drying out threatens leaks, so failed main elements must be replaced in a timely manner.
Powder receiver
The dispenser is a container with different compartments for powder and conditioner . Detergents are loaded into the powder receptacle before starting the program and stored there until the desired washing phase begins.
After the soaking or washing mode is turned on, water enters the compartment with the powder and washes it into the tank. When the final rinse stage is initiated, water is poured through the conditioner compartment.
After each wash, it is recommended to dry the powder receptacle to avoid the appearance of a musty smell and mold.
Video
For more information, watch the video on how to disassemble a Samsung washing machine.
She graduated from the author's physics and mathematics lyceum and art school. Received a higher education in economics with a major in innovative management. Freelancer. Married, actively travels. He is interested in Buddhist philosophy, enjoys transurfing and loves Mediterranean cuisine.
Found a mistake? Select the text with the mouse and click:
Threads made of gold and silver, which were used to embroider clothes in the old days, are called gimp. To obtain them, the metal wire was pulled for a long time with pliers to the required fineness. This is where the expression “to drag out the rigmarole” came from - “to do long, monotonous work” or “to delay the completion of a task.”
If your favorite things show the first signs of gestation in the form of untidy pellets, you can get rid of them using a special machine - a shaver. It quickly and effectively shaves off clumps of fabric fibers and returns things to their proper appearance.
Stretch ceilings made of PVC film can withstand from 70 to 120 liters of water per 1 m2 of their area (depending on the size of the ceiling, the degree of its tension and the quality of the film). So you don’t have to worry about leaks from neighbors above.
The habit of using an automatic washing machine “sparingly” can lead to the appearance of an unpleasant odor in it. Washing at temperatures below 60℃ and short rinses allow fungi and bacteria from dirty clothes to remain on internal surfaces and actively multiply.
The easiest way to remove scale and carbon deposits from the soleplate of the iron is with table salt. Pour a thick layer of salt onto the paper, heat the iron to maximum and run the iron over the salt bed several times, applying light pressure.
The dishwasher cleans more than just plates and cups. You can load it with plastic toys, glass lamp shades and even dirty vegetables, such as potatoes, but only without using detergents.
There are special traps to combat moths. The sticky layer with which they are covered contains female pheromones that attract males. By sticking to the trap, they are eliminated from the reproduction process, which leads to a decrease in the moth population.
Before removing various stains from clothing, you need to find out how safe the selected solvent is for the fabric itself. It is applied in a small amount to an inconspicuous area of the item from the inside out for 5-10 minutes. If the material retains its structure and color, you can move on to stains.
Fresh lemon is not only suitable for tea: clean dirt from the surface of an acrylic bath by rubbing with half a cut citrus, or quickly wash the microwave by placing a container of water and lemon slices in it for 8-10 minutes at maximum power. The softened dirt can simply be wiped off with a sponge.
Source
Main components of a washing machine
Schematically, the device of a Samsung washing machine can be represented as follows:
- On the front side: control panel, powder receiver, drain pump with hose, filter.
- On the cover side: inlet valve, level switch, tank suspension springs, counterweight.
- Side: tank, shock absorber
- From the back: drive belt, electric motor, pulley, power cord, drain hose.
You need to know the location of the main components in order to get to the desired unit as quickly as possible in the event of a breakdown. To eliminate the malfunction, you may also need an electrical circuit of the washing machine.
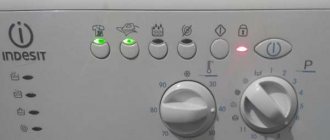
What errors are found in programs?
We are talking about codes that appear on the dashboards of Samsung washing machines if something is wrong.
If the Samsung washing machine is installed in rooms with high humidity levels, the paint on the surface may deteriorate over time. The same applies to any metal parts. A dehumidifier is then installed in the room, or the Samsung washing machine is reinstalled in another place.
Humidity often causes the display to not work. It is recommended to dry the device if problems occur. If drying does not help, you just need to call a technician to service your Samsung washing machine.
SAMSUNG WF8590NHW File Details
| Scheme SAMSUNG WF8590NHW |
| Uploaded by: Nikola-beard Date: 05/22/2012 Size: 13.91 MB Downloaded times: 4213 |
| Download schematic SAMSUNG WF8590NHW |
| 1 | 2 | 3 | 4 | 5 | 6 |
| Recommend to a friend |
| A comment: |
| Receiver name: | |
| Your email: | Recipient's email: |
| Message: |
Scheme
Before you start disassembling household appliances, it is a good idea to familiarize yourself with their structure. The general diagram of a Samsung washing machine will give you an idea of the structure of the unit, the location of its main parts and will help when making repairs.
Location of the main components of an automatic washing machine
The electrical diagram will be useful in checking the integrity of the wiring and the functionality of some components.
Circuit diagram of a Samsung washing machine
Take your time, understand the diagrams, and only then proceed directly to disassembly.
Final Thoughts
Disassembling Samsung washing machines is a labor-intensive process that requires a responsible approach. The principle of disassembly is practically no different from different manufacturers, since the units themselves are designed approximately the same. Some differences in the procedure are typical only for Samsung washing machines with a vertical loading type. The main thing is to accurately remember the location of each of the parts while installation is underway. Then it will be easier to reassemble in the reverse order, following the manufacturer’s requirements. It is important to assess your own strengths in advance so that disassembly later does not turn out to be overwhelming.
Preparation
Disassembling a washing machine is not difficult if the owner of the device has minimal skills in electrical engineering and plumbing. In Samsung brand models, such as, for example, S821, WF-S861, S803J, WF6458N7W, it is easy to access the main mechanisms.
To disassemble and subsequently repair the washing machine, you need to choose a bright and spacious place where nothing will interfere with the work.
Whatever machine you are going to repair, first it is important to prepare a workplace and tools that will be useful during the disassembly process. Of course, you can get started with a few screwdrivers and wrenches. But if the machine requires a detailed inspection and subsequent repairs, it is better to prepare everything you need at once. So, you may need:
- hammer;
- wire cutters;
- screwdrivers (slotted and figured);
- open-end wrenches;
- heads (socket wrenches);
- pliers;
- hacksaw;
- pliers;
- mites;
- soldering iron
It is important to prepare auxiliary materials in advance - liquid for softening nut fasteners WD-40, silicone sealant and lubricant for hinge elements. It is convenient to have a clean rag on hand to wipe your hands or any remaining liquid from the machine. Experienced craftsmen advise beginners to photograph each stage of disassembling the unit to make it easier to reassemble the device after completion of the repair, therefore, you need to prepare a camera.
It is convenient to disassemble the unit when all the tools are at hand
The preparation stage may not seem so important, but the result largely depends on the quality of its implementation.
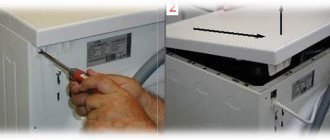
How to disassemble the unit yourself: step-by-step instructions
To properly disassemble a Samsung washing machine, we recommend following the following sequence of actions. You need to start the process by removing the top cover , for which you need to take a screwdriver and unscrew the two screws located at the back of the machine. Then carefully slide the cover forward a little and remove it from the body. If you need to inspect the motor pulley and belt drive, simply pull the counterweight towards you.
The next step is to remove the detergent tray . Open the container, press the locking tab and pull the compartment towards you as you would when removing it for cleaning. It is a little more difficult to remove the cuff - the rubber drum seal. Helping yourself with a screwdriver, carefully disconnect the fixing ring and remove it from the cuff. Perform the procedure slowly so as not to accidentally damage the rubber. Next, wrap the rubber part inside the drum.
Design and principle of operation of the control board
This code is printed on 1 or 2 stickers on the module board, usually one of the stickers is located next to the module code sticker, and the second is on the reverse relay housings - see. Now all official service information is sent to service centers - it is often of very low quality and not always differs in the necessary completeness.
Reception and transmission of information bits is carried out upon receipt of a positive synchronizing signal SCK, which is formed in the active state of the pressure switch. Other reasons include excess soot, the presence of conductive feces of domestic pests cockroaches, mice, as well as short circuits through the body of insects or rodents.
This helps to reduce the possibility of another part burning out.
In most models, near the trigger there is a filter whose resistance is 20 ohms.
In fact, the real price of the modules is significantly overestimated.
So we got rid of the old equipment and made some money. In fact, this is a graphic display on paper, necessary to convey the connection between key elements, using conventional graphic, alphanumeric characters.
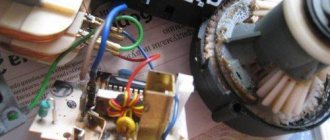
The reasons can be very diverse, for example, unexpected engine operating modes - it either spins at full speed, or barely cranks with effort. The cause may be burnt out contacts, but this rarely happens if the power supply is in order. Speed controller for commutator motor from washing machine with power support from Aliexpress
Samsung DC41-00035A does not turn on
View of the MFS-C2R10NB-00/C80908/6LF module itself.
The defective unit has obvious signs of overheating, capacitor CE1 is swollen.
Remove the display board. Underneath is a plastic backing that covers the board. We cut out a window in it under the defective unit. On this board it is divided into sections, which is quite convenient. It is convenient to cut with a craft knife.
Then pry it up with a screwdriver and remove the window.
I clean the place from the “jelly”. And I unsolder the shimka contacts.
Cleaning up the “jelly”
And remove the microcircuit
To unsolder the capacitor, I had to cut out an additional window.
We remove the capacitor.
We take the new TNY266PN.
And we install it in place of the failed one.
The same procedure applies to the capacitor.
Checking the module. The 220 V module power is supplied to the relay contact relay 2 and the middle connector CN3. The testing of this module was successful.
Result: Capacitor CE1 and microcircuit IC3 were replaced. The defect occurs due to the constant presence of the washing machine in the network.
Recommendations: After each wash, turn off the SMA from the mains.
Causes of malfunctions and methods for eliminating them
The main part of the faults can be divided into groups depending on the causes of the breakdowns and how to eliminate them.
Washing machine won't turn on
The reasons why the device does not start up may be the following:
- The hatch is not closed.
- The power cord is broken.
- The control unit has failed.
- The socket is faulty.
- The engine has failed.
- The power button does not work.
- There is no electric current.
If the machine does not react in any way when turned on, first of all, you should check the presence of electricity, the socket and the cable. The power cord must be inspected for mechanical damage, insulation damage, contact oxidation and tested using a multimeter. If a malfunction is detected, the cord is replaced with a similar one. The easiest way to check an outlet is to simply connect another, known working device into it.
If the washing machine's hatch is not closed, the indicators on the control panel light up, and in models with a display, an error code is visible on the screen - to fix the problem, just open the door and slam it forcefully again until it clicks.
If there is power, but when you press the button the program does not start, perhaps the problem lies in the button itself. It is necessary to ring its contacts while it is on. If resistance does not appear, the button should be replaced.
The control unit (board) and the engine cannot be repaired at home; you will have to contact a service center. In addition, these parts are quite expensive.
Water does not fill
There may be several reasons why water is not collected or flows too slowly:
- The network pressure is below the minimum.
- The inlet filter is clogged.
- The inlet valve or control module has failed.
If the pressure is too low (this happens in private houses or high-rise buildings on the upper floors), the machine will draw water slowly or intermittently. In this case, it is worth taking care to install equipment that can maintain the required pressure or wash at night, when it is higher in the network.
Another probable reason for the lack of water is that there is a shut-off valve on the pipe that shuts it off completely or partially.
To clean the inlet filter, you need to unscrew the inlet hose, remove the mesh, go over it several times with a brush, rinse in clean water and put it back in place.
A broken intake valve is a serious problem that requires qualified repairs. You can replace it according to the following scheme:
- unplug the washing machine and remove the back cover;
- disconnect the wires leading to the valve, tighten the pipes secured with clamps, unscrew the inlet hose;
- remove the faulty part and replace it with a similar one;
- connect the wires and tubes in the reverse order;
- check the performance of the system.
Failure of the control module, in this case, also requires the intervention of a qualified specialist.
Doesn't drain water
There are two main reasons why the washing machine does not drain the water at the end of the wash:
- The drainage system is clogged.
- The pump has failed.
Before you begin repairing the drain pump, you need to clean the drain system. To do this, you need to open the panel at the bottom of the facade. If the washing unit is equipped with an emergency drain tube, pull it out, open it and drain the dirty water. If not, place a flat container under the filter and carefully unscrew the lid. Remove all debris from the opened hole and turn the pump impeller - it should rotate freely.
If the blockage is severe, in addition to the pump, the drain pipe and hose may become clogged. You can clean the listed parts yourself using the following scheme:
- lay the machine horizontally and remove the protection at the bottom;
- unscrew the clamp that holds the pipe, unhook the plug from the pump sensor, disconnect the fastening elements;
- pull out the pump, unscrew the drain hose and rinse them with hot water under pressure.
If the problem is not a clog, you need to diagnose the drain pump. The pump is inspected for external damage. Possible causes of malfunctions:
- the impeller has fallen off the axis or cracked;
- the casing was deformed from hot water;
- the integrity of the motor windings is compromised (the contacts ring with a multimeter);
- rubber seals are torn.
Rubber gaskets and impeller are replaced with new ones. If, due to the loss of the geometry of the casing, the blades begin to touch its surface, you can trim them a little (literally 1 mm). To accurately assemble the pump circuit in reverse order, it is worth photographing the assembly.
Water flows
If your washer is leaking water, you need to find the source of the leak.
- Moisture accumulates under the bottom - the hoses (drain and filler), drain pipe, and tank could burst.
- There are leaks under the hatch - the cuff may be damaged.
The cause of the leak is sought sequentially, checking each node. If a place of depressurization is detected, the faulty part is replaced.
The drum does not rotate
There may be several reasons why the washing machine does not work and does not rotate the drum:
- The drive belt has fallen off.
- The bearing has failed.
- There is a foreign object stuck in the tank that is preventing the drum from moving.
You can check the integrity of the belt by turning the car over and removing the protection from the bottom. Bearing failure is preceded by a loud knocking and grinding noise that accompanies the operation of the unit for a long time.
The machine does not heat the water
If a malfunction occurs, the machine continues to operate, but all laundry is washed in cold water.
There are three main reasons for the malfunction:
- The heating element has failed.
- Thermostat is faulty.
- Problems with the control module.
The heating element may fail due to a thick layer of scale formed over years of service. Change the heating element in the following sequence:
- remove the front panel of the device;
- disconnect the wires leading to the heating element located at the bottom of the tank;
- dismantle the heater by unscrewing the fasteners holding it, disconnect the temperature sensor;
- gently tapping, pull out the stuck heating element;
- test the part with a multimeter, if the resistance is extremely low, replace it with a new one.
- install a new heating element, having previously cleaned the installation site.
Not only the heater can break, but also the thermostat. In this case, the machine may not heat the water or, conversely, wash clothes in hot water, regardless of the selected mode.
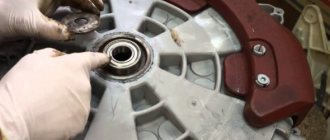
Noise when the washing machine is running
A strong hum or knock heard when the unit is operating may indicate bearing failure. The most common cause of malfunctions is wear of the seals.
Change them in the following sequence:
- disconnect the machine from the network and water supply, remove the top cover;
- disconnect the hoses, remove the tray, unscrew the counterweight;
- remove the rubber band of the hatch, having previously disconnected the latch;
- unscrew the lid at the bottom;
- dismantle the engine and drain pump;
- unscrew the fill valve, remove the springs holding the tank;
- remove the tank and, having removed the brackets and clamps, remove its upper part, opening access to the bearings;
- carefully knock out the bearings, replace the seals with new ones, pre-lubricated with oil;
- Press in the bearings and reassemble the machine in the reverse order.
You can replace bearings at home only with a collapsible tank. If it is not dismountable, you will have to send the equipment to a service center.
Disassembly
When the repair site, equipment and washing machine are prepared, you can begin to work.
The first step is to remove the top panel of the machine. On the back side of the unit, in the upper corners, there are two self-tapping screws on which the panel is attached. Unscrew them with a screwdriver (or screwdriver), lift the back of the cover, move it towards you and remove the panel.
Then you need to remove the detergent tray . To do this, press the locking clip and pull out the container in the same way as you do for cleaning. Behind the powder tray there are fasteners that hold the control panel; By removing the tray, you can easily unscrew the bolts and disconnect the latches that secure it (usually one fastener is located under the tray and two more on the back of the panel). Carefully disconnect the control panel so as not to damage the wires leading from it into the mechanism. To prevent the part from interfering with further work, it is hung from the right side of the unit using a special hook or simply carefully placed on the top of the machine.
When disassembling the washing machine, carefully inspect all parts for damage. For example, quite often the water level sensor fails. It is easy to access the part if you remove the top cover of the unit: the sensor is located, as a rule, on the side wall of the machine, closer to the top, and is secured with 1-2 bolts. Unscrew the fasteners, disconnect the hose and contacts from the pressure switch (the hose is held in place with a clamp that needs to be unscrewed or pulled apart with pliers) and inspect them. If necessary, clean the contacts and remove blockages in the tube, and check the sensor itself with a multimeter.
Next you should remove the hatch cuff . Gently pry the rubber collar clamp (retaining ring) with a flathead screwdriver, pull lightly on it, and then move the screwdriver around the entire circle to release the ring. Remove the rubber cuff and place it in the drum. Proceed as carefully as possible so as not to damage the integrity of the rubber. Close the drum door tightly.
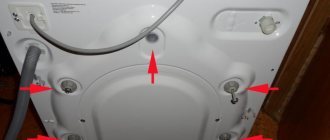
Next, proceed to dismantling the bottom panel . In Samsung washing machines it is fixed with latches that need to be disconnected from the body. On newer models, the panel is secured with screws; They are easy to find and unscrew.
It's time to dismantle the front wall. How to remove the front panel of a Samsung washing machine? This is quite simple to do: you need to unscrew the screws that secure the front panel to the body of the car (they are located in the upper and lower corners, under the dashboard and above the lower panels). Next, you need to remove the front wall along with the loading hatch from the hooks/latches. First disconnect the wires of the locking lock.
Removing the back panel is even easier: unscrew the four screws and remove the part. Immediately disconnect all hoses that are attached to the machine tank: filler, drain, as well as from the pressure switch and powder tray.
Now you should disconnect the wires of the heating element and temperature sensor or, if necessary, completely remove the tubular heater (for replacement). It is usually located in the lower front part of the tank under the drum. Unscrew the nuts and remove the heating element from the socket. At this point you should also disconnect the motor wires and wiring. Be sure to take a photo of the pin locations so you can connect them correctly when reassembling. The terminals can be marked with colored markers.
To get to the tank, you will have to remove the counterweights (balance stones); they are located at the top and bottom of the washing machine. Unscrew the mounting bolts and carefully remove the weights (they are quite heavy). When performing this work, an electric impact wrench will be useful, which will significantly speed up the process of removing fasteners.
In order to remove the washing machine tub , you will need two pairs of hands. After removing the counterweights, disconnect the shock absorbers, and then, together with an assistant, carefully remove the tank from the springs and remove it from the unit. Then disconnect the motor from the tank, to do this, first remove the drive belt, then unscrew the motor fasteners. Finally, remove the pulley by removing the bolt in the middle.
To replace the bearings on the drum, you need to disassemble the tank . The task will become more complicated if it turns out that your washing machine has a non-separable (soldered) tank. In this case, you will need to either completely change the part (which is not cheap) or saw it (the procedure can take several hours, and it is also quite painstaking work).
Samsung washing machine error codes
It is much easier to determine damage if there is a display on the control panel. In case of malfunctions, symbols are displayed on it, each of which corresponds to a specific breakdown.
4СWater is not filled or is filled too slowly (the filling process takes more than 20 minutes) 4С2 Make sure that the inlet hose is connected to a pipe with cold water A0, B0, C0, D0, E0 The diagnostics of the washing machine is turned on (test mode, which is used at the factory) 5С, 5Е , E2Water does not draindCD Door is openOCExcessive water, you should put the machine on spin and restart itLC,LC1Problems with the inlet hoseUbThe spin does not workUCNo power in the network, low voltage, check the connection3CThe engine does not workHCThe heating temperature is exceeded, the thermostat may be faulty1CThe water level sensor is not working correctlyDDC,ddCAppears if the door Add Door (for loading forgotten laundry) opens without pressing the “Start” or “Pause” buttonDC3Add Door lock does not work correctlySdToo much foamDC1Main door lock does not work correctlyBCAThe unit cannot start the enginePoFThere was a power outage during the washing processHotIn the drying process the temperature inside the drum exceeded 700CLE ,LC,E9 Spontaneous drainage of water due to a low-lying hose or a leak.Please note that the listed fault codes are periodically modified and new ones are added. Therefore, before starting repair work, you should check the list of errors specified in the instructions.