Types of bath brooms
Brooms can be made from young branches of birch, oak, maple, willow, and linden. There are bath brooms made from nettle, juniper, spruce, rowan and other plants and trees. Most of the brooms on this list should be prepared in the summer after Trinity, when the leaves are green and full of vitamins and healing oils. If you store them correctly, you can provide yourself with a bath tool for the entire fall, winter and spring - just until the next season.
Oak brooms will be more fragrant if you put herbs (wormwood, mint, nettle) and eucalyptus sprigs inside them.
When preparing rods for a broom, try to treat the wood with care. Remember that it can serve you for many years. Do not touch too young trees, do not destroy them for the sake of a few branches. Some harvesters specifically plant oak and birch seedlings every year to replenish nature’s storehouse.
When are birch brooms prepared for a bath?
The brooms are prepared depending on the type of plant from which the bath accessory is planned to be made. Traditionally, harvesting begins on Trinity Day, the date of which is floating:
- In 2015 it falls on May 31st.
- In 2021, Trinity Day is celebrated on June 19th.
- In 2021, the holiday falls on June 4th.
Birch broom
The first 2 weeks after Trinity, as folk wisdom says, are the most favorable for the procurement of raw materials. The leaves on trees and plants have accumulated juice and contain a high concentration of nutrients.
Depending on the plant species, the broom has a number of distinctive characteristics.
Preparation for drying
The process of making a broom can be divided into several stages:
- the branches are cut;
- sort and collect together;
- tied tightly in several places;
- form a handle.
The ability to skillfully knit brooms is acquired with experience. Branches for them must be taken from the middle of the tree. There they are quite flexible and rich in nutrients. You can buy ready-made brooms at the market, learning how to choose them correctly.
The height of the finished product can be from 30 to 60 cm. Everyone chooses the density as desired. Some people like fluffy little brooms, while others like big, loose bundles. Be sure to take care of the handle. It should be free of knots, properly rounded, neither thin nor thick, so that it is comfortable to hold on to in the bathhouse.
Remember dates and places
To pamper yourself with an excellent accessory in the steam room, you need to collect good raw materials, then tie a broom and dry it, according to the canons.
The general rule for harvesting branches is: you need to collect them before lunch, on a day when the weather is clear and the dew on the grass has already dried. If it suddenly starts to rain, it is better to postpone the trip.
You need to go for oak somewhere from mid-June (usually after Trinity). However, the best quality broom is obtained from raw materials collected in July. Then the leaves on the branches stick better, and they themselves become stronger. The end of August marks the end of the harvesting season. Although, if you wish, you can collect branches in September, if it is warm. True, the quality of the broom will be slightly worse.
In different areas, the harvesting season begins and ends at different times. But you should firmly remember that after frost this cannot be done categorically. You'll just be wasting your time.
When should you go to cut brooms, and how should you do it? We are looking for suitable oak trees
Both common oak (called Quercus robur) and Canadian oak (also called Quercus rubra or red oak) are suitable for brooms. The latter has wide leaves and flexible long branches, which is convenient for mating. There is also Caucasian oak, which is good because its leaves are especially thick and durable.
We choose oak trees with large leaves, growing somewhere in a shady place. It is better if they are three or four meters high. We take pruning shears and cut a little side branches from each tree so as not to destroy them. Only after a year, when the oak tree has become stronger, can you come again and take branches from it. They should be straight, flexible and about half a meter long.
Do you want the best broom? Then look for an oak tree with a burdock lurking at the base of its trunk. And the most durable product is obtained from the branches of those trees that do not shed their leaves for the winter. They usually grow at high altitudes.
When enough branches have been collected, let them lie for an hour in the shade, spread out in one layer. Then we transport it, trying not to pack the branches tightly so that they do not overheat on the road. Otherwise it would be a pity if the leaves fell off because of this.
How to knit a broom correctly?
First, we discard branches that are woody or dotted with too little foliage. When knitting, the number of these branches is selected individually - usually based on the thickness of the handle, making it from 3 to 5 centimeters in diameter. In the place where it will be located, the leaves must be removed (about two palm widths).
There are two ways to form a broom:
- The easiest way is to knit with a ball. To do this, you need to lay the rods evenly in a circle - you get a loose product with good volume.
- "Shovel" is a more popular method. We lay the rods flat, so that they press the previously laid branch, and the outer side of the sheet faces the middle. This creates a dense fan.
We remember that thinner branches should lie closer to the outer part of the broom, and those that are thicker will be good in the middle. To make it strong and reliable, we fix the product in two places. Where the rods fan out, we use twine. And wrap a cloth around the edge of the handle (you can take a medical bandage).
Watch how to knit a broom correctly in the video. Remember the tips.
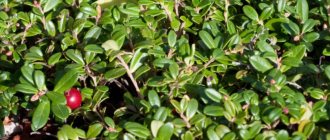
To get more pleasure and benefits, we will add healing and aromatic additives to the broom. A couple of rowan branches will invigorate, and coniferous branches will increase blood flow in the body and drive away colds. Bird cherry will serve as a bactericidal drug.
How to dry it properly?
First, let’s hold the finished accessory under pressure for about a day. This is if you need a flat shape. And then we hang brooms, two at a time, on a rope where there is a draft and where the rays of the sun do not reach. You need to take special care from them so that the leaves are not overcooked, removing all the beneficial substances.
We store finished products according to the rules
If you have a haystack (what if), then you can bury branches in it in the form of sheaves. In this case, we tie the brooms together immediately before going to the steam room. This method allows you to avoid deformation of finished products.
Well, in urban conditions we use a glazed loggia or balcony, garage, dry basement. Any place where it is cold, not damp and there is a draft is suitable. You can wrap the products in paper or put them in cardboard boxes. There are also “advanced” options - vacuum packaging or dry freezing.
As soon as the leaves dry well (this usually takes about a week), our accessory is ready for going to the steam room. Feel free to dip it in hot water. However, you can take a freshly tied broom with you, but we use warm water for soaking it.
We take a steam bath with pleasure
Oak accessories are the most durable. They are enough for about five times. But this is approximately. And so we look at the appearance of the broom - when it finally goes bald and becomes too rough, then you need to change it.
As for the steaming procedure, the easiest way to do it is this: first, dip the broom in cold water (for two or three minutes), and then in hot water (not boiling water). Cover the basin or bucket and wait until the oak begins to exude a wonderful smell. So it's time! By the way, the remaining water does not need to be poured out. It's worth splashing it on walls and hot stones. Nice and useful.
After the bath, we water the broom with warm water so that it becomes clean, and then we put it in a bag and take it to our place. At home, you need to hang it on a rope and wait until it dries completely, then put it back in place.
You can take care of extending the life of your bath assistant. To do this, in the morning, put it in a bucket of warm water for five minutes, then wet a rag in the same water, wring it lightly and wrap it around the broom. We put all this in a plastic bag and leave it until the evening, until the steam room, where we dip a broom in a bucket of hot water.
Your own or store bought - that is the question
For a broom to really be useful, it must be made according to all the rules. If you made it yourself, you can be sure of this. And store-bought products depend on your luck. However, provided you buy them in a reliable place, there will be no misfires.
However:
- You can add something for your body and soul to your own broom. For example, a sprig of rowan, Christmas tree or eucalyptus. And in finished products you will have to be content with “what they give.”
- While steaming with friends, it is much more pleasant to pull out an accessory knitted with your own hands (or even give one to all your friends). It will be very emotional.
- If you visit the bathhouse regularly, using your own brooms will save you a lot of money.
To be honest, I didn’t know how to make good oak brooms for a bathhouse, I kept buying them, but after reading this article I decided to make it myself and it turned out quite well for the first time and even no worse than the purchased version. And I like the oak broom the most, both in terms of smell and feel, it’s quite pleasant, so I’m in favor of this option, I didn’t like the others so much) I decided to make oak brooms myself. I read, watch videos. EXPLAIN to the dull. The video says “we lay the branches with the back side facing the BODY.” I rewatched this moment three times. And in the photo of the broom, all the branches are laid with the front side facing the body. So how is everything right?
Drying and storage
The branches collected together and compacted must be dried properly. They are dried by tying them in pairs and hanging them in a well-ventilated dark place where they cannot fade from the sun and where mold will not grow among the leaves. What kind of place it will be, choose for yourself.
Experienced harvesters hang bundles in attics, sheds, hay barns, spacious dry storage rooms, and in the corridors of bathhouses. There should be a distance of 15–20 centimeters between them for free air circulation. The main thing is to prevent the leaves from drying out and falling apart. It is necessary to preserve the aroma and nutrients in each branch.
It is not recommended to store brooms under the roof if it is too hot there. Sometimes the thermal insulation of roofs leaves much to be desired and the temperature in the attic rises above 40 °C due to the heated roofing material. Drying and storage cannot be done under such conditions, because the leaves will dry out and fall off. Here are a few more storage rules.
- You can wrap the brooms in paper so that less aroma escapes from them. At the same time, the paper will protect them from dust and allow air to pass through.
- Do not place birch and oak branches on tightly folded boards, as this may be prohibited.
- It is better to hang recently made bundles that have not yet dried rather than lay them out flat.
- Dry branches are highly flammable, so keep them away from stove pipes and heating systems.
- The best place to store brooms is dry, cool and shaded.
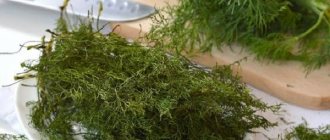
Juniper and spruce brooms cannot be dried. If you want to store them for a long time, then put them in the freezer.
When to prepare brooms for a bath?
According to traditional custom, the period of harvesting birch brooms for the bathhouse begins 2 weeks after the Holy Trinity, that is, in mid-June.
But this rule is not entirely accurate, since due to the peculiarities of the weather in different regions, by the time the right moment arrived, the birch leaves did not have time to get stronger, but the buds were already forming. June–July is considered a suitable time, but experienced bathhouse attendants claim that by the third week of July, birch leaves become hard.
Attention! Harvesting is carried out only in sunny weather. When collected, wet pinwheels will have an unpleasant odor.
The time for harvesting birch brooms begins at the beginning of June, maximum in the middle of June. When to collect brooms for a birch bath can be determined by the condition of the leaves.
For the preparation you need delicate, velvety, slightly downy leaves. If they become hard, it is too late to collect the broom. It will scratch and leave small cuts when used in a bathhouse.
If, on the contrary, you choose leaves that are too tender, they will fall off the branches during drying. And if the leaves don’t fall off, the broom itself will become slippery and unpleasant to the touch.
Properly drying birch brooms should be in the shade in the open air. The brooms are hung by the base in the shade, on the veranda or in the garden, and dried in this position for 5-6 days.
Avoid exposure to the sun as it will dry out the leaves and cause them to curl.
When the leaves become brittle and breakable, it means that the broom is already dry and you need to immediately put it away for storage, otherwise the leaves will fall off.
Advice! Before drying, place the brooms under a press for several days, turning them over periodically, so that excess moisture will be released from the leaves and branches.
A prerequisite for their storage is a dark, cool, well-ventilated room with optimal humidity. The ideal option is a haystack. They are placed inside with leaves so that the handles are on the outside and placed in a circle.
Also, an attic is suitable for this purpose, but it must be poorly lit. Can be stored in the dressing room. A glazed balcony is suitable as an alternative, but you should minimize sun exposure and place brooms in cardboard boxes
Advice! You can extend the shelf life of brooms by sprinkling salt on top of them.
It is better to store them by the handle, so as not to damage the structure of the broom. Separate each one from each other so that they are ventilated and do not “suffocate”. Be sure to avoid drafts, otherwise they may crumble.
If it is not possible to make a broom yourself, then you can purchase a ready-made one. They are inexpensive and in terms of quality you can find an excellent option. To do this, you should know how to choose the right broom when purchasing:
- Turn the bunch leaves side down and shake a little. If a lot of leaves fall off, it means that the harvesting technology was violated.
- Touch the leaf; it should be dry, but not crumble in your hand.
- A well-made bundle should fit in your hand. The lower branches are specially trimmed to make it comfortable to hold.
- Smell the broom: the presence of a smell of dampness or mold is a sign of improper preparation and violation of storage conditions.
The bunch should be tight, but not too tight, so that the air can circulate and the leaves can ventilate.
To feel all the benefits, you need to know
from birch. A dry bundle can be steamed in two ways:
- Place the leaves in boiling water and leave for half an hour. During this time they should soften. If the rods leave marks when used, you still need to keep the bundle in boiling water.
- Place the leaves in cold water and wrap in a wet cloth. Then the bundle should be placed in a bag overnight. Before the steam room, you should place it in boiling water for a couple of minutes, and then you can use it.
Dry brooms need to be steamed well so that they do not leave marks on the skin, but at the same time, the main thing is not to over-expose them so that they do not become sour.
Advice! Do not throw away the water in which the broom was steamed. It can be used to rinse hair.
There is no need to steam fresh birch brooms. Indeed, as soon as you have tied a broom, you can immediately use it in the bathhouse. It can be soaked in water at room temperature for 5-7 minutes, but under no circumstances in hot water. If you pour boiling water over a bunch, the fresh leaves will simply cook and fall off.
It is important to wet them a little, but not to let them gain too much moisture, which can also lead to shedding. Fresh preparations can leave painful marks on the skin, so you can hold it in a bath at a high temperature for a while so that the pores of the leaves open, and then immediately start using it.
The process of using a birch broom differs from using bunches from other tree species. This is due to the tenderness of birch leaves and the elasticity of the branches.
You cannot whip the birch too hard, otherwise marks will appear. It should be used like a fan, which attracts heat. There are several recommendations to consider:
- The broom in the bathhouse should always be wet. Once it dries, it needs to be re-wetted in water.
- Touches should be superficial and soft. No harsh slaps. They can leave burns and wounds.
- You should barely touch the broom to the skin and try to avoid blows from branches.
- At temperatures above 60 degrees, you need to keep the broom wet at all times; if not in use, immediately put it in water.
To get all the benefits of birch, you should massage correctly. Using soft, light and painless blows, you need to work the entire surface of the body. If you feel discomfort, then you should not hit, but stroke it - the effect will be the same.
You can use bundles to collect warm air. To do this, lift it up and lower the air flow to the lumbar or back area. The broom should touch the body, at least a little. Otherwise, hot air will stagnate between the leaves and the body, causing burns.
Slight, but sharp, whip-like movements with the tip of the branches are very useful. The procedure should end with light stroking to soothe the steamed skin.
A useful contrast is when, after a hot steam room, the bath attendant takes a cool shower. Thus, blood circulation improves and the effect of using birch branches is enhanced.
Please note that the broom must be of high quality. Otherwise, you will end up with a bunch of flying leaves and a spoiled mood. No methods of “reanimation” will help him.
1. The broom is placed in a steamer, in cold water for 10-15 minutes before steaming, after which it is transferred to a heated steam room, taken out and allowed to warm up over the heater, shaking constantly for 20-30 seconds. After this, you can carefully begin the bath procedure. As the leaves and branches warm up, the intensity of the soaring increases.
We suggest you familiarize yourself with How to build up an iron chimney pipe
2. Before lighting the bath, lower the broom into a steamer with cold water. Then immediately transfer it to a steam room that has not yet been warmed up and place it on the top shelf. As the steam room warms up, the water in the steamer heats up along with the broom. When the temperature in the steam room reaches the set value, the broom is ready! At the same time, you receive a healing decoction of oak leaves, which “give” their unique aroma and some of the beneficial substances into the water. This decoction can be used to heat it and produce healing steam.
3. To adapt, the broom is dipped in cold water for 10-15 minutes, then in hot water for 15-20 minutes. At the same time, the branches of the broom become flexible, the leaves are very elastic, but fly off faster. Most of the beneficial substances go into the water, you get a kind of oak “tea”. This decoction is very effective for succumbing to stones, but very few useful substances remain in the broom itself.
Creating a bath broom consists of several stages, and drying is only one of the stages. Collecting branches, knitting and steaming are integral components of obtaining a high-quality broom, but these harvesting stages are not relevant to the topic under discussion.
You just need to note an essential detail - to get a good broom, every stage matters, not just drying.
Although creating a worthwhile broom will require considerable experience and subject knowledge, the process should be carried out without fanaticism. What is more important is not the observance of small nuances, but knowledge of the basics, to which experience and the corresponding skill will ultimately be added.
Preparing brooms for a bath
Preparing brooms for a bath is a rather complex process, and the drying stage is only part of it. In addition to drying, it is also important to cut, tie and steam correctly, but that’s not about that now. Therefore, it is worth considering the process of direct drying.
Primary requirements
In order to dry brooms correctly and efficiently, you should not ignore the basic rules of this process:
- You should not knit brooms that are too large, as they will take a very long time to dry, and your hand will quickly get tired when using them.
- Drying should be carried out only under natural conditions.
- The best brooms will be those produced in early June.
- When drying, do not allow exposure to direct sunlight or drafts. It is best if the brooms are dried in a closed and relatively dark room.
- Before you start knitting a bath attribute, the branches should be dried on the fabric.
Figure 1 - Proper hanging of brooms for drying
You can hear a huge number of tips from experienced bathhouse attendants on how to properly dry good brooms for use in a bathhouse. The room should be cleared of light, but well ventilated. At the same time, there should be no constant drafts in such a place. It is best not to hang the brooms at first, but simply stack them.
It is worth noting that for ease of use, you should clear the handle of leaves before sending the broom to dry. Experienced bath attendants advise making the handles long enough. It is more comfortable.
Storage in the apartment
Residents of apartment buildings are better off buying ready-made brooms shortly before going to the bathhouse. But if you decide to make a broom with your own hands, then set aside a place for it on the balcony in a specially prepared cabinet. It must be dry, dark, and air must circulate. Owners of personal garages can store bath accessories in them.
Two or three small brooms can be placed in the freezer, wrapped in cling film or wrapped in a bag. This method allows you to preserve the color and smell of the branches. After defrosting, the leaves look fresh.
Before using in the steam room, the broom must be steamed. Birch and linden are poured with hot water; oak and juniper brooms can be poured with mild boiling water. Leave them for 30–60 minutes to soak. Linden branches can be left for only 10 minutes, as they become slippery after getting wet.
It’s even better to first soak the broom in cold water for a couple of hours, and then just water it with hot water. In this case, the aroma will be more intense. A good-quality oak and juniper broom can be used several times if you do not share it with anyone. Rinse it and dry it by hanging it on a nail. Linden and grass brooms quickly crumble, they are enough for only one, maximum two, baths.
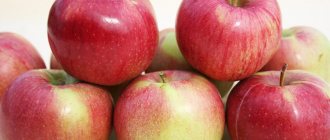
Oak broom photo
The most beautiful bath broom is rightfully considered to be oak. Its carved leaves are shaped like beautiful paper cutouts, and the broom itself generally looks like a curly bouquet.
Oak leaves are amazing in that they remain in their original form for a long time. They are difficult to damage and oak harvests are often used several times.
How to store birch brooms for a long time
Many people, especially those who like to spend time in the sauna or have their own sauna, do not know how to store birch brooms so that they can serve for a long time and retain their properties over a long period of time. First of all, it is necessary to note that the brooms must initially be dried. Proper drying is essentially the first stage of proper storage of a birch bath broom.
It is necessary to dry the brooms under a canopy; to do this, you need to stretch a strong rope and attach the brooms to it. There should be some distance between them, through which a flow of fresh air can easily circulate. If there is not enough space, then the brooms will need to be turned over periodically, otherwise moisture will remain in the places where they come into contact with each other. After they are completely dry, they should be stacked tightly one on top of the other. This will give them a certain shape that will visually resemble a fan.
Preparation of birch brooms for a bath
Massage technique
You should not visit the bathhouse alone. It is advisable to go alone, ideally with an experienced person. Before a massage, a person should protect their hands with gloves. If you used our instructions to prepare the brooms, then you can do without gloves - the handle will already be protected by thick fabric. Without protection, abrasions and calluses may appear on the palms. We place emphasis on ensuring that the bathhouse attendant is experienced, because not everyone can give a competent massage. Follow 3 rules to achieve better results:
- Brooms must be moistened with water, both before the procedure and during it (the foliage should not be allowed to dry out).
- There is no need to aggressively whip a person in hopes of improving the healing effect. The blows should be light and the touch to the skin almost unnoticeable.
- At temperatures above 65°C, it is recommended that only experienced bathhouse attendants use brooms, as steaming can easily cause severe burns.
When all procedures are performed correctly, metabolism is significantly accelerated, blood circulation is increased, parasites are eliminated, pathogenic bacteria are destroyed, metabolism is improved and the epidermis is restored. Gross violations of technique can lead to injuries, so there is no need to massage aggressively.
Fact:
The use of high-quality brooms made from fragrant birch branches allows you to increase the effectiveness of the procedure by 200%. If brooms are not used in a traditional bath, the healing and restorative effect is noticeably reduced.
The procedure is quite simple - the first bath attendant lies on his stomach, and the second prepares brooms and begins to gently stroke his body with them. It is important to press the branches firmly against the skin when stroking. The movement from bottom to top goes to the back of the head, and on the way back along the sides of the body.
After this, the bathhouse attendant captures hot air by lifting the products, and then lowers them onto the lower back and holds them in this position for literally 1-2 seconds. This is especially true for athletes and older people who have lower back problems or whose muscle corset is tight. To eliminate pain in the back, you can apply brooms. For example, after placing products on the lower back, you need to move them in opposite directions - one to the back of the head, the other to the knee joints. The movement must be performed synchronously. The same principle is used to treat other parts of the body.
Note!
To avoid serious damage to the epidermis due to thermal burns, brooms should touch the human body during massage. It is also necessary to constantly monitor the condition of the branches and the amount of moisture. If the product gets too dry, you need to moisten it in water. This will help reduce the risk and avoid burns.
A worthy technique is also quilting, which is performed with the end of the workpiece on the body of the bathhouse attendant. Movements should be as fast as possible. The massage begins with the back muscles, after which a descent is carried out to the lumbar region, pelvis, knees, and feet. Since the movements are performed at high speed, the entire procedure will take approximately 40-50 seconds. At the very end, you need to treat the body with stroking (the speed should be higher than in the early stages of the massage).
One of the most effective techniques is whipping, but the result will greatly depend on the experience of the bath attendant (you can cause harm if you whip too hard). To perform this, you need to sharply lift the brooms up above the body, and then whip all areas no more than 3-4 times. In this case, the actions alternate - the bathhouse attendant strikes, then presses the brooms to the body, and then strikes again. This alternation can significantly increase the healing effect.
It is imperative to master the plowing technique, which allows you to easily and painlessly treat the entire body. At the same time, the brooms are raised and lightly touch the skin (it is important to make gentle touches that are almost invisible to humans). You need to move from bottom to top, so the massage begins from the feet and ends in the back of the head. On the way back, the sides of the body are plowed. If a person feels gentle stroking with warm air, you are doing everything right.
Fans of critical temperatures can increase the benefits of visiting the bathhouse. To do this, you need to constantly lift the broom up and shake it, and then press it to all parts of the body - feet, hips, buttocks, lower back, back, neck. If discomfort occurs, you need to moisten the workpiece in cool water, and then continue the session. The final stage is rubbing with a fragrant birch broom. It presses tightly against the body, thanks to which it releases all the essential oils and improves the condition of the skin.
It is not uncommon to feel dizzy after such an intense massage. To avoid this effect, next time reduce the duration of the procedure.
Storing a birch broom
After the brooms have been dried and laid one on one, they must be placed in dry plastic bags, securely closed and placed in a dark place. Moreover, the place in which they will be stored must have a cool air temperature. It is better to release as much air as possible from the bag. This is necessary to prevent water vapor in the air from condensing during a possible temperature change.
You can also use cardboard boxes instead of bags, as well as boxes made of plywood or natural wood. They will be even more preferable to bags, since the brooms will “breathe” in them. Boxes with brooms can be placed on the balcony, in the pantry or on the loggia. The main thing is that they should not be exposed to sunlight, which will cause your brooms to dry out quickly. Now you know how to store birch brooms, but these are only the simplest ways to store them. We'll talk about more clever ways to store them below.
Basics of drying brooms
Artificial options for drying brooms are always unacceptable. It is necessary to dry the broom in natural conditions, although this will require more time.
It is necessary to dry the broom in natural conditions
What do brooms not need during the drying process? Avoid the following:
- drafts;
- direct light and illuminated room;
- high humidity.
These factors should be minimized and, if possible, eliminated from the drying process altogether. Please consider their possible presence when following further recommendations.
Drying bath brooms
Drying process
So, the brooms are collected in a certain quantity. Now all that remains is to choose a drying space, which can be:
- dressing room;
- a separate room in the house;
- attic;
- garage;
- balcony;
- wardrobe (ventilated);
- separate utility room.
Drying process
Which space to choose is not so important, the main thing is that there:
- there were no direct rays of light and there was shadowing;
- there were no fumes of chemical elements (relevant for garages and utility rooms);
- there was a stable temperature range (15-25 degrees Celsius - optimal).
Brooms should not be dried on the balcony
We invite you to familiarize yourself with DIY bathhouse door, self-installation and possible problems during installation
Storage of dried products
Depending on the position in which the broom is dried, a different shape is obtained. If you pay attention to this aspect, it is easy to detect the two most common forms:
- round;
- panicle (shovel-shaped).
Brooms that were hung to dry have a spade-shaped shape, since nothing squeezed them.
Brooms that have been stored on any surface, and especially if they have been stacked on top of each other or under a small load, take on a flat panicle shape.
Birch broom
Which method to choose depends on the type of broom and your soaring needs. In general, flat ones are functionally more useful, since they allow you to move a large amount of steam and distribute it better (a flat and even shape, as it were, scoops up warm air and moves it in the right direction).
Flat bath brooms
However, if the broom is made in order to breathe in the foliage, then a rounded shape is also quite useful; for coniferous brooms, hanging drying and a minimum period (an hour or two) immediately before hovering is more preferable.
Coniferous bath broom
Accordingly, based on your needs, you need to choose the appropriate option. With proper drying, the amount of useful components in both brooms remains approximately identical.
Juniper brooms;
The most ideal option is to combine these drying methods. If the availability of appropriate premises allows, then first the brooms are laid on top of each other to “wither” in the dark for 1-2 days. The longer the period of this stage, the more important it is to turn the brooms over during the drying process (at least once a day) so that they have a uniform shape.
After the main bath accessory takes on a flat shape, the bundles are hung in a ventilated area. The flat brooms are hung to dry. The duration of this period can be 1-2 weeks, in fact, this is how brooms are stored before use.
Various broom preparations
Types of bath brooms
Different trees dry out differently. This difference is determined by the quantity and quality of the liquid components that make up the foliage. For the main reference system, let's take a birch broom, which dries for about a week and a half.
Coniferous brooms for baths
If several birch brooms are dried on top of each other (to obtain a flat shape) and the wet ones are transferred daily from below onto the remaining brooms, then they usually dry out in a couple of weeks. Oak brooms have denser foliage and may require one and a half to two times more time. Likewise, maple brooms take longer to dry than many others.
Oak brooms
Varieties such as aspen and linden are approximately identical in drying time to birch. Rowan, shrubs (currants for example) and herbs dry out completely within a week (especially herbs).
Bound and dried bath brooms
Of course, each individual tree has a different amount of sap, and although it is recommended to collect branches of approximately the same parameters, that is:
- from young trees;
- only lateral;
- identical length (about half a meter);
still, each drying process is completely unique. It is best to look not at the amount of time spent on drying, but to evaluate the condition of the foliage and send the broom for storage only after the leaves are completely dry and there are no obvious signs of moisture on them.
Eucalyptus broom
Table. Bath brooms, their varieties and benefits
Broom varietyBenefitsRecommendations
| Conifers (spruce, cedar, fir) | Phytoncides contained in needles are a natural antibiotic with strong action and a wide spectrum. A broom perfectly disinfects the skin, improves wound healing, enhances sputum discharge, and improves mood. | Spruce broom for a bath | |
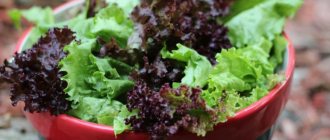
| Nettle | Contains formic acid, helps with gout, radiculitis, arthritis. Used for back pain, joint pain, colds, as well as for the treatment of skin rashes, acne, boils. | It is recommended to use infrequently, when pain occurs. | Nettle broom |
| Currant | Used for colds, hoarseness, cough, whooping cough. | Young shoots of bushes are suitable for harvesting. | Currant broom |
| Oak | Contains anti-inflammatory substances, beneficial phytoncides, flavonoids. Useful for sweating, skin diseases, acne. Tones blood vessels, improves the functioning of the nervous system. | Oak broom | |
| Birch | Contains flavonoids and tannins. A bathhouse with a birch broom is useful for smokers, asthmatics, and those suffering from bronchitis, since after the procedure the functioning of small alveoli and bronchi is significantly improved, phlegm is easily removed, and ventilation of the lungs improves. | Harvesting is done in early summer. | Birch brooms |
| Eucalyptus | The broom is used to treat colds. Good for the respiratory tract. The steamed broom is held near the face and its aroma is inhaled. | Eucalyptus broom m | |
| Linden | They cure respiratory diseases (sore throat, colds, etc.), and act on our body as a sedative and restorative. Helps to remove freckles, acne, rashes. It has antipyretic properties and relieves headaches. | Harvesting is carried out from May to June, before the linden blossoms. | Linden bath broom |
| Juniper | It has a pronounced antiseptic property. Juniper broom is good for massage for pain in the spine, radiculitis, and other neuralgia. Has a diuretic effect. Removes waste and toxins from the body. Accelerates tissue regeneration, healing of purulent wounds, abscesses, ulcers, boils, as well as cuts, eczema, stomatitis. A good antirheumatic drug. Reduces high body temperature during colds and flu. | The dry broom is steamed for 15 minutes. | Juniper broom |
| Rowan | It has a stimulating effect on work, restores physical strength and mental abilities. Using a rowan broom in a steam room promotes good sweating and, accordingly, the removal of toxins from the body. It also improves blood circulation and metabolic processes. | Harvesting from June to July. For a broom, take only twigs from the middle of the tree, and cut off the branches. | Rowan broom |
Using bath brooms
The branches collected together and compacted must be dried properly. They are dried by tying them in pairs and hanging them in a well-ventilated dark place where they cannot fade from the sun and where mold will not grow among the leaves. What kind of place it will be, choose for yourself.
Experienced harvesters hang bundles in attics, sheds, hay barns, spacious dry storage rooms, and in the corridors of bathhouses. There should be a distance of 15–20 centimeters between them for free air circulation. The main thing is to prevent the leaves from drying out and falling apart. It is necessary to preserve the aroma and nutrients in each branch.
It is not recommended to store brooms under the roof if it is too hot there. Sometimes the thermal insulation of roofs leaves much to be desired and the temperature in the attic rises above 40 °C due to the heated roofing material. Drying and storage cannot be done under such conditions, because the leaves will dry out and fall off. Here are a few more storage rules.
- You can wrap the brooms in paper so that less aroma escapes from them. At the same time, the paper will protect them from dust and allow air to pass through.
- Do not place birch and oak branches on tightly folded boards, as this may be prohibited.
- It is better to hang recently made bundles that have not yet dried rather than lay them out flat.
- Dry branches are highly flammable, so keep them away from stove pipes and heating systems.
- The best place to store brooms is dry, cool and shaded.
Juniper and spruce brooms cannot be dried. If you want to store them for a long time, then put them in the freezer.
Using salt for storing birch brooms
If you want your birch bath brooms to be stored for a long time, and at the same time remain green and fragrant, with a characteristic pleasant smell, then you can sprinkle them with a small amount of ordinary kitchen salt.
Salt will help preserve not only the color and aroma, but will also ensure that birch brooms remain soft and flexible even for two years.
But it is worth saying that such long-term storage using salt does not occur at room temperature, but in the freezer. And if you intend to remove such a broom from the freezer, then this must be done approximately one or two hours before using it. During this time, it will be able to thaw at normal room temperature. It is not recommended to re-freeze this broom and it is better to use it immediately for its intended purpose.
When to harvest oak brooms
In Russia, the most common type of oak is the English oak subspecies, which is divided into winter and summer. The flowering season for summer oak begins at the end of April, while winter oak blooms at the beginning of May, with a difference of about 2-3 weeks. But it’s worth noting that this is not the best time to collect brooms.
Oak branches should be filled with juices and gain full strength, for which they are so famous. If you use young branches that have just blossomed, they will be of no use. Oak leaves need to be collected in June after Trinity. Around mid-June, the woody cover of young branches has become stronger and bends well.
You can collect branches at the end of June if they are green and fresh. Basically, this period is suitable for northern types of oak. Collecting brooms in the fall is not recommended due to natural wilting. During this period, the process of nutrient metabolism slows down, the leaves become less durable, the crown becomes thinner and more fragile. Oak harvest is friendly with other trees and herbs. You can dilute its brutal aroma with willow branches, fragrant wormwood and other spicy herbs.
Preparing a broom for a bath
Note that a dry broom is not used immediately; it is pre-steamed in water. But in order to preserve the leaves on it, this must be done gradually, dividing the steaming into several steps. To begin with, simply rinse the broom with warm water. After this, pour almost hot water and put a broom there. Cover it on top and keep it this way for about a quarter of an hour. After this procedure, the leaves become silky and very pleasant to the touch. Severely dry birch brooms are doused with boiling water several times.
How to properly soak an oak broom for a bath
The Russian bathhouse is a whole collection of rituals that each person uses in his own rules and procedures. But one thing the bath attendants are always united in is soaking the broom. This is understandable; there is nothing to do with a dry broom in a bathhouse. Immediately upon arriving at the bathhouse, you need to lower it into the water and soak it. The fact is that no one washes the leaves when collecting them; dust, organic waste and other impurities accumulate on them.
To steam under clean sheets, you need to wash the leaves of the broom. There will be several options for this. If a trip to the bathhouse is planned for the evening, then the broom can be prepared in the morning. Place it first in warm water to wash off the dirt. Leave for about 30 minutes, rinse and place in a bowl of hot water. The basin will need to be covered. The branches will soak and gain nutritious moisture; before the bath, put it in a bag, and then heat it over the coals.
You can get the broom into shape before visiting the bathhouse. To do this, fill a tub of boiling water in a bathhouse, lower a broom into it, then transfer it to the coals, turning from side to side, then lower it back into the boiling water and back onto the coals.
For those who plan to use the oak fan several times, it is worth soaking the leaves in cold (ice) water for 8 hours. True, such a bouquet will not be as useful as one steamed in boiling water. The leaves will harden, but will lose their healing power.
How to properly store bath brooms in an apartment or house?
Anyone can assemble a bath broom, but not everyone knows how to store bath brooms correctly. The quality of steaming and whether the person steaming will benefit from this procedure depends on how to store bath brooms.
Basic rules for drying and storing brooms in the house and apartment:
- It is advisable to mix different types of plants. You can add a sprig of laurel tree to the birch branches. This will add a noticeable aroma.
- Fresh brooms, freshly picked and tied, are not stored. First they need to be dried.
- When drying, it is necessary to get rid of the dried leaves, and it is better to tie the branches with gauze or cloth rope.
- Using a knife, knots that can cause damage are removed.
- The best month for harvesting is July.
- Dry in a dark, ventilated area, hanging.
- Can be preserved by freezing. To do this, use polyethylene, which is used to wrap the product and place it in the freezer.
- Do not store in warm and damp rooms, near stoves, radiators and other heating devices.
- It cannot be kept in a steam room or in a lying position on a wooden surface.
Best places for drying and storage:
- Rest rooms in the bathhouse.
- Attic, barn.
- In the apartment they dry it and store it on the balcony, hanging it from the ceiling.
- Canopy. Negative aspects include the effect of insects on products.
- Bags and nets. This method is used for mass procurement to reduce the occupied area.
- Hay. Storing in hay does not allow the product to become moldy or spoiled.
- Forest. This method involves cutting branches for a broom in the forest immediately before going to the bathhouse.
- It's cold in winter.
How to knit an oak broom correctly
Oak brooms are connected according to two principles. Choose one of the suitable ones and prepare a batch of fragrant preparations. You can save a lot of money on this. Each trip to the bathhouse will save you 200-300 rubles. Bath fans are knitted according to two principles: a fan and a broom.
In the first case, a fan-shaped broom is laid out like this: each oak branch is laid out and aligned in the image of a peacock’s tail. The paired branches are aligned along the top leaf, that is, along the green top. The second, third, etc. are applied on top of the first layer.
A broom in the shape of a broom or, as it is also called, an oak bouquet, is much easier to form. The branches are folded into a single bundle, aligned with the leaf crown and tied in two places. Bath craftsmen often wonder how thick a broom should be? Determining everything is quite simple, take an oak broom in your hand. If you feel comfortable holding it and using it at work, then it means you have a sufficient number of branches in your hands.
A large number of branches in an oak broom will interfere with the park, the hand will quickly get tired, and hitting such a shock will not bring pleasure at all. A broom that is too small will not be very effective; it can only be used for steaming children.
Fir
The most important thing is to prevent the effect of direct sunlight on a fir bath product. The sun makes the branches dry, and the fir broom loses its beneficial and aromatic qualities. The needles become orange-gray in color, and the leaves begin to fall off.
The effect of high humidity also affects the needles, making them dark in color. The needles wrinkle and fall off. Therefore, the collection of fir branches is carried out in warm, non-rainy weather, at the moment the dew disappears.
It should be stored in a dark, ventilated and dry place.
- Many professional bath attendants do not immediately make a product from fir branches, but make a sheaf from them and dry them in straw in the attic. And before taking bath procedures, branches are removed and a broom is tied from them. This method protects against drying out and debate.
- Dried grass is spread out in any dark place, and fir branches are laid on it at a distance from each other. They are covered with straw on top and turned over every three days.
After a month, they cover themselves with plenty of grass. In this state they can remain until autumn. If necessary, the branches are taken out and tied.
- In apartments you can store a fir broom by wrapping it in a thick layer of paper.
The process of proper knitting
In order to properly dry the prepared raw materials for brooms, it is recommended to correctly pre-knit the sheaves. Sheaves consist of upper and lower branches. Such bundles can be carefully placed in the barn for proper drying.
The knitting process is performed as follows:
- The cut branches are laid out on a dry, clean rag or burlap;
- Slightly withered branches are placed in small piles. Thick branches are laid inside to create a strong frame. Thin branches are lined up around the base;
- The finished stacks are tightly tied with cord or rope;
- The ends of the cord are tied in a knot and trimmed;
- The finished bundles are hung with the handle up to dry.
Before you start knitting, you should go through all the branches, removing damaged leaves and protruding knots. The handle of the finished broom should not be too long and comfortable for vigorous swings. You should not make the finished product excessively heavy, because when wet its weight will increase.
Tips for preparing:
- The length of the branches should not exceed 75 cm;
- The handle is formed using twine or a piece of thick fabric to prevent calluses;
- The length of the handle should be 15 cm;
- Drying the broom is done in a dry and well-ventilated area, not in direct sunlight;
- Each type of raw material has its own drying time.
Eucalyptus
Before storage, the eucalyptus broom must be dried. Drying it is done in the same way as with other types of brooms. For this purpose, choose a dark, ventilated place where there is no direct sunlight and high temperature.
The branches need to be tied, create a handle and hang them from the ceiling or on the wall of the room. When choosing the second option, it is necessary to constantly turn the products over to ensure even drying and to eliminate the possibility of rotting.
Eucalyptus must be stored very carefully, as its branches are characterized by increased fragility and brittleness. The best storage location would be an inaccessible, lockable room.
What determines the shelf life
How long bath brooms will retain their performance characteristics depends on the following conditions:
- Temperature . It is advisable that the room is cool enough.
- Illumination . Avoid prolonged exposure to direct sunlight.
- Ventilation . The room must be well ventilated, otherwise fungus may form.
- Humidity . You should choose a relatively dry room. High humidity leads to rot and mold.
- The quality of the source material.
Birch
A warm sunny day is used to harvest birch branches. If the humidity is high during harvesting, the leaves will rot, darken and curl, and eventually fall off.
Knitted products must be dried in a dark, well-ventilated place. An attic, barn, or balcony are suitable for this. Hanging dry.
Storage is carried out in dark places. The sun's rays negatively affect any broom, causing yellowing of the leaves and loss of aroma.
You can also store them in a box with holes for air circulation. The products are placed in a box and stored in a cool place away from sunlight.
For city residents, storing bath brooms on the balcony is popular. They are tied to a rope near the ceiling.
The process of drying the prepared broom
How to dry bath brooms? There are many options for carrying out such a procedure.
The main thing is to follow the basic rule - ensure drying in a well-ventilated and darkened room. Direct sunlight is harmful to leaves, which results in their burning, curling and yellowing. In addition, the sun dries out the aromatic oils contained in the branches and leaves, causing them to become less aromatic and beneficial.
You should not keep ready matings in drafts. For drying, a calm, quiet, dry and slightly cool place is suitable - a barn, garage or attic. To ensure even drying of the leaves, the bundles must be turned over daily.
After preliminary drying for 7 days, the products are tightly tied and stacked on top of each other, which allows them to be given a flatter fan shape.
Products dried according to all the rules have the correct shape, green leaves and a pleasant aroma.
In villages and villages, drying bath bundles can be done in haystacks, which will provide them with the necessary freshness and dryness. To do this, they are stacked in a circle with leaves in the middle of the stack. Each layer is sprinkled with hay.
If the finished broom dries out, you can use quick resuscitation. Before the start of the bath procedures, the dry bunch is steamed a little longer than the allotted time and laid out on a heated heater. After completing this procedure, it is recommended to remove all limp and damaged leaves.
Oak
Oak brooms are harvested in the summer. Choose branches in dark places where burdocks grow. These brooms will be durable when used.
Dry in dark, ventilated areas away from sunlight. Subsequently, the product is pressed under heavy pressure. This is necessary for convenient storage.
Stored in rooms with good ventilation, outdoor humidity and temperature. Packed in paper to allow the broom to “breathe” freely. For long-term storage, products are placed in boxes and placed on a wooden surface.
If properly prepared and stored, this oak product can be used for more than two years.
How to collect brooms and how to dry them
Everyone who prepares bath brooms has come to the unanimous opinion that it is necessary to cut branches for brooms after the Orthodox holiday of Trinity. The leaves are still young, but have already collected juice. How to do it:
• Branches must be cut from the middle of the tree. It is there that the branches are thin and the leaves are juicy. • You should not choose single branch branches. It is better that they have 2-3 branches, then the broom will turn out to be fluffy, like a fan. • Oak brooms are harvested either in June or in August-September. Oak trees located near industrial zones are not suitable for these purposes. You need to go deep into the forest, cut branches 50 cm long in the shady part of it. The leaves on the branches should be large; it is with these brooms that you can steam a person well and cure many ailments. • Harvesting deciduous brooms is done early in the morning, as soon as the dew has dried. The day should be clear and fine. • The brooms are tied in several places, forming a comfortable handle, and hung high in a dry, dark, well-ventilated place. It is important that the brooms do not touch each other, otherwise the leaves may trample.
So in a suspended state they need to be dried. Many people keep brooms like this until winter.