Any car owner knows that children can only be transported with special restraints. One of the main parameters on which their safety depends is the reliability of fixation. The Isofix fastening system, developed back in the 90s, is considered the most optimal. Besides this, it is also easy to use. However, if you have not yet had any experience of use, then questions may arise regarding fixing and removing the chair with such a fastening system. First, it’s worth understanding its structure.
How to assemble a siger chair after washing
Content:
During use, a child car seat will sooner or later become dirty. Little passengers often snack in the car, and stains inevitably appear on the seat cover. In addition, do not forget about dust, which gradually accumulates in the cabin, settling on all surfaces. A logical question arises: how to clean a car seat? To do this, you need to take it out of the cabin and disassemble it, i.e. completely remove the upholstery. This can be done without much difficulty. But after washing, many parents are faced with the problem of how to assemble the car seat? Let's figure out how to do it right.
Instructions to help
The task will be greatly simplified if all accompanying documentation for the car seat has been preserved. All you need to do is take the instructions and assemble the car seat according to its instructions. But how many people keep instructions? Most often, “papers” that seem unnecessary at first glance are simply thrown away. If the instructions are lost, you can find them on the Internet.
We disassemble the car seat wisely!
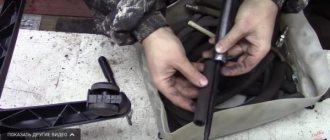
If you have not yet managed to remove the cover from the car seat, do not do it in a hurry. First, carefully inspect the child seat to understand its design features. See how the key elements fit together. Remove covers and belts one by one, for example, from bottom to top. When disassembling the car seat, first of all, disconnect the seat belts (most often this can be done by pressing a special button at the place where they are connected). Then remove the liner and upholstery.
On a note!
Assembling the car seat will be much easier if you capture all the manipulations during the disassembly of the restraint device. It can be difficult to remember and then repeat all the steps in reverse order, so it is recommended to take care of a “cheat sheet”. You can mark the steps on paper, take photographs, or film the entire process with a video camera.
How to reassemble a car seat after washing?
After all upholstery elements have been washed and dried, they can be put back on. It is recommended that you deal with the bottom of the holding device first. Pass the straps through the special holes provided on the cover and seat. Having correctly positioned the belts, you can fasten the cover to the bottom of the seat using the method provided for you (clips, buttons, buttons, etc.).
Next we put the cover on the back. It should tighten easily and quickly. The next step is to pull the straps through a special buckle that holds them together, and then put the soft pads on them. And finally, we pull the ends of the straps into special slots, which are located in the upper part of the back, and connect them to the front straps.
For a reliable and convenient connection, metal clamps are used, which are located at one end of each of the straps. How to assemble a car seat after washing is clearly demonstrated in the video.
How to assemble car seat belts correctly?
While it’s quite easy to figure out the car seat cover, many parents don’t know how to properly assemble the seat belts. It should be noted that the strap fastening scheme for all models is almost the same. Remember that the long straps are intended for the back of the car seat, and the short ones must be secured at the bottom. After you pass the upper and lower straps through the special holes, they should “meet” in one place, where they will be secured with a special buckle.
In the comments you can share your own experience or ask your questions on this topic.
Together we make the world safe and comfortable.
Source
Instructions for assembling a car seat
When disassembling the car seat, it is recommended to record or videotape the process of detaching each part, so that you can then reassemble it in the reverse order. If all the parts have already been washed and difficulty arises, you need to follow the following instructions:
- Take the seat cover and connect it to the straps on the sides and at the fastener locations.
- Pull the cover and make sure that all the parts are placed in their grooves, then fasten the latches.
- Place the cover over the back and slide it over the sides. After tightening, you need to fasten all the buttons.
- Thread the shoulder straps into the grooves located below and attach pads designed to soften friction.
- Bring the straps to the backrest and insert them into the slots, and then fasten them to the chair.
Review of Child car seat SIGER Cosmo blue, 1-12 years, 9-36 kg, group 1/2/3
Good day, dear readers of my review of the SIGER COSMO BLUE child car seat!
Let me start with a little story about my family and my experience with car seats (actually the experience is really “little” :). My favorite baby is a little over 6 months old at the time of writing this review. And already upon discharge from the maternity hospital, we were faced with the problem of transporting the child in the car. But we solved it very successfully by purchasing a three-in-one universal stroller, which includes a car cradle. I recommend it to everyone, it's really convenient. Having arrived by car to any point (for example, to a park, to a dacha), a sleepy child in a car seat moves into a stroller and continues to sleep in the clean air.
But the baby grows, and ours especially, and already at 6 months he weighs almost 9 kg with a height of 72 cm. And winter is coming, and in the fall the clothes are more voluminous, and my son only fits in the car seat with great difficulty. So our family had to think about buying a car seat.
Assembling the child car seat after cleaning
With constant use, the car seat quickly becomes dirty and needs to be cleaned. Before this procedure, the product must be disassembled, and after it - correctly assembled. Assembling the car seat after cleaning requires a certain algorithm of actions. In this case, a number of problems are possible that can be successfully resolved after identifying their cause.
| Contents of the article: 1. The need to wash the product 2. How to disassemble a car seat to make it easier to reassemble later? 3. How to reassemble the car seat after cleaning? 4. Possible problems and their solutions |
Tips for parents
One of the main criteria when choosing a child car seat is its safety and high quality. In order to use the seat for a long time and not encounter problems, you should pay attention to designs from the following manufacturers:
- Siger. The Russian manufacturer produces comfortable child seats that comply with established standards and regulations. All designs are pre-crash tested and tested.
- Zlatek. To create the seats, non-toxic hypoallergenic material is used, which is absolutely safe for children. Injection molding technology reduces costs and reduces costs.
- Stiony. The anatomical shape of the seats with additional padding ensures safety by absorbing the force of impact that occurs during collisions.
- "Bebeton". This brand produces a wide variety of designs for children of different weights and ages. Modern technologies are used in production, which has a positive effect on the quality of products.
- "Mishutka." The most economical and affordable option is the Mishutka chairs, which are an order of magnitude lower than most alternatives. Despite their low cost, they meet safety regulations and undergo standard testing.
How to reassemble a car seat after washing? This is worth thinking about before you start cleaning or washing the seat cover, which ensures the safety of the baby who is in the car while driving. The special design allows the cover to be washed multiple times without damaging it. The visual appeal and integrity of the material can be preserved by proper washing using appropriate detergents. Assembling the car seat in compliance with all the recommendations given in the instructions makes it possible to avoid damage to the fabric and breakage of individual structural elements.
The need to wash the product
Cleaning a child's car seat should be carried out on a regular basis, because a dirty object in the car interior not only looks sloppy, but also accumulates a huge number of pathogens. The fact that the car seat is intended for a child says a lot: there will be crumbs, stains from spilled drinks, and sand from the baby’s clothes. All this together forms an excellent environment for the proliferation of bacteria, which can serve as carriers of dangerous diseases. This is why regular cleaning of car seats is necessary.
How to reassemble the car seat after cleaning?
After the car seat has been thoroughly cleaned and dried, it needs to be assembled and returned to its original place in the car. The algorithm for assembling the product is as follows:
- The upper part of the cover is put on and securely secured with Velcro on the back side.
- The same is done with the other part, and you need to make sure that the cover is put on correctly and does not form wrinkles.
- The soft pad must be returned to its place so that the slots for the straps are opposite each other.
- The central locking belt is threaded through the slots and secured in this position. It is important to check how secure this mount is.
- The upper padding is attached slightly higher than the lower one and should be located just between the slots for the shoulder straps.
- The shoulder straps are threaded through the corresponding slots, and pads are attached to them to reduce friction.
- The side straps pass through the pads of the shoulder straps, and they must also pass through the cover itself and the car seat. After this, they are securely fastened at the back. The mounting bracket can be either metal or plastic, but in any case it must be handled with care.
- It is important to check the degree of tension of the belts - it should be sufficient to securely hold the child, but at the same time comfortable for him.
- The straps coming from the back of the backrest are connected to the straps coming from the front. There is also a special lock for this.
- The seat is assembled and can be returned to its place in the car.
Watch the video instructions for assembling the car seat:
Step by step assembly
After washing, the thoroughly dried components of the cover and seat belts must be returned to their original places, strictly following the sequence of actions specified in the attached instructions. If there is no manual, you should use your own notes or photos taken during disassembly of the structure.
It is important to remember that replacing the cover with any similar product is strictly prohibited. The cover is an integral part of the car seat; for each model it is made in accordance with the features of the device.
Washing is carried out only using special detergents or using a solution prepared from water and laundry soap. Do not use chlorine bleaches or other chemicals.
All actions associated with assembling a car seat after washing are performed in a certain order:
- The cover intended for the base of the seat must be connected to the seat belts, aligned at all points where they should be fastened.
- Pull the prepared cover onto the base of the seat, check the accuracy of all buttons and other fasteners.
- Place the main cover on the back of the seat, carefully straighten it, spreading it along the sides of the structure. Fasten the existing buttons (most models of child car seats have 10 or more buttons).
- Insert the shoulder straps so that they fit exactly into the grooves of the lower latch on the back side of the backrest. Don't forget to wear special pads designed to soften friction.
- Thread the ends of the shoulder straps into the holes on the back of the car seat in accordance with the pre-selected height.
If all recommendations are followed accurately and in strict sequence, the child car seat will be quickly and correctly assembled after washing.
Possible problems and their solutions
Often mistakes and problems happen after the first cleaning of the car seat. If any difficulty arises, you need to know how to resolve it. Let's look at the most common situations.
Incorrect assembly of the car seat
To understand what exactly was done incorrectly and how it can be corrected, you need to carefully read each point of the instructions again and check all the actions performed. It’s even better if you have the opportunity to watch video instructions - sometimes it’s enough to see how to do it once to understand your mistake. Under no circumstances should you use an incorrectly assembled seat - this can lead to child injury, even when driving quietly in a car.
The straps are located inconveniently
It is clear that the seat belts are located at the level of the baby’s shoulders. The inconvenience may consist in their tension being too strong or, conversely, they do not stay in place. Most likely they are not connected correctly. It is necessary to check all connections again and adjust the degree of tension of the belts for the child.
The child is uncomfortable sitting in the chair
This defect may also be due to improper assembly, especially if the child did not complain before cleaning. In this case, you also need to disassemble the chair and reassemble it, following the instructions exactly.
Child takes off seat belts
According to established rules, the locking device must be such that the child cannot open it independently. If it does this, it means the straps are not fastened correctly or are too loose.
The covers are deformed
If this happens, it means that the product was washed using the wrong program. If the deformation is very severe and hard folds form, you will most likely have to purchase a new cover - the child will not be able to sit comfortably on the crumpled material. You can, of course, try to use the chair without covers, but then all the dirt will quickly penetrate inside and it will not be so easy to wash them off.
Reassembling the car seat after washing is not difficult if you do it carefully and slowly, following all the steps and securing all the elements correctly.
Source
Actions before cleaning
Before assembling a child seat for a car after washing, you need to familiarize yourself with the design features and remove the cover without damaging individual small parts and fasteners.
During operation, a large amount of dust accumulates on the surface of soft parts and belts and other contaminants appear. This can cause an allergic reaction in the baby.
Removing the case and straps is quite simple, but returning all the components to their places is not always possible. Therefore, some parents refuse to wash and are content with only superficial wet cleaning. However, such treatment is not enough to eliminate severe contamination and maintain the health of the little user at the proper level.
Before washing, you should carefully study the instructions, which provide clear instructions and describe the procedure for:
- with disassembling the device;
- removing the cover;
- belts
Some manufacturers do not care about the presence of this description, and therefore parents should write down or take step-by-step photographs before the first wash to remember the sequence of attaching individual parts. It is important to return all components to their previous position in strict sequence, otherwise there will be no reliable fixation of the small passenger in the seat for transporting him.