Pros and cons of drying dill
To harvest harvested dill bushes, two common methods are used: freezing and drying. Many people use the first method of storing greens, as it allows them to preserve some of the beneficial properties of plants. However, it is better to use another method - drying. By drying ripe dill, it will be possible to preserve much more vitamins and other useful components. Essential oils are also preserved in dried herbs.
The disadvantages of drying plants include the complexity of this procedure, since not every vegetable grower can dry the crop correctly.
Oven drying
Today there is an oven in almost every apartment and house.
Instructions:
- Preheat the oven to 40 degrees.
- Place the dill on baking sheets lined with wax paper and place in a warm oven.
- Leave the door slightly open - you can insert a matchbox or plastic bottle so that it does not close at all. Then, thanks to natural ventilation, the moist air will escape and drying will proceed more evenly.
- It takes 2 to 4 hours to completely dry the dill in the oven.
We recommend: How to remove a broken key from a door lock
Important: Only at +40 will the dill dry without losing its aroma and will not turn yellow. therefore, increasing the temperature to speed up the process is not recommended.
If several baking sheets are installed, then change their places every hour, or better yet, twice as often. Mix the greens carefully, check: the branches should crumble when rubbed in your fingers, leaving your hands dry.
How to prepare dill for drying?
Before you start drying the harvested greens, it is recommended to prepare them in advance. To do this, all the dill is thoroughly washed in a small container with warm water. It is then placed in salt water for 5-10 minutes to release toxins from the plant.
When the dill is washed, wipe it with a waffle or regular paper towel and lay it out on the table to dry completely.
How to dry dill at home for the winter
How to dry dill correctly so that it does not lose its qualities and remains green? It contains a large amount of vitamins, microelements and essential oils. To maximize the preservation of all useful components of the product, choose a convenient drying method for yourself.
Attention! Do not dry greens in direct sunlight to avoid loss of nutrients and taste.
There are several methods for drying spices, let's look at them in more detail.
On air
The most common method for drying greens is air drying . Using this method, greens are dried both vertically and horizontally.
Vertical drying
To dry in a vertical position, collect the prepared twigs in small bunches of 5-6 pieces . Carefully tie each bunch with thread, without damaging the stems. Damaged stems will begin to rot during the drying process, which will spoil the appearance and taste of the product.
Next, hang the tied bundles at a short distance from each other in a dark, ventilated room . In this form they will dry until ready. Make sure that there are no rotting twigs in the bunches during the drying process. If they do appear, remove them immediately.
Horizontal drying
To dry the greens horizontally, spread the prepared branches in a thin layer on paper towels. In this form, both chopped greens and whole twigs are dried.
Place paper towels with dill in a ventilated, dark place , away from direct sunlight. Stir the greens occasionally to ensure even drying. In a few days, the dried dill will be ready.
In the oven
Another way to dry greens is in the oven. Since dill is a very delicate spice, at high temperatures it will burn and lose its beneficial substances and taste. Therefore, greens should be dried in the oven at low temperatures, no more than 40°C. In this way, both whole branches and chopped dill are dried.
To dry using this method, place the prepared greens in one layer on a baking sheet lined with baking paper. This is necessary so that the dill sprigs do not come into contact with the metal, which can cause them to darken. Place the pan in the oven, leaving the door slightly open. This will allow air to circulate, drying out the greens. Every 30-60 minutes, remove the pan from the oven and stir the dill, checking it for doneness.
The drying time of the product in the oven takes from two to four hours.
Drying greens in the oven
In the microwave
The fastest drying method is in the microwave. Both whole and chopped dill are suitable for this method.
Take a disposable paper plate or a regular plate , previously covered with a paper towel. Place the prepared product on a plate, cover it with a paper towel and place in the microwave at maximum power for three minutes.
After this time, remove the dill from the microwave and determine its readiness. If the greens are not yet completely dry, stir them and place them back in the microwave for the same amount of time at maximum power.
In an electric dryer
An electric dryer (dehydrator) is a very popular device in housewives’ kitchens. One of its functions is drying herbs. To dry the dill in it, spread the prepared herbs in a thin layer on a tray and turn on the “Herbs” function . If this function is missing, simply turn on the electric dryer at 40°C. With this mode, the greens will be ready in three hours.
In a refrigerator
Another way is to dry the herbs in the refrigerator. This method is the longest, it takes 2-3 weeks.
Place whole or chopped dill on a flat dish or cutting board . Cover it with a paper towel or napkin and place it in the refrigerator on the top shelf. Don’t forget about the dill for the entire three weeks: periodically remove it from the refrigerator, turn it over, and if you find damaged branches, remove them to avoid spoiling the rest. Wipes should also be checked and replaced if necessary.
How to check readiness
The readiness of dried dill is very easy to check . Take a sprig or a pinch of the crushed product and try rubbing it between your fingers. If it crumbles, it means the drying is ready. You should continue the process if the dill becomes wrinkled in your hands.
It will be interesting:
A useful way to combat excess weight: dill for weight loss
How to use dill for high blood pressure
In what form should you dry dill?
It is recommended to determine in advance in what form to dry the greens, since the features of its storage depend on this.
Drying chopped dill
First you should start preparing the place for drying. To do this, a flat surface is covered with cloth or special wrapping paper. Do not cover the surface with newspapers, as the branches will become saturated with printing ink.
See also
How and when to plant dill before winter so that it grows largeRead
After preparing the place, all the collected dill is finely chopped and laid out on the surface. It is not recommended to place chopped greens in the sun, as this will cause them to quickly deteriorate.
Drying dill sprigs
Most housewives prefer not to chop the dill, but to dry it entirely. Many of them consider this method to be the best since it does not require much time or effort. To do this, just collect ripe greens from the garden and thoroughly wash them from dirt. Then the branches of all the collected bushes are broken off and laid out in the sun so that they dry faster. When the plants are well dry, the leaves are plucked from the branches and placed in a container for further storage.
The main advantage of this method is that the essential oils from dill, which is dried in this way, will evaporate more slowly.
How to dry dill at home
Now let's move directly to the question of how to dry dill at home. Have kitchen paper towels ready to dry the greens. Do not use magazines or newspapers, because printing ink is toxic, and wet dill will absorb all these harmful substances, which is definitely not suitable for us. Dry (not wet) greens can be simply laid out on the table surface, without any bedding.
Spread the chopped dill or whole sprigs on paper towels, not very tightly. It’s better to take more paper so that the greens have more space, and they dry well and don’t stick together. Another important point: before drying the greens, find the most ventilated place in the house, where there is no sun. Many people mistakenly dry dill on the windowsill; it withers in the sun, loses its color and taste. Of course, dill will dry out much faster in the sun, but, as mentioned earlier, it will lose color and taste. Therefore, it is better to spread the greens in the dark (or shade) and wait a few days.
The readiness of dried herbs is very easy to check. You need to crush the leaf (twig) in your hands, it should crumble, making a crunchy sound.
Another way to dry dill if you want to preserve the whole greens. It is necessary to tie the dill in bunches and hang it on a thread in a ventilated, dark place until ready. This way the branches (stems) will remain intact. We remember that we do not dry the bunches in the sun, we hide them where it is dark and there is ventilation!
Then the greens dried on the stems need to be chopped. If you want your seasoning to be the same as in the store, chop the herbs by rubbing them through an iron sieve (see photo). It's very simple, but the result is wonderful!
Now we know how to dry dill in sprigs and chopped.
How long to dry dill?
It is very important to determine the optimal drying time for harvested greens. If you take too long to dry dill leaves, they will spoil.
Experienced gardeners recommend drying dill for no longer than three hours in cloudy weather. On sunny days, the duration of this procedure is reduced to two hours. Also, the duration of drying depends on the number of plants located on the drying surface. If the layer of greens is too thick, it will take longer to dry.
Dry in the fresh air
If the weather outside is good and it’s hot in the summer, then it would be right to dry the dill without additional equipment - you won’t have to pay for electricity or gas. The method works both in the country and at home.
It is recommended to use pallets with a perforated bottom - plastic or metal. If you don’t have such a pallet on your farm, it’s very easy to make a replacement. The gauze needs to be pulled over the top of the box so that there is a void inside that allows air to pass through.
What to do:
- Spread the dill in a thin layer over a tray or cheesecloth.
- Leave for several days in a dry, shaded place.
We recommend: We tell you how Coca-Cola, potatoes and a battery effectively clean a rusty barbecue grill
You should not lay it out in the sun if you want the dill to remain green. Overheated in the sun on a hot day, it may well turn yellow. In addition, thick branches can dry out on the outside and remain damp on the inside. And this will inevitably lead to the formation of mold, and all the work will go down the drain.
In rainy weather, it is worth bringing the pallets into the house or at least under a shed - just not in the garage, otherwise the greenery will become saturated with the smell of gasoline.
Basic methods for drying dill at home
There are five main methods of drying dill that you should familiarize yourself with.
Drying in the fresh air
Most often, the harvested crop is dried outside. To do this, 4–6 bunches of plants are hung on the canopy with their leaves facing down. It is very important that they are not exposed to sunlight, which can damage the dill leaves. The top of the grass can be covered with a cloth to protect it from dust.
How to dry dill in the oven?
Some people do not have the opportunity to dry the leaves outside and therefore use the oven. When using the oven, you need to be careful not to accidentally spoil the greens. The temperature in the oven should be within forty degrees.
To dry the herb, place all the branches on baking sheets and place in the oven for 20–25 minutes. Then the greens are taken out and the degree of dryness is checked.
See also
Description of the Alligator dill variety, features of cultivation and careRead
Drying greens in an electric dryer
The easiest way to prepare dill for the winter is for owners of electric dryers, since this device greatly facilitates the drying process. To prepare the grass, just lay it out on dryer trays and select the appropriate mode with a temperature of no more than 35–40 degrees. After half an hour, all the leaves will be well dried.
Drying dill in the refrigerator
Another common harvesting method is drying in the refrigerator. To do this, the entire dill is laid out on a plate and covered with a piece of cloth. The plate with the herb is then placed in the top of the refrigerator at a positive temperature. Drying time is 1–2 weeks. During this time, all moisture will come out of the leaves.
How to dry greens in the microwave?
Sometimes microwaves are used to completely dry the herbs. When using this method, the harvested crop is laid out on any flat container with a napkin on the surface. The laid out greens are covered with another napkin, after which the container is placed in the microwave for five minutes. If the stems have not dried during this time, the procedure is repeated.
Preparing dill for drying
For the procurement process to be successful, you need to properly collect and prepare the raw materials. It is better to collect dill in dry weather in the morning, but so that the dew has already disappeared. Otherwise, the greens may turn black or a putrefactive process will begin to develop due to the presence of moisture.
The collected raw materials are carefully separated from the roots and sorted. Yellowed and damaged branches, as well as foreign debris, are removed. Afterwards, rinse the dill in cold water and leave to drain. Stems, leaves, umbrellas are prepared for drying separately.
The twigs can be dried in two ways: whole in bunches or finely chopped. The first option is considered more effective when the branches are dried whole, and then the leaves are separated from the stem and ground. This way, the essential oils in dill are better preserved, which means the aroma of the seasoning will be more intense.
Basic drying methods
Dill greens are very delicate and if you overheat them, they will instantly turn yellow and lose all their beneficial qualities. Therefore, when drying, you need to choose the most gentle temperature regime and a suitable place.
We advise you to study the vitamin composition of dill in detail.
Outdoors
If you are going to dry chopped dill, then spread it in small portions on clean white paper in one layer. For drying, the workpiece is placed in a ventilated area. The drying process takes 3–5 days, during which the dill must be turned from time to time so that it dries evenly. Greens laid out on paper can also be dried outside, but then you need to take care of protection from wind and insects.
If the branches are dried as a whole, then they need to be collected in bunches and hung by the tails in the shade or in a well-ventilated area. It will take several days to dry.
In the oven
When drying in the oven, you need to remember that dill contains a lot of oils that can instantly evaporate at elevated temperatures, so it needs to be dried at a minimum temperature, up to +40°C.
Important! Do not dry dill near heating systems or in very warm rooms, as it loses its taste and other properties.
The greens are laid out on a baking sheet, in bunches or chopped, on parchment paper. The door is left ajar to allow air to circulate. Every half hour or hour you need to remove the baking sheet and stir the herb, checking it for readiness. In general, the entire process can take 2–4 hours.
In the microwave
This method allows you to dry the greens quickly. The whole process takes about 6 minutes. Chopped or whole spice is laid out on a flat plate lined with a paper napkin. Another layer of napkins is placed on top of the grass. The microwave is set to maximum power and time - three minutes. After this period of time, the top napkin is removed, and the greens are checked for readiness and mixed. If necessary, leave for another two to three minutes.
Did you know? The Latin name for dill, Anethum, is derived from the Greek “aneton” meaning “penetrating”, “fragrant”.
In an electric dryer
In an electric vegetable dryer, dill is dried at a gentle temperature. It’s good if your device has a “grass” mode. Otherwise, you need to select the temperature yourself. How much to bet depends on how quickly you want to receive the finished product. But it is not recommended to raise it above +40°C. At this temperature, the drying process takes 3-4 hours. If lower, it may take longer.
Video: Drying dill in an electric dryer
In a refrigerator
You can dry herbs in the refrigerator. To do this, place it on a flat plate in a thin layer and cover with a napkin. The container is located on the bottom shelf of the refrigerator compartment. Drying takes two to three weeks.
Preparing greens for drying
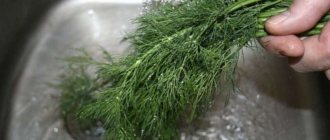
When the raw materials are collected, they need to be washed. This is necessary to clear the greens of soil and small insects. Use cool, clean water. Leave the greens in the water for 5-10 minutes, then place the vegetation on a cotton towel so that the moisture is easily absorbed. You should not use newspapers or magazines - printing ink will remain on the raw material.
Cutting is done using a knife or scissors. The plant does not need to be uprooted. The stems are also not added to food due to their toughness. A suitable part of the crop is soft bunches of rich green greenery. Darkened, yellow, limp twigs are not used for drying. Spoiled dill can spoil good raw materials with an unpleasant odor.
Washing greens
Drying chopped dill
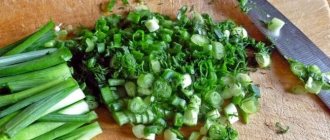
Chopping greens is preferable for those who do not tolerate tough twigs in dishes. The chopped stems are mixed with soft bunches and are practically not noticeable in food. Dill, peeled and chopped in advance, is subjected to horizontal drying. In this case, the layer of greenery should not exceed 4 cm, otherwise putrefactive processes will begin to develop.
Chopped dill must be stirred regularly so that it dries evenly. Please note: you cannot cut the raw materials too finely; as the moisture evaporates, the greens will turn into dust.
Chopped dill
Drying with twigs
Chopped twigs are easier and faster to prepare. It is enough to pick the fluffy part of the dill, peel, rinse, and then choose a drying method. When the dill dries, just rub it with your fingers, after which the greens will crumble into small pieces.
Drying with twigs is the preferred option, as the rich aroma that the essential oil gives to dill is preserved. In addition, harvesting with twigs takes less preparation time and also increases the number of drying methods.
Bunch of dill