Mechanical damage and ways to eliminate it
Knowing how to fix a hand or stationary blender, you can save a lot, because most problems do not require large investments. In some cases, mechanical damage can block the operation of equipment. For diagnostics, you can use different methods, such as: disassembling the blender bowl or body.
Leaking engine gasket and bowl
If during operation a leak develops between the body and the bowl, do not hesitate to repair it. To do this, apply the following algorithm:
- remove the bowl from the body;
- unscrew the spindle;
- replace the old gasket with a new one.
When repairing a Scarlett blender with your own hands or another brand, please note that the spindle has a left-hand thread
Damage to the lid latch mechanism or attachment
If the lid latches or attachments break during operation, they cannot be repaired. The problem can only be solved by purchasing a new component.
Please note that not every manufacturer offers replacement parts for their models. Take this point into account when choosing equipment, otherwise if the bowl, lid or nozzle fails, you will have to buy new equipment
Damage to the blender body
If the blender body is damaged during operation, it cannot be repaired. The problem can only be solved by purchasing new equipment.
Damage to the blender jar
Due to careless use, the bowl latches, which not only hold the container, but also operate the device, may fail. There is no point in trying to repair it, since it cannot be returned to its previous state. The problem can only be solved by purchasing a new bowl.
Leg repair
Most models, ELENBERG BL-3205 G, are equipped with a leg that cannot be restored. If it is made of metal, you can try to bend it manually. Even after returning to its previous shape, the leg will no longer work as well as before.
Please note that the monolithic leg cannot be restored. If it breaks, you will need to buy a new one that is compatible specifically with your device model.
Gearbox repair
Repairing a blender gearbox is a problem that you may encounter in cases where the equipment operates beyond its capabilities. This problem occurs due to overheating: the heated shaft melts the gear seats, which leads to its jumping off. To eliminate the breakdown, the device must be disassembled and visually inspected. If the gear is intact and just slipped off, it needs to be put back by replacing the fasteners or using superglue.
If during the repair you find that the gear is broken, you need to purchase the same one. No analogues or similar models will fit.
Blender Chopper Cover Repair
The repair is not difficult, you just need to follow these steps to disassemble the blender:
- First you need to pick up and remove the outer coupling;
- Then the lower coupling is removed;
- After this, use a copper tube to knock the gearbox out of the cover;
- If the gearbox is glued, then you need to use other methods;
- After this, the old gearbox must be replaced with a new, serviceable gearbox-shredder.
Most often, the gearbox becomes unusable due to the accumulation of rust. This is not a serious breakdown, which is very easy to fix with your own hands.
How to disassemble a Brown blender (Scarlett, Polaris, Philips, Bosch)
We immediately want to warn our readers. If your blender (mixer) refuses to work fully for reasons unknown to you, and its warranty period of use, which is mandatory provided by a trade organization for products of well-known brands of kitchen appliances, in our case - a blender, has not expired, there is no need to pretend to be home-grown Lefty or Kulibin!
Just take it (the mixer) to a service center, where the device will be fixed if you provide the appropriate warranty. If this is not possible due to the fact that the device has honestly and efficiently worked for the period specified by the manufacturer of a well-known brand in the warranty (usually from 1 to 2 years), simply buy a new one. Moreover, these devices are not very expensive, and uninterrupted operation for 1.5-2 years is a very decent period for such equipment.
We will, of course, give an example of how to disassemble a Philips blender (of another brand), but we warn you in advance. In most cases, you are unlikely to be able to assemble the device in its original form. Due to the fact that individual companies (Brown, Philips, etc.) produce disposable models. So, when choosing an answer to the question of how to disassemble a Brown blender, we came across an example in which the user of the named device had to disassemble the blender by sawing it. It was not possible to more accurately divide the device into its component parts due to the fact that some elements of the mechanisms are sealed into the case at the factory and do not imply free access.
How to disassemble a Philips blender
Before disassembling the device, carefully read the instructions supplied with it. Sometimes it indicates how to disassemble a Bosch, Philips, Scarlett, Polaris, etc. blender. Prepare the tools necessary for work:
- Various types of ends and screwdriver thickness;
- Pliers;
- A knife or a hard, thin metal plate replacing it;
- Magnet for removing small parts from the case.
Disassembly of the device:
- We unscrew all the screws available for this, remembering their location.
- We remove the released components of the housing.
- We carefully study the elements remaining in the same place. It is possible that they are connected through latches.
- Having found the latch locks, carefully press them out with a suitable tool.
As a rule, after this, disassembly of the case is completed, and its mechanism hidden inside is provided for subsequent actions to replace components and assemblies.
To be honest, we don't really understand the purpose of disassembling a blender yourself. Since replacing an engine due to its cost is not a financially profitable operation, as are smaller and less important parts. You will still have to buy them from a company service center. You won't find them on the open market. The only motivation for disassembling a failed blender can only be the user’s natural curiosity or his desire to use the working parts in the future. But already in devices for other purposes. How to disassemble a blender - watch the instructions in the video.
How to disassemble and repair a Polaris blender with your own hands
VIDEO ON THE TOPIC: #98 BLENDER REPAIR
An “Online Consultant” is available on the seller’s website. To go to the website, click “Go to store”. “One-click ordering” is available on the seller’s website. A free Product Catalog number is available on the seller's website. Shown from products.
The blender is a motor equipped with an attachment. Nothing complicated. The bowl with the knife is placed on the output shaft of the electric motor, and the engine lock is switched off. It is not difficult to disassemble the blender, the main thing is to reassemble it later. Those who doubt it, read on to learn how to repair a blender with your own hands.
The most detailed description: do-it-yourself polaris phb a blender repair from a professional technician for your readers with photos and videos from all corners of the web on one resource. They refused to take it to the warranty because it would be easier to wait a month, it would be easier to buy a new one. It should be noted that the blender is less than a year old.
A blender is an indispensable tool in the kitchen of any housewife. Like all household appliances, sooner or later a blender can fail. If the product warranty has not yet expired, it will be most profitable to have the device repaired by the manufacturer. Or buy a new blender if it is not possible to repair it at the expense of the company.
For curious people who do not want to purchase a new kitchen appliance, there are instructions on how to disassemble various models of Polaris blenders with your own hands.
What parts can fail?
The features of blender repair directly depend on which component has failed. Some parts can be repaired, while others must be replaced.
Filters
Modern types of kitchen blenders have a filter in the lid. Additionally, you can use a mesh filter by installing it in the bowl.
Diode bridge
Budget blender models have one rotation speed, and the electric motor in them is powered directly through a diode bridge. A faulty part causes the engine to slow down or not start. To use the device in normal mode, you will need to perform diagnostics and, if necessary, repair or replace the diode bridge.
Transformer
The role of the transformer in a kitchen blender is to control the voltage level that is transmitted to the electric motor.
Generator
The generator is one of the key internal components and works in conjunction with other mechanisms, including the engine. It is possible to detect a generator malfunction only by disassembling and diagnosing the equipment.
Key transistor
The key operating mode of the transistor is one of the simplest and most common. Most of the time, the blender transistor is in two states: cutoff and saturation. A transistor malfunction results in the device not responding after switching on.
Rectifier output diodes
To check the functionality of the rectifier output diodes, a standard testing procedure is carried out. In many types of blenders, the motor is connected via a diode, so the ability to operate the device depends on the correct operation of the component.
Varicaps
Varicaps are semiconductor diodes. They change the capacitance indicator in proportion to the magnitude of the applied reverse voltage.
Circuit breakers
If you use the blender continuously, the fuse may burn out. In this case, it is not allowed to use the device until repair or replacement is carried out. Otherwise, you can provoke new breakdowns.
DIY blender repair ↑
Housewives are often faced with a situation where the blender has stopped and the blade does not spin. It happens that the knife is spinning, the motor and speed switch are working properly, but when loading products, the device runs “idle” without grinding them. In many cases, repairs can be done yourself. Let's figure out how to do this.
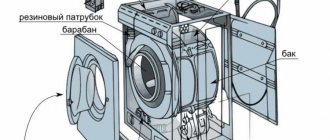
Scheme of a stationary blender
(KMu: take a screenshot of the 1st picture with the names of the parts)
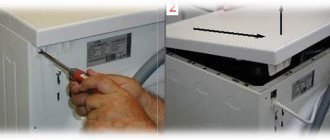
Before disassembling the blender for repairs, you should carefully read the technical documentation. Bosch, Philips, Scarlett, Polaris models may come with disassembly instructions. It is best to follow the manufacturer's recommendations. Otherwise, there is a high risk of permanently breaking the device.
Blender Braun
For disassembly and repair you will need the following tools:
- a flat thin screwdriver (if such a screwdriver is not available, it can be replaced with a narrow knife);
- long screwdriver;
- pliers;
- a magnet to get out small parts if you can’t remove them with tools;
- superglue or any other reliable adhesive that can be used to restore the integrity of the seams if they are damaged.
Polaris disassembly
The procedure for disassembling a blender with your own hands:
- Remove all screws, remembering or marking their locations.
- Remove all elements that are possible.
- Parts that could not be removed must be carefully inspected. They can be attached with latches. In this case, they can be removed by releasing the latch locks.
- When the case is disassembled, you can begin checking the functionality of parts and making repairs.
Philips disassembly
The most common models), Vitek ("Vitek"), Polaris ("Polaris"), Philips ("Philips"), Bosch ("Bosch") usually require disassembly, so they can be repaired with your own hands and replace the nozzles. Let's consider in what cases independent repair is possible.
- Replacing the knife. If the knife becomes dull, it can only be replaced, because it cannot be sharpened. New knives are sold in specialized and hardware stores. To replace, remove the old part by wrapping it in a towel and unscrewing it. After this, insert a new knife (it may differ in appearance from the old one) and secure it.
Old and new knives
- Speed controller. In stationary models, it may be difficult to check the switch, because Often there is a locking function for switching on without a bowl. By the way, the problem of stopping the operation of the device is also associated with blocking. If you suspect a malfunction of the speed switch, you need to unsolder it, check each position in full, and repair it.
Speed controller
- Stop work. If the device does not turn on, first check and, if necessary, replace the cord. If it turns on and buzzes, but does not work, then you should disable the lock. Inoperability when the lock is released most often indicates a burnt-out motor winding. It can be replaced, but this is an expensive repair, so most often it is more profitable to just buy a new blender.
Philips model repair
Electronics related problems
Troubleshooting the “filling” is a much more complex process than simply replacing knives. In order to carry out repair work, you will have to disassemble the system, but here everything depends on the type of blender.
It is not difficult to disassemble the submersible model - just determine where the latches are and, by pressing them, disassemble the case.
To disassemble the stationary model, you need to arm yourself with: a Phillips and flat-head screwdriver, pliers, and tweezers. Gradually disassemble the structure, getting to the element you need.
Failure of the speed controller
Only a great expert in electronics and radio engineering can repair the speed controller at home. In the absence of such knowledge, it is not recommended to carry out repairs yourself - you risk further damaging the system.
However, before you give the device to a technician or service center, make sure that the problem is with the regulator. Set the blender to minimum mode and, gradually increasing the speed, listen to whether the sound changes. If not, you cannot do without the help of a specialist.
There is a buzzing sound, but the knife does not spin
We've already talked about how the blade can stop rotating when the blender is full, but what if the blender is empty and the device still doesn't work?
To begin, press the power lock. In this case, you will have to remove the bowl (if necessary) and use an auxiliary object to carefully press the button located under the blades. If everything is in motion, then the problem is solved.
If this does not help, the breakdown is much more serious. Most likely, the motor winding has failed. In this case, you either contact the service center with a request to replace or repair the device, or buy a new blender, since repairing the old one will cost many times more.
The device “shows no signs of life”
So, you turned on the device, pressed the power button and... nothing happened. No, your blender is not dead, it can still be repaired and we will do it now.
First, let's check if the socket is working and if the wire is broken. Checking the suitability of the outlet is not difficult - just plug another device into it and turn it on. If the problem is not in the socket, we move on to inspecting the wire. Turn off the power and disassemble the case. Follow the cable: it stretches to the power block to which it is screwed or soldered. Using a special screwdriver with an indicator or any other monitoring device, check whether there is voltage at the junction. If it is missing, you will need to replace the wire with a new one.
If there is voltage at the contact point, it is necessary to check the integrity of the fuse by also measuring the voltage at its ends. If it is missing, the fuse will have to be replaced and then the system will be checked for functionality. The fact is that the fuse can instantly burn out, then you need to take the device to a workshop.
Is there no fuse or is it in working order, but the motor is still silent? Check the board: are there any bulges or broken tracks on it? These damages indicate that the blender is burnt out and cannot be restored.
If you have any questions, you can contact the consultants of the Spare Parts for All store - they will tell you how to carry out repairs, what part to choose and how to place an order.
Video: disassembling and repairing a blender ↑
To ensure that you have to disassemble, check and repair blenders with your own hands as little as possible, you should follow simple rules for safe operation. Check that the attachments are securely fastened before starting work, do not turn on the device without a bowl, do not overload, handle the wire carefully (make sure it does not bend or twist). The main thing is to follow the operating instructions. These simple measures are enough to ensure that the equipment serves for many years without repairs.
Lath structures on the ceiling are used to decorate various premises, both residential and public. The kitchen is no exception. Popularity of this material.
We install a slatted ceiling with our own hands: a master class with video instructions
Someone becomes an adherent of this style at first sight, someone is annoyed by its excessive sweetness and “cuteness”, but is completely indifferent to shabby.
DIY shabby chic kitchen: 21 interior design photos + video
The financial costs of furnishing a kitchen and bathroom often account for the lion's share of the cost of renovating an entire apartment or private house. No wonder, after all.
Using a blender helps when preparing large quantities of dishes. Incorrect operation, external damage or third-party factors can lead to equipment failure. Features of blender repair depend on the type of fault and the design of the device.
Elimination of minor breakdowns
Next, you will learn how to repair a blender with your own hands and that this will only require basic knowledge from the field of electrical engineering and electronics, some tools and desire.
Information: there are models of immersion blender with a molded plastic body, the disassembly and repair of which is not possible.
Blender blade repair
It is unlikely that you will be able to sharpen a blade for a blender or chopper yourself unless you have a special tool and the proper experience. Especially if these are knives in a dicing attachment, but anyone can replace a dull knife:
- check that the device is not plugged in;
- remove the bowl from the stationary blender;
- on some models the knife is secured with nuts; remove them using a wrench;
- use a cloth to grab the knife;
- unscrew, taking into account that the thread is left-handed.
Check the contents of your blender; there may be a spare blade there. Otherwise, buy a new one based on your model.
It is a rare case that you will need to disassemble the bowl to remove the knife. The steps are the same, but it is worth replacing the oil seal at the same time.
And it’s certainly not a repair case - this is not a collapsible bowl. Then you just need to throw it away and buy a new one, but here it is worth considering the price issue. Maybe it's better to buy a new blender?
Cleaning required
Important! Do not put metal objects such as spoons, forks and knives into the blender.
Any cleaning should begin by disconnecting the device from the mains:
carefully remove the bowl from the main body; unscrew and remove the ring nut, which is located under the blade holder; carefully release the knife from the stuck object; check the integrity of the knife (most likely it needs to be replaced with a new one); wash all parts with warm water using a non-aggressive detergent; dry thoroughly and assemble; check the work.
How to disassemble the Polaris blender attachment
To repair the blender attachment, you need to disassemble it and remove dirt. This seemingly simple task is complicated by the fact that it is not clear how to disassemble the nozzle, since there are no external fastening elements.
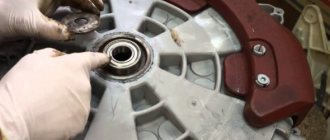
Many immersion blenders have an additional metal washer in the attachments on the blade side. In order to disassemble the nozzle, you need to unscrew the knife and, using a sharp object, first remove this washer. Then, using a hammer on the opposite end of the axle, remove it with the bearing from the base.
But I was unlucky; the metal sphere on the knife side was non-separable and was welded to the stand of the nozzle body. Taking this into account, it became obvious that the axle and bearing are removed through the hole on the side where it connects to the motor part of the blender. Additionally, this was confirmed by the presence of protrusions on the shank of the axis for fixing it in the blender body.
Therefore, the knife was unscrewed first. To do this, use one pliers to hold the axle by the shank in the place of the protrusions, and with the second pliers, grasping the knife and rotating it clockwise, the knife easily moved out of place and was unscrewed. Please note that a left-handed thread was cut at the base of the knife and on the axis, so the knife must be unscrewed clockwise.
Next we had to remove the spherical plastic part. I didn’t know how it was secured, so I grabbed the metal sphere from the side of the knife with one hand, and the plastic part with the other hand, and tried to unscrew it with force, believing that it was fastened to a thread.
The cup gave way and became detached. It turned out that it was fixed to the nozzle tube using plastic latches.
Additionally, a washer was inserted into this cup, also with latches, apparently for secure fixation on the nozzle tube.
This photo clearly shows the rectangular holes on the nozzle tube for fixing plastic parts.
Next, the nozzle was installed in a metal cube with a hole for moving the axis. For this purpose, you can use a vice or a wooden board, having previously drilled a hole in it.
Next, using a metal spacer with a diameter smaller than the diameter of the axle, the axle was knocked out with hammer blows.
Now there is an opportunity to clean the bearing and seals from any processed products that have gotten into them. For this purpose, it is best to use cotton swabs soaked in a solution of detergent or alcohol.
Quite a lot of dirt was removed from the bearings. You need to clean until the cotton wool on the sticks remains clean.
The axle in the contact area with the oil seal and bearing was also covered with dirt, which was easily removed with a rag soaked in alcohol.
Despite the considerable pressure applied when knocking the axle out of the bearing, it was not possible to remove it. And the force applied to the bearing was large, as evidenced by the broken expansion washer. I couldn't figure out how the bearing was secured deep in the tube, so I couldn't remove it.
Features of disassembling blenders from different companies
Brown, Polaris, Redmond, Philips, Scarlet, Bosch models are widely used in everyday life. Some of them are disposable and cannot be repaired. Their disassembly is not provided.
The Brown technique is disassembled as follows:
Using pliers, remove the cartridge (holder for nozzles). A thin screwdriver is inserted into the seam between the body and the outer shell. Lightly hit the screwdriver with a hammer, thus knocking out the weld. This action is continued until the engine begins to move freely inside the housing.
Everything is done with great care so as not to destroy the fasteners. Do not use a thick screwdriver; it may damage the outer shell of the case. Press the clamps and remove the engine
Typically the control board is pulled out along with the motor. If it does not give in, it is pulled up with pliers by the lower edge. There are latches inside to secure the lid. They are folded along the arrows. Use a screwdriver to pry off the speed control cover. Unbend the power cord fastening clips located inside.
Polaris models come in collapsible and non-dismountable types (for example, PHB-0713AL), the parts of which are glued or soldered.
The elements of collapsible blenders are separated as follows:
- unscrew the screws;
- use a blade or thin knife to unfasten latches and plugs;
- carefully separate the elements.
The glued parts are cut, but such a blender will not be able to return its original appearance during assembly.
For Redmond equipment, all fastenings are locking. They must be separated carefully, otherwise discontinuities will appear at the joints during assembly.
Popular Rendmond models are disassembled as follows:
- remove the upper metal ring by bending the internal latches;
- With a little effort, remove the adjustment knob, holding the plastic axis of rotation and the spring;
- unscrew 4 screws;
- pry up and remove the lower ring, carefully pull off the metal protective casing;
- process the glue seam around the circumference of the body with a knife and remove the cylindrical part;
- remove the guide sleeve;
- pull the motor out of the housing along with the board.
Philips models are disassembled according to the following instructions:
- on the side where the speed control knob is located, disconnect the decorative cover by prying it off with a knife or screwdriver - it is secured with double-sided tape;
- the next cover, secured with self-tapping screws, is removed using a screwdriver;
- remove the plastic gear by hand;
- Unfasten the protective cover from the reverse side; to do this, press the latching buttons with a screwdriver and bend the eyelet with a knife;
- Next comes the glued shaped cover that protects the motor - it is removed with a knife.
At the final stage, the motor and control board are removed.
Submersible Scarlet models are disassembled in the following sequence:
- pry up the speed control cap with a screwdriver and remove it from the rod;
- unscrew the 4 screws that secure the cover;
- pull out the connecting sleeve covering the engine;
- remove the motor and board.
The engine is the most vulnerable part of these devices.
Parts of Bosch stationary blenders are dismantled using a wrench and pliers.
Disassembly of submersible varieties has the following features:
- fastenings on the outer surface - fragile plastic latches;
- internal parts can be fastened with bolts, self-tapping screws, screws.
Trouble-shooting
As mentioned above, you can fix the breakdown yourself only by replacing faulty components. To do this, you need to carefully inspect all elements and connections of the control board for swelling, oxidation or melting. It is also advisable to check all suspicious nodes with a tester.
First of all, you should pay attention to the fuse.
The Bosch MSM 7700 is equipped with a self-resetting thermal fuse that opens the circuit when heated above 120 degrees Celsius, protecting the parts of the immersion blender from overheating and damage.
This fuse is designed for 100 operations, after which the device itself returns to its original state after some time and continues to function normally. If the fuse life is completely exhausted, it must be replaced with one of similar characteristics.
The blender has stopped and the blade does not spin
You decide to grind minced meat, but the blender just won’t turn on! Don't panic right away! This problem can be solved even easier than if the device worked, but did everything poorly.
First, let's press the button and listen. Is there a quiet buzzing sound? This means the engine is running, but it is unable to turn the knife. We disconnect the bowl and use our fingers or a small screwdriver to press the button that blocks the blender from turning on. If everything starts working, then the defect has been identified.
If the device does not start even when the lock is turned off, then the problem is in the engine, or more precisely in its windings. One or two of them burned out. In this case, it is necessary to replace the engine. If you manage to buy it at a reasonable price, then you are in luck. But most often its cost is comparable to the cost of a new, inexpensive device, so it is not economically justified to repair such a blender. It's easier to buy a new one!
If you do not hear the engine running when the button is pressed, in order to make repairs you need to examine the power supply circuit:
- First, make sure that the electrical outlet is working properly. To do this, take any household appliance that works for sure and plug it into the outlet you are testing. If it works, then the socket is working and you should continue checking.
- The second step of checking is the electrical cord. Practice shows that it often frays or breaks off from the inside. We disassemble the blender body. In modern household devices, manufacturers are very fond of using special screws, so it is necessary to stock up on various heads and attachments before disassembling. You won't be able to get by with a Phillips and flathead screwdriver. The cord inside the blender is attached to a special block using screws or soldering. Using a voltmeter, check the cord for integrity. Its resistance should be almost zero. If you don’t have a voltmeter, take a new cord, put it in place of the old one and plug it into the network. This will allow you to determine the breakdown.
- If your blender has a fuse in its circuit, it should also pass the test. Remove it from its slot. If it fails, the thread inside the housing will be broken. There is no point in repairing the fuse by making a bug. Usually such parts cost pennies in the store, and homemade ones can lead to a fire. On the fuse body there will be all its technical parameters, write them down, or better yet, take the part itself with you to the store. The seller will help you find a similar one. By the way, the contacts of the fuse socket are a very convenient place to check the presence of voltage in the network.
- You installed a working fuse, and when you plugged in the blender, it immediately blew again! This indicates that there is a short circuit inside the blender. The problem is either in the engine or in the control unit. We connect individual blocks to the electrical network and observe the result. This is where you should put a “bug”, because a large current can pass through it. We connect the ammeter and check the voltage. In this case, you should do everything quickly so that the overload protection circuit breaker does not trip in your home. We substitute the shown value into the power calculation formula and evaluate this value. If it significantly exceeds the nominal value, then the source of the problem has been found.
- If after all these steps you understand that everything is in order with the power supply, you need to inspect the printed circuit boards. Capacitors often fail. This can be visually determined by their swelling. If a resistor burns out, it turns black. The connecting tracks on the board should not have breaks or peeling. If you find something similar, it means the device is not working due to the fault of the electronic unit. If the engine has a short circuit, then the unit can hardly be repaired. It needs to be replaced with a new one.
Here is the order of work that needs to be done if you decide to repair the blender yourself. If the device fails during the warranty period, the service center must repair it free of charge. It is better not to disassemble expensive blender models and try to fix them yourself, but rather contact a specialized workshop. Today, the cost of an expensive blender can be considered 3000-3500 rubles.
If the blender stops
A complete stop of the device can be caused by a fairly large list of reasons. For each of them there is a way to eliminate the malfunction. The removed motor and electrical circuit must be carefully inspected for visible damage. Next, you should ring the key contacts of the device. First of all, check the fuse, resistor, diodes. After the rectifier capacitor and triac. If the electrical circuit is in working order, the next step is to inspect the motor.
There is a buzzing sound when turned on, but no action occurs - possible damage
There are situations when the device stops functioning, but at the same time makes characteristic buzzing sounds. The cause of this phenomenon is usually jamming of the cutting parts. To eliminate the breakdown, you need to separate the bowl and carefully press the power lock button. To do this, you can use flat, pointed objects. If the blender's operation is restored, then the cause has been identified correctly. Repairing a Vitek blender follows the same principle.
Food Processor Complementary Ingredients
The blender, which is an integral part of the combine, is in many ways similar to the stationary model. The device is built into the food processor and has many functions. If repairs are necessary, it may be necessary to partially disassemble the combine.
Replacing the knife
If the knife is significantly damaged, it must be replaced. For most blender models, purchasing a blade is easy because they are sold as separate replacement parts.
How to pull it out
After purchasing a new knife, you must first remove the old one and replace it. The process involves performing the following actions:
- When starting to disassemble the device, first unplug the blender from the outlet and remove the bowl.
- To avoid getting hurt by a sharp blade, take a clean towel and unscrew the knife from the motor spindle. Since the threaded connection is not standard, the knife must be unscrewed by rotating to the left.
- If the knife is fixed in the bowl with nuts, you need to use wrenches or pliers to remove the part.
How to disassemble the bowl
There are models of devices in which to install a new knife you will need to first disassemble the bowl. As a rule, it is enough to remove it from the central mount
It is important not to forget to replace the oil seal with a new one.
If the bowl is not removable
In cases where the design features of the blender do not allow disassembling the bowl, the only way to solve the problem is to replace the bowl along with the knife. You need to choose a bowl that is the right size and fix it in the correct position.
Speed controller
On many blenders, the speed controller often breaks down. Due to incorrect operation, the speed may change during operation or be greatly reduced.
Part removal
In stationary varieties, there is often a problem with checking the switch due to the presence of a switch lock without a bowl. To remove the regulator from the case, you will need to unsolder it and check the condition of the internal components.
Calling
Testing the speed controller helps to find an open circuit or short circuit, which facilitates effective diagnosis and elimination of the problem. For testing, use a special device, a multimeter. It is allowed to ring only de-energized circuits to avoid injury or damage to the equipment. The procedure is performed according to the following instructions:
- Fix the probes in the connectors of the multimeter.
- Switch on the dialing mode on the device, after which the display should display one.
- Check the correct functioning of the multimeter by connecting the probe contacts. If the device is working properly, it will emit a beep.
- The multimeter probes are applied to the contacts on the speed controller. If there are no faults, the buzzer will sound and a value close to zero will appear on the screen.
Electrical breakdowns
The knowledge gained at school in physics lessons will come to the rescue. You don’t need to have a brain and super gadgets. All you need is basic knowledge and a voltmeter.
Broken wire
Have you turned on the blender and received silence? Don't immediately run for a hammer and screwdriver. Start by checking the voltage in the outlet you need by connecting any working electrical appliance. Is the table lamp shining? Then check the cord:
- unplug from the outlet;
- ring the wire;
- use a screwdriver to disassemble the case;
- we find the power block where the wire is screwed;
- call, if there is no signal, change the wire;
- assemble and turn on.
Fuse blown
A similar algorithm of actions:
- unplug from the outlet;
- disassemble the body;
- remove the fuse;
- ring him;
- If a problem is identified, purchase a new identical one.
Blender motor repair
A simple test in a few steps will help determine the performance of the electric motor:
- connect the device to a power outlet;
- turn on the blender without a bowl;
- If there is a lock button, press it using improvised means.
If it buzzes but does not work, then the problem lies in the motor winding. Should I buy a new one or recycle the old one? The answer is hidden behind the price of the question.
Failure of the speed controller
If the device does not rotate or does so very slowly, the speed controller may be damaged .
The speed switch has several positions. To check, you can turn them on one by one, assessing the speed of the knife movement by the sound. The faster the movement, the stronger the buzzing. This failure is quite common among blenders. For radio amateurs or those who understand this industry:
- the regulator is removed from the unit;
- all positions are checked (the absence of a short circuit indicates a breakdown).
The principle of operation of a stationary blender
Let's look at the design and operating principle of a blender. Products are placed in the blender bowl. The device turns on and its blade begins to rotate very quickly. The shape of the knife is made in such a way as to force the products to move along a closed path. The knife of the device is located at the bottom of the bowl and is connected to the engine rotor. High speed and the desired shape allow you to quickly chop food. The blender blade is shaped like a propeller. This allows him to pull in the products for cutting, and at the same time throw the already crushed mass onto the walls of the bowl.
The blender bowl has a special shape that ensures movement of the processed products in a circle. The walls widen towards the top. In this regard, the resulting mass begins to fill the walls, freeing up the center of the mold for not yet chopped products. As soon as the amount of processed products on the wall reaches a critical weight, they fall back onto the knife and further grinding occurs. In practice, all this happens in a matter of moments.
We have described a process that can be observed with high-quality equipment. Cheaper models may not cope with the task. The lack of power does not allow creating a continuous flow of processed products and the knife begins to cut the air. If you decide to chop the cabbage, add a little water. This will help the knives handle this vegetable.
If a blender cannot cope with grinding food, this does not mean that it is broken, it may simply not have enough power. Then you should add some drinking liquid and try to start the blender again. If this does not help, then perhaps you should do the repair yourself:
- sharpen or replace the knife;
- test the speed switch;
- make sure the engine is working properly;
- check how the bowl connects to the knife.
If you decide to repair the blender yourself without involving professionals, then you should start by checking the speed controller. It's simple. It is necessary to press successively different speeds and determine by ear whether the speed of the rotor is changing. If the speed changes, then the regulator is working properly, and it is worth checking the blender blade.
How to disassemble and repair a blender depending on the cause of the breakdown - minor faults
It is immediately necessary to note the fact that not all devices are capable of grinding food equally well. For example, low-power models are not able to cope with solid food, so if your blender does not work, or rather does not cut food, this does not mean that it is broken and needs repair. If, after turning on, the device starts to buzz, but no process occurs, you need to check two things:
- whether the knives rotate if they are not obstructed by food. If yes, then this means that your device is simply not capable of handling such a volume, and it does not need repair. To do this, you need to either add liquid or reduce the amount of grinding;
- in some cases it may not cut due to dull knives.
In the first case, you will not do anything, since your model is of very low power. But we will describe below how to replace the knife.
Check the blender before disassembling!
Troubleshooting and Troubleshooting
Basically, problems with the iron arise due to faulty wiring, which is revealed when disassembling the back cover. The fuse, heating element, thermal protection or steam spray mechanism may also fail.
Power cord
If the equipment stops working, you need to check the condition of the power cord. For this you will need a multimeter. Using this device, you need to “ring” (touch) different parts of the power cord plugged into the outlet. If the LED lights up, then the fault lies elsewhere. But when the light blinks, it indicates a problem with the cord. This malfunction can be of two types: the integrity of the wires is broken or the wires do not adhere tightly to the contacts. To eliminate the first problem, you need to find the bend and insulate it.
heating element
If the malfunction is not identified at the first stages, you should contact the heating element, which is hidden under the sole. After disassembling the device, you need to check the resistance level of the heating element. Normally, this figure does not exceed 250 Ohms (the exact value must be clarified in the passport). If the measuring device shows infinity, this means that the heating element has failed. In such cases, it is recommended to buy a new iron, since the heating element is replaced along with the soleplate, which is comparable to the cost of the device.
Thermostat
Problems with the thermostat vary. Before disassembling the iron, you need to rotate the part until it stops. At this moment, a click should occur, indicating that the contacts are closed. The thermostat must be left in this position and further testing of the component can begin.
Two contacts extend from this part towards the heating element, which need to be “ringed”. This procedure must be repeated, after first unscrewing the thermostat all the way in the other direction. In the first case, the multimeter should show the presence of voltage, in the second - the absence.
Thermostats fail due to acidification or contamination of the contacts. The wires need to be cleaned with sandpaper and checked again with a multimeter. During the procedure, the plates should not be bent too far. If the thermostat is difficult to turn, the part needs to be turned in one direction and the other several times (flat pliers may be required), and then rub the assembly with a pencil.
Fuse
In 50% of cases, iron failure is caused by a blown fuse. This part is located under the body. After disassembling the iron, you need to check the condition of the fuse with a multimeter. If the device does not respond, then this part must be removed and a new one soldered.
Steam spray system
The malfunction of this system is due to the accumulation of scale on the iron parts. In this case, you will need to disassemble the device and clean the internal components.
Steam button sticks or fails to work
This malfunction occurs due to scale in the pump chamber. The latter is built into the handle of the iron, on top of which there is a steam button. To eliminate the malfunction, you need to disassemble this part, remove the pump (compact box) and push the ball, which has dropped down, back into the chamber.
Clogged steam outlets
The lack of steam is due to the accumulation of scale in the iron tank. To fix this, you need to stir a tablespoon of citric acid in a glass of water. Next, you need to fill a separate container with the resulting solution so that the liquid covers the sole by 1-1.5 centimeters. Then this tank with the iron is placed on the stove. After waiting for the mixture to boil, you need to turn off the heat, wait 20 minutes and repeat the procedure.
Oxidation
If at the first stage of inspection of the iron no fault is identified, then you need to check the condition of the heating element. To do this, you need to remove the back cover, under which are hidden the terminals connecting the power cord and the heating element.
Design and principle of operation
All blenders are divided into several categories, which differ from each other in design and method of use, as well as different attachments and functionality. To effectively and correctly carry out repairs, you should understand the design features.
Stationary
Stationary varieties look like small food processors and are bowls with knives rotating inside. As a rule, the knives are installed at the bottom of the bowl. The device is desktop and does not need to be held during operation. This blender model is capable of grinding a large portion of food at a time.
The main disadvantage of stationary devices is the need to allocate a lot of storage space. In addition, some models do not chop vegetables well and grind them into crumbs or leave too large pieces. In terms of repairs, stationary equipment is much easier to disassemble and repair compared to submersible equipment.
Manual (submersible)
Hand blenders are shaped like a long handle with a cutting end. The nozzle is lowered into the container with the products, the device is turned on and held until the grinding process is completed. Due to their compact size, submersible devices do not require much storage space in the kitchen. The ability to change attachments significantly expands the list of food preparations.
This creates discomfort during long-term cooking. Also, the device is not suitable for stirring large portions of food.
Types of blenders
A thoughtful choice of a blender determines its effectiveness during further use in the kitchen. It is important to pay attention to the power of the device and what material the device is made of. It also doesn’t hurt to know how to fix a blender if it breaks.
Immersion blender
A multifunctional portable device with the main purpose of chopping and churning products and liquids. A hand blender is quite simple to use. Compact and convenient to use. An additional advantage is the ability to process products in any convenient container. The main components of the device are the engine, control unit and spindle. Repairing an immersion blender does not require special knowledge or tools.
Stationary blender
The most complex and multifunctional equipment is presented in the form of a stationary device. When cooking, it is used to solve a large number of problems. A significant advantage is the free hands of the cook and the processing of a large volume of products in a blender. The structure of this device is more complex than that of a hand blender. It includes a glass or plastic bowl with a paddle blade. The housing contains a motor with a drive shaft and a locking mechanism.