Tools and materials
To assemble the dryer you will need:
- pieces of plastic pipe;
- temperature control cable;
- electrical wire;
- electric plug;
- Dimmer;
- terminals;
- power supply or batteries.
And also tools:
- soldering iron for plastic;
- roulette;
- pliers;
- insulating tape;
- screwdriver, screws;
- side cutters, knife.
Power tools and materials for assembling a shoe dryer will help you create a device with your own hands
Photo of DIY shoe dryer
Do-it-yourself TV repair - an overview of circuits and modern TV designs. 120 photos and videos repair master classHow to make a subwoofer with your own hands: calculations, theoretical foundations and tips on choosing materials and components (135 photos)
Do-it-yourself screwdriver repair: device, operating features, restoration and assembly of the screwdriver (110 photos + video)
DIY LED lamp: diagrams of the simplest adjustable and universal LED lamps (100 photos)How to make a power supply - ways to build adjustable and universal power supplies (95 photos and videos)
How to install a washing machine: instructions on how to install it smoothly and connect the washing machine correctly (120 photos + video)
Read here - How to make a charger with your own hands: 110 photos of examples, diagrams and methods for making a charger
Help the site, repost 
0
How to make an electric shoe dryer
The easiest way to dry your shoes in the slush is to put them on a radiator. However, it is not always possible to do this, since the heating season lasts from November to April. And during the unheated period, the shoes do not dry out.
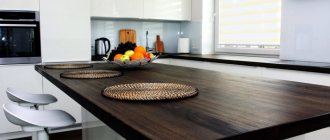
A homemade electric dryer made from a shoe rack, a thermal cable and a sheet of metal looks aesthetically pleasing and does the job of drying.
Installation steps:
- The size is measured according to the size of the bottom shelf and a metal plate is cut out. The basis for drying is metal 0.8 mm thick
- A self-regulating heating cable with a power of 30 W/m, reaching a temperature of 85 0C, is cut into pieces. The cable regulates its temperature along all lengths
- Remove the top sheath of the wire and connect the three sections into a network in parallel. Cable contacts are protected with electrical tape
- To increase heat transfer, the cable is attached to a sheet of metal using aluminum tape. Several layers of adhesive tape securely fasten the wires and increase thermal conductivity
- The lower part is covered with a reflector, and the upper part is painted black. The finished dryer is placed on a shelf and plugged in.
Attention!
To increase heat emission, the metal surface is painted black. So the power of the device increases from 30 W to 50 W. Temperature measurements showed that the shoe dryer heats up not only on the lower, but also on the upper tier.
The device dries the shoes of all family members overnight
From the cooler
Make your own air dryer for shoes from coolers from a broken microwave oven according to the instructions:
- The corrugated pipe for electrical wiring is divided into 2 parts. 2 holes are made in the junction box at the end sides. Junction box with rubber elastic plugs
- The cooler is placed in the box so that air enters the pipes. The blades are trimmed if necessary
- The gaps are filled with a rubber gasket. The bottom is glued with a vibration isolator. The cooler is attached to the base of the box with screws. Connect the wires and check the functionality of the dryer. A hole for the wire is cut in the rubber plugs
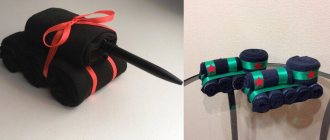
From small fans
A do-it-yourself electric ski shoe dryer is assembled from the following materials:
- sewer drain 2 pieces of 25 cm each, with a cross section of 5 cm;
- 2 plugs, diameter 5cm;
- power unit;
- 2 fans from an old computer;
- 2 tubular resistors OPEV-30, resistance 24 Ohms;
- 2 grilles for the fan;
- 1 m of double stranded wire PEV 0.75;
- electrical tape, soldering iron, knife, shrink tape.
Work algorithm:
- A hole is soldered into the plastic plug. Install the grate. The fans are attached to plastic plugs. The wires are routed out. Mark the fan with a marker and use a soldering iron to melt a hole for fastening
- The wire is bent and placed in a resistor. With the bare wires down, install the part to the plastic plug with the fan. The wires are soldered. Bent wire prevents resistors from moving within 25cm sections
- The network cable is brought out and connected to the power supply in parallel. The workpieces are put into pieces and tested. The wire is insulated. The red “+” wire is attached to the power supply
When the device was turned on, the air temperature in the room increased by 8 0C.
The device reaches operating mode in 10 minutes
From thermostatic cable
Assembly steps:
- Cut pieces of the thermostatic cable 35 cm long. Prepare the electrical cord, terminal block and thermal cable
- Electrical tape is used to insulate the cable on one side. The wires on the second side are exposed. The sheath is removed and the veins are freed
- Attach the terminal block. All wires are carefully insulated
- The segments are bent into a loop and soldered to the electrical cord. The joints are carefully sealed with heat shrink tape.
The finished shoe dryer is connected to a 220V power supply.
The temperature control cable heats up to a temperature of 40 0C
The video shows instructions for assembling an electric shoe dryer with your own hands:
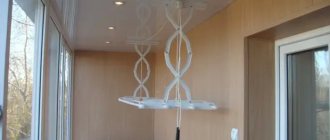
From plastic pipes
For production you will need:
- hair dryer;
- plastic pipes;
- corners for PVC connection;
- hacksaw;
- soldering iron for PVC products;
- clamps.
Assembly instructions:
- Prepare pipe sections 20 cm long. At a distance of 2-3 cm from the ends, a hole is made for air to escape. Elements are cut at an angle of 40 0
- The corners are attached to PVC. Corner fasteners are soldered to pipe sections
- A tee is attached to the corners. Using a soldering iron, connect the tee and corners
- A hairdryer is attached to the hole using clamps and a pipe. Testing the device
How to make electric dryers
Materials and tools
To create an electric dryer we will need the following.
- 2 computer coolers.
- 12 volt power supply.
- On/off button
- Cardboard box.
- Wires.
- Pencils for glue gun.
- Corrugated pipe 2 m.
- Scotch.
- Sewer plastic couplings.
We also need such tools.
- Jigsaw.
- Glue gun.
- Scissors.
Manufacturing
- Remove the lid from the box and make two holes in it the same size as the coolers.
- Use hot glue to securely secure the coolers to the lid.
- Connect the cooler wires in parallel. That is, plus to plus and minus to minus, in this case we will not lose the power of the coolers.
- Also make a small hole in the lid and install a button.
- Make a hole in the bottom of the box and insert the wire from the power supply. Be sure to seal the hole.
- Now you need to connect the electrical circuit. One lead of the cooler is routed through the button. In this case, it will be possible to turn the dryer on and off.
- At this point, test the circuit and plug the power supply into an outlet. If air is expelled from the box, then you need to change the polarity of the power supply connection.
- Make 2 holes in the side wall and use hot glue to fix the sewer couplings in them.
- Cut the corrugated pipe in half and then use tape to attach the pipe sections to the couplings.
Now our dryer is ready for use! The power supply needs to be plugged into the outlet, then install the pipes in the shoes and turn on the power button . Air will be forced into the box and blown out of the pipes, thereby quickly drying wet shoes.
From our article you learned different ways to make dryers with your own hands. We wish you success in production!
How to make a shoe dryer from heating
To make a shoe dryer with your own hands from heating you will need:
- PVC pipes;
- fitting;
- 2 valves with ball mechanism;
- pipe cutter;
- soldering iron;
- 7 steel pipes, 1 m long.
Manufacturing process:
- Solder a 10 cm piece of pipe to the heating system through a fitting. Draw the pipe to the location of the dryer. Install the tap and turn it off.
- Steel sections are connected parallel to each other using angles and tees. The distance between the segments is 5 cm. This is a closed contour.
- The last pipe is connected to the heating system. Open the tap and perform the test.
The advantage of the dryer is that it can be turned off from the heating at any time.
Attention! It is recommended to place shoes on a wooden grate, since if the pipes are too hot, the soles may melt.
How to make a heating dryer
This method is considered the most effective. But it requires a little more time to manufacture compared to the previous version.
Materials and tools
For production we will need the following.
- Polypropylene pipes.
- Polypropylene fittings.
- 2 ball valves.
- 7 steel pipes 1 m long.
We also need the following tools.
- Pipe cutter
- Soldering iron for pipes.
Manufacturing process
- Solder a small piece of polypropylene pipe into the heating system, then install the tap and turn it off.
- Then run the pipe to the location of the future dryer.
- In the same way, you need to do it in the heating area after 2 m. Solder a piece of pipe through the fitting, and then install a closed tap. After this, a pipeline is created to the intended location of the dryer.
- Now we need to create the outline itself, which will dry the shoes. To do this you need to use polypropylene fittings. It is necessary to solder steel pipes into them. You need to create a closed loop. The elements must be parallel to each other. The distance between them should be approximately 5 cm.
- When the heated circuit is created, it will be possible to solder it with the pipes that we connected to the heating system.
A huge advantage of this dryer is that it can be turned off and on as needed. To do this, we installed taps.
Attention! It is not recommended to place shoes directly on the pipes, as they may be damaged by the high temperature.
Therefore, you need to install a wooden grate or dense synthetic material on the pipes. In this case, there will be no close contact and no damage will be caused to the boots.
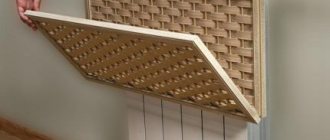
DIY shoe dryer for radiator
To make a shoe dryer with your own hands from propylene, you need to prepare:
- PVC pipes with a cross section of 20-25 mm;
- corners, tees;
- soldering iron;
- pipe knife
The plastic pipe is divided into sections with a length equal to the length of the radiator.
Stages of work:
- Using a soldering iron for PVC pipes, solder 2 pieces of 5 cm each and 2 elements of 10 cm each with corners according to the diagram. You will get 2 end parts. The elements are tried on the battery so that the dryer is conveniently installed
- Pipes are soldered into the resulting holes at the ends. You will get a structure of 3 rods
- Check that the battery is securely attached to the wall. The finished dryer is installed on the radiator and tested. This device is useful for drying not only shoes, but also things
DIY shoe drying shelf
The product will require tools and materials:
- metal-plastic pipe, diameter 25 mm;
- corners;
- tees;
- fitting;
- fastenings;
- 2 taps;
- knife;
- soldering iron
Work algorithm:
- Determine the size of the device. A drawing is drawn on paper. Measure the length of the segments. Analyze the number of shoes that need to be dried daily. This affects the number of shelves. One shelf consists of 3 pieces of the required length. End parts are assembled from corners and 5 cm sections. Their number is determined by multiplying the number of shelves by 2. Long sections of pipes are soldered into the resulting holes. The structure begins to be assembled from the bottom shelf
- The shelves are attached to each other with pipe sections 20-30 cm high. The height of the shelf depends on the height of the shoes that will be placed on it. Connect the required number of shelves into a single system
- Each tier of the dryer is attached to the wall. After the entire structure is securely strengthened, it is connected to the main heating system, and the tap is first soldered in. The system is filled with water. At this stage, check the connections for leaks
- If defects are detected, the tap is turned off, the water is drained from the system, and the defects are eliminated. Reconnect the dryer to the heating system and fill it with water. Re-check all attachment points. If there are no leaks, turn on the heating.
This design is made from pipes that can withstand pressures of 10-15 bar and temperatures up to 100 0C