DIY ceiling dryer installation
Most commercial dryers are mounted to the ceiling in approximately the same way, with only minor differences.
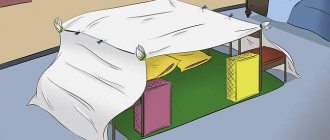
Let's consider installation using the example of a simple retractable model to a concrete ceiling covered with clapboard. <img class=” wp-image-29058″ src=”https://svoimi-rykami.ru/wp-content/uploads/2016 /08/oR0Gq2r08m8-6-copy.jpg" alt="Design of retractable ceiling dryer" width="599″ height="599″ />
Design of a retractable ceiling dryer
Step 1. The surface of the ceiling is wiped from dust and other contaminants. Place the first bracket on the ceiling perpendicular to the load-bearing wall and mark the drilling locations with a pencil. From these points, measure a distance equal to the length of the dryer bars, attach a second bracket, parallel to the first, and also make marks for the fasteners. For each bracket there should be two holes located at a distance of about 7-10 cm from the edge.
Step 2. At the marked points, drill holes through the lining into the concrete base so that the dryer is fixed as firmly as possible.
<img class=” wp-image-29053″ src=”https://svoimi-rykami.ru/wp-content/uploads/2016 /08/oR0Gq2r08m8-3-copy.jpg" alt="Drilling holes for fasteners" width="604″ height="604″ />
Drilling holes for fasteners
Step 3. Place the bracket on the surface again, align the holes on it with the holes in the ceiling and screw it in with anchor bolts.
Step 4. Assemble the dryer: insert the crossbars into the holes in the side bars and put on the plugs. Bolts secure the structure to the brackets.
Step 5. The cord is threaded through the central hole on the side panel, lifted up and threaded through the hole in the bracket. Then they pull the cord along the ceiling to another bracket, pass it through the holes again and tie it with a knot on the side bar.
Step 6. Attach the clamp to the other end of the cord and check the ease of movement of the dryer by pulling and releasing the cord.
<img class=” wp-image-29056″ src=”https://svoimi-rykami.ru/wp-content/uploads/2016 /08/Pull-out-dryer-in-an-unfolded-state.jpg" alt="Pull-out-dryer-in-an-unfolded state" width="598″ height="336″ /&amp ;amp;gt;
Pull-out dryer unfolded
<img class=”size-full wp-image-29057″ src=”https://svoimi-rykami.ru/wp-content/ uploads/2016/08/Linen-hanger-on-balcony.jpg" alt="Linen-hanger on balcony" width="600″ height="338″ /& >
Clothes hanger for the balcony
Types of ceiling dryers
All models are conditionally classified into several types. They differ in appearance, installation method and capacity.
Based on the type of construction, ceiling dryers are divided into the following categories:
- Stationary . The most primitive and simple mechanism, which consists of ordinary ropes or fishing line stretched between slats. The main disadvantage of such a dryer is that it cannot be adjusted in length and height. In addition, to hang laundry, you will have to use a chair or stepladder.
- Sliding . A more convenient and technologically advanced model. Consists of a frame with tension ropes. It is attached to the ceiling with consoles, with the help of which the height of the dryer is adjusted (the structure can be lowered by 40-50 cm).
- Telescopic . This mechanism has sliding metal holders, thanks to which not only the height, but also the distance between the strings is adjusted.
- “Lianas” (wall-ceiling) . Stationary massive model with extended functionality. It consists of tubes that are connected by ropes to fastening blocks. The control mechanism is located on the wall. This design allows you to adjust the height of each individual tube. The only drawback of such a dryer is the complexity of installation.
According to the type of installation, clothes drying devices are divided into two types:
- Removable . Most often, this opportunity is present in two-tier models, which have a large capacity and take up a lot of space.
- Stationary . The most common type of ceiling dryer design is used for all types.
In addition to the listed options, new technologically advanced and modern models have appeared over the last decade:
- Automated . A type of retractable dryer with a remote control unit, which is mounted in the ceiling. In addition, such structures have several fans that facilitate the drying process and time. The standard model can support weights up to 30 kg.
- Two-tier . They are distinguished by the presence of a lower tier with a large number of strips, which are connected to each other by metal fasteners. The upper part of such a dryer is stationary, the lower part is removable, and can be removed after use.
- Ceiling with movable hinges . Characterized by the presence of hangers for clothes. They consist of two profiles fixed to the ceiling with cross-shaped brackets. The roller system allows you to raise and lower the device to the desired height.
Radiator grille
Shoes get wet quickly but dry slowly - this depressing fact makes many people think about how to speed up this process.
Often they simply put wet boots on the radiator, but this can affect them in the most negative way. The fact is that boots dry unevenly near such a heat source. Moisture evaporates only from the outside, remaining wet inside. This leads to shoe deformation and cracking. If some parts are glued, they may simply fall off.
To avoid negative consequences, you can make your own device for drying shoes using a radiator. To do this you will need: several slats with a thickness of 0.5 cm, nails and soft synthetic fiber cloth.
You can quickly build a device using a hammer, sandpaper, an electric jigsaw and a construction stapler.
- First you need to make a diagram of the dryer.
- Then you should measure the required length from the rail and cut it.
- The internal dividers are nailed only after the side ones are attached. There should be a small distance of one centimeter between the slats.
- To avoid damaging the battery, a soft synthetic fabric is attached to the homemade dryer. A construction stapler will easily cope with this task.
- To secure the slats to the radiator, you can make hooks from leftover wood.
This drying method does not allow your favorite pair to come into contact with the surface of the radiator. Therefore, it dries evenly, without the risk of being spoiled.
Frame with crossbars
Connect one part B to two parts A using wood glue and self-tapping screws. Apply glue to the ends of the crossbars and insert them into the prepared grooves. Check the correct connection of the frame using a construction angle, checking the right angle. Let this piece dry. Attach the crossbars to the second part B on top, and connect it to parts A using glue and self-tapping screws.
The money tree pleases with lush flowering: my secret is in caring for the leaves
Why French children behave well: eight ways to raise them
A student at the Vietnam Police Academy shared how she takes care of her facial skin.
Important options to select
Making delicious and healthy marshmallows
For an electric dryer to become a truly good helper during the harvest season, it must be:
This will be influenced by the number and volume of pallets or surface area. Options for dryers up to 5 trays are a good choice for a small family. They are capable of drying several kilograms of food at a time. For more serious harvests, devices with 6 or more tiers are purchased. Models with 15-20 sections are capable of drying up to 15 kg of fresh food.
Allows you to dry various fruits and vegetables
Directly depends on the capacity of the device. A good option are 350-600 W models, which have sufficient capacity, efficiency, and do not consume a huge amount of energy.
You can set the desired temperature
Makes it possible to preserve all the beneficial properties and vitamins in products. Many convective devices are available with fixed 3 modes:
- 30-40С (Low) – light load
- 45-55С (Medium) – average load
- 60-75C (High) – high load
The last 2 modes are relevant for preparations from vegetables, fruits, berries, mushrooms, meat, and fish.
Plastic dryer for vegetables and fruits
Available in 2 main versions:
- metal – strong, reliable, durable; has significant weight; may get warm during operation
- plastic – light in weight, easy to clean
Plastic models are easy to assemble and disassemble, make it possible to increase the number of tiers, and are also transparent, which is convenient for monitoring the drying process.
With mechanical control
- the electronic view is equipped with a touch screen and keys for convenience; less exposed to pollution; adjustment is more precise
- mechanical appearance is reliable
Horizontal arrangement of trays is a more convenient option
- Trays are located vertically (one above the other) in many convective type electric dryers. Heating can be from above or below. The first option is more durable and easier to maintain, because... nothing gets on the heating block. Although devices with bottom heating cope well with large volumes of products
- horizontal arrangement of pallets is more convenient. Trays can be easily removed without affecting others. The heating block is located on the rear wall. It is also possible to simulate the chamber space by removing the pallets altogether. This way you can place large items, such as yogurt jars.
It is possible to make pastille
- the ability to prepare marshmallows or dry-dry meat and fish
- Thanks to the system of independent supply of hot air to each of the pallets, there is no need to swap them during drying
- There is no risk of getting over-dried food if the device has an auto-shut-off timer
- a device with overheating protection will be safer and last longer
- the adjustable height of the trays is useful, for example, for mushrooms, in order to dry them without chopping them
Good quality sofas: how to choose a universal model for relaxing and sleeping. Popular manufacturers + Reviews
Time to tinker
Let's look at the simplest option for arranging a ceiling dryer on the balcony with your own hands, for which we will need a drill, a hammer drill and a screwdriver from the tools, and from the materials we will take a rope, wooden planks in the section 50x20 and a dozen self-tapping screws-rings.
We will carry out the work in the following sequence:
- To begin with, we will cut the strips to the required length, depending on the calculated width of the future dryer, and clean the surfaces;
- Let's make markings on the slats for the holes on the basis that where we will then attach the screw-rings, the distance between the holes will be about 8-10 cm (usually the width of the dryer is 50-60 cm, so we will get 5 holes each), and We mark the holes that will serve us for fastening to the ceiling along the edges.
- Using a drill, we drill holes to the required diameter, but do not forget that the holes for the ring screws should be smaller in diameter than the diameter of the screws;
- Before continuing to work with the planks, they must be varnished or painted;
- We screw self-tapping rings into the drilled holes and be sure to check the strength of the connection, make sure that they can withstand the weight of the laundry;
- Attach the slats to the ceiling and make markings along the prepared holes that are intended for attaching them to the ceiling;
- Using a hammer drill, make holes in the ceiling, remove the strips and install dowels;
- Using screws, secure the planks to the ceiling;
- Attach the cord to one of the outer rings from the self-tapping screw and pull it through all the other rings.
This way you will get a simple and inexpensive design that you can make yourself.
If the ropes sag over time, they can be easily adjusted by simply untying one end and tightening them. A very interesting option could be a dryer made from hangers, especially since things dry much faster on hangers.
You can even use just a durable bathroom curtain with a cornice as holders. Of course, you won’t be able to hang bed linen on such a drying rack, but it’s a very good option for shirts and blouses.
Craftsmen with enviable imagination manage to make a sock dryer from an old umbrella - the result is a completely simple and at the same time original type of drying device.
Another interesting variation for setting up a clothes dryer on the balcony is to hang a light ladder from the ceiling, the slats of which will serve as elements on which you can hang both clothes and bed linen. You can also attach hooks to it or attach “hangers” for clothes.
As you can see, there are a lot of options for arranging a ceiling clothes dryer, both industrially produced and homemade. And since it is simply impossible to do without such a house design, every owner has every chance to buy or make a model that is suitable specifically for his needs, which will become truly useful, functional and convenient.
Tips for choosing
To ensure that the dryer lasts as long as possible, the following factors should be taken into account when choosing a model:
- material of manufacture;
- permissible load;
- dimensions of the structure;
- complexity of installation;
- equipment.
The most common are dryers made of aluminum, stainless steel, plastic, followed by rope and wooden structures.
Aluminum models are lightweight and affordable, but with active use they will not last long. Aluminum tends to oxidize over time, causing black spots to appear on clothing. In addition, under increased load, the aluminum tubes bend noticeably, and such a dryer does not look very aesthetically pleasing
If you have a large family and have to do a lot of washing often, you should pay attention to other materials.
Stainless steel structures coated with polymer compounds are durable and have a very attractive appearance. They serve for decades without oxidizing or losing their original shape.
Chrome elements fit harmoniously into the interior of the balcony and are easy to clean from any dirt. And their only drawback is the high price.
Plastic dryers are very light, inexpensive, do not leave stains on clothes, and are easy to clean from dust. You just can’t load them too much, otherwise the tubes will become deformed, and the plastic clamps quickly become damaged due to frequent use.
Rope models are the simplest and cheapest, and you can make them yourself with almost no effort. But they also have more disadvantages: ropes sag quickly, leave creases on clothes, are less easy to clean from dust, and fray. In addition, hanging ropes or fishing line does not look very attractive.
Dryers made of wood are less common on balconies, and most often they are homemade structures. They look original, are easy to use, and are great for eco-style interiors. True, over time, wooden planks dry out, darken, and can become deformed from moisture, and therefore they do not last long.
Before purchasing a dryer, determine its location on the ceiling and take measurements. If a chandelier hangs there or a fan is installed, not a single element of the dryer should come into contact with them. Also take into account the distance between the edge of the window sash and the ceiling, because an incorrectly fixed structure will interfere with opening the window
When choosing a model, check the reliability of all fasteners and the integrity of components, and also pay attention to the permissible load indicators
How to choose the right ceiling clothes dryer
If you plan to install the dryer yourself, make sure that it comes with detailed instructions, because some models are not so easy to figure out. Finally, check the package for reliable fasteners - you may need to purchase them separately.
Required Tools
Before you begin the process of making a product for drying clothes, you should prepare well for it. You will definitely need special tools, with the help of which the entire structure will be made.
Regardless of the type of structure, it is necessary to prepare the following equipment:
- drill;
- screwdriver;
- level;
- tape measure for measurements;
- screwdriver;
- drill;
- screws, dowels.
In addition to these tools, you should purchase material that will serve as the basis for the structure. So how to make a clothes dryer with your own hands? Let's look at the detailed instructions for this process for each type of dryer.
Making a drill for wood carving with your own hands
And yet, if we talk about an easy-to-use drill, most users agree that the best option is the one in which you, as they say, hold the motor in your hands. With all this, it should not be heavy, bulky, and should not tear off the hand when starting.
We bring to your attention an example of making such a drill for small jobs with our own hands.
For this particular drill the following was used:
- brushless electric motor with permanent magnets DPM-25;
- a piece of pipe from a vacuum cleaner;
- collet clamp with replaceable inserts;
- power button;
- 2 banana plugs;
- two-wire power supply wire;
- heat shrink tubes.
DPM-25 electric motors are represented by a large number of modifications with significantly different parameters. So, the number of revolutions they produce can be from 2500 rpm. up to 9000 rpm. So you can choose with the characteristics you need. You can buy them in many online stores or on the radio market, which is several times cheaper.
It must be said that in addition to 25 engines, there are also 30 and 32 and more powerful ones, and also with different parameters.
I now have an engine waiting its turn for something of the same appearance and design, powered by the same 27 volts, but with a diameter of 100 mm. Both this and the ones we offer you for a homemade drill were used in aviation technology.
The button can be with or without locking. Collet clamps are selected in a radio shop according to the motor shank (this one is 2 mm) and the diameters of the tool shanks that are planned to be used for work. Here, the variety of options is even greater than when choosing an engine.
You can also use a collet clamp from a dental drill. In specialized stores it is not that expensive, but you can find very inexpensive used ones.
And there are also plenty of options for supplying electricity to the engine. A very convenient and simple method using a tulip-type connector, where “+” is supplied to the central wire, and “–” to the outer cup. And given that the motor is reversible, the direction of rotation should be adjusted on the power supply:
These small digressions will not distract us much from the process of making a particular drill, but they can be useful in terms of varying its design.
1. Cut off the part of the vacuum cleaner tube that goes to the narrowing - this way the motor will be installed more securely, with a length so that it is convenient to hold the tool in your hand.
2. We cut a heat-shrinkable tube with a diameter of 32 mm along the length of the electric motor housing and, securing it to the shaft in a vise, rotating it by the power wires, we seat it, evenly heating it with a technical hair dryer from the center to both ends. In this case, we will just get the required size to fit it tightly in the tube. But, if you use a different tube for the housing, you can use electrical tape by winding the required amount of it on both ends of the motor housing.
3. Drill the hole for the electrical wire in the right place, based on the parameters of the button and the wire itself.
4. We cut out the restrictive rings and the seat for the button from suitable sized plastic containers for medications, children’s toys such as soap bubbles, etc.
5. Connect the wires through the button. Better - by soldering method. And, of course, do not forget to use heat-shrinkable tubing in the soldering areas to eliminate the slightest possibility of a short circuit.
6. Assembling the drill. If the sizes of the rings were chosen successfully, we simply press them into the body tube, and if not, then we use either hot melt glue or any suitable one for the materials used.
7. Place a collet chuck with a collet under the desired bur or drill, connect the drill to the power source. All.
The length of the body was chosen solely for reasons of convenience of placing the instrument in the hand.
The tool is powered by a factory-made regulated power supply - not a cheap thing, but very useful for many purposes in the home workshop. You can also use any step-down transformer that has outputs from 25 to 32 volts - permissible voltages for operating this engine, but it is better to adjust it to a nominal value of 27 volts.
It remains to add that such a drill is simply irreplaceable when used as a micro drill when carrying out small work on wood, when using drills with a diameter of less than 1 mm, and for grinding and polishing work in hard-to-reach places.
If you decide to make a drill with your own hands, then you should definitely know that instead of collet clamps, a three-jaw microchuck is often installed on such a tool. They come in different designs and parameters, which determines how they are mounted on the electric motor shaft. Sometimes hot glue is also used for this purpose, but alignment is difficult to do, although it is possible, but this method is only suitable for low-speed machines with low torque.
So there are many manufacturing methods and options for using such a tool as a drill.
Dear readers, if you have any questions, please ask them using the form below. We will be glad to communicate with you;)
Wall-mounted fan dryer - how to make it yourself
- The next type of dryer is also quite popular. It’s not difficult to make, but the appearance is original and can also transform the balcony.
Related article: Volume of cast iron bathtub in liters
To make such a device, you will need:
- stair balusters,
- board,
- nuts and bolts,
- steel corner.
As you can see, the list is small, which is what makes this design attractive. Balusters for stairs fit perfectly into the dryer as holders for clothes. They can be purchased at any construction market at an affordable price. The middle part of the baluster, where the laundry will hang, should not be embossed. The edge where the round section becomes square needs to be cut off, and the second edge simply shortened.
Wall-mounted clothes dryer on the balcony - a convenient and practical solution
Next you need to proceed like this:
- The second edge, which has a square cross-section, is the hinge. You should step back 2 cm from the edge and drill a hole one centimeter in diameter for the bolt in the center. This structure will be attached between two corners.
- For a concrete wall, the corners are attached directly to the wall, but if you are dealing with drywall, the holders are installed on a kind of backing. Its role will be played by a base board similar to the one that appeared in the previous instructions.
- The holders should not dangle during assembly, but they must be slightly rotated; a washer is placed between each baluster.
- And the final finishing of the holders concludes the whole work. The easiest way is to varnish them, after treating the wood with sandpaper. But you can, of course, paint the entire structure in your preferred color.
As you can see, everything is simple: the dryer is convenient, unusual in shape, and most importantly, not bulky. If the balcony is small, such a product is quite appropriate.
Wall-mounted dryers have many advantages, and the main thing is that the choice of models is wide. Compact, unusual in design, easy to use, lightweight - they become an integral part of the balcony, and at the same time do not steal space.
Good luck with your choice!
Clothes dryer for the balcony: do it yourself
Drying clothes in multi-storey buildings is one of the pressing issues. Often, apartment residents use either a balcony or a bathroom for this purpose, having previously installed a special dryer in these rooms.
The most practical option, in our opinion, is the balcony, because there is better air flow, which significantly speeds up the drying process. Therefore, we will deal with drying equipment on the balcony, the main principle of which will be hanging things that should not disturb anyone. Don't worry about the fact that your balcony is completely open and there is no place to tie ropes. We are confident that a way out of any situation can be found.
Options by location
First of all, let's decide what space in the apartment can be used for drying clothes. It’s good if your apartment has a balcony, even better if it is equipped or at least glazed - usually this is one of the most suitable rooms for drying things.
The air there is usually fresher than, for example, in the kitchen, and there is less humidity than in the bathroom, with the exception of rainy weather, of course. However, in the bathroom, in the living room, and even in the corridor, drying clothes is also quite acceptable: everything will depend on the model of the device, its design and its location.
So, let’s look at what dryers are by location:
1. Floor-standing – this is, as a rule, a portable folding structure that does not require additional fastening, since when unfolded it is a device resting on legs, which, by the way, are equipped with plastic wheels for ease of movement.
They can be horizontal, vertical (maximum saving of usable space), multi-tiered and electric (ideal for quick drying). Convenience and practicality lies in the fact that you unfold the dryer when you need it and install it on the floor where there is currently free space.
After the laundry has dried, fold it and hide it in a closet, on the mezzanine, etc. Floor-standing models generally have so-called “wings” in their design, which can significantly increase the area for hanging wet things, shoes, and bedding. If when folded the width of the device is approximately 5-7 cm, then when unfolded it has an area of about 1.5 square meters.
Undoubtedly, these structures are indispensable for small apartments, in a more aggravated version without a balcony: because they hung laundry on it at night while everyone was sleeping and it didn’t bother anyone, and in the morning they got up, took off dry things and hid it “out of sight” .
I would also like to say that the variety of floor-standing models offered by modern manufacturers is so great, and their prices are so affordable, that making a floor-standing clothes dryer with your own hands seems to be an irrational activity, unless “tinkering” is your favorite hobby.
Also read on our website: Curtains for the balcony: making and installing them yourself
2. Wall-mounted – such models can be permanent (rigidly attached to the wall) or mobile (removable). The former are beneficial to use in the bathroom or on the balcony, the latter become an interesting option in terms of installing them on radiators using a special mount.
Rigid mount models can be:
- sliding in the form of an “accordion” or with retractable grooves;
- exhaust, consisting of two parts, attached to opposite walls;
- folding ones, which when assembled are adjacent to the wall;
- so-called “vines” made of rods and cords, fastened to brackets, etc.
The latter are often referred to as ceiling-wall models, so we will talk about them in more detail below. Unfortunately, regardless of the option, all of them are not designed for large volumes and weight of laundry: they are mainly intended for children's clothes, socks, towels or shoes.
3. Ceiling - the most popular and most used designs, characterized by the ability to hang a large volume of washed items on them.
Their main advantage is the fact that when they are not wearing underwear, they are practically invisible, unless, of course, you specifically raise your head to detect them. Basically, these devices are designed for installation on a balcony; the main thing is to correctly think through their location relative to the windows and the balcony door, so that subsequently the device does not interfere with the free opening and closing of the latter.
There are many types of ceiling structures, and this is the best opportunity to make a clothes dryer for your balcony with your own hands, exactly the way you like it. Therefore, we propose to talk about these devices and their homemade versions in more detail.
What are the criteria for choosing a dryer?
Before you start choosing a dryer, decide how much laundry you will dry at one time.
Linen volume
It must be calculated based on the load of the washing machine and the number of washes performed at a time. For a large family, you should choose a model that can withstand a maximum weight of 20-30 kg; for a family of 3-4 people, 15 kg will be enough; for one person, you can limit yourself to 5-10 kg.
The useful length of the ropes or drying rods matters. It can be 1.5 meters for some wall-mounted ones, and up to 20 meters for exhaust ones.
These characteristics depend on the design, method of fastening and material of manufacture.
There are several ways to attach dryers, which allows you to choose the most convenient option. First of all, decide where it will be installed.
Where can it be mounted: floor racks, wall brackets, window options, etc.
- the floor can be placed in any free space and, if necessary, moved to another place;
- wall-mounted is permanently attached to one or two walls, always ready for use;
- the ceiling without linen is completely invisible, does not take up useful space, and can withstand a large volume of laundry;
- wall-ceiling or vine - the most popular option with adjustable height of individual rods;
- other types: with attachment to a radiator, a bathtub, hanging nets for delicate items - convenient as additional ones to the main dryer.
When making a choice, pay attention to some design features
Design features
At first glance, dryers may not differ from each other. But some models are equipped with useful features that will make them easier to use and save space in the house, while others are not.
- monolithic - one-piece structures, suitable for spacious rooms, as they do not fold;
- sliding ones have retractable elements, which allows you to increase the usable area if necessary;
- folding ones take up space only when in working order, after which they can be put away in a pantry or closet;
- electric ones dry a large volume of laundry in a short time, which is very convenient for a large family.
It is very important to choose the right material from which the dryer is made
Material of manufacture
- aluminum;
- plastic;
- tree;
- stainless steel.
Aluminum is the lightest
The material is light, but not very durable. Under heavy loads, parts of such a dryer may bend or break. In air, aluminum oxidizes, forming a black coating on the surface that stains laundry.
Plastic is brittle
It is good because it does not oxidize, does not stain laundry, and is lightweight. Unfortunately, it does not always pass the fracture test and is only suitable for light loads.
Wood - eco-style
Environmentally friendly material, does not oxidize and does not get dirty. But there is a drawback - the wood swells from water and becomes deformed with frequent use. Do-it-yourself dryers are often made from wood by home craftsmen. It is better to use it for the frame, and use a different material for the working rods.
Stainless steel - strong and heavy
It has more weight compared to other options, but also increased strength. This is the most popular and practical option. The coating of such structures can be powder, spraying, or enamel. The powder wears off over time, exposing the metal. It is preferable to choose enamel.
The price range for dryers is wide, as is the list of manufacturers. The most popular are four manufacturers.
Popular dryer manufacturers
- Gimi is an Italian company that supplies a wide range of high-quality dryers for every taste and budget.
- Meliconi also comes from Italy. Specializes in luxury products that are distinguished by excellent quality, but also high prices.
- Dorgular is a Turkish manufacturer of inexpensive but high-quality dryers. The products are not burdened with frills, but are distinguished by their simplicity and long service life.
- Leifheit is a German supplier and manufacturer. The highest quality of products combined with German meticulousness and foresight make the products convenient and practical. As a rule, they are supplied with various useful little things.
How to choose the right clothes dryer - video
Let's take a closer look at some types of these home helpers. The simplest among them are portable.
Do-it-yourself design device
Many of the dryer designs that were given above can be done independently rather than purchased. Here are several options for clothes dryers for the balcony with your own hands, which anyone can make if desired.
Rope
Let's consider a structure that can withstand a large amount of laundry. This option is suitable for balconies that have two opposite walls. A wooden strip will be attached to one of these walls. And on the second one a guy wire is mounted. So, here is a detailed instruction on how to make a dryer with your own hands:
- We install fasteners in the wall. In the case where the balcony is covered with plastic, we attach a large furniture corner so that it falls on the rail to which the plastic is attached. A beam is attached to the furniture corners.
- We screw screws in the form of rings into the upper part of the beam at the same distance from each other. We mount similar screws on the wall opposite.
- We stretch twine or strings onto the rings to dry clothes. For more information on how to make a dryer with your own hands, watch this video:
Using self-tapping screws in the form of rings, you can adjust the tension of the rope, which will begin to sag over time.
Floor structures
Sliding floor clothes dryers are a wonderful mobile design for arrangement in any room of the apartment, while when folded they do not take up much space and can be easily stored in the pantry. These dryers are quite simple to disassemble, but they vary in parameters and layout.
Among the advantages are mobility, ease of installation, variety of product range, compactness, and the ability to install dryers, as in the photo, in the bathroom and other rooms. However, fairly large structures can be heavy, but for ease of movement they are equipped with wheels.
Having once taken up the task of modernizing floor-mounted clothes dryers, designers came up with many original options that even looked like innovative installations.
Making your own clothes dryer
For homemade dryers, wooden slats, PVC pipes, metal corners and other available materials can be used. There are a lot of options for such designs, from simple to the most complex, and the choice depends only on your skill and experience. As an example, let’s look at making a dryer from corners, which any novice craftsman can make.
To work you will need:
- 2 steel corners 25x25 mm and about 1 m long;
- Grover washers with a diameter of 20-30 mm;
- drill with a set of drills;
- level and pencil;
- anchor bolts;
- braided steel cable or durable laundry cord.
Step 1. Take a corner and drill holes in one shelf for fasteners at a distance of 50 mm from the ends and in the middle. In the other shelf, holes with a diameter of 6 mm are drilled in increments of 10 cm, departing from the ends by about 2-3 cm. The second corner is processed in the same way.
Steel corner, holes in it, drawing
You can also use the following brackets
Linen brackets
Step 2. The prepared corners are thoroughly sanded and painted to give the dryer an aesthetic appearance. The paint must be anti-corrosion, because the dryer will constantly be in conditions of high humidity.
Metal paint
Step 3. When the paint has dried, apply a corner to the wall to determine the most convenient height. The level is set horizontally and marks are made with a pencil through the holes in the shelf. In the same way, mark the second corner on the opposite wall. All marks must be at the same level, otherwise the dryer will be skewed.
Step 4. Drill holes in the marked places, clean them from dust, apply a corner and fix it to the wall with anchor bolts. Then screw the second corner.
Step 5. Pull the cord between the guides, threading it through the washers and securing the ends with knots so that they do not slip out.
The photo shows an improved design with rollers
This design can withstand significant loads and is very durable, however, the cord may sag over time and will have to be replaced.
Secure laundry with clothespins to prevent it from falling
How to make a clothes dryer with your own hands
Before you get started, you should:
- determine the maximum weight of laundry for which it will be designed;
- decide in which room it will be located;
- see what materials are available;
- Having decided on a suitable model, you should familiarize yourself with how best to make it by studying tips and recommendations.
Wall dryer
The following materials will be required:
- For the base that will be mounted on the wall, you can use moisture-resistant plywood, a board with a joint groove, laminated chipboard, or a shelf from an old cabinet.
- Sanded bars and slats.
- Locking lock, hinges (2), folding mechanisms (2), hooks, hanging fastenings (2).
- Nails or screws.
- Varnish, enamel - to choose from.
- Carpenter's glue.
The work is performed in the following sequence:
- Create a drawing of the future structure with dimensions, taking into account that the optimal distance between the planks is 8-9 cm.
- Saw off 4 bars and strips of the required size. Treat the rough surface with sandpaper or an angle grinder (grinder).
- Drill blind holes for the planks symmetrically in two bars. If the planks have a square or rectangular cross-section, round the edges.
- Coat the holes with glue, assemble the frame together with the slats, fasten with nails or self-tapping screws.
- Make the base 10-15 cm larger than the frame.
- Paint the structure or varnish it.
- Screw on the locking lock on the top side of the base, on the back side - fastenings for hanging, on the side - a folding mechanism, at the bottom - the required number of hooks, just above which fasten the loops, and on them the frame.
Folding floor
Necessary materials:
- bars;
- furniture screws (4), partially threaded bolts (2);
- clothesline;
- paint (varnish).
Sequencing:
We recommend: How to remove glue from clothes
- Assemble two U-shaped structures. To do this, you need to saw off 4 bars of equal length for the vertical sides and three for the horizontal crossbars. The second cross member is made shorter than the first by two beam widths, the third (central) by four.
- Drill holes in the top of the vertical bars and at a distance equal to 1/3 of their length, marked from the bottom.
- Based on the length of the bolts and screws, make holes under them at the ends of the crossbars.
- Drill symmetrical holes for the cord in both crossbars at equal intervals.
- Paint all the parts and, after drying, assemble the structure.
- Pull in the cord.
Homemade ceiling options
Necessary materials:
- bars (2);
- round or rectangular strips (5);
- wood screws, screws with a ring (3);
- clothesline;
- varnish or enamel.
Progress:
- Saw off 2 bars of the same length and 5 planks.
- Paint the resulting parts in 2 layers.
- On both sides of the center of the block, mark marks every 10 cm, drill through holes and insert strips into them.
- If the plank is rectangular in cross-section, then you can screw them in with self-tapping screws along the marked marks, overlapping.
- Drill 2 holes for dowel-nails on the ceiling and one on the wall.
- Tie ropes to the resulting structure, pull them through the rings on the ceiling and tie them to a screw with a ring on the wall.
Date: September 25, 2021
How and where to dry clothes
Previously, clothes were usually dried outside by stretching a rope between two poles/trees. Many people still remember this picture from childhood. The main disadvantage of this method is that it is impossible to dry things in winter/rain. In the 21st century, residents of city apartments no longer hang their laundry on the street, but use a variety of devices to dry things in their house/apartment. This is how our ancestors, as well as our grandparents, dried clothes. In retail chains you can find many portable models of folding dryers (these are dryers). Most often, such structures are inconvenient to operate and bulky. Do-it-yourself drying products that have mounts on the ceiling/wall in the bathroom have become more practical. Also, homemade drayers can be attached to heating radiators. In this case, the laundry will dry much faster than on a conventional dryer, and the design takes up little space. A balcony or loggia can also be used to install modern structures.
Types and nuances of clothes dryers
All drying structures can be divided into 2 types - stationary and portable. The latter are more convenient because they can be folded and put away so that they do not cause inconvenience. It is better to place stationary dryers where they will not create problems for residents. For these types of products, it is better to choose a balcony or bathroom. Based on the placement method, dryers are divided into the following types:
- Wall-ceiling - as a rule, they are attached to the ceiling surface using brackets, and to the walls using a fixing bracket.
- Ceiling - are a system of brackets and ropes that are fixed to the ceiling.
- Wall-mounted - can be sliding, folding or stationary.
- Floor-standing – portable types of structures.
For small rooms without a balcony, the best option would be a mobile design, which is needed for drying clothes above the bathtub.
Portable dryer options
With a variety of mobile designs, horizontal floor-type drying devices have become extremely popular. They take up quite a lot of space, and therefore are most suitable for people living in a country house or dacha in the summer. There are also vertical floor drayers that take up a little less space. Miniature portable dryers are usually attached to a bathtub or to a heating radiator. The first option is convenient for drying items made of delicate fabrics, which are best not wrung out (in this case, water will flow into the bath). Electric dryers have become extremely popular lately. The heating elements in them are placed inside aluminum tubes, and in this case the laundry will dry much faster.
Stationary models
Inertial drying devices that can be attached to walls have become the most compact option. They fold and unfold quite conveniently, taking up very little space when assembled. The only drawback is that you cannot hang a lot of things, and the maximum weight of laundry that can be hung is 5 kg. In addition to the folding floor-mounted clothes dryer, another interesting option would be a stationary wall-mounted dryer for the bathroom, which is made in the form of a folding accordion. It can be folded up at any time if you want to take a shower. Such a device can be attached not only to the wall in the bathroom, but even on the loggia/balcony. But you can’t hang a lot of laundry on such a device either, because there are weight restrictions. Among ceiling dryers, drayers like vines have become popular, which are also convenient to use on the balcony. The huge advantage of this design is that the height of the metal strips can be adjusted with cables. If you place the slats at different heights, the clothes will dry much faster. To independently carry out installation work on stationary structures, the following tools are required:
- Drills, drills, dowels and screws.
- Screwdriver for screwing in the fastener.
- A hammer drill or impact drill to drill holes in the ceiling/wall.
We invite you to watch a video that clearly demonstrates the installation process of a dryer like a vine.
What material is suitable for manufacturing
Before you start making a clothes dryer, you should decide on the material for the construction. The choice is quite large:
- Stainless steel is the ideal choice for structures that are powerful in weight and size and are designed for a large family. The only disadvantage of this metal is its large mass. You can mount the structure on the ceiling or wall quite reliably, since ordinary hooks cannot withstand the heavy weight of clothes with a frame. Beginners should refrain from using such material to create ceiling-type drayers with their own hands.
- Aluminum is the lightest of metals, although it is quite fragile. This means that a drying device that is designed to hold a huge amount of laundry and clothing should not be made of aluminum elements. Moreover, making a frame from aluminum pipes is quite difficult.
- Wood is a natural and quite easy-to-work material, which is also quite affordable. The fact is that wood products are destroyed by moisture; it is worth treating the dryer with a double layer of varnish or water-repellent paint before use.
Before you start designing the structure and start manufacturing it, you should decide on the dimensions and weight of the things that you plan to dry. You should expect that there are about 5.5-6 kg of wet things for each family member. It turns out that a family of 3 people requires a device that can support up to 17 kg of weight. A lifting metal structure for drying things on the balcony is the best option. The best places to place drayers are loggias, balconies and bathrooms. Do not forget that water can drain from things, and therefore it is impractical to install structures for drying in residential areas.
Primary requirements
The dryer can be located on the floor, on the radiator, on the wall and on the ceiling. If the dryer is floor-mounted, then it can be stationary or mobile. The stationary version is used for the street, and the mobile version is used both for the street and for the home.
The suspended version of the device is installed in a specific place with reliable fasteners; it does not move. The wall-hung model of the dryer can be installed when you need to hang laundry. The rest of the time she hides somewhere behind the closet so as not to disturb.
Let's look at several simple and reliable options for a homemade dryer . Basic requirements for the product:
- the structure must be made of a material that does not rust, so as not to stain things;
- it must withstand a lot of weight (while the laundry is wet, it is heavy);
despite the fact that a lot of things are washed, only a certain number of them need to be hung on the dryer;- if the structure is stationary, then its fastenings must be reliable;
- the modular design when folded should not be too heavy - its optimal weight is 10-12 kg;
- Regardless of the type of structure, washed items should hang on it and not lie;
- the design should be comfortable so that there is no need to resort to using a stool to remove, hang or rehang laundry;
- It would be nice if things could be hung on it without clothespins;
- Items that cannot be wrung out after washing should preferably be hung over the bathtub to allow the water to drain.