Features and Properties
Liquid leather is usually understood as a mixture of polymers made on the basis of alcohol and water. Of course, the composition contains an adhesive type base, rubber resins, and multi-colored dyes. All this definitely contributes to the choice of the optimal color solution. The consistency of liquid skin is a thick viscous mass, a gel. It is usually sold in a bottle or tube equipped with a special brush-shaped cap.
advantages , mainly in the following aspects:
- ease of application of the composition to the surface;
- instant drying, which does not require long waiting;
- high level of strength;
- absolute elasticity, which contributes to the full recreation of the contours of products;
- wear resistance;
- long service life;
- absolute safety due to lack of toxicity.
This material has practically no disadvantages The main nuance is that the color palette implies some restrictions, however, if you dilute the colors according to a special scheme, this problem can be easily and quickly solved. Today, purchasing this product is available in several ways. You can do this at specialized points (furniture retail outlets and household chemical stores), or you can order it on the Internet. The cost of one bottle starts from 200 rubles, depending on the brand and volume.
Preparing to remove scratches
Before starting the procedure, inspect your boots or other footwear. You need:
- understand how serious the defect is, whether it affects only the surface or penetrates quite deeply;
- remove those small pieces of material that cannot be put in place - nail clippers or small tweezers will help you with this.
Also, before removing a scratch, you need to clean the surface.
- Wipe it gently with a soft sponge soaked in soapy water.
- Remove any remaining soap using a clean, damp cloth.
- Wipe the surface with a dry cloth.
- Dry your shoes in a well-ventilated area, but never place them near heating appliances or where they may be exposed to direct sunlight.
Instructions for use
- To repair a damaged item, you will need the leather itself, which 100% matches the product in color characteristics, sandpaper to help clean the surface, and alcohol for neutralization purposes (absolutely any detergent can be used in its place). Along with this, it is advisable to use glue to pre-glue the surfaces of cracks and tears.
- The next step is the actual preparation of the product. First you need to clean it, for this you use sandpaper. If the damage has a large area, it will need gluing, and in such a way that the edges fit together as tightly as possible. The glue should dry well. After this, the surface is degreased and wiped with alcohol or washing liquid.
In some situations, color mixing may be necessary for repairs. It is immediately worth noting that there are three shades of the primary type, which include blue, yellow and red. They can be mixed together as you like, the main thing is to follow the instructions that come with the set.
- Next, it is worth considering the features of using liquid leather. Traditionally, it is applied to damaged areas using a brush (it is sold in one set). First, the surfaces are adjacent to each other closely; gauze is used for this. Application is traditionally carried out in two layers, the first of them is applied evenly, the second too.
- Next comes drying the liquid skin. For everything to be successful, you need to make sure that the first layer is as thin as possible; it dries within 2-3 hours. The second level should also be thin. Only if these conditions are met can the product be fully prepared for use.
General recommendations
- The most important thing in restoring leatherette is restoring the original pattern. For example, it is better to paint over a small damaged area with a brush or aerosol. Before starting work, it is advisable to degrease the surface for better adhesion of the artificial leather to the polymer.
- “Liquid skin” should be applied in two stages: first, on the damaged first layer, and two hours later, on the second.
- If the furniture has a large number of abrasions, cracks and cuts, then it will be impossible to restore it. You are unlikely to be able to restore the former appearance of a sofa with leatherette in a rare color (turquoise, light green, coral, purple), since the applied shade will differ from the factory color.
- It is impossible to recreate a complex leather pattern by using a napkin with a relief imprint, which is used only to imitate the fine structure of the leather covering.
- The aerosol coloring pigment should be sprayed at a distance of at least 20 cm. It is advisable to carry out painting work in a respirator or protective mask to reduce the risk of penetration of the product into the respiratory tract. Also, do not forget to wear plastic gloves on your hands, which are used by hairdressers when dyeing hair.
Popular brands
Today there are a large number of brands producing liquid leather on the market; they exist not only in Russia, but also abroad. The most popular companies are presented as follows.
- FLEX STEP . This is a domestic brand, which is presented in individual bottles and sets consisting of 7 shades. Their volume is 17 ml, colors may vary. The cost can reach 600-1000 rubles.
- LIQUID LEATHER . Another popular Russian-made brand that has won rave reviews from a huge number of customers. It is sold in the form of a bottle with a volume of 125 ml, and a set consisting of 7 bottles with a volume of 20 ml is also available. The average price is from 600 rubles.
- SAPHIR . This brand is sold in the form of tubes, the volume of which is 25 ml. The color palette is extremely rich and varied; the cost of a tube starts from 500 rubles. High level of moisture resistance.
liquid skin
These are not all brands of liquid leather, but they are the main ones.
How to make liquid skin with your own hands
Instead of buying liquid leather and spending money, you can make it yourself. To do this you will need the following substances:
- acetone or a solvent based on it;
- a piece of leather of similar quality;
- putty knife;
- knife;
- pipette.
A small amount of solvent is applied to a piece of skin using a pipette. Then the paint that has been dissolved is scraped off, then applied to the damaged area and evenly leveled with a spatula.
Thus, liquid skin is a truly useful substance that has a fairly wide range of applications. With its help, you can update any item and preserve its characteristics.
How to repair a leather jacket at home
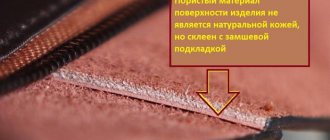
The leather jacket is usually fastened with a zipper or buttons. Modern products are made of soft natural or artificial leather with or without insulated lining. The skin of different animals is used for sewing - buffalo, pigs, cows, sheep, horses, goats, etc.
Buffalo leather is very durable and elastic, so jackets made from it can be worn for years without any problems.
Pigskin is the cheapest because it has poor technical characteristics. It is porous and inelastic, so even new jackets often develop defects.
The most problematic areas of leather jackets:
- collar;
- sleeves;
- cuffs;
- pocket area;
- shoulder and side seams.
If your leather jacket is torn, repairs should begin immediately. When a gap or cut forms along a seam, the hole quickly increases in size. This especially applies to places where the skin stretches the most - the area of pockets, elbows, chest.
Restoring leather products is a painstaking job, which in some cases requires pinpoint precision. In order not to completely damage the jacket, carry out repairs without haste.
How to mend a gap
Tearing of the material at an angle is a problem that owners of leather jackets often encounter. If you get caught on a sharp metal object, defects will certainly appear on your skin:
- break in the shape of an angle;
- a hole due to a completely torn flap of skin.
We recommend: How to clean jewelry from darkening and restore its shine?
The methods for repairing a jacket in both cases are radically different. When the skin is torn at an angle, restoration is less labor-intensive and takes little time.
How to sew a leather jacket when the material is torn at an angle:
- the jacket is turned inside out;
- in the area of the defect, the lining is ripped out along the seam;
- from the inside, the area of the rupture is degreased with alcohol;
- cut out a patch from a piece of fabric or leather so that it overlaps the edge of the tear by at least 1 cm;
- the patch is smeared with glue and applied to the area of the tear, having previously joined the edges of the torn material;
- a load is placed on top (a stack of books, a heavy iron, a decanter) and left for half an hour;
- If the patch has stuck well, the lining is sewn up.
To close the gap and not redo the work, you can’t rush. If you apply too much glue, smudges appear on the front of the jacket. Sometimes the edges of the torn flap diverge, causing the defect to become noticeable. To fix the problem you need to:
- bend the skin at the site of the tear;
- Using a toothpick, coat the edges with glue;
- place the jacket on a flat surface;
- move the edges of the tear by pressing them with your fingers;
- place the weight on top for 15-20 minutes.
To better camouflage the repaired area, it is treated with cream paint. If the jacket is winter, you can go outside in it only a day after restoration.
To repair leather outerwear, use special adhesives - SAR-30E, Nairit, Rubber, Desmokol.
When a piece of skin is torn out, it is more difficult to deal with the hole. To revive the jacket, a double patch is made - from the inside and from the front side.
How to repair a leather jacket if the hole is not along the seam:
- the leather jacket is turned inside out, and the lining in the place of the hole is ripped open;
- the inside of the skin is degreased with alcohol;
- glue is applied to the patch and applied to the hole;
- place a load on top for 30-40 minutes;
- on the front side, glue a torn flap or a piece of skin as similar as possible to it, corresponding to the shape of the hole;
- the joint between the base material and the patch is carefully filled with glue;
- Once dry, cream is applied to the repaired area and the lining is sutured.
If a piece of leather is torn out in a visible place, the damaged area can be decorated with leather patches or chevrons. In extreme cases, the patch is masked with a decorative seam.
How to seal a cut on a jacket
If there is a cut, you can repair a leather jacket with your own hands using glue and a patch, tape, plaster or adhesive-based tape. If a hole appears on a sleeve or chest, it is recommended to use patches or keeper tape, as they are highly durable.
How to fix a hole in a leather jacket:
- in the area of the cut, the lining is peeled off;
- a rectangular patch is cut out of leather or thick fabric;
- the reverse side of the cut is degreased with gasoline or acetone;
- Moment glue is applied to the cut;
- a thin layer of glue is also applied to the cut-out patch;
- the scrap is glued to the cut so that it overlaps the edges by 1 cm;
- pressed down with a load from above;
- a day later, the results of the work are evaluated.
When repairing colored jackets, use salicylic or ethyl alcohol as a degreaser. Unlike acetone, they do not dissolve paint.
To disguise cuts, craftsmen use liquid leather - a means for repairing leather products, which in consistency does not differ from shoe glue. After polymerization, it turns into an elastic material. For the restoration of leather bags and jackets, the following is used:
- Guin – eliminates cuts, deep scratches, burns on the skin. The manufacturer produces adhesives in different colors - red, green, black, white, yellow, etc.
- Premium – restores burnt areas, cracks, abrasions and cuts. Professional glue has waterproof and frost-resistant properties.
- Kolorstar - masks deep scratches, small holes, abrasions and faded areas of leather. After drying, the glue becomes flexible and elastic, which prevents the glued edges of the product from coming apart.
To seal cuts with liquid leather you will need:
- bandage or piece of gauze;
- plastic card (bank, discount);
- tube of liquid skin.
Features of repair using liquid leather:
- a piece is cut out of gauze to cover the cut on the jacket;
- liquid skin is applied to the defect on the front side;
- a piece of gauze is placed on top, the edges of which are stretched;
- after 10 minutes, another layer of liquid skin is applied to the gauze;
- After 3 hours the glue dries completely.
Gauze or bandage plays the role of a reinforcing layer that prevents the edges of the cut from re-diverging. If desired, it is made from the wrong side, but glued with rubber glue. And from the face, a thin layer of liquid skin is applied to the cut only once.
What to do if part of the material is torn out
A torn “wound” is the worst thing that can happen to a leather jacket. But if desired, it can be restored using leather or a patch.
Many leather adhesives are toxic. Therefore, repairs to the jacket should be carried out in a ventilated area.
Fixing a hole in a jacket:
- the product is turned inside out and the lining is ripped open in the area of the defect;
- use scissors to straighten the edges of the hole so that it takes on an oval or round shape;
- a patch is cut out of a piece of leather to the size of the hole in the jacket;
- on the reverse side the material is degreased;
- a patch is made from fabric;
- a piece of fabric is coated with glue and applied to the hole;
- leave the jacket under the load for 2 hours;
- a leather patch is inserted on the front side;
- glue is carefully poured along the edge;
- press down with a weight and leave for at least 12 hours;
- the lining is sewn together, and the problem area is lubricated with cream.
The edges of the patch should overlap the hole by 1-2 cm. Otherwise, after a couple of months the product will have to be restored again.
Repairing cracked collar and cuffs
Cuffs and collar are the most problematic areas of a leather jacket. Due to constant friction, abrasions appear on them, and sometimes the skin cracks. If there are pieces of material that match the color, it is better to replace the worn parts. If this is not possible, restoration will have to be resorted to.
Leather jacket repair:
- Greasy and worn. The collar is treated with gasoline and then allowed to dry. Apply paint with a sponge to remove scuff marks.
- Cracked skin. Peeling sections of material are cut off with scissors. The problem area is degreased with alcohol. Apply a thin layer of liquid skin. After 3-4 hours, another layer of glue is applied. You need to make sure that the liquid skin does not extend beyond the edges of the crack. To prevent sagging, remove excess product with a dry cloth.
After repair, the jacket is left at room temperature for at least 1 day.