Today, more people are trying to use a bolster-shaped pillow instead of standard rectangular or square pillows. This is due to the anatomical needs of the body itself. If we turn to a historical excursion, it becomes obvious that in ancient Rome and Egypt, as well as ancient Asia, people slept on similar structures.
Such an item not only decorates the room, but also allows you to make your sleep better and more correct.
What are the advantages of using bolster pillows?
A bolster pillow is not just a fad or a tribute to fashion - it is a physiological human need caused by the specific structure of the spinal column. If you lie down on such a pillow, placing it under the cervical deflection of the spine, you can subsequently avoid many problems with the musculoskeletal system.
Effects of using a bolster pillow:
- eliminate anatomically incorrect deflection in the thoracic region;
- maintain the neck in a comfortable state, promoting normal blood supply to the brain and thus preventing headaches, tinnitus, and cognitive impairment.
It's no secret that a regular pillow can cause pain in the neck and spine, so a bolster pillow is an excellent solution for healthy sleep.
The pillow-cushion will become a companion remedy for getting rid of many problems with the spine, including osteochondrosis.
Where to begin?
Initially, you need to decide what you want: add color or create an exquisite luxurious sample, or maybe write your name in large soft letters or give your child an original toy. Nothing is impossible.
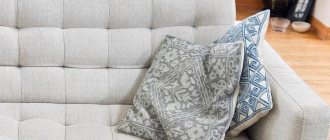
When choosing a design and color combination, you must rely on the purposes for which the product is intended. Sofa cushions are intended not only to perform a decorative function in the interior, but also for purely utilitarian purposes: to put under your head while reading, to throw on the floor to sit next to your child, or just to take a nap.
How to choose the right design
To make using a bolster pillow comfortable, you need to make the right choice. To do this, the following factors should be taken into account.
They allow you to take the load off your spine while you are lying down. In this case, not only you and your body rest, but also your spine.
- Height of the product – when choosing a bolster pillow to suit your individual parameters, you need to measure the distance from the shoulder to the base of the neck. The height of the pillow should not exceed this parameter, otherwise it will cause a feeling of discomfort.
- Product width – you need to add 5-7 cm to the shoulder width. But sometimes in orthopedic products it is allowed to add a smaller value in order to properly support the cervical spine.
- Additional functions of a bolster pillow can be made from a material that has a memory function or filling material in the form of buckwheat husks or with the addition of essential oils or aromatic herbs. All this contributes to the massage effect and calmness during sleep.
Such a pillow can even make it easier to fall asleep, because the body relaxes as much as possible.
Master class “Pillow “Candy””
This small candy-shaped bolster pillow will add a pop of color to your living room or bedroom, or can be tucked under your head while relaxing.
Materials and tools for the master class “Pillow “Candy””
pink fabric with a pattern, yellow and blue satin ribbons, padding polyester, red lace, thread, scissors, safety pin.
1. Cut out a rectangle measuring 30 x 45 cm from pink fabric. Take two pieces of ribbon of different colors, each 30 cm long. Sew the ribbons to the pink rectangle, departing from the edges by about 14 cm.
2. Turn the rectangle over so the wrong side is facing up. We fold the side edges on each side by about 6 cm, and make two lines on each side as shown in the photo. We will also sew up the sides at the hems, reaching only to the beginning of the lines. A little later we will insert laces between the transverse stitches.
3. Fold the rectangle in half and sew the middle part of the pillow between the cross stitches, leaving the edges on the sides unsewn.
4. Turn out the resulting part. From two edges into the space between the perpendicular lines we insert pieces of red lace, each 30 cm long. We will insert the laces using a safety pin. Tie knots at the ends of the laces.
5. Tighten the lace on one side and tie it with a bow.
6. Fill the pillow with padding polyester.
7. Tighten the lace on the other side and tie it with a bow.
All that remains is to find a place for it on the sofa or bed.
Source
Pillow for children
A bolster pillow for children must have a specific structure. It must fit the anatomical dimensions of the child and have two sides at the edges. They prevent the head from slipping and will help maintain the spine at the same level.
It is also important for a child to choose the right roller. It is better if it is a product with two sides at the edges.
It is especially important to use it for children suffering from poor posture, headaches, poor sleep and cognitive impairment caused by improperly formed blood circulation in the neck and head.
Candy pillow with embroidery insert. Master Class
I am glad to welcome you back to my master class.
Having taken a short break, I got back to work. Due to the wonderful sunny mood, I decided to create a candy pillow with shoes - flowers. By the way, the pillow is made with hand-made embroidery, so it will not be an ordinary thing. And so, perhaps, let's begin. To work on our product we will need:
- matching fabric with embroidery,
- finished embroidered picture,
First, let's decide what piece of fabric we need. And for this we must know what kind of pillow we want to get as a result.
Now let's move on to working on our embroidered picture. The cross stitch pattern is given below.
To begin with, we will process the required size of canvas with an embroidered image using a zig-zag stitch.
We will do it in the same way on all sides. This is what it should look like when finished.
Let's cut the outline close to the line. It is this that will prevent the fabric from falling apart in the future.
This is what we ended up with.
Now let’s attach our embroidered picture to the middle of the product, having previously taken measurements.
When we have completely decided, we will pin the base onto the fabric using sewing pins.
Baste using white thread.
Using a sewing machine we will sew a stitch.
Now, in order to hide the stitching and the ends of the seams, we will hide them using decorative tape. Let's see how it will look.
Then carefully attach the decorative tape using basting.
Pay attention to the angles. Try to lay them out nicely so that the transition is not visible.
This is what we have after basting.
Now it’s time to secure the ribbon over the top with machine stitching.
When we have made the main pattern, we will begin to form the pillow itself; to do this, we will fold the fabric with embroidery inside out.
In order for the open parts of the pillow to look beautiful, we need to close the seams at the ends. To do this, cut two more pieces that will be equal to the width of the pillow and slightly longer in length than the open part of the side.
Using pins and a basting stitch, we connect the two side pieces of fabric. Notice that we do this by folding them with their front sides facing inward.
Source
How to sew such a product with your own hands
It is not at all necessary to buy this type of product in a store. Having minimal cutting and sewing skills, you can sew it yourself.
Depending on the style of the room, such sofa decor can be made in the color of the upholstered furniture.
This hand-made bolster pillow will allow you to choose exactly the parameters to suit your own needs, as well as decorate it taking into account the interior of the room.
Before starting work, you should prepare the necessary materials and tools:
- fabric for pillowcase and fabric for base cover;
- threads of the corresponding color;
- decorative elements in the form of cords, buttons, appliqués;
- filler (depending on desires and needs).
Before you sew a bolster pillow with your own hands, you need to make a pattern.
The only important point is that it is not recommended to use down and feathers for stuffing such products.
It is necessary to take your own anatomical measurements, in accordance with the recommendations indicated above. After this, correctly calculate the parameters of the pillow - approximate calculations are also given in the description above.
If you want, you can add various trims along the seam line at the ends of the cover: cord, ruffles, or something else.
Once the dimensions of the bolster pillow are obtained, I begin to create a pattern on paper. This moment is the most crucial, since the correctness of the pattern will determine how comfortable and correctly the pillow will be selected for individual needs.
Having made the pattern on paper, it is transferred to the fabric for the base (napernik).
Then they are duplicated on fabric for a pillowcase, which can serve as both a decorative cover and exclusively a pillowcase for sleeping. It is important to consider that if the pillow is used solely for sleeping on, the fabric of the pillowcase should be as natural and light as possible.
When making a pattern, you need to take into account seam allowances. They should be at least 0.5-1 cm.
This stage should end with cutting out the fabric pattern.
Fold and sweep the napkin.
First, the napkin (bottom pillowcase) is basted, then it is machine sewn along all the seams. Be sure to leave a small area unstitched in order to place the stuffing.
Do your work smoothly and accurately.
First, pin the edges together.
Baste the sides.
Sew the seams using a machine.
Prepare the filling.
Insert the filling into the napkin.
When the filler is compacted to the desired density, you should carefully sew up the existing hole by hand.
Sew up the remaining hole.
The cover is sewn. For ease of use, it can be made with a zipper. This will make it easier to remove and clean the top.
Pattern for a pillow cover.
Sew a pillow cover.
This is what the finished product will look like.
The inner part is placed in the outer pillowcase - the pillow is ready.
Decorative donut
Have family and friends stopped believing that you can resist any kind of candy? The delicious sweetness is hard to resist! Luckily, you don't have to worry about calories anymore! The soft donut is inedible, but has a very appetizing appearance, one can only dream about it. It can be used as:
The pillow looks like a giant candy covered in frosting and topped with delicious sprinkles.
Round pillow with a very appetizing look, photo
Even novice needlewomen can sew such a product. Are you looking for a gift idea for March 8th for a friend or mother? This original gift will appeal to women, children, and those with a sweet tooth of any gender and age. A wonderful pillow is an ideal gift:
The donut is useful at home, on the road, suitable for hugging, and will evoke pleasant associations in any situation. Below is a fun solution to making a donut!
Options for decorative items
To make a decorative cushion in the shape of a cushion, you can take several types of fabric.
They can be combined in a variety of ways. The simplest and most frequently used option is a cross combination of several types of fabric. To do this, at the stage of patterning the outer cover, it is necessary to fold the types of fabric in the required sequence and stitch them so that they form a continuous fabric. The seams must be ironed so that they do not form crumpled parts on the finished product. And after that, on such a colored canvas, make a pattern for the outer pillowcase.
You can use sewn edgings or use them along the end parts of the tie.
To correctly and easily assemble the cylindrical parts of the pillow, you must first sew a round tube. Then take the round end piece and pin it to the pipe, turned inside out all the way around. After this, carefully baste and only then stitch the middle so that the circle does not move and does not gather the cylindrical part.
The rest of the sequence of actions is carried out similarly to the process described above.
Since sewing a bolster pillow at home is quite simple, you can make several products at once. Some of them are for decorative purposes, and the other part is for sleeping properly.
How to quickly and easily sew an ottoman pillow
I bring to your attention a very simple method of sewing ottoman pillows. These cute and cozy fabric items can be used in so many ways around the home and outside. They can be seats for chairs, stools, chests, garden benches and swings, bumpers for a crib, soft toys and pillows themselves.
To make ottomans you will need fabric and insulation. As stuffing for pillows, I use padding polyester and siberia, which are left over from sewing patchwork quilts. The insulation that is sold in the form of a continuous sheet can be easily fluffed by hand.
So, let's start making ottoman pillows:
1. Cut out 2 squares with a side of 43 cm from fabric (or from two types of fabric).
We put them face to face. We need to connect 3 sides of the squares. We start and finish sewing, not reaching 2 cm from the top edge of the fourth side.
2. Trim the corners a little and turn the pillowcase over your face.
3. Place a decorative stitch at a distance of 1 cm from the edge along the three connected sides.
How to sew a bolster for a baby crib with your own hands: pattern and sewing instructions
Of course, any mother wants the crib to be not only cozy, but also safe, because even if the baby does not know how to roll over on his own, the baby can get hurt on the wooden sides. Therefore, sewing a bolster for a child’s crib is a pressing issue. Having such “soft protection”, you will not only protect the newborn from possible damage, but also decorate the children's room.
No interior design project will reward you more than creating a warm, cozy environment for your baby. For a child's bedding, you should try to use non-flammable fabrics and finishes; Carefully check all labels on fillers to ensure they meet government fire safety standards.
To avoid choking accidents, choose trims that are sewn firmly and are also large enough to prevent your child from swallowing anything; Trims with buttons, beads and hanging items, which are often used for home decoration, should be kept out of reach of children.
The bolsters in the crib provide the baby with both physical and emotional protection. They absorb sounds, protect the baby from accidental injury and turn such a large crib into a small cozy nest.
Since the bolsters are made of four sections with ribbon ties, they are very easy to attach.
Mattress flaps on the bottom edge of the bolsters sit between the mattress and the slatted wall of the crib, covering the sheet and helping to keep the bolsters in place.
In this article you can find step-by-step instructions on how to sew bolsters for a baby crib.
How to make a bolster for a baby's crib: measurements
To make bolsters for a baby crib, measure the length, width and depth of the mattress in the same way as with any bed. Then take the following measurements:
Cushion Depth: From the top of the mattress to the bottom of the slatted side of the crib when it is lowered and in its lowest position.
Headboard depth: from the top of the mattress to the top of the center rail.
Length of side bolsters: this is a distance equal to the length of the mattress plus 2.5 cm.
Width of side rollers: this is the distance equal to the depth of the roller plus 2.5 cm.
The length of the bolsters in the legs: this is a distance equal to the width of the mattress plus 2.5 cm.
Length of side flaps: this is a distance equal to the length of the mattress plus 2.5 cm.
Side flap width: this is the distance equal to the depth of the mattress plus 2.5 cm.
Before sewing a bolster into a crib, calculate the material consumption. The exact amount of fabric you'll need depends on the size of the crib, the depth of the bolsters, and the width of your fabric.
The pattern of the fabric can also affect whether you need to cut the bolster sections to length or width.
The best way to determine the correct amount of fabric is to make a pattern of the roller sections, then in the store just lay it on the actual fabric and count.
Sewing a bolster for a newborn baby's crib with your own hands
Step 1: Make a pattern for the headboard bolster in the crib.
The top edge of the head bolster is usually rounded, even if the top edges of the sides and foot bolster are straight.
- Start making a pattern for a bolster for a newborn's crib by cutting out a paper rectangle. Its length should be 2.5 cm greater than the depth of the headrest; its width should be 2.5 cm larger than the width of the mattress. Mark 12mm at each corner. Connect these marks by drawing a smaller rectangle.
- Fold the rectangle in half lengthwise. Working with a small rectangle, measure up and mark a distance equal to the depth of the roller.
- Make a curve by drawing it between the roller mark and the line at the top of the fold. Add 12mm to the rounded edge, then cut along this new rounded line. Once unfolded, you will receive a paper pattern for the complete headboard bolster, including seam allowances.
Step 2: Cover all parts of the roller.
From decorative fabric:
- Four side bolsters
- Two cushions at the feet
- Two headboard bolsters
- Four side valves
From polyester fabric for lining:
- Two side bolsters
- One cushion at the feet
- One headboard bolster
Made from lightweight lining material:
To sew a crib bolster and avoid pattern confusion once all the pieces are cut out, separate the matching bolsters, quilting, flaps, and ribbon ties, stacking them in piles, one on each of the four sides of the crib.
From the tape:
You only need 17.5 m of tape for everything. Cut twenty-six ties, each 61 cm long:
- Six for each side roller
- Six for the foot roll
- Six for the headboard bolster
Step 3: Assemble the side protective bolsters into the crib with your own hands.
- Divide and mark the top edge of the roller into four parts. Mark the corners.
- Pin, then baste the stitching to the wrong side of one of the side bolsters.
- Fold each strip in half lengthwise. Pin, then baste one tie at each mark along the top corner and at each corner mark as shown.
- If you've decided to add trim to your crib's bolster, do it now. With right sides facing each other, baste the frill, cord, or other inset trim to the top edge of the quilting roll, between the corner marks.
- Fuse the lining material to the wrong side of one side flap. Pin to the second side flap, right sides facing each other; stitch, leaving one long edge unstitched.
- Trim seams, pin corners, then turn right side out and press.
- Pin right sides together, then baste the flap to the bottom edge of the quilting bead, between the corner marks.
- With the right sides facing each other, pin the second side section to the quilting roller. Sew as shown in the picture, leaving the bottom edge unstitched so that you can turn the product inside out later. Be careful not to catch the ribbon ties or the ends of the flap in the stitching. Trim seams, pin corners, then turn right side out.
- Sew the unstitched area with a blind stitch. Grab all layers from the top to the bottom edge of the roller, just below the tape. Be careful not to catch the ribbon ties or flap ends in the stitching.10
- Repeat the entire procedure for the roller on the other side.
Tip: to make your DIY baby crib bolsters even plumper, line each of them with an additional layer of polyester quilting.
When sewing quilted parts, sew them up with the side where the quilting is located. To sew the bolster into the crib as neatly as possible, and to prevent the sewing machine foot from getting tangled in the quilting, use strips of paper or non-woven material, or a tear-resistant stabilizing layer between the quilting and the foot. When you finish stitching, carefully pull out the paper or stabilizer.
If you want to make the upper edges of the side and foot bolsters of a newborn crib shaped, then you will need to make separate patterns for them with your own hands. To begin, draw two rectangles on paper - one equal in size to the side bolster minus seam allowances, and the other equal to the leg bolster minus seam allowances.
For the side beads, divide and mark one long edge into four sections. Then mark down 5-10 cm at each corner and draw a line across the entire roller. The deeper the mark, the deeper the cutout. Connect the marks so that they intersect with this line.
Determine the center point on the top edge of the roller, between each row of marks. Draw a curly arc connecting the center and two quarter marks as shown in the image below. When making a bolster for a child with your own hands, use this arc as a pattern for all three curly cutouts.
Once you have marked the arc, add a 12mm seam allowance.
For the leg rolls, split and mark one long end in half. Measure, mark and draw two shaped cutouts in the same way as for the side bolsters. Add 12mm seam allowance.
As you can see, making a bolster for a child’s crib is not at all difficult, and there are a lot of benefits from this product.
Blanket, frill and pillow for baby bed
In addition to bolsters for a crib, you can make a blanket, frill, and pillow with your own hands.
Since there are no standard sizes for cribs and baby blankets, use the dimensions of your crib's mattress as a starting point. Make the blanket about 20 cm wider and shorter than the dimensions of the mattress. A blanket this size will comfortably cover your baby in the crib and will also be large enough to be used as a changing pad.
A crib frill is simply a smaller version of a gathered bottom frill with open corners.
Since most cribs do not have a box spring, the gathered frill is placed on a wooden platform inserted under the bottom of the mattress.
Although the skirt can fall down to the floor, a more popular length is one that reaches the bottom edge of the crib side slats when they are down.
A matching pillow is a wonderful finishing touch to a child's room design; it will also be an excellent support for the back or arms of parents at the moment when they feed the child. Take a small pillow (30-35 cm). Choose a fabric and finish that matches the blanket. Choose an easy-to-remove pillowcase that can be washed frequently.
Don't miss more on this topic
Source: https://domosedi.ru/blog/homemaking/6197.html
Work process
When sewing, you need to start from the bottom of the roller.
You can find a lid or plate of a suitable diameter and transfer it to a plain fabric. Make two identical circles. After this, you need to measure the circumference of the future bottom; this will be the width of the roller. To find out the length of the future cushion, you should determine the perimeter of the crib and divide it by the estimated number of pillows. When the width and length are known, you can draw a rectangle with 1 cm allowances on all sides.
A similar rectangle needs to be prepared for colored fabric. For the cover you will need strips of 30*4 cm. But circles for the cover will not be needed.
Important! The number of ties depends on the length of the roller. If it is small, then you need 3 ties - 1 in the middle and 2 along the edges. If it is long, then you need to sew 2 ties in the middle, that is, you will need 4 in total.
When all the parts are cut out, we start sewing from the base. Rectangles of plain fabric are sewn lengthwise. From the inside out we sew the first bottom to one of the holes.