Home / Types of ceilings / Ceiling tiles / What and how to wash ceiling tiles?
Any ceiling covering will sooner or later require attention. It will just need to be washed or cleaned. And oddly enough, the care of ceiling tiles raises a lot of questions. As it turns out, not everyone knows how and how to clean it from dirt.
Variety of Foam Ceiling Tiles Coverings
The service life of the ceiling coating largely depends on the quality of the materials used for its design.
It is desirable that the selected coloring composition has a sufficient degree of density, is resistant to high humidity and detergents, does not fade over time, looks beautiful and adheres firmly to the surface. Also, the foam surface is not painted with alkyd compounds; oil paints are very rarely used, since the finish after final drying will not have the required strength. Experts recommend using two groups of water-dispersion paints, or rather water-based and acrylic.
The first of them have numerous positive qualities:
- environmentally friendly and completely safe for health, non-toxic;
- quick drying of the painted ceiling;
- easy application with roller and brush;
- moderate gloss and sufficient density;
- affordable price;
- a wide range of products regarding color solutions;
- possessing a sufficient degree of vapor permeability;
- resistance to harmful microorganisms;
- fire safety.
Such compositions also have other disadvantages. For example, they do not adhere well to previously painted surfaces and cannot be used to paint metals. When applying a very thick layer, the water-based emulsion may peel off, and in conditions of high humidity, mold may appear on it. Surfaces painted with this composition strongly absorb dirt.
Water-dispersed acrylic paints made from polyacrylates have a number of advantages:
- heat and water resistance;
- strength and elasticity;
- environmental friendliness and hygiene;
- ease of application and quick drying;
- color brightness;
- wide palette of shades;
- resistance to ultraviolet radiation and different temperatures.
Advantages and disadvantages of the material
The popularity of seamless polystyrene foam tiles is ensured by the presence of a large number of advantages. Among them, the following deserves special attention:
- Insignificant mass. Thanks to this quality, the finishing of the entire ceiling space does not exert a significant load. In addition, lightweight materials are easy to transport and install.
- Minimum gaps between individual elements. The missing seams on the ceiling make the surface more aesthetically attractive.
- Resistant to high humidity. Even direct contact with water does not reduce the quality characteristics of kitchen ceiling tiles. Thanks to this, the tiles can be washed with plain water or using cleaning and detergent compounds. The main thing is to avoid using various solvents that can damage the foam.
- Affordable price. Expanded polystyrene ceiling tiles are one of the cheapest finishing materials used to repair ceiling space. At a lower price level are whitewashing, painting and wallpaper.
- Fire resistance. Most tile material made of expanded polystyrene is treated with fire retardants, which allow the material to withstand higher temperatures, and when exposed to open fire, only melt, smolder and die out quickly enough.
- Good soundproofing and thermal insulation characteristics. The thermal conductivity of the tiles is quite low; in addition, the material will be a good obstacle to extraneous noise and sounds emanating from neighbors above.
- Easy installation. A simple home craftsman can install extruded ceiling tiles, since this does not require special knowledge and experience. In addition, laying tiles does not require expensive tools and materials. Installation is carried out without first creating a frame structure, which is necessary to create suspended ceilings.
- Insignificant tile thickness. Thanks to this characteristic and the absence of lathing, the height of the room practically does not change. This is especially important in the question of how to choose ceiling tiles for old houses where the ceiling height is not too high.
- Wide selection of patterns and textures. Using seamless tiles, you can create a unique pattern on the ceiling, and, if necessary, paint the finishing material in the desired color.
But even with such a huge list of advantages, almost all types of polystyrene foam ceiling tiles have several negative characteristics:
- Increased fragility. Working with such materials should be done with extreme care and precision.
- Poor vapor permeability. Foam tile products do not allow air to pass through at all. If this characteristic is not of particular importance for urban premises, then country houses may suffer from this. The fact is that wooden floors and thermal insulation require regular heat exchange above the ceiling, which prevents the accumulation of excess moisture.
- The use of low-quality adhesives when finishing ceiling tiles can lead to elements peeling off from the ceiling. This issue is especially relevant when exposed to high temperatures.
- In addition, it is worth noting that when heated strongly, the tile does not burn, but the melting process is accompanied by the release of a large amount of smoke and substances harmful to human health.
What paint to paint foam ceiling tiles
At the moment when the decision was made to update the appearance of the foam ceiling tiles, many cannot decide which coloring composition to use in this case. It is worth considering right away that polystyrene foam is susceptible to chemical influences. As practice shows, polystyrene foam can melt the solvent contained in oil and alkyd paints.
That is why it is recommended to use the following paints:
- water-based;
- acrylic;
- latex.
Since water is used as a solvent, such compositions do not cause any harm to the foam. In addition, such coatings have a number of advantages:
- environmentally friendly;
- no smell;
- fast drying process;
- high level of durability;
- fits perfectly on a foam surface.
If you plan to paint the foam ceiling in the kitchen, it is recommended to use moisture-resistant compounds. Typically, the price will be higher, but the service life will be significantly longer.
How to paint ceiling tiles with water-based paint
You should work with water emulsion according to the following algorithm:
- The first step is to paint the junctions of the foam plastic with the walls along the entire perimeter of the room. Since working with a roller can stain the walls, apply a strip of paint up to 5 cm wide around the perimeter of the room using a brush.
- This composition is applied in 3 layers.
- To remove excess paint, pass over the surface with a dry roller.
If you shine the light on the ceiling, you can see all the existing flaws.
Acrylic paint for ceiling tiles
Before you start applying the paint, it is recommended to first protect the furniture and walls. All work should be done in stages:
- All existing gaps should be sealed with putty, and then cleaned with fine-grained sandpaper. After this, it is necessary to remove the resulting dust with a dry cloth.
- In order for the paint to lay as evenly as possible, it is necessary to coat the surface with an acrylic primer.
- The paint is diluted with water until the required consistency and shade are obtained. To test, apply a small amount of the mixture to another surface and evaluate the result.
- For work, use a roller, and paint hard-to-reach places with a small brush. The roller should constantly move in one direction, which will allow you to apply the paint evenly.
If you need to get a more saturated color, then you should apply several layers.
Painting foam ceiling tiles with latex paint
It is very easy to paint a foam ceiling with latex paint; such a coating has a number of advantages:
- The drying process is quite fast;
- color lasts for a long time;
- You can paint not only dry, but also wet surfaces;
- If necessary, you can paint the surface of any material.
In this case, it is not recommended to make a thick layer, as there is a possibility that it will begin to peel off.
Folk remedies
At home there is always a replacement for ready-made store-bought formulations. What can you use to clean tiles? Let's look at the simplest and most affordable options.
Laundry soap
Grate a bar of soap on a coarse grater, dilute the shavings in hot water. The concentration should be like jelly. Cool the liquid, foam, apply to the tiles and let stand for 5 minutes. Then remove the remaining dirt with foam with a napkin, rinse the coating with water and vinegar.
Soda
Baking soda is great for removing any type of stain.
Loading …
- to remove yellowness, dilute 2 tbsp. l. soda in 0.5 liters of warm water;
- to eliminate local contamination, clean the dirt with soda and vinegar - 1 tbsp. l. add 2 drops of vinegar to soda, spread foam on the stain, wipe off the dirt after 2 minutes;
- to remove greasy dust, mix 1 tbsp. l. soda with 1 tbsp. l. salt, dilute with 0.5 liters of warm water, rinse off dirt.
Ammonia alcohol
What you need is alcohol, not tincture.
To remove dirt, soak a cotton pad or napkin in alcohol, and then carefully wipe the dirt off the tiles.
Expert opinion Evgeniy Katyshkin Specialist in housekeeping and subsidiary farming
Alcohol can be replaced with vodka without additives. To remove difficult old stains, it is better to apply with a spray bottle, immediately removing the dirt with a napkin.
Eraser
This stationery accessory cleans as well as any product. You can wipe off black dots and yellow spots with an eraser. The eraser will not cope only with greasy stains, the rest will be removed without a trace.
Lemon acid
Concentrated solution of 1 tsp. lemons, 2 tsp. soda and 0.5 tbsp. water will wash away persistent yellowness. The gruel should be evenly distributed over the surface of the tile, after 15 minutes, remove the dirt with a napkin, and rinse the coating with water and vinegar.
Knowing how to wash and clean the tiles, it is better to prevent the formation of persistent dirt. Cleaning the ceiling of dust once a week will eliminate the hassle of cleaning.
How and with what to wash ceiling tiles
The textured finish looks beautiful, but takes much longer to clean.
Work algorithm:
How to easily clean all household appliances in the kitchen
- remove dust from the surface with a soft brush or vacuum cleaner;
- Clean the recesses with a thin brush;
- beat the concentrated cleaning solution until foamy;
- apply foam to dirt with a porous sponge;
- remove the cleaning solution with a napkin;
- use clean water to wash the cladding;
- treat the surface with a spray bottle, immediately removing moisture with soft cloths.
Do-it-yourself ceiling pasting technologies
The process of decorating a ceiling depends, first of all, on the condition of its surface: flat or curved. In the first case, installation is much faster and does not require additional alignment efforts.
Where you should start installing tiles depends on the type of room and installation method. During the installation process, you should monitor the aesthetic appearance of the coating. The seams between the tiles are sealed with putty or sealant. Excess glue that appears at the joints should be removed with a damp cloth without waiting for complete drying.
On a flat ceiling
Before gluing the tiles, you should check the ceiling surface using a level to make sure there are no differences in height. For concrete and plasterboard ceilings, such a procedure is not required. The method of applying the installation composition depends on the type of glue. Usually the tiles are coated along the perimeter and diagonals. Water-based adhesives, including liquid nails, are applied to the panel in the form of large drops and pressed against the ceiling for even distribution. Then set aside to polymerize for 3-5 minutes and finally installed according to the instructions.
The surfaces of the ceiling and tiles are impregnated with liquid adhesives. The putty is applied to the area under one tile in a thin, even layer. Continue after securing the panel.
If the ceiling is uneven or crooked
It will not be possible to stick high-quality decorative panels onto a curved, cracked surface. It is necessary to seal the cracks or level the ceiling. One of the effective ways to level out large differences is to install ceiling plasterboard. Minor deviations are corrected using putty.
Center of the room
It is most convenient to start installation from the geometric center of the ceiling, which is determined by the intersection of the diagonals. It is taken into account that the chandelier will be located at this point, so the panels are placed around it, cutting the edges for the wires.
Classification of ceiling slabs
Today's range of ceiling tiles is pleasing to the eye. You can find the most unusual option. The most common types of this material used for ceiling finishing are:
- stamped tiles made from extruded polystyrene foam;
- injection, its distinctive feature from the previous variety is the production method and thickness, which allows it to serve as sound insulation;
- an extruded board with a thickness of two and a half to three millimeters, which makes it very durable; its coating is often laminated.
Methods for cleaning non-washable slabs for suspended systems
If non-washable panels are used when constructing suspended ceiling structures, then there is no answer to the question of how to wash suspended ceilings, because they cannot be wet at all. To clean the coating, use only dry cleaning. A vacuum cleaner with a soft furniture attachment is ideal for these purposes. The unit must be set to minimum power so that the finish does not move away from the base due to strong attraction. A vacuum cleaner simply removes dust and cobwebs from the surface. Do not rub foam boards intensively.
Many housewives like to perform dry cleaning using a Duster brush, the bristles of which have a negative charge and attract dust well. This product is optimal for dry cleaning of textured surfaces, because the bristles of the brush collect dust in all recesses. Thanks to the negative charge of the bristles, the collected dust does not separate from the brush and does not fly in the air, settling again on surfaces. After cleaning, shake the brush well outside the house.
Tools and necessary materials
To remove particularly difficult contaminants from the surface of slabs made of non-washable materials, you will need the following devices:
- dry rags;
- metal spatula;
- eraser;
- stepladder or table;
- cleaning wipes for suspended ceilings;
- microfiber cloths;
- ammonia for glossy surfaces.
Step-by-step technology for cleaning suspended coverings
Depending on the type of contamination, the following surface cleaning technology is used:
- Dried tile adhesive is very difficult to remove from any materials (washable and non-washable), so it is recommended to remove it without waiting for it to dry. To do this, use a dry cloth or sponge. Detergents or water should not be used.
- Dried glue is more difficult to get rid of. To remove it you will have to use a spatula. You just need to use the tool very carefully so as not to damage the surface of the finishing material.
- To add shine to glossy surfaces, use ammonia or sprays containing it. Lightly moisten a soft rag with the solution and wipe the ceiling. After this, the panels are immediately polished with a dry flannel cloth.
Cleaning steps
You can reach hard-to-reach places with a long-handled brush.
When removing dirt from the ceiling, you should follow a certain sequence. This is necessary so as not to waste time redoing your own mistakes. Here's how to proceed:
- The entire surface of the ceiling is vacuumed to remove dry dust and cobwebs.
- Get into hard-to-reach places with a soft bristle brush and a long handle.
- Dirty stains are wiped off with a strictly dry cloth or sponge.
- Wet cleaning. Using household chemicals or folk remedies, remove greasy stains.
- Wash away foreign odors. Homemade recipes are used for this.
If you arm yourself with the necessary tools, means, and set the goal of cleaning the ceiling, then everything will work out. The difficulty is that your hands quickly get tired of working in this position. Therefore, you will have to rest often.
In extreme cases, when splashes from coffee or ketchup get on the ceiling, or the tiles become covered with rusty stains, such contaminants are removed using whitewash. And stains that are not completely washed are painted over with water-based paint.
Dyeing technology
Before painting, you need to prepare the necessary tools and clean the surface, as well as apply a primer.
Before all work is done, furniture is removed from the room. What cannot be taken out is covered. The floor and other surfaces are covered with plastic film. Places that can be accidentally painted along with foam plastic (the junction of the wall and ceiling or baseboard) are sealed with masking tape.
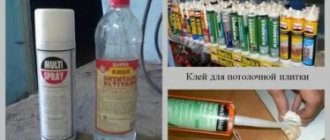
What you need for painting
List of tools and materials that will be required for work:
- dye;
- primer;
- sealant or putty;
- paint brush, sponge, rubber spatula, roller or spray (depending on the chosen painting method);
- trestles or stepladder;
- container for paint;
- workwear;
- vacuum cleaner, dry brush and detergent to prepare the surface.
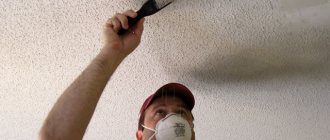
Surface preparation
Before painting, the ceiling is cleaned of contaminants (grease deposits, dust), since the paint will not adhere to them. First use a vacuum cleaner. Then, with a dry brush, remove the dust that has accumulated in the unevenness of the relief pattern, since the panels rarely have a smooth surface. After mechanical cleaning, wet cleaning is done. To do this, apply a soap solution using a brush, then wipe dry with a clean napkin or cloth.
If you plan to paint new panels that have just been glued, then you need to fill the seams with sealant. The cracked joints between old tiles are covered with putty to obtain a seamless surface. Use only rubber spatulas so as not to accidentally damage the integrity of the polystyrene foam.
Padding
Prime the ceiling 11-12 hours before painting. The leveling compound is applied with a roller or brush; one layer is sufficient.
Painting work
Painting ceiling tiles at home is possible using a spray gun, brush or roller.
During work, arrange lighting from both sides to avoid uneven coloring and streaks.
Painting is recommended in two layers. The second is applied after the first has dried, making strokes in a perpendicular direction. If it is not possible to achieve the desired layer density, apply the paint a third time.
To obtain a matte ceiling with a glossy relief, the surface is painted with acrylic, then varnish is applied to the protruding parts. This way you can make an original design with your own hands.
The option of applying paint to the slabs before gluing is not very successful. After installation on the ceiling, you will still need to seal the seams and repaint the surface.
Preparing for work
For high-quality gluing of seamless tiles, it is important to carry out a number of preparatory measures on the ceiling. The main direction is to clean the surface from old coating, traces of dirt, grease and dust.
Depending on the material used to finish the ceiling, the cleaning method is selected:
- If the ceiling was covered with wallpaper, then first moisten the surface with water and wait until the material becomes damp. Further actions involve removing wallpaper from the ceiling, using a narrow spatula for this purpose. Then remove any remaining glue.
- You can also remove old ceiling tiles or plaster using a narrow spatula. If the plaster sits firmly on the surface and does not fall off when tapped, then you can glue the polystyrene foam tiles directly onto it.
- The whitened surface is washed several times with plain water or with the addition of detergent. Most often, old coating of this type is removed in two or three steps.
- The same method is used to remove water-based paint.
- Old oil paint is scraped off with a spatula.
- Coloring compounds that cannot be scraped off or washed off are removed using special solvents. After using them, it is recommended to thoroughly rinse the surface with water.
Further preparatory activities are carried out in the following order:
- All lighting devices are disconnected and removed, the ends of the wires are insulated. If possible, it is recommended to turn off the electricity in the room during the renovation period.
- Inspect the ceiling, identifying existing defects and errors in height. For differences of more than 5 mm, putty is used to level the surface.
- In a similar way, chips, gouges and cracks are eliminated. In this case, minor defects can be left; ceiling tiles are responsible for masking them.
- A deep penetration primer must be applied over the concrete ceiling and onto the putty. This material provides high adhesion to working surfaces. The surface is primed several times, with each subsequent application performed after the previous layer has completely dried.
Stages of work
First, you need to cover all the furniture and floor with plastic wrap. This is the most common material for this type of operation. If you don't have it, try something else, but film is the best option. After use, it can be rolled up with the trash into a neat roll and thrown away, since the cost of the film is very low.
Next, we begin to remove the glued foam parts using a hard spatula. In hard-to-reach places, like corners and other things, use a narrow spatula. When removed, the material will break and particles of foam will begin to stick to everything that is nearby. Therefore, you need to cover your hair with something and, if possible, use a respirator when working.
Very carefully you need to remove the tiles that were glued with PVA glue. After drying, it becomes very hard and you can easily cut yourself on the edge of the panel glued to it.
This is where gloves come in handy.
You should not try to remove both the panels and the remaining adhesive at once. It is better to leave the removal of glue stains for later, and first, scrape off all the tiles. It will work out faster, no matter what they tell you - it has been tested many times in practice.
Residues of the adhesive solution cannot always be completely removed. Especially if the finishing was not done by you. In this case, there are not too many options left for what can be done. The easiest way is to peel off the dried glue residue with a solvent. If you know what was used to fix the foam plastic ceiling panels, this is the most reasonable option.
The mixture is applied to the stain and acts on it for some time, softening it. After this, you can use a regular spatula - everything comes off perfectly and almost no traces remain. It is enough to prime and paint the surface thoroughly.
It is much more difficult if you do not know what the foam tiles were laid on. There are only two ways to remove such foam plastic tiles from the ceiling, or rather, to remove all traces of glue:
- The first way is to scrape off the stains using different tools - from a chisel to a grinder or a grinder. After such treatment, the surface of the ceiling will have to be carefully puttied, especially if you plan to paint the ceiling.
- The second option for removing stains is to level the ceilings using a thick layer of plaster. This method is suitable in cases where leveling the surface is still included in the work plan and the cost of such finishing is not scary.
In any case, before the next finishing, the surface of the ceiling must be thoroughly dried, primed and all small irregularities that were or appeared after removing the old coating should be leveled.
https://wikipotolok.com
Foam tiles are often used to create a beautiful ceiling design due to its advantages:
- high fire resistance;
- good thermal insulation;
- moisture resistance;
- variety of patterns;
- possibility of painting;
- low cost.
How to choose the right seamless ceiling tiles
A beautiful and durable ceiling can only be achieved with the right choice of finishing method. Seamless tiles for the ceiling in this case are no exception, therefore, it is necessary to choose high quality material.
The first thing you need to pay attention to when choosing ceiling tiles for a room is the back surface of the material. There should be no depressions or swellings on it, which indicate a violation of the technological process. Such material may have many hidden defects, which are most often revealed during operation or installation.
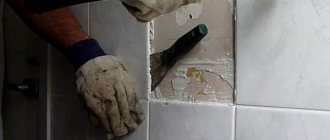
How to remove glue residue from the ceiling
Usually, after removing the tiles, 3-4 or even more areas of dried glue remain on the ceiling.
The surface is cleaned with an acetone-based solvent or ordinary nine percent vinegar. Professional products are also suitable, for example, Mellerud, Keranet, Atlas Szop or pharmaceutical dimethyl sulfoxide, which perfectly dissolves the adhesive composition.
To remove the glue you will need:
- Coat dried marks with solvent.
- Use a spatula to clean the “islands” with pieces of tiles.
- If the solvent does not help, use a grinder and a grinder.
After applying chemicals, you must wait a few minutes. The liquid is applied using a sponge, brush or old toothbrush. When the solvent starts working, carefully scrape off the softened mixture with a spatula. Repeat as many times as necessary.
To soften dried glue, use a dishwashing detergent such as Fairy (made by Procter & Gamble), which almost always includes sodium laureth sulfate, polypropylene glycol, and other solvents. 1-2 caps of product per 1.5-2 liters of water is enough. After this, we remove the old glue using a hammer and chisel.
If all else fails, you will have to use a grinder, sandpaper or brush. In this case, a mask and a respirator will come in handy, as there will be a lot of dust. Before starting work, wet the ceiling with water using a spray bottle. It will be much easier to tear off the remaining tiles.
You should not set fire to dried glue, thinking that this will soften it faster. This is dangerous and will not lead to the desired result. Be patient and treat the glue with water or solvent and gradually it will begin to yield. The softened pieces are scraped off with a spatula, and then the surface is cleaned with other means.
What products dissolve glue?
Not only professional products, but also folk recipes will help you remove glue from the ceiling with your own hands.
For example, suitable for dissolving:
- technical alcohol;
- sunflower oil;
- gasoline, turpentine, ammonia;
- a mixture of soda and water;
- hot soapy solution;
- table vinegar.
These products are applied to the remaining glue and wait from a couple of minutes to half an hour. As soon as the substance begins to soften, it is cleaned from the ceiling with a spatula. Sometimes, for faster removal, the treated area is covered with plastic wrap and waited for several hours. Soda paste, oil, vinegar last the longest, but these options are considered one of the most effective.
It is possible to clean the ceiling from glue using the methods described above only if the mixture is not very old. In more complex cases, professional products and serious mechanical cleaning will be required. But if there are only a few problem areas on the surface, then you can really deal with them with water and vinegar or regular oil.
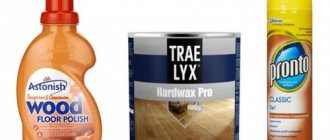
Ready-made cleaning products
The following ready-made products for cleaning tiles are used:
- Soap compositions for dishes . You should choose simple mixtures without fragrances or dyes. Use in a concentration of 1 tbsp. l. for 1 tbsp. warm water.
- Vinegar . Water with vinegar 5:1 helps to quickly remove yellowness and wash off soap scum.
- Washing powder for children . A mild, fragrance-free product can be used in place of dish soap.
- Bleaches . Oxygen bleaches work well on yellow stains.
It is permissible to use chlorine bleach in small quantities, locally and only on heavily soiled areas.
Foam Ceiling Tiles Cleaning Tools
You can use a vacuum cleaner to remove surface dirt from ceiling tiles.
To clean the tiles on the foam ceiling, you need to stock up on a set of equipment suitable specifically for this case. For work you will need:
- Vacuum cleaner with a soft fluffy brush. It is used to pre-clean the ceiling of dust and cobwebs.
- A soft, lint-free cloth.
- Sponges for washing dishes. If the area of contamination is large, then a lot of them will be needed.
- Highly absorbent dry cloth.
- Paper towels or napkins. They are needed to absorb excess moisture.
- Step ladder.
- A brush with fluffy bristles to remove yellow stains and grease in hard-to-reach places. The special Duster dust brush will become an indispensable assistant in dry cleaning. Its negatively charged soft bristles collect and hold dust.
- Bucket or basin with warm water. Needed for wet cleaning.
- Special sponges for washing dirt from foam. They are impregnated with special compounds and easily remove soot and other impurities from the ceiling.
- Latex gloves.
- Protective glasses. When working with chemicals, it is better to protect your eyes from getting harmful components into them. Moreover, while cleaning you must constantly look up.
- Putty knife. After repairs, when drops of glue or putty get on the tiles, you cannot do without this device. You need to act carefully and carefully so as not to damage the coating.
In order to properly wash the ceiling made of foam tiles, you should not rush or use force. Such actions only harm the coating.
Household chemicals for foam tiles
If the foam ceiling is so dirty that it cannot be cleaned using a dry method, resort to wet cleaning. Areas stained with grease and soot are best washed with compounds that can destroy the oily structure of the stain:
- Dishwashing detergents : Myth, Fancy, Fairy, Frosch, Eared nannies, Sorti, Sarma, Surprise for Cinderella, Help, I was born, World of Childhood. In most cases, their aqueous solution can easily wash away most of the stains and soot on the ceiling. This mixture is whipped into a thick foam. Only it is applied to the surface to be treated, not water. At the same time, they do not press and rub with force. The foam mass is only lightly driven in. And if suddenly there is water on the tiles, remove it with paper towels or napkins. Otherwise, gray streaks will appear on the coating.
- Gels for washing clothes without bleach containing: Ushasty Nyan, Laska, Persil, Ariel, Losk, Pemos, Dreft.
- Hair shampoos . The simplest of them, bought in a store, will be suitable for this purpose. To do this, it is diluted with water and whipped until a thick foam is formed, which is used to clean the surface.
Construction and hardware stores also sell special compounds made for cleaning ceilings of various qualities. The sales consultant will tell you what is best to choose for washing a specific type of tile.
Before using any of the listed products, apply its solution to an inconspicuous area of the coating and observe the reaction. Unused pieces of ceiling tiles are also used for this. If no undesirable reaction occurs, then the product is suitable for this type of coating.
Washing powders are not used to clean suspended ceilings. Even a small particle that does not dissolve in water can leave scratches and irrevocably ruin the appearance of the kitchen ceiling.
Painting with water-based emulsion
To work with this group of paints, you will need the devices and tools listed earlier in the article.
The dyeing process consists of the following steps:
- First, paint the joints between the ceiling surface and the walls, moving along the perimeter of the room. For this purpose, take a brush, dip it in the coloring composition, squeeze it lightly and apply it in a strip 3-5 centimeters wide. This is done so that in the future, when using the roller, it does not stain the walls.
- The ceiling is covered with water-based paint in three layers. Use a wide roller. The first layer is applied in the direction of the light flow coming from the windows. Work should begin from the left corner near the wall with the window opening.
- To remove excess paint, roll over the already treated surface with an almost semi-dry roller, almost without paint.
- The second layer is placed perpendicular to the first painting after the starting composition has completely dried on the ceiling. This usually takes 8-12 hours.
- The final layer of paint, after the previous one has dried, begins to be applied from the corner of the wall opposite the window opening. In this case, the roller is moved in the direction of the light coming from the windows. It is better to paint this layer with a new roller and then the surface will be uniform.
Until the painted ceiling has completely dried, experts do not recommend opening doors and windows in the room. It is necessary to ensure that the sun's rays do not fall on the newly repaired coating, so it is better to darken the windows.
Compositions for washable suspended ceiling tiles
To work, you will need a container for water, the cleaning agent itself, gloves, sponges and rags, as well as a long-handled brush. Before cleaning washable suspended ceilings, you need to shake off dust from them - this is easiest to do with a long-haired brush on the handle or a vacuum cleaner.
Now how and how to wash a suspended ceiling - liquid dishwashing gels are suitable
It is important to select a composition without fragrances or fillers. Soap products such as Cinderella and Fairy quickly dissolve in water, wash off grease and other stains and gently clean the surface
It is strictly forbidden to use hard brushes, sponges, abrasives, or solvents. If you don't have any gel on hand, hair shampoo will do. Washing is carried out with a soft cloth, then washable suspended ceilings should be rinsed from soapy water and wiped dry.
And a few more tips:
Stamped foam tiles do not tolerate excess moisture, so the rag must be wrung out
It is better to use dry shampoos, which quickly remove dust and other light dirt. Extruded, injection slabs withstand moisture; here, soap solutions with a slightly higher concentration of soap substance are suitable for cleaning. If there is no gel, you can use laundry soap - grate and dilute in warm water. Apply the solution to the surface carefully and rinse off without zeal, so as not to damage the decor. Remove remaining foam and moisture with paper or cotton towels. Toilet paper or regular napkins will come in handy - they do not leave streaks or cellulose fibers. To get rid of gray deposits from cigarette smoke, you need to dilute 2 tbsp in 1 liter of warm water.
l. salt, 1 tbsp. l. baking soda and wipe down the tiles.
Different tiles - different dirt
The type of coating dictates its own cleaning rules. In particular:
The popular bookmaker has released a mobile application for Android, you can follow the link absolutely free.
- Injection tiles . They have water-repellent properties. Can be washed with water and soap. They do not tolerate direct sunlight and turn yellow when exposed to light.
- Stamped elements . Porous tiles that absorb water, odors, and dirt. You should not glue it in the kitchen, since it is extremely difficult to clean the stains. Tiles require regular dry cleaning to remove dust; they cannot be washed with water. If persistent stains appear, the cladding must be changed.
- Extruded tiles . The elements are protected from dust and have water-repellent properties. The coating does not accumulate dirt and soot; when deformed, it straightens out and returns to its original size. Can be cleaned dry or wet, using soap.
Causes of pollution
Before choosing a cleaning method, you need to understand the type of contamination:
- Dust, grease . Drops of grease bind dust, which settles on the surface of the finish. This makes the dust sticky and difficult to dry clean.
- Smoke . Cigarette smoke or fumes from the frying pan cause the lining to turn yellow, making stains difficult to wash off.
- High humidity . Excess moisture can cause the formation of fungus and mold.
- Insects . Mosquito spots and fly spots cause a lot of trouble. Cleaning becomes more difficult if the ceiling has stamped tiles; in this case, only a mosquito net will help.
Regular dry and wet cleaning will eliminate the need to wash out old, difficult stains. Any foam tiles should absolutely not be cleaned with solvents.
What to do with old stains
Long-term stains cannot be cleaned from the kitchen ceiling using gentle methods. To get rid of them, there are more radical recipes.
| Required substances | Sequencing |
| |
|
|
| |
| |
|
After completing all actions, excess moisture is removed with paper towels.
Placement methods and markings
Installation work begins with marking the ceiling. Regardless of the placement method, determine the diagonal, perpendicular lines, the center of the ceiling. Lines are drawn from opposite corners, the intersection point of which is the center where the lamp will be located. 4 perpendiculars are restored from the center to the edges of the ceiling. The position of the first tile depends on the installation method.
Parallel
Laying begins from the geometric center, around which 4 tiles are placed along perpendicular lines to the walls. The inner corner of each tile must coincide with the geometric center and with each other. Subsequent rows are laid out parallel to perpendicular guides.
Diagonally
When placing the tiles diagonally 4, the central panels meet at the internal corners at the geometric center. The external angles opposite to them lie on perpendiculars, which for the resulting square will be diagonals. Continuation of installation - along the perimeter of the resulting squares with the corners aligned with perpendiculars. The second option for diagonal laying: from the central tile, glued at the corners to perpendiculars along the geometric center / from the chandelier. Subsequent panels are glued along its sides, filling the gaps.
Snake
The sequence of placement from the center of the ceiling along perpendiculars:
First row:
- 1 bottom left tile;
- 2 top left;
- 3 top right;
- 4 bottom right.
Second row:
- 5 lower right;
- 6 lower left;
- 7 lateral lower left;
- 8 bottom left;
- 9 top left;
- 10 upper side left;
- 11 top left;
- 12 top right;
- 13 upper right side…
Continue moving around the perimeter.
With shift
The central row is glued in such a way that one of the perpendiculars “divides” the tiles in half, and the central one is located at their intersection. Subsequent rows on both sides are shifted symmetrically by ½ tile.
Crisscross
The first 4 tiles are glued in the same way when laying parallel to the walls. Subsequent double rows are placed along perpendiculars to the walls, forming a cross.
Diamond
Diamond-shaped gluing starts from the wall. The first tile is laid at an angle to the wall, perpendicular. The second and third tiles are placed to the sides of the panel, the fourth - next to the third. The fifth is glued in between the second and third, the sixth is adjacent to the second, the seventh is adjacent to the sixth. Subsequent rows are filled in order.
Tips and tricks for cleaning the ceiling from old glue
To make cleaning as little hassle and inconvenience as possible, you can use some tricks. They will help you avoid some problems:
- To reduce the spread of dust throughout the room, the entire ceiling can be moistened with water. This, of course, will not make it easier to remove the glue, but it will significantly reduce the amount of small debris.
- Spread oilcloth or polyethylene on the floor. At the end of the work, cleaning the room will be much easier.
- If traces of mold are found on the ceiling during renovation, then it is better not to ignore this point. Apply special antifungal compounds to the surface, preferably several times.
- To remove glue from hard-to-reach places (chips, cracks, depressions), use a chisel.
- When performing each stage of work, avoid unnecessary haste. Don't try to remove old glue in one go. It is better to divide the ceiling into several sections and gradually clean each of them.
Description of the washing procedure
You can wash the products using, for example, a sponge. The material is dipped in water with liquid detergent. First of all, the relief elements are “soaped”, after which the mixture is washed off with a sponge dipped in water.
If water remains on the surface, it can be soaked using paper-based napkins. This must be done, otherwise stains may remain in these places.
Solvents must not be used under any circumstances. This will contribute to the destruction of the tiles. If there is putty or paint on a foam product, it can be removed with a rag when it is fresh, otherwise a spatula should be used.
“Dry” care is preferable
If you intend to regularly care for ceiling tiles in the kitchen or bathroom, then it is better to do it in a “dry” way. And the “wet” option is best left as a last resort if vacuuming is not satisfactory. This reduces the risk of damage to the surface, since washing in any case is accompanied by pressure on it.
The vacuum cleaner should not be used at full capacity right away. You need to start with the minimum, and then observe how much dust the equipment absorbs, and whether the tiles fall off. Having chosen the optimal mode once, you should stick to it for further cleaning.
Suspended ceilings are very popular because they allow you to hide defects in the base and utility lines, level the surface well and are quickly installed, and allow you to mount different lamps. Despite the ease of maintenance of many types of ceiling tiles, owners of such ceiling systems still wonder how to clean a suspended ceiling. Since ceiling panels are made from different materials, some products can be washed, while others are subject to dry cleaning only.
First, we will figure out how to wash washable suspended ceilings. The work is carried out using the following materials and tools:
- soft kitchen sponges and flannel napkins;
- container with water (basin or bucket);
- latex gloves;
- suitable detergent;
- protective glasses;
- a window squeegee or a soft brush with a long handle.
Since all work will have to be carried out at height, you will need a stepladder, table or small scaffolding. A stepladder is not very convenient for the reason that you cannot place a container of water and detergents next to you, so you will constantly have to go up and down the steps. A scaffold or table is much more convenient due to the large, stable surface on which you can place all the tools at hand.
The question of how to wash foam ceiling tiles is especially relevant in the kitchen, where surfaces are often contaminated with grease and soot. In other rooms, dry cleaning of dust and cobwebs is sufficient. If we talk about how to wash foam ceiling tiles, then liquid detergent solutions for washing kitchen utensils, gels for washing clothes, and shampoos are suitable for these purposes. These products dissolve grease stains well and do not damage the surface of the foam.
Loose stamped tiles cannot be wetted too much, so before washing, wring out a rag or sponge well. Injection panels and products made from extruded polystyrene foam do not absorb moisture so much, so they can be generously moistened with water.
If you don’t know exactly how to wash ceiling tiles, first try a regular soap solution. To prepare it, grate traditional laundry soap and dissolve the flakes in warm water. To wash loose tiles, it is better to use only foam so as not to wet the surface too much.
The sequence of washing stamped panels made of loose foam:
- First, prepare a soap solution with a large amount of foam.
- Apply a little foam to the surface of the tile using a sponge and easily wipe away dirt. It is not recommended to rub loose tiles vigorously.
- When the stains come off, gently wipe the surface with a dry soft cloth. This removes any remaining foam and water.
- If after wiping there are residual detergent residues, then wipe the panels with toilet paper or soft paper towels. Dry, loose paper absorbs remaining moisture well. If drops of water and foam are not removed, stains will remain after drying.
For painting stamped slabs, only water-based emulsion is suitable, which is applied in two layers, and injection tiles can be painted with different paints that do not contain solvents that are aggressive to foam plastic. Laminated panels cannot be painted.
Which is better - dry or wet cleaning?
Before washing the ceiling tiles, make sure that there is no other way to do it. Wet cleaning is a last resort and there are several reasons for this: the material, having absorbed moisture, can change color; Residual marks and stains are possible.
For some surfaces, special cleaning products are indispensable
To maintain order, it is enough to vacuum the ceiling once a month or walk over it with a brush, and you can keep the surface in its original form for much longer. When washing, you put pressure on the surface, creating mechanical damage.
Even if the ceiling material is not afraid of direct exposure to water, moderation must be observed in everything.
These tiles are only for replacement; they cannot be cleaned.
In cases where aggressive stains (coffee, ketchup, rust stains, etc.) get on the surface, try soaking them with white. Then the white surfaces can be whitewashed with water-based paint.
Tips for successful painting
The following tips will help you achieve the best results:
- Water-based paint (like acrylic) must be applied in as thin a layer as possible. A thick coating will bubble when applied and peel off as it dries.
- Tiles with a relief pattern are easy to paint with a brush. But if possible, it is better to use a paint spray gun. It will spray the enamel in an even layer and easily paint over all the relief elements. In addition, this method of applying paint takes much less time.
- When painting the ceiling, you do not need to bring the roller to the very edge, so as not to accidentally stain the wall with paint.
- To check the quality of painting, you need to shine a bright lamp on the ceiling. It is better to inspect the coating from different sides, lighting it from different angles.
- Until the paint is completely dry, do not open windows or doors. It is also advisable to protect the surface from heating by sunlight. If the sun shines on the ceiling from a window, it should be curtained.
With this approach, the fresh coating will be smooth and uniform in color. And knowing how to properly paint foam ceiling tiles, you can create a beautiful, stylish and easy-to-clean ceiling in any room with your own hands.
Advice from professionals
In order to properly stick tiles, you must follow the advice of professionals:
- It is necessary to ensure that the cut parts of the tiles are in that part of the ceiling that is not so obvious.
- Press the tiles tightly against each other so that no gaps form.
- After laying the tile, you need to smooth it with a clean cloth so that the air comes out and it is installed more evenly.
- After installation is complete, the tiles can be painted in the desired color with acrylic paint.
To learn more about the process of installing ceiling tiles, you can watch this video
With proper installation of ceiling tiles, you can get a beautiful surface that will not only last a long time, but will also fit well into the interior. So in the living room you can create beautiful patterns on the ceiling using gypsum tiles, and in the bathroom you can install shiny plastic material.