What is a canopy and why is it needed?
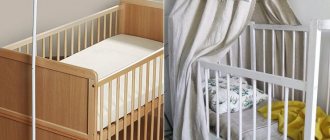
First, you need to take a closer look at what a canopy is. It is a kind of canopy made from different types of fabric. Some people prefer to sew the canopy themselves, while others turn to specialized stores.
A canopy is a canopy that is located above the bed.
Its main function is to protect the child from:
- dust (it is everywhere, even if the room is regularly wet cleaned);
- insects (especially important in the warm season);
- sun rays;
- extra eyes.
Basically, the canopy is designed to protect the child from various factors.
Depending on the type of product, it is determined how to install a canopy on a crib. It is important that the fabric for it is not dense. Otherwise, the air will circulate worse.
The fabric should not be too dense so as not to interfere with air circulation.
What is a canopy?
A canopy is a structure with flowing fabric that is installed above a seating area (bed, sofa, armchair) to provide comfort and a sense of privacy.
What is it for?
Many parents do not want to install a canopy over their child’s crib, believing that it is an impractical design that collects dust. But in reality, such a canopy turns out to be not only beautiful, but also a practical element that helps provide a cozy sleeping environment.
Its main function is not aesthetic, but protective. It is a barrier from an intrusive environment, giving the child a feeling of comfort and security. Long and dense canopies do not allow the sun's rays to disturb children's sleep and protect against drafts, creating their own microclimate in the crib. The fabric of the canopy can protect a sleeping child from annoying insects, and if there are animals in the house, it can prevent hair from getting into the crib.
Location options
The canopy can be attached in 4 ways:
When choosing one or another option for the location of the canopy, you need to start not only from the interior and the preferences of the parents, but also pay attention to the fact that the canopy does not interfere with the child’s sleep and the mother’s care for him.
Varieties
For fabric canopies there is a conditional division, depending on the type of structure. There are 3 main types of such, namely:
On supporting supports
This type of canopy is considered the most common and in demand among consumers. In this case, curtains are placed above the bed using special supports. The supports themselves are fixed to the bed frame.
In some cases, the supports are attached to the bed.
Curtains can be fixed on rings, clothespins, or simply lie on the frame of horizontal top slats. The support can be made of wood, metal, plastic, or a combination.
The support can be in the form of a ring or another shape.
Dome type canopies
Fixed on the cornice above the bed. Due to the specific nature of curtains falling at an angle, forming a dome over the bed (due to the difference in the area of fixation and the sleeping area). It mainly performs a decorative function.
A domed canopy can also perform a decorative function.
On the ceiling cornice
This type involves fixing the frame slats on which the canopy curtains are hung directly to the ceiling. The fastening elements may be different, but the end result is a reliable and simplified curtaining of the entire area of the bed.
The canopy frame is attached directly to the ceiling.
Notes! Understanding the differences in the type of fixation, you can choose the perfect canopy, which will not have to be put in the closet due to the impossibility of installation.
How to sew a canopy for a crib
You can sew a canopy for a baby crib yourself. It all comes down to your ability to handle fabric and your imagination. Developing a plan comes down to defining the desired end result.
You can make a canopy for a child with your own hands.
We present to your attention an algorithm of actions:
- We decide on the type and desired appearance.
- Several subsequent ones will depend on the previous point: development of a diagram, selection of material and tools for work.
- When everything is ready, we move on to cutting and sewing the future canopy.
You need to stick to a specific plan.
It is important to consider the size of the bed and the possibility of fixing the future canopy. It is proposed to familiarize yourself with a specific example with the rules for sewing a canopy with your own hands.
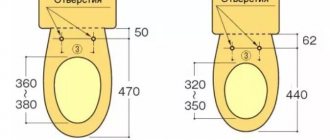
Scheme and dimensions
The length of the curtains depends on the chosen method of fastening in the future. You can use a tape measure to determine the desired length/width of the segments yourself. Let's assume that the canopy will be attached above the crib using a cornice. You need to measure the distance from the intended location of the frame, observing the angle of inclination to the floor or bottom of the bed.
The size of the curtains depends on the method of fastening the canopy.
Choose the width according to the length of the bed (if we choose a dome type). In other words, both pieces of fabric should cover the entire area of the crib with a margin of width and length.
Selection of tools and material
The objectives determine the choice of material. For example, if you plan to provide protection from light, then the fabric should be thick. The decorative function is quite feasible due to the transparent fabric.
Transparent fabric performs a decorative function.
The same goes for color options. For girls, delicate colors are chosen, often pink. This will create a cozy atmosphere that will delight the child and give a feeling of warmth.
As for tools, their list may differ depending on the type of product:
- scissors (make sure they are sharp);
- pencil and paper, tape measure (needed both at the stage of developing the pattern and when cutting the pattern);
- thread and needle (preferably thin, so that the seam is invisible, it is important to choose a thread that matches the color of the fabric);
- additional materials (patches, stickers, there are a lot of options here).
When you have stocked up on everything you need, you can move on to the creative process - sewing. Remember the main rule: measure 7 times, cut 1 time.
The process of creating a canopy
The simplest canopy looks like an ordinary canopy, a cape. And the important thing is not what it will be, but whether the latch is equipped correctly. How to attach a canopy to a crib is a priority issue that needs to be resolved before starting work. The fabric is sewn together along the entire length on one side, or does not interact at all between the halves (the simplest method).
Let's look at the last option as an example:
- we fold the upper part of the fabric and make special loops (they can be purchased or made from nylon thread, fishing line, etc.), with their help the future product will be hung on rings or hooks, so as not to lose the ability to move/spread the curtains;
- if you do not plan to cover all 4 sides of the crib, then you can sew pieces of fabric at the top and hang them through a hanging frame or holder on the rail (it doesn’t matter);
- we decorate with decorative elements: ribbons (along the lower part or along the movable opening) are sewn on, all kinds of butterflies and fabric toys (optional) can be pinned with a hairpin.
The process of making a canopy is quite simple.
In fact, you can turn your canopy into a real work of art.
All that matters is desire and minimal skill with scissors, thread and needle.
Features of fastening the canopy
A canopy can be attached in a variety of ways. Everyone has the right to determine what is most convenient for themselves by presenting the final result. The choice is made with an emphasis on where the crib is located, what function the product performs, its size, the need to move it and how to implement this, and so on. Those. There are a lot of factors that need to be taken into account. Below we will consider which mounting options are the most popular.
There are several options for attaching a canopy.
At the head of the bed
A popular method because it takes into account the ability to move the child's bed. The holder is attached to a special bracket at the headboard. The body of the crib acts as a place for fixing the base of the holder. During sleep, the curtains can be moved, let them run along the opposite side (towards the feet). While awake, do the opposite - push it apart.
Mounting at the head allows you to vary the location of the canopy.
Centered
This method assumes the presence of a holder and the ability to fix it to the cornice. Allows you to place the canopy in the shape of a dome, enveloping the entire crib gracefully. Holders can vary, as can the methods for attaching the edges of the canopy (for example, clothespins, rings, loops, hooks, etc.).
In the center of the bed, the canopy is attached using various devices.
All around the perimeter
An equally popular method, sometimes more practical, but to implement it you will need to bother with the placement of the holder. Let's look at the two options that are available when choosing this method:
Fixing the supports to the crib body
Externally it looks like 4 slats placed in the corners. At the top, 4 more horizontal slats are attached between them, forming a rectangular holder frame.
Slats are attached to the bed frame, forming a rectangle.
To the ceiling
The scheme is similar to the previous one, but this fastening does not require the presence of supports. Those. The holder frame is suspended from the ceiling above the crib. On the one hand, it looks more elegant, on the other hand, it complicates the process of moving the bed.
A canopy attached to the ceiling looks elegant.
Support rails are rectangular, square, round. And the jumpers are even curly.
On a stand
This is a popular way to hang a canopy. It consists in the fact that the support of the holder is not attached to the bed, but is held in place by a footrest. This simplifies the installation process, minimizing any time wasted. If necessary, the stand can be moved freely to wherever it is needed.
The canopy is mounted on a stand, which is located next to the bed.
To the ceiling
Ceiling canopies can be held in place by a cornice or by screwing fasteners into the ceiling. Despite the fact that this method is not very common, it allows you to achieve the most positive aesthetic appearance. You can form frames, start edges from a round holder, and so on.
The canopy fasteners are screwed into the ceiling.
Beautiful protection
The technique of arranging a sleeping place with a light cape attached to the ceiling came to Europe from Ancient Persia. At some point, a person realized that on a hot summer night it was not very convenient and pleasant to protect himself from insects by covering the body directly with a cloth. This is how the first canopy was invented.
To do this, you definitely need to hang a canopy made of beautiful, cheerful fabric on it.
The canopy, fixed according to the instructions, will reliably protect the baby and give him and his parents peace, comfort and tranquility.
For centuries, this practical tool was used by both ordinary people and members of the nobility. At the same time, of course, the products placed in the royal bedchambers were distinguished by their beauty and luxury.
You can sew it yourself, but for those who are not confident in their tailoring abilities, special stores offer inexpensive kits that include the interior of the crib and a canopy.
To decorate the cornice, a lambrequin is attached to it with Velcro.
A canopy is one of those things that, in addition to an aesthetic component, also contains a purely functional component. Such things never go out of furniture fashion, they can be transformed, the demand for them may increase or decrease, but they have been and will be. Today, this interior element is returning to widespread use. However, it is intended primarily for cribs.
This is the most reliable fastening, since the screws will not become loose from the inevitable touching of them during manipulations inside the crib.
Pros and cons of canopy
Each decorative item or any other product will always have its pros and cons. To give an objective assessment of a thing, it needs to be examined from all angles, taking into account its advantages and disadvantages.
There are both pros and cons to a fabric awning.
Let's start with the advantages:
- A canopy with thick fabric will serve as reliable protection from light (natural or artificial - the source does not matter).
- A feeling of comfort and safety is created. All children love tents, tree houses and similar structures. With a canopy, the child will be calmer, and this will improve his mood.
- Insects cannot get inside. It is best to use fabrics such as tulle for these purposes, since it is highly breathable, and for babies this is extremely important.
- Decorative element. Of course, creating the right atmosphere is impossible without taking into account additional elements. And given the variety of canopies, you can choose any one!
In addition to its decorative function, the canopy has a lot of useful qualities.
There are also disadvantages. For example, if the fabric is thick and tightly closed, air will not circulate well. Here's another possible problem: if the child wakes up and does not attract the attention of his parents, in an attempt to explore the world around him, he may simply become entangled in the fabric. But this drawback is questionable, because with the same success the child may fall out of bed or encounter other troubles if he is unattended.
Fastening methods. Their advantages and disadvantages
According to the method of fastening, the canopy can be stationary or mobile. Its appearance and functionality depend on this. Each method has its pros and cons.
Fixed mount
Installation of stationary canopy holders is carried out to the wall or ceiling. Suitable in cases where frequent rearrangement of furniture is not planned, since installation and dismantling of such a structure will require cosmetic repairs at the mounting location. But, as a rule, redevelopment of a children's room is carried out no earlier than several years later, when the child grows up.
Despite the fact that a permanently fixed canopy cannot be moved to another location, there are also positive aspects:
Mobile mount
Mobile mounting of the structure above the crib is more popular than stationary mounting, because... The holder is mounted directly to the crib. In this case, the walls and ceiling are not affected, which is a plus, because... there is no need to repair the wall or ceiling after dismantling the canopy. The design of the mobile canopy is compact and lightweight; it does not require any special tools or skills in installation work. If necessary, it can be moved to another place along with the crib.
Among the disadvantages of this method of fastening, one can note the mobility of the entire structure. It is advisable to mount it and not disassemble it again, since repeated assembly/disassembly may affect the reliability of the fastening. Sooner or later, a growing child will be interested in grasping, tugging, and playing with the fabric, which is undesirable. The decorative qualities of such canopies are inferior to stationary ones.
Canopy on a stand
This canopy is a type of free-standing mobile structure that does not require attachment to the crib. Its advantages include the ability to move and change height. The functional features of such a canopy include the ability to make a playhouse or hut out of it when the child grows up. The design is light in weight, which can be a disadvantage if there are animals in the house that can turn it over or tear the fabric with their claws.
What is the holder?
This is a ring on a stand or a rectangular frame on supports attached to the headboard or side rails of the crib, which can be adjusted in height. When choosing, you need to ensure that the holder is made of durable and safe material.
The holder rings can be detachable or non-detachable. For them, different types of canopy fastening are used. For the first option, a drawstring is made on the fabric, into which an open ring is threaded. The fabric is secured to the ring removed from the stand, after which it is fixed to the support.
To secure the fabric to a one-piece ring, various fasteners, loops with buttons or Velcro, and ties are used. They put the canopy on a holder of this type without removing the ring from the stand, which is a plus.
DIY crib canopy holder
The supporting element of the canopy is the holder, which comes complete with the purchased structure. But if you sew the canopies yourself, you can also make the supporting structure yourself.