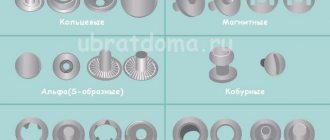
Where are eyelets used?
Eyelets are needed to make a smooth hole in any material and protect the cut edges from chafing . In 1901, the fittings were invented for fastening ship sails; over time, eyelets began to be used in sewing clothes, belts, curtains, as well as for assembling documents or other papers into ring folders.
Small eyelets are installed on almost all models of sports shoes, for example, sneakers. The laces are passed through the metal rings. Thanks to this fittings, the item will last longer, the cord will not fray, and the material from which the shoes are made will not deform.
How to use hand tools when installing grommets
First you need to make a hole and thread the grommet into it, leaving its cap on the front side. Turning the product over, install the support ring on the wrong side. Taking a metal ball, the diameter of which is slightly larger than the diameter of the part of the eyelet, which has a cylindrical protruding shape, it should be placed on this part and hit with a hammer. The rivet will be flattened by the ball and the block will be fixed.
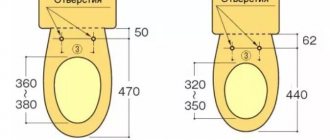
Device for sealing eyelets: a - matrix b - punch c - piston d - upper washer of the piston 1 - matrix groove 2 - guide part of the punch 3 - impact part of the punch 4 - clip groove.
For maximum strength, you should lightly tap the installed rivet with a hammer, but you should not apply too much force, otherwise it will ruin the appearance of the fittings. To use this method, you should have experience with all the tools listed above, which will allow you to correctly calculate the impact on the ball.
If you use improvised means during installation, the work process itself will proceed very slowly. In this case, you will need many additional tools that should be available on the farm. It is best to install the fittings using special pliers that allow you to flatten the rivet-like cylindrical part of the grommet.
Related article: Dressing room, minimum dimensions
After flattening with pliers, the eyelet head should remain on the front side of the product, and the wrong half, which is flattened, should be folded onto the back side. In this case, the grommet ring, which is its second half, should be used as a support. It is necessary, since often the flaring process can lead to rupture of the cylinder, that is, its walls. After this, cracks and sharp edges form, which can harm the material by tearing it.
To prevent fabric damage, it is necessary to use a special backing ring in contact with the material from which the product is made. This will prevent cracks, scratches or tears from appearing.
The use of pliers in the process of installing eyelets is available to everyone and does not require additional skill in working with this type of hand tool.
Advantages and disadvantages of application
Why eyelets are considered a good invention:
- Curtains with eyelets glide well on a special round curtain. They open silently and easily. The same can be said about paper with eyelets. Such sheets are easy to turn over in a folder.
- Reliable fastening. If curtains on hooks can be accidentally touched and the loops broken, then the eyelets will withstand such a load.
- Aesthetic appearance. Thanks to the fittings, the holes look neat. You can choose eyelets by color, to match the tone of the product, and also choose an unusual shape.
- Clothes and curtains can be washed in a machine without removing the accessories.
The only drawback is that the material on which the eyelets will be installed must be chosen correctly. Many fabrics shrink after washing, as a result of which the hole is deformed, and threads or the edge of the cut material come out from under the fastening of the fittings.
Types and materials
Eyelets can be classified according to several criteria.
The table describes in detail the types of fittings and their characteristics:
| Distinctive features | Description |
| Magnitude | From 4 mm to 8 cm in diameter. Small eyelets (up to 2 cm) are used for sewing clothes, for making shoes, and also in office supplies. Large rings are installed on curtains and awnings. |
| Form | The outer edges may have an unusual appearance. For example, for children's rooms and bathrooms, you can purchase accessories in the shape of a flower or animals. Triangular and square grommets are sold for living rooms. For ribbons and flat laces, you can purchase oval eyelets. |
| Material | The fittings are made of metal, wood or plastic. |
| Color | The rings should be in harmony with the shade of the product on which they will be attached. You can buy matte or chrome metal eyelets. A special coating protects the metal from corrosion. Plastic fittings come in a wide range of bright colors, and wooden rings come in dark and light colors, usually coated with a layer of varnish to ensure good glide over the curtain. |
It is important to select the size and color of not only curtains, but also cords or ribbons. For example, shoe fittings should either match the base material or be the same color as the laces.
How to choose a mounting option
You can install eyelets yourself only if they are plastic or wooden rings. These products are designed to be installed manually. The bushings are easy to unfasten and, conversely, snap into place. Metal fittings are attached using special tools.
The choice of the type of eyelets depends on the material on which they will be attached. For light and elastic fabrics, plastic rings are suitable. They can also be used to attach paper and laces to summer shoes.
Wooden fittings are installed on dense materials, for example, cardboard, leatherette, or curtains of medium thickness. Metal eyelets are used to make holes in rough and thick materials such as leather, jeans or canvas, as well as for thick blackout curtains.
Self-installation without special tools
You can install the eyelets yourself, without special tools. It is important to smooth the material well before installation.
What else is needed:
- sewing threads matching the tone of the main material;
- sewing needle;
- scissors;
- a piece of chalk or soap for marking;
- roulette.
You can install wooden or plastic eyelets yourself without using special tools.
Algorithm of actions:
- Place about 3 cm down from the top edge of the curtains. Make markings (how to determine the optimal distance between the fittings, you can read later in the article) with chalk or soap.
- Attach the eyelets to the fabric and trace along the inner diameter.
- Use scissors to carefully cut holes.
- Remove all protruding threads and fabric fibers.
- The crumbling material can be carefully hemmed.
- Place the lower parts of the fittings under the canvas, and place the upper parts on top. Press the ring with your fingers until you hear a slight click. Repeat with all holes.
In order for the curtains to slide well, the eyelets must be at least 1.5 cm wider than the rod. Paper folder staples, cords and ribbons, on the contrary, must be narrower than the holes in the rings.
Calculation of the distance between eyelets
The distance between the rings depends on the texture of the material on which they will be attached. The thicker the fabric, the further apart the rings are placed . The exception is paper. Here, the distance between the eyelets depends on the location of the staples in the folder, which will pass through the hole.
For attaching eyelets to tulle or other thin fabric, a distance of about 16 cm is considered optimal. On coarse and dense material, the gap should be about 20 cm. Particular attention should be paid to the rule for calculating the distance between the rings when installing them on thick curtains.
The same spacing will contribute to the formation of even and beautiful folds on the curtains.
It is also important to calculate how many rings will need to be installed.
To do this, you need to use the formula A = (b - 2x): 18 + 1, where:
- A – number of holes;
- c – curtain width;
- x is the distance between the center of the first or last eyelet and the edge of the curtain.
It is recommended to place the outer rings 3-7 cm from the edge of the curtain. This way they will look beautiful and the fabric will form an even wave.
Using grommet tape
Eyelet tape is needed to strengthen thin fabrics where the rings are fixed. If the base material is dense enough, then you can attach the eyelets without compaction.
The tape is a strip of fabric with finished edges. One or both sides are impregnated with a special glue, the fixing properties of which are activated at high temperatures.
How to attach ribbon to a curtain:
- Measure the width of the tape and place a point down from the top edge of the curtain, doubling the measurement result.
- Fold this part of the material in half, wrong side inward, and iron well.
- Apply the tape to the edge of the resulting fold, with the glue side down.
- Iron.
- Wait for the fabric to cool, cut off the excess tape on the sides.
- Use a sewing machine to stitch the top edge of the tape to secure it more securely.
For curtains that cannot be ironed, you can purchase grommet tape that matches the color and simply sew it to the top edge of the curtain. Transparent but dense ribbons are sold for tulle.
Marking and preparing holes
Before installing fasteners, you should mark the product. The eyelets should be installed at intervals to prevent sagging of the material between them. Having placed the inserted grommet in the right place, circle it (the sleeve along the outer edge or the ring along the inner edge).
You may also be interested in: Single-row cornices
Then the holes are prepared. If their diameter is small, the holes can be pierced with an awl. Sometimes a hole punch is used for piercing. To prepare larger holes, punches are used. If there is no suitable tool, you can use a specially made homemade one. To do this, you need to select a tube of a suitable diameter and sharpen one of its edges. The hole should be such that the grommet bushing is inserted tightly, but does not cause tears or deformation of the material. It is convenient to punch holes on a piece of thin rubber or linoleum.
If the holes need to be large, make a cross-shaped cut with scissors and then cut out the excess material. The bushings should be inserted from the front side, and the rings should be put on from the back. The installation of plastic fasteners ends here.
Video of installing plastic eyelets with your own hands:
Installation using specialized tools
You can install the eyelets yourself if you have special tools. Metal fittings are more difficult to fasten; hand strength is not enough for the eyelets to snap into place. Much depends on the width of the ring.
For heavy and thick fabrics, rings with a thick stem are used. In this case, the pressure on the grommet should be very large.
Installing eyelets with clips
There is a type of metal grommet with clips that can be installed by hand using a small hammer. The disadvantage of such rings is the presence of a front and back side. They are usually installed on bags and shoes.
Algorithm of actions:
- Press the ring onto the material so that a dent remains.
- Using the extruded lines as a guide, cut a hole.
- Place part of the eyelet with clips under the material.
- Place a ring with recesses on top.
- Bend the clamps using a hammer.
Then you need to remove protruding threads and fibers of the material.
Installing eyelets using pliers
In specialized stores you can purchase pliers for installing eyelets. The tool resembles pliers. The kit comes with removable attachments of different sizes. They are called punches and matrices.
How to install eyelets using pliers:
- Reinforce the material with grommet tape.
- Attach a nozzle of the required size to the pliers and punch a hole.
- Insert the part of the ring with the leg from below.
- Close with the top half of the ring.
- Install the nozzle into the pliers to close the ring.
- Place the grommet between the closing parts of the pliers and slowly press them down.
It should be taken into account that such eyelets also have a front and back side. It is important to position them correctly relative to the sides of the material.
Press installation
You can install the eyelets yourself using a special press. This tool has a lever and a pressure plane. It is used for eyelets with short and long legs. The set includes punches and dies for rings of different diameters.
How to use the press:
- Strengthen the material with adhesive tape or fold it in half.
- Select a punch of the required size and make a hole.
- Place part of the ring with the leg under the material.
- Place the washer on top.
- Place the desired matrix in the press and gently press the lever.
It is important to ensure that the washer does not slip or move, otherwise the grommet will be installed crookedly. You'll have to remove it and install a new one.
How to get started installing grommets?
Before you start making curtains with grommets with your own hands, you need to:
- Make calculations;
- Choose fabric for curtains;
- Purchase grommets, dublerin or grommet tape with a width greater than the diameter of the fastener on the outside by 2 cm.
- Prepare your work surface.
Note. If you choose light fabric (tulle, organza), you must purchase a special transparent tape.
We calculate the fabric
First of all, measure the length of the curtain rod and decide on the height of the curtains. To get beautiful and even folds, the length of the cornice is multiplied by the coefficient:
- 1.5 – for weightless transparent fabrics.
- 2-2.5 – for thick textiles.
We take into account allowances for creating seams:
- On the sides 10 - 15 cm;
- At the top and bottom at least 25 cm.
Example
The length of the cornice is 1.7 m, which means that the fabric needed to sew curtains is:
1.7 x 2 + 0.15 = 3.55 m = 355 cm.
Calculation of the number of eyelets on a curtain
To make the calculation, take measurements of the internal and external diameter of the element. In addition, you need to arm yourself with the following knowledge:
To create beautiful folds, the edges of which would look at the wall, you need to insert an even number of eyelets.- The distance between the center of the fastener should be approximately 18 cm (range 15 – 20 cm).
- If you plan to install double curtain rods, then make sure that there is a gap between the rods and that there is no contact between the tulle and the curtain.
- The gap from the sides to the center of the starting eyelet is 5 - 7 cm. This depends on the width of the hem and the diameter of the fastener on the inside.
Important. Make sure that the grommet does not touch the seam, otherwise you will not be able to snap it tightly.
Calculation of eyelets for curtains, distance
Calculate the distance from one edge to the middle of the first fastener element (p). Let's take as an example elements with a diameter of 25 mm inside and 38 mm outside.
p = ½ outer diameter + hem width at one edge + indent from hem
p = 3.8 / 2 + 2.5 + 0.5 = 4.9 cm
Round to 5 cm.
Calculation of the number of eyelets on a curtain
Number of elements = 2p / distance between fasteners + 1
(355 – 2 x 5): 18 + 1 = 20.16 pieces.
Round the value to 20.
Calculation of gaps between the centers of eyelets
(355 – 2 x 5) / (18 – 1) = 20.29 cm.
You can also round to get 20 cm.
Installation technique for curtains or tulle
Before purchasing fabric and curtain rings, you must correctly calculate the material consumption. Considering the fact that when installing eyelets, the canvas will not hang evenly, but will become wavy, more fabric will be required than the width of the window.
Since the standard distance between eyelets on thin fabrics is about 15 cm, to calculate the width of the tulle, you need to multiply the result of measuring the width of the window by 3. A narrow and often repeating wave hides a lot of material.
Thick curtains will require less fabric because the eyelets will be far apart and the wave will remain large and sparse. The width of the window must be multiplied by 2.
Further procedure:
- Calculate the required number of rings.
- Install grommet tape if the fabric is not stiff enough.
- Punch holes and install eyelets.
- Thread the rod from the cornice through the holes.
If the curtain or tulle fabric is elastic, but there is no grommet tape at hand, you can install the rings without it. You should make the holes a little smaller than necessary, then the fittings will not fall out.
Characteristics of hand tools and methods of use
We can highlight the most common types of tools that allow you to install grommets. When performing the installation, you can use:
The Fiskars grommet installer includes 3 attachments for installing grommets of different diameters.
- Installer Fiskars.
- Using a 4-in-1 eyelet tool or a collapsible hammer.
- Punch for installing eyelets.
- Pliers for installing Micron NT-2 blocks (manufactured by Gamma).
- Installer "Kangaro".
- Cropodile.
The Fiskars installer kit includes three tools that allow you to install grommets of various diameters. They are used when working with various materials whose density is up to 400 g, for example, among them the following can be distinguished:
- Paper.
- Plastic.
- Thin skin.
- Thin foil.
- Felt.
- Cardboard, etc.
The installer is placed on the surface of the material with its lilac-colored tip where necessary. Be sure to place a special mat to protect the product from damage. When fixing the lilac tip, you should pull up the gray tip with your free hand, which will allow you to stretch the spring by releasing it.
The spring stretches no more than 5 cm upward. After this, the product is laid face down along with the grommet, which should be aligned similarly to the working hole when the product is facing down. Then you should make the installation of the gray tip of the installer, and pull the lilac tip up. If necessary, the work should be repeated.
Related article: Do-it-yourself gazebo made from a profile pipe: drawings and photos
The pliers for installing blocks are convenient and easy to use.
Using the installation punch, you can install eyelets with a diameter of 4-5 mm. Along with the punch, the kit includes attachments that allow you to nail holes. To install eyelets, twist the punch attachment, screw in the punch attachment and make the required holes. Upon returning the nozzle, the blocks are flattened with tongs.
The general set of Micron NT-2 pliers from Gamma includes 100 blocks, the diameter of which is 4 mm. Durable material is used to make the tongs. They are equipped with an anatomically shaped handle, a ruler that allows you to determine the diameter of the block, and a hole punch, which is used to first punch holes. When installing the eyelets, simply squeeze the handles of the pliers. Installation using a similar principle is carried out using Kangaro pliers.
How to use a collapsible hammer during installation
The process of installing eyelets.
A split hammer is an installation tool that has several attachments. They are screwed into each other, and then into the instrument itself, which is quite heavy and therefore convenient for storage.
Using a collapsible hammer, install eyelets measuring 6 mm or larger, if necessary. During installation, the hammer makes a lot of noise, which is a negative point when using it, especially if it is used late in the evening. A positive effect can be achieved by installing the grommet at any distance from the very edge of the product.
The most important point in the work process is the presence of a hard work surface, since otherwise the grommet will not be installed evenly. The collapsible hammer should be used strictly according to the instructions:
A manual eyelet press is used when installing eyelets into leather or felt.
- First, mark the places where the blocks will be installed.
- Having prepared a hard, flat surface, place the paper or other material with the mark on it.
- After this, the punch is placed in a perpendicular position, and a series of blows are applied to it with a hammer.
- Putting the punch aside, check for the presence of a hole.
- If it is not there, then use a spherical tip to squeeze out the installer or punch it again.
- Having turned the product, insert the grommet from its front side, and then lay it down.
Related article: How to lay parquet correctly - important aspects
At the last stage, the installer's mandrel must be inserted into the grommet leg, which is flattened by tapping it with a hammer.
Installation on leather materials, shoes
When fixing the eyelets on the rings, it is better to use pliers or a press. It is important that the hole is smooth, so you should punch it with a special nozzle. It will not be possible to carefully cut it out with scissors, as creases and cracks will appear on the skin.
Algorithm of actions:
- Strengthen the area where the fittings are installed by folding the material in half, with the wrong sides facing each other.
- Mark the location of the rings with a marker.
- Select a punch of the appropriate size and make a hole.
- Insert the matrix tool of the required diameter, place the eyelet and secure it.
You need to work with leather only on a hard and flat surface so that the material does not deform and the fittings are fixed correctly.
Installing eyelets on curtains with your own hands
After the fabric is prepared, iron it again and lay it on the floor. Now you can begin the installation of fasteners. The eyelets along the edges are installed first. For this:
Make notes using chalk, dry soap, a pencil or a special marker on the fabric in the center of the element, according to preliminary calculations.- Attach the grommet and outline the diameter inside.
- Using scissors or a special punch, make a hole that should be slightly larger than the outlined circle.
- Place part of the eyelet under the textile, and place the second one on top.
- To insert the eyelets into the curtains with your own hands, gently press on the elements and snap them into place. You will hear a clicking sound. In the same way, install the grommet from the opposite edge.
After this, you need to follow the drawing and calculations you made the day before. Make sure that the eyelets are installed at the same height. After installing all the fasteners, you can hang the finished product on the cornice.
Installation on paper products
The easiest way to install eyelets yourself is on paper or cardboard. Those who have never installed such accessories are recommended to practice on paper before attaching the ring to fabric or leather.
Algorithm of actions:
- Use a ruler to measure the distance between the staples that will pass through the holes. According to the result, mark the location of the rings on paper.
- Use a hole punch to punch holes in the sheet. If the hole punch blade is too narrow. You can widen the hole by twisting the tip of a stationery knife in it. Excess paper needs to be cut off.
- Insert the fittings with the foot on the wrong side. Cover the top with a washer.
- Secure the eyelet with pliers or a press.
Since the small paper rings are made of thin metal, they can be secured by hand. To do this you will need some kind of cone-shaped object, such as a nail. It should fit in diameter. Using a small hammer you can secure the grommet. However, you will have to get used to it. The first attempts may be unsuccessful.
Tips for installing grommets on a canvas awning
Tools you will need to install the grommet on the tarp by hand:
- hammer;
- bumper;
- pencil;
- roulette.
Algorithm of actions:
- Make markings, determining the optimal distance between the rings.
- Use a punching tool and a hammer to make holes.
- Place the parts of the eyelets with the leg under the material. Place the washer on top.
- Using a hammer, secure the eyelets to the awning.
It is advisable to fold the tarpaulin in half at the location where the fittings are installed so that the fastening is secure.
Awnings require rings made of durable material. Eyelets must be chrome-plated or galvanized so that the quality of fastening is not affected by aggressive weather conditions.
In addition, a special coating makes it easier for the awning to slide along the rod. You can buy plastic rings. They are easier to install and do not corrode. The main thing is to buy special eyelets for heavy materials so that they fasten well and are made of thick, wear-resistant plastic.
The manual installation method is suitable for those who have experience working with eyelets. The rest are recommended to use professional equipment that reliably solders the parts of the rings together. To attach fittings to a tarpaulin awning, flaring and nozzles for punching holes are often used.
Different types of rings are processed with appropriate rollers. If it is not possible to install the fittings professionally, you can use a hand press. Various dies and punches are always sold complete with this tool, so choosing bits for a specific ring size will not be difficult.
If the awning is intended for frequent use and there will be a heavy load on it, such as shelter from rain and wind during a hike, then reinforcement of the eyelets will be required.
To keep them even stronger and not come off during a sharp gust of wind, you need a lining made of coarse fabric. It is inserted between the 2 halves of the ring before snapping them into place. In specialized stores you can buy reinforcing tape for eyelets. It is sold in rolls of 5-15 m. You can choose the desired color and width.
It is possible to install eyelets on any material yourself. The main thing is to choose the right rings and auxiliary tools.
However, the manual installation method is suitable in cases where the fittings have to be inserted 1-2 times; for constant work with eyelets, for example, when sewing bags or clothes, professional tools will be required.
Necessary materials
Installing eyelets on clothes with your own hands is not difficult, the main thing is to prepare thoroughly before starting work. You need to prepare a set of necessary tools and materials.
The main ones include:
- marker or pencil;
- eyelets of the selected diameter and model;
- hammer;
- a piece of flat iron;
- knife, ruler;
- a piece of rubber or linoleum for work.
If you need to install eyelets of the smallest diameter, then it is good to use steel rods for installation. The edges at the end should be rounded. You can also use balls from bearings. If you use steel rods with a conical end, then their diameter should be larger than the diameter of the eyelets themselves.
Important! If there are no such tools on the farm , then you can turn to a turner for help. It can easily make the edges of the rods rounded or in the form of a cone.