Removing the front panel
In order to completely remove the rubber band from the drum of the washing machine, you also need to disassemble the facade. It's not difficult if you follow our recommendations:
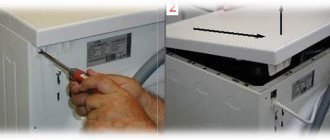
- After unscrewing the fasteners on the back of the machine, remove the top cover.
- Remove the detergent dispenser - underneath you will find other bolts that hold the front panel in place.
- Using a thin screwdriver, bend the latches of the control unit, remove it and place it on top of the case.
- Also remove the bottom panel (where the drain filter is).
- Walk around the perimeter of the front panel to unscrew the fasteners holding it in place.
- Now you can pull the wall towards you, thereby providing access to the inside of the seal.
What else damages the cuff?
Many factors can disrupt the function of the sealing ring on the washing machine hatch. Repairing the machine due to damage to the cuff will cause such common reasons as:
- exposure to laundry detergents;
- careless loading/unloading of laundry;
- loss of sealing qualities over time;
- fungal infection;
- damage to internal components of the machine.
When the hatch cuff is torn or worn out, losing its original qualities and function to prevent water leakage, you can replace it. Doing this type of machine repair with your own hands will not be difficult. All you need is a little time, experience working with your hands and a little ingenuity. With this, repairing the machine to replace the cuff will not cause any problems. Replacing the cuff on a washing machine itself is performed in five steps.
Step 1
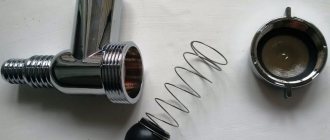
First you need to remove the outer clamp. It holds the curved part of the cuff in the front groove of the hatch. The retaining clamp can be of two types:
The spring can be removed in two ways. The first is to simply unscrew the screw holding it, the second is to pry the spring itself and pull it towards you. Having removed the outer clamp, you need to bend the edge of the cuff and remove it from the dispenser pipe located on top.
Step 2
Next you will need to remove the inner clamp. To do this, first find the installation mark on the cuff. It helps to determine the correct position of the sealing rubber of the hatch relative to the washing tank. Because only a correctly installed cuff prevents water from leaking from the hatch and guarantees proper drainage.
If it was not possible to detect the mark, you can make it yourself. Place a mark on the cuff with a felt-tip pen to indicate it is factory installed. In the future, this will allow you to correctly install the new seal.
Before moving on to the next step of replacing the cuff on the washing machine, you need to carry out preparatory steps. Remove any possible dirt from the mounting grooves. To make it easier to insert a new seal, prepare a soap solution and apply it to the edges of the groove.
Step 3
At this stage, you need to insert a new cuff into the prepared grooves. It is when performing this step that you will need ingenuity and some effort. Before you pull the sealing rubber onto the edge of the hatch, you need to align the mark on the cuff with the mark on the tank. Then, take the seal from the side facing the tank and insert it sequentially with your thumbs. If the edge of the hatch has been treated with soapy water, then the insertion process will be easy.
Having put on more than half of the cuff, the process becomes slightly more difficult, since the part already put on will slide off the hatch. Therefore, to dress the remaining part, change the principle of operation. Do not pull the cuff sequentially (in one direction), but insert it simultaneously from both sides. After pulling the seal, check how tightly it fits to the tank.
Step 4
To secure the cuff, you need to reinstall the clamps. You need to start from the inside. To put on a spring clamp, be sure to fix it at the initial tension point. To do this, you can use a screwdriver by inserting it into the hole that blocks the hatch. When the spring is put on the screwdriver, stretch the clamp and gradually push it inward along the circumference of the hatch until it falls into place.
When installing the spring, the same difficulty arises as with the cuff. Having put the clamp on a little more than halfway, the tension angle changes, creating difficulty in further installation. But with a little practice and patience, the inner clamp can be completely put on.
If the washing machine is an old model, then you can only tighten the clamp using pliers. Because on older models the clamps do not have springs or screws for adjustment.
Step 5
The last thing that involves repairing is installing an external clamp. It will be much easier to install it. If the outer clamp is like that of older machine models, that is, without an adjusting screw or spring, then round nose pliers will come in handy again. They need to open and close the hooks located at the ends of the clamp.
After completing the repair of the washing machine, it is worth checking the result of the work. Start the rinse program and leave the machine to do it. When it is completed and the water drains, tilt the washing machine back and look for any signs of leakage. If they are not there, then the cuff replacement was done efficiently.
Finally, we suggest watching a video about replacing the cuff.
Installing the cuff
All sealing rubbers are asymmetrical. They have a bottom, which can be identified by through technological holes, and a top, which is marked by a small protrusion. There is a triangle mark on the tank.
Therefore, installation must be done from above, aligning the designations.
Working with your fingers, stretch the rubber over the edges of the tank. And gradually we go in circles.
Expert opinion
I work in the household appliance repair industry. Extensive experience in restoring washing machines and dishwashers.
Ask a Question
Important! If difficulties arise, you can lubricate the joint on the cuff with a small amount of dishwashing detergent.
After completion, be sure to check with your fingers along the entire radius to make sure that the rubber is completely seated in place. And also spin the drum. It should not touch the cuff.
Then install the clamp. First you need to insert the edge with the hook into the gutter. And pull the other end with the spring onto it. To do this, it is most convenient to use round nose pliers with an angle of 90°.
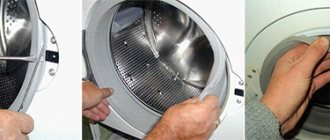
Disassembling the machine
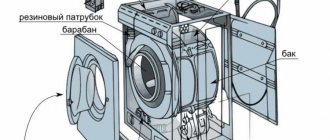
The cuff is difficult to replace without disassembling the washing machine, so we’ll start with disassembly. We go around the back of the machine and unscrew the screws that hold the top cover. Pull the lid towards you and lift it up.
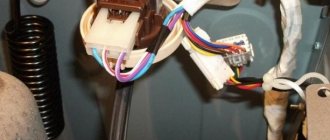
Now we go around the front of the car. We need to get the powder tray out so that it doesn't interfere with our removal of the control panel and front wall. Pull the powder tray out towards you until it stops, press the plastic tab in the center and remove the powder receptacle completely.
Having pulled out the powder receptacle, you will see that there are two screws to the right and left of its niche. We unscrew these screws as carefully as possible using a Phillips screwdriver.
Now we need to remove the control panel of the LG washing machine. There are special latches on the back of the control panel behind the end of the housing. You can press them out using the same Phillips screwdriver. We press the latches one by one and carefully pull off the control panel.
We take a flat screwdriver in our hands and squat down. We hook on the manhole cover that covers the garbage filter. This cover is located at the bottom on a narrow decorative panel.
Having opened the lid, we move aside the emergency drain hose, which may interfere with access to the fastening element. Using a Phillips screwdriver, unscrew the screw that holds the decorative panel. The screw is located to the right or left of the filter, depending on the LG CM model. Carefully grasp the decorative panel and pull it off the latches, first on the right side, then on the left.
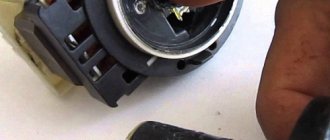
We open the hatch door wide, take a flat-head screwdriver and try to remove the front clamp of the hatch cuff. This needs to be done precisely at this stage, since this clamp will interfere with removing the front wall of the SM housing. We find the spring on the clamp. The spring can be located both above and below. We pry up the spring with a flat screwdriver and, moving it towards ourselves, carefully pull off the clamp.
At this stage of disassembly, we cannot yet remove the door sealing rubber. But we can tuck it inside the drum so that its edges do not catch the front wall of the case during further disassembly. Thread the cuff into the drum. Next, unscrew the two screws that hold the UBL of the LG washing machine. There are screws to the right of the hatch and you will need a Phillips screwdriver to remove them.
To release the front wall of the LG washing machine, you need to unscrew five more screws. First unscrew the two screws on top, and then the two screws on the bottom.
Using a screwdriver, carefully press the UBL out of the front wall so that it falls inside. Now you can remove the front wall and put it aside. There is no need to specially remove the hatch cover; let it remain assembled with the front wall of the machine body. Next we need to remove the hose attached to the cuff fitting.
How to install?
We look for the places where the o-ring seal is attached:
- as we already know, there is a triangular protrusion on top, which, when installed, fits into the drum mark;
- The lower reference points can be not only marks, but also technological holes.
The rotation of the ring seal on the Indesit washing unit starts from the top; its protrusion must be aligned with the mark. Holding the upper part, we push the O-ring inside. Then, starting from the top and moving along the contour in any direction, we completely put the inner edge of the seal on the drum of the washing machine.
After attaching the inner part of the o-ring to the drum, you should carefully check the alignment of the marks . If they are displaced during installation, it is necessary to dismantle the seal and then perform the installation again.
Next we switch to installing the clamp. This stage is the most difficult in replacing the seal. For convenience, its outer edge must be folded inward. Disconnect the door lock by unscrewing 2 screws.
A screwdriver is inserted into the hole for the blocker, and a spring clamp is hooked onto it. This is necessary so that when tightening the clamp onto the ring seal, it does not come off and is fixed.
The tension of the clamp is carried out along the contour in an arbitrary direction, both at the top and at the bottom. When tightening, you should always monitor the position of the screwdriver, especially when the work is done independently, without an assistant. Because if the tension is loosened or other sudden movements are made, the screwdriver can move to the side and the spring will break off.
When the spring clamp is fully put on and sits in the seat of the cuff, you need to slowly pull out the screwdriver from under the clamp.
Next, you need to feel the entire spring clamp along the contour with your hands and make sure that it fits correctly into the socket everywhere, and that the edges of the o-ring seal fit neatly to the drum everywhere and are not jammed. The loose fit of the clamp needs to be corrected.
And also at this stage it is necessary to test the tightness of the connection between the seal and the drum:
- pour water into the drum with a ladle, but in such a way that it does not spill out of it;
- if there is no penetration, then the clamp is installed correctly;
- if there are leaks, then determine the place where the tightness is broken, pour out the water, eliminate the defect, and check the tightness again.
Before securing the outer edge of the rubber cuff, we install the door lock back and secure it with two screws. The leading edge of the seal is configured to match the curve at the edge of the opening of the front wall of the machine. Having bent it, you need to put it on the car body, and so on along the entire contour.
When the cuff is finally put on, it is necessary to examine it and feel it to ensure it is completely tucked.
The last stage is the installation of the external spring clamp. This can be done in two ways:
- the spring is taken with both hands, stretched in different directions, recessed into the recess and by moving the hands further and further from the clamp, it is put on until it is completely seated;
- one end of the clamp is fixed, and the tension is done only in one direction and gradually fits into the recess along the contour.
We dismantle the damaged part
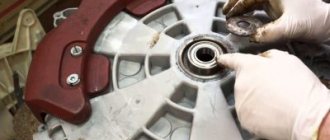
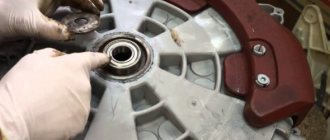
First you need to remove the rubber from the drum. The cuff is secured in the body with two clamps. You will have to remove the internal and external fixing “ring” and only then remove the seal. The algorithm of actions will be as follows:
- turn off the power to washing equipment;
- open the drum door;
- Feel for the outer “rim” with your hands. For Siemens machines it is plastic;
- hook the “latch” of the clamp with a thin screwdriver, pull the “tab” to the right and remove the ring from the body;
- remove the powder receptacle from the washing machine;
- Unscrew the bolts holding the front panel of the case;
- move the front wall to the side so that the wires connected to the UBL do not break;
- use a screwdriver to “handle” the internal clamp (also loosening its latch);
- remove the second plastic “rim” from the washer;
- pull the sealing collar out of the recess.
This way the rubber of the hatch door is removed. Having taken out the cuff, inspect it, find all the defects and cracks on the surface of the seal. This will help you understand why the gasket became unusable and prevent this from happening in the future.
Preliminary inspection and preparation
If you decide to repair the cuff yourself (for example, there is no money to buy a new one or there is no suitable option in the store, but you need to wash it), then you should carry out a list of preparatory measures that will help avoid unpleasant surprises later.
The first step is to thoroughly inspect the cuff and determine the feasibility of gluing it, as well as the extent and cause of the damage. To do this, you need to remove the spring clamp that holds the cuff itself. In some washing machine models, you will need to remove the entire front cover, and sometimes even remove the drum.
An analysis is then performed to determine whether the cuff needs to be removed. If the damage is accessible and located on top, then you can seal the cuff without removing it. In some models, in order to remove the cuff, you will also need to dismantle the drum, so you need to soberly assess your strength regarding reassembly. It may be better to contact a specialist or a more experienced person.
Finally, the patch and glue are selected. If you don’t have thin rubber on hand, you can use a condom or a medical glove, which should be folded several times. The glue must have good adhesion and elasticity.
Causes of damage to the hatch sealing rubber
Most often, damage to the integrity of the rubber cuff is caused by natural wear and tear, but the defect may also be the result of careless handling of equipment. The seal has fairly high strength and good resistance to mechanical stress during operation of the machine.
Damage may result from:
- friction during the washing process on hard objects (for example, shoes, zippers, etc.);
- careless placement of things in the drum;
- inaccurate removal of things from the drum;
- foreign objects getting into the seal - coins, buttons, keys forgotten in a pocket, etc.;
- damage by pets.
In addition, rubber wears out as a result of exposure to detergents and water.
If the cause of the cuff damage is not determined, replacing it may become a regular occurrence.
Removing the façade of the building
If the goal was to replace the seal, you will have to remove the front panel of the Samsung washing machine. This is necessary to gain access to the inside of the drum, to securely fix the cuff in the body.
Using a screwdriver or screwdriver, unscrew the screws located on the front of the machine. Three bolts are located in the lower area of the wall; finding them is not difficult. The upper fasteners are covered by the control panel - you will have to disconnect this part and put it aside.
The last bolt is located under the powder receptacle. When all the screws are unscrewed, all that remains is to disconnect the front wall of the case and move it to the side. This will give you direct access to the drum.
Experienced craftsmen change the seal without removing the front panel, thereby saving time on repairs. However, installing the gasket from the inside is much more difficult, so it is better to still gain access to the drum.
Preparation for gluing
If you still decide to glue a silicone part, prepare properly for the job:
- Inspect the seal, determine the cause of damage and the advisability of gluing. To get a good look at everything, you should press out the spring clamp that holds the front part of the cuff on the outside of the washer. For Bosch, Siemens, Samsung, Beko, LG, GE and Hansa machines, to access the seal, you must remove the entire front wall of the housing.
- Decide whether the cuff needs to be removed for repair. Sometimes the damage is “on top”, and you can seal it without removing the part. But it will be safer and neater if you apply the patch from the inside, and to do this the seal will have to be removed. True, there are cars in which the entire tank must be dismantled to disconnect the cuff. Immediately think about whether you have enough experience to put him in his place.
- Choose a patch that is durable and elastic. Experience shows that condoms and household rubber gloves, folded in two to four layers, work best in this capacity.
- Choose your glue. It must have maximum adhesion and elasticity (these properties are usually indicated on the packaging). Instant rubber and shoe adhesives work well.
What causes rubber bands to break?
In order not to change the cuff every month, it is important to identify the cause of its damage. Natural wear and tear occurs, but more often than not, the seal deteriorates due to the fault of the user
Any part of the Atlant washing machine is characterized by a service life. The rubber gasket can perform its functions for several years. Defects on the cuff sometimes appear earlier due to careless handling of the machine by the user. There are several reasons for premature damage to the seal:
- getting a sharp metal object into the tank (bra wire, nail, paper clip, button, keys);
- constantly experienced friction against clothing (if the permissible drum loading weight is exceeded), heavy items, shoes, which are machine washable;
- the formation of mold on the surface of the cuff, “corroding” the gasket;
- careless loading and removal of laundry from the drum, causing damage to the seal;
- very frequent washing at high temperatures;
- strong vibration of the body during the cycle.
Careful operation of the Atlant machine will help to avoid accelerated deterioration of the rubber seal. After each use of the machine, it is necessary to wipe the cuff dry and ventilate the drum to avoid the formation of mold. Before putting things in, be sure to check the pockets to ensure that foreign objects do not fall into the washing tank.
It is also important to use high-quality detergents and not to exceed the dosage of powder and conditioner recommended by the manufacturer
It is better to periodically inspect the seal for flaws. Even a small crack can lead to a leak. If you can’t urgently change the cuff, you can repair it yourself by sealing the damaged area with a special rubber patch. However, this measure is temporary; the defective gasket must be replaced as soon as possible.
You can’t joke about the tightness of a washing machine. Therefore, at the first “symptoms” you should remove the damaged one and put on a new cuff. Moreover, you can do the repairs yourself without overpaying the technician for the work.
Share your opinion - leave a comment
Why does a cuff deteriorate?
In order not to make a regular replacement, it is important to “work on the mistakes” and identify the cause of damage to the gum. No one has canceled natural wear and tear, but often the cuff of Indesit washing machines suffers due to the carelessness, negligence and lack of education of its owner.
The seal, like any other part of the machine, has its own safety margin, but its service life is greatly reduced due to specific negative factors. It is not difficult to determine the source of a crack or abrasion: just carefully inspect the old gasket. Afterwards, all that remains is to select the cause of the malfunction that is suitable in nature and direction:
- constant friction against solid elements, metal parts of clothes being washed, shoes, heavy things;
- foreign objects (nails, keys) getting into the drum;
- fungus, mold and plaque that worsens the general condition of the rubber;
- inaccurate loading and unloading of laundry, leading to serious mechanical damage.
Aggressive detergents, continuous use of the unit, strong vibration during spinning and high water temperatures also have a destructive effect on the cuff material. To avoid accelerated wear of the part, it is recommended to regularly clean and dry the seal, carefully check the pockets of items being washed, and not exceed the permissible dosage of powder, concentrates and cleaning compounds.
Ideally, before each wash, you should carefully inspect the cuff for flaws and defects. Even a minor crack in the seal is considered a serious leak and requires immediate replacement. If it is not possible to replace the damaged gasket in a timely manner, it is recommended to repair the part - sealing the damaged area with a suitable patch.
Important! Gluing a patch is only a temporary measure. A defective rubber band should be replaced as soon as possible.
It is not recommended to joke with the tightness of the machine, therefore, if there is any suspicion of a damaged cuff, the situation must be corrected immediately. You can assess the size of the flaw, dismantle the damaged seal and install a new rubber band yourself. Moreover, all the necessary tips and instructions are described in detail in this article.
Interesting:
- The rubber seal of the washing machine is leaking
- How to choose a cuff for a washing machine?
- How to replace the cuff on an Ariston washing machine
- How to change the cuff on an LG washing machine
- How to replace the cuff on a Siemens washing machine?
- How to change the cuff on an Atlant washing machine?
Reader comments
- Share your opinion - leave a comment
Nuances of installing a new part
To change the cuff, you will have to try. Pulling the seal back onto the drum is a little more difficult than removing it. A very dense factory rubber band will “resist” during installation, and this will be the main difficulty of the installation process. To make it easier to tighten the rubber gasket, follow the following algorithm:
- attach the cuff to the seat so that the mounting mark on its surface and the tank coincide;
- start installation from the outer part, hold the already put on section of the elastic with one hand, and with the other, pull the seal onto the protrusion;
- tighten the inner edge of the cuff onto the edge of the tank;
- feel the gasket around the circumference, make sure that it sits tightly on the edge and fits well to the body of the automatic machine;
- check that the mounting marks are aligned with each other. If displacement is obvious, you will have to remove the seal and re-tension it.
On Atlant washing machine models, you can change the cuff without removing the front wall of the case. However, in order to have more free access to the inside of the machine, you can still remove the front panel.
After the seal is in place, it should be secured with rings. It is more difficult to install the internal clamp. The installation method directly depends on the type of latch. If the rim is metal, you need to loosen the screw “lock”, fix the element on the cuff and tighten the fasteners.
If the latch is made of plastic, you need to loosen the clamp by pressing on the junction of the “tongues”, put the rim in place and secure it inside. If the machine has a wire fastening, you will have to pull it around the circumference, tighten the ends with pliers, and hide the formed knot in a special hole in the seal. It is more difficult to work with spring tension. You need to insert a thin screwdriver into the groove of the door locking device, pry up the spring and put on the bracket.
The final stage is attaching the external clamp. The rim is installed and locked in place
It is important to understand that only old clamps without defects can be reused. If there is damage or the ring is deformed, be sure to replace it with a new one.
If everything is done correctly, the cuff and clamps will be located close to the body
Afterwards, it is important to check whether the system is sealed. To do this, start the wash “idle”, turn on the shortest mode, which provides for the addition of water, for example, “Rinse”
If there is no leakage from under the hatch door and it is dry under the machine, it means that the rubber band was installed correctly.
When droplets or even trickles of water are visible on the body, leaking under the hatch, you will have to work with the cuff. Check how tightly it fits to the edge, tighten the clamps more tightly. If this does not help, you will have to dismantle the seal and install it again.
How to install a cuff on a washing machine
Before installing a new element, you need to compare it with the dismantled one to make sure it is similar in size. After this, we find the places where the cuff is fixed:
- there will be a triangular protrusion on top, which, during installation, fits into the tank mark,
- for the bottom, not only marks, but also drain holes can serve as reference points.
Tagging is an important feature. Otherwise, the cuff will move, and over time, damage will appear on it again.
Replacing the cuff on an Indesit washing machine starts from the top point, its protrusion should be aligned with the mark. Supporting the upper section, we press the second rubber seal inside. Then, moving from the top point to one side, the inner part of the elastic band is put on the washing machine tank.
To make it easier to put on the cuff, it is recommended to view it from above, looking through the opening of the dismantled cover. Having attached the inner part of the seal, check the alignment of the marks. If they move during installation, it is best to remove the sealing collar and re-install.
Now let's move on to installing the clamps. This stage of work is the most labor-intensive. For convenience, it is recommended to tuck the outer edge inward and disable the hatch lock by unscrewing a couple of screws.
A screwdriver is inserted into the hole under the blocker, and a clamp clings to it. This is necessary so that when tightening it does not jump off and remains in place.
The clamp is tensioned around the perimeter in a convenient direction, while the position of the screwdriver is constantly monitored. This is especially important if you are working without a partner. The fact is that with any loosening or sudden movements, the screwdriver moves and the spring slides off. Once the spring is fully inserted and located in the recess of the seating point on the seal, you will have to hold it and carefully remove the screwdriver.
Now we probe the entire perimeter of the spring with our fingers to make sure that it fits into the recess everywhere, and that the cuff edge fits exactly against the tank, without jams. If loose spring connections are detected, they are corrected.
If you fail to place the cuff tightly in the intended place, the likelihood of leakage increases.
At the same working stage, you should make sure that the Indesit washing machine is tight after installing the purchased cuff:
- water is poured into the tank in such a way that it does not flow out of it,
- when no leakage is detected, the spring is inserted correctly,
- otherwise, the area of leakage is determined, the liquid is poured out, the problem is eliminated, and a recheck is performed.
Before fastening the outer part of the sealing collar, the door lock is installed and the fastening screws are tightened. The front part of the seal is curved in a certain shape, corresponding to the bend of the edge of the hole in the front panel of the Indesit washing device. Having bent the front part, it must be pulled onto the body of the washing machine, performing similar steps in a circle.
When the rubber part is completely put on the front, you will have to inspect it and feel it to completely fill it.
The final stage is the installation of the external clamp. It doesn’t always work out in one go, because the spring is quite stiff. But there are ways:
- taking the clamp from both ends of the spring, stretch it, insert it into the recess, and, continuing to hold it, put it on completely,
- You can fix one spring end and pull it to the side, placing a clamp.
Rules for choosing a new cuff
In order for the cuff to be connected correctly and reliably, it is not enough to simply buy and install it: you will need the right approach to choosing a device
Several parameters should be taken into account:
- first you need to determine the diametrical cross-section of the pipe - outside and inside, so that the seal fits well to the walls;
- You should buy a product whose elastic band is as dense as possible so that it tightly grips the pipe; only with this approach can reliable fixation be ensured, especially in conditions of draining water and spinning things.
If the cuff is purchased separately from the tee (and they are usually sold as a set), you will need to follow similar rules. The main thing is that there are no cracks or holes in the product. Experienced plumbers say that it is worth purchasing a product that is made of modern alloys, because... They last a long time and are reliable.
After purchase, proper installation of the cuff will be required. The procedure for this is as follows:
- you need to insert the tee into the connector area, the rubber band for sealing is not removed;
- after this, the device is securely fixed, and the cuff itself is installed in the hose connector;
- subsequently a drain hose is threaded into it.
After this, the installation process is considered complete. If the cuff is installed in the tee itself, the seal is fixed to the sewer pipe. After this, the hose itself is inserted. So, the purchase is optional, but very desirable. And since the device itself is inexpensive, saving on it is unacceptable.
Preliminary inspection and preparation
If you decide to repair the cuff yourself (for example, there is no money to buy a new one or there is no suitable option in the store, but you need to wash it), then you should carry out a list of preparatory measures that will help avoid unpleasant surprises later.
The first step is to thoroughly inspect the cuff and determine the feasibility of gluing it, as well as the extent and cause of the damage. To do this, you need to remove the spring clamp that holds the cuff itself. In some washing machine models, you will need to remove the entire front cover, and sometimes even remove the drum.
An analysis is then performed to determine whether the cuff needs to be removed. If the damage is accessible and located on top, then you can seal the cuff without removing it. In some models, in order to remove the cuff, you will also need to dismantle the drum, so you need to soberly assess your strength regarding reassembly. It may be better to contact a specialist or a more experienced person.
Finally, the patch and glue are selected. If you don’t have thin rubber on hand, you can use a condom or a medical glove, which should be folded several times. The glue must have good adhesion and elasticity.
How to remove the rubber seal?
A damaged hatch O-ring is not a death sentence for a washing machine. On the contrary, such repairs will be much cheaper than replacing failed electronics or control devices. And essentially any owner of the Indesit brand can dismantle the cuff on their own and install a new one.
First of all, you need to prepare for rotation: buy a new seal identical to the damaged one. Then we worry about personal safety - we disconnect the unit from the power supply and wipe the body dry. Then we begin dismantling.
Remove the fastening clamps. When the clamps are made of plastic, then, holding the junction of the 2 latches, pull towards yourself
With iron rims, you need to unscrew the screw or pick up the spring with a straight screwdriver. Carefully pull out the face of the O-ring.
We look for the mounting mark showing the correct location of the seal to the washing machine drum (usually the mark is a triangular protrusion).
We mark the counter mark on the body with a marker.
We pull the cuff towards us and pull it out of the recess.
After removing the old O-ring, do not rush and install a new one. It is necessary to thoroughly clean the edge under the cuff from scale, dirt and detergent residues.
Removing the damaged part
A damaged hatch cuff is not a death sentence for a washing machine. On the contrary, such repairs will cost much less than replacing a control module or damaged electronics. And what’s even nicer is that almost every owner of the Indesit model can remove the rubber band from the drum with their own hands and install a new one.
The first step is to prepare for replacement: purchase a new cuff identical to the damaged one, focusing on the diameter, markings and recommendations of the consultant in the store. Next, we take care of our own safety: disconnect the machine from the electrical network and wipe the body with a dry cloth. After this, we proceed directly to dismantling.
- Remove the fixing clamps. If the holders are plastic, then, holding the junction of the two latches, pull forward, and with metal rims, unscrew the screw or pry off the spring with a flat screwdriver.
- Carefully pull out the front part of the rubber gasket.
- We are looking for a mounting mark indicating the required location of the cuff to the drum of the washing machine (most often the mark will be a characteristic protrusion).
- We mark the response mark on the body with a marker.
- Pull the elastic towards you and remove it from the recess.
After removing the old seal, do not rush and install a new part. It is important to thoroughly clean the cuff edge from dirt, scale and detergent residues. A richly soaped sponge is perfect for these purposes, and the soap will become not only a cleaning agent, but also a lubricant.
Important! There is no need to rinse off the foam and wipe the recess dry: the slippery solution will help speed up the installation process.
Installing a new cuff
First, you still need to remove any remaining dirt from the installation site. And the soap film on the tank body can help pull the new rubber onto the tank, acting as a lubricant. We will put it on after we have aligned the mark on the tank and on the cuff itself.
It is clear that it will be difficult to tighten the cuff. You just need to be patient and do everything carefully so as not to turn the new elastic band into something like the old one. Put the cuff in place. We check the accuracy of installation according to the marks and the density with which the rubber adheres to the body of the washing machine tank.
Now you need to secure the cuff with a clamp. If the front wall has been removed, installing the clamp should be fairly easy. The spring clamp is simply tensioned, and the screw clamp is compressed with a bolt.
If the wall is not removable, or you really don’t want to remove it, the technique for installing the clamp is a little different. The screw clamp is loosened and placed on the cuff so that the tightening bolt is at the top. It can now be tightened by reaching through the open top of the washing machine.
To install a spring-type clamp, you will first need to unscrew the fastenings of the hatch lock. Push the lock itself to the side. Next, a screwdriver is inserted into the hole in the lock and a clamp is attached to it. In this way, we ensure constant spring tension, which will allow you to easily and evenly pull the clamp onto the cuff. We return the hatch lock to its place and secure it with screws.
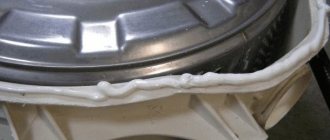
At the final stage, carefully place the edge of the cuff on the body of the front wall and secure it with the appropriate clamp. Of course, if the case was disassembled, the same procedure is performed after the front wall is installed in its place. If everything is done correctly, you can forget about water leaks through the hatch for a long time.
That's all science is. And nothing that would cause difficulties. Such types of repairs as the process of replacing the washing machine hatch cuff described above can easily be carried out independently. And there is no need to spend money on a master that he will ask for a simple job. It’s easier and more profitable to become a master yourself. And you choose how to spend the saved money yourself.
Assembly of the SMA
Reinstall the counterweights and gradually tighten the screws.
View of the washing machine without the front panel
We install counterweights
Disassembled machine with front panel
Reinstall the front panel. You need to get the holes into the plastic fasteners on the SMA body. We tighten the screws.
We insert the bottom bar using latches.
Bottom bar and cover
Then we mount the control panel and tighten the screws.
Control panel
Don't forget to install a washing powder dispenser.
After this, we pull the cuff onto the body and install the outer clamp.
Cuff clamp
Let's check the operation of the LG washing machine!
Video
In addition to LGi, it is not difficult to change the cuff on the following machines: Samsung, (Bosch), Siemens. And “Indesit”, “Ariston” and “Beko” have a non-separable body.
AEG, Zanussi and Electrolux washing machines are collapsible, but this will not help to replace rubber, because the front panel of these machines cannot be removed. Changing a cuff there is not so easy. Step-by-step master class.
Problems with the hatch cuff
More often than not, a puddle under the washing machine appears due to the rubber seal. It is also called a cuff and is located around the circumference of the drum, ensuring the tightness of the system. But if the rubber wears out and becomes damaged, then cracks and holes form on its surface. As a result, the water is not retained in the machine, but flows out in portions.
Another possible cause is a leaking powder receptacle. Sometimes a trickle starts from the detergent tray, and then goes around the dashboard and down to the drum hatch. As a result, it seems that the rubber band is leaking. Sometimes a leak occurs due to a foreign object getting stuck between the sunroof glass and the cuff. The door does not slam tightly, the seal is broken, and some of the water flows out onto the floor during washing. Fixing a leak is simple - remove the item and slam the drum.
But more often the problem is in the cuff, especially if the washing machine has been in use for a long time. In this case, it is better to check your guess: inspect the seal for integrity and flexibility. If the rubber band is chipped or cracked, the system is not sealed and water is not retained in the drum. The gasket is not always torn - sometimes it is a matter of severe wear. Old rubber loses its smoothness and elasticity, which invariably leads to leakage.
To understand why it is leaking and what to do to fix the problem, you need to stop the cycle and inspect the hatch door. If the cuff is visually intact and flexible, then it is enough to clean the elastic and the surfaces in contact with it from accumulated debris, plaque and dirt. If the seal is damaged, there are cracks, black traces of mold and chips, there is no alternative - only replacement.
You can replace the rubber seal either at a service center or at home. The procedure for dismantling the old cuff and installing a new cuff is complex, but quite realistic. The main thing is to prepare for repairs and not deviate from the instructions.
Washing machine: repair or throw away?
No, Iksha is the north of the Moscow region, from the city, I don’t know, about fifty kilometers, an hour or something like an hour by train. In the north is the city of Dmitrov, and in the south (towards Moscow) is the city of Lobnya. With a heated bath, yes, a great idea, I was thinking about something like that for a while, but so far it has come to nothing. And specifically, my bathtub - it’s already quite scary; about 15 years ago, workers dragged it in when we were concreting the perimeter of the fence (we have a relatively solid fence, with steel pillars located in a reinforced concrete line). We poured this concrete, of course, not stupidly for money, but by throwing all sorts of rubbish in there - ancient Soviet broken reinforced concrete pillars (pieces), some fragments of slabs, all sorts of pieces of iron and so on, pouring it with concrete for connection. It’s hard to say how justified this was, but at least the Alabai won’t undermine this fence, and the goats, who are in the habit of sometimes testing everything for strength with their horns, won’t overwhelm it. In general, we pulled out this bathtub (it was a masterpiece, of course, carrying a cast iron bath around the perimeter of the site, mixing concrete in it and then pouring it into the trench with shovels or simply tilting it), we finished the work, then I concreted something else, I don’t remember what, but the workers didn’t take this bath anymore, they went to their home (they were from some Soviet republic, newcomers; it would have been strange to carry something like that home on a plane or train).
I have had this cast iron bathtub ever since. And before that, it seems that some neighbor had it, he also concreted something and dumped it with the workers, like, take out this rubbish, it’s bothering me. Well, the bathtub went traveling around the village, and in the end it settled with me. And it’s been like that for about 15 years now; this is probably her last refuge.
And so... There were a lot of different weirdos working here in the village, I caught a case when one guy’s crew mixed concrete in another cast-iron bathtub, and then abandoned it, went and got drunk and left it there. Well, the concrete in the bathtub froze safely. They started hitting her with a sledgehammer and knocked her down. The result is a cast-iron bathtub with a hole and still a block of concrete that cannot be pulled out. Laughter and sin.
There is such an ideology there. A homemade welded greenhouse 3x12 m, glazed at the bottom with ancient windows, and polycarbonate at the top, a drain runs along the entire length of the right side, and is lowered into this bathtub by the stub of an ancient sewer elbow, and the rain drains there. On the left there is a barrel, and the ducks live, they also have a foam block house there with an exit to the same greenhouse, sometimes I sing from the barrel, pouring it into their bucket. And from this bath I draw water and water the cucumbers. Although this year I’m thinking of planting tomatoes, not cucumbers, in this greenhouse, and transferring the cucumbers to the tomato greenhouse. It’s just that geese spend the winter in the tomato room, and there’s always a lot of manure there, the tomatoes go a lot into the tops, I just want to try planting eggplants, peppers and cucumbers there, and “drag” the tomatoes here, here in this greenhouse they somehow work out better.
Before renovation
A considerable part of washing machine problems can be fixed without using any special tools. Take cuff replacement, for example. This is a fairly simple operation and can be done with just one screwdriver, but to be sure, it makes sense to collect the following tools:
- hex keys;
- pliers;
- hammer;
- screwdrivers, slotted and Phillips.
There is one small trick. For those who are doing this work for the first time, it makes sense, in addition to the necessary tools, to have a camera or phone with a camera on hand. This is necessary in order to take a series of photographs. They are needed so that later, during assembly, you can use the photograph to install the removed parts in place. This approach will allow you not to confuse anything and start the machine without any problems after repairs.
DIY instructions for repairing holes in the cuff
To start
To repair the cuff and patch the hole, first unplug the washing machine and turn off the water supply.
Prepare:
- flat head screwdriver;
- a piece of thin elastic band (larger than the hole formed on the drum);
- scissors;
- surface degreasing agent (alcohol or gasoline will do);
- glue suitable for rubber (“Moment” is great);
- cotton pad or piece of cotton wool.
Dismantling: remove the clamps
First, let's pull out the front clamp. It can be attached to the front wall in three ways:
- latches;
- spring;
- on the screw.
If the tie is attached to a screw, unscrew it and pry the clamp with a screwdriver. For plastic clamps on a spring, you need to hold the spring at one end, pull it back and loosen it. Then pull the clamp towards you and remove it with a screwdriver.
To remove the second tie, unscrew the front panel of the machine. As soon as you see the clamp, unscrew the screw that holds it, pry the spring with a screwdriver and pull it off.
It happens that the rubber band comes off or flies off the mounting connectors in the case, then you need to check the spring and fastening, this is most likely the problem.
Looking for a hole
The cuff is in your hands, now you need to find the “hole”. Carefully inspect the rubber for holes.
If the hole or cut is significant, then there is no point in repairing it - it’s easier to buy a new one. To purchase a suitable one and not make a mistake with your choice, take the old elastic band and, based on it, select an analogue or identical model.
Putting on a patch
- Prepare the material for gluing. Fold it in several layers, gluing them together. The patch should be 1.5-2 cm longer and wider than the hole on each side.
- Degrease the sizing area: wet a cotton wool or rag with alcohol or any other impregnation, then thoroughly wipe the area with the hole.
- Apply glue to the elastic and patch. Glue them: “join” them with each other, press them and hold them in this state for a while so that the glue grips better. We recommend reading the instructions on the packaging, as there are some nuances.
- Leave the seal in its natural position for a day - sometimes it is enough to spread it on the floor.
Installation: install back
Place the inner clamp correctly. If it is screw-type, then put it on the cuff and tighten it. Stretch the spring version over the entire area of the opening, the plastic version with latches - insert into the grooves and snap into place. Take the front clamp and do the same with it.