Author's rating
Articles written
703
Author of the article
Vasily Mikhailovich Sviridov
home appliance repair technicians Salary from 80,000 rubles!
Published: 14-5-2018
Modified: 14-4-2020
Reading time: 5 minutes
This article has: (i)
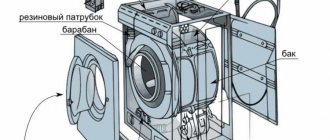
If the bearing wears out in an automatic washing machine (WMA), you will have to disassemble the tank. If a non-separable version is installed in the machine, the product is first sawed to remove the bearing, and then glued together. Moreover, the glued seam must be monolithic and waterproof. Let's figure out how to glue the washing machine tank to ensure a reliable connection. Let's find out which adhesives or sealants are preferable.
Why do you have to glue it?
Sealing and gluing the washing machine tank is a forced process that owners of some SMA models have to deal with. Washing machines with a non-removable tank are offered, for example, by brands such as Ariston and Indesit. Manufacturers, making this element monolithic, do not intend to disassemble it. If the bearing breaks, the unit must be completely replaced. But such a replacement costs a lot of money and our people simply cannot agree with this order of things. As it turned out, you can halve the drum, remove the bearing, replace it with a new one, and then connect the halves. It is important to know how and with what to seal the tank.
Why gluing?
Manufacturers of automatic washing machines, for example Indesit or Ariston, put a “real pig” on the craftsmen by making the tank of their equipment non-separable. It is understood that the user must change this entire unit of the washing machine due to bearings or some other small detail. In Europe, anyone can do such nonsense, but in our country they will repair the unit anyway, and the fact that it is non-separable is unlikely to stop anyone.
As a result, the repair will be carried out, but the problem will be how to restore the tank after such a repair, because in order to get to the key parts we needed to saw it in half. The first thought is to seal the tank with sealant. But the sealant, no matter how good it is, will not provide sufficient structural strength. Conclusion: in order to reliably connect the two halves of a plastic tank, you need to twist them with bolts and nuts, and seal the gap between the halves of the tank with sealant, ensuring water resistance.
Experts advise not to skimp on sealant. After all, you must admit, it would be a shame to re-disassemble the washing machine tank and re-glue it if the junction of its two halves leaks.
If you are interested in more detailed information on how to repair a washing machine tank with your own hands, read the article of the same name on our website. It describes in detail, including, disassembling the tank and its further assembly.
Requirements for glued joints
When new bearings are installed, the question arises - how to repair a plastic tank that has been sawed in half. How to seal the drum to prevent leaks? What to choose - glue or sealant? It is better to use glue, since no sealant can provide the necessary strength characteristics of a glued structure.
Reliable connection of parts requires two operations:
- The halves are connected using bolts and nuts. To do this, holes are made in the plastic - evenly along the entire seam.
- The gap between the parts to be joined is filled with glue or sealant.
Not every composition will work. It is important to know what sealant to glue the halves together with. In this case, the operating features of the unit are taken into account:
- Strong vibrations - the connection must withstand severe mechanical loads.
- Extreme temperature conditions - the unit either heats up or cools down.
- Contact with aquatic environment. Including water supplied under pressure.
If the purchased composition fails you, leaks are possible. Then you will again disassemble the machine and fix the problem.
How to choose the right silicone
Sealing a washing machine tank is a delicate procedure. The average user, when asked “what sealant should I use to glue the tank?” will answer that any modern silicone. Unfortunately, this answer is not true. In order to select the correct sealing compound, the following factors must be considered:
- During operation, the tank and drum operate under conditions of high vibration loads
- The tank operates with a constant temperature change: from cold to hot
- Water is supplied to the tank, sometimes under pressure, which also affects the tightness of the connection
Without taking into account the above conditions, there is a high probability that the incorrectly selected material will not provide proper tightness and the tank will leak again.
How to glue a plastic water tank?
Below are adhesives and sealants that are suitable for bonding the drum. These compositions easily withstand the difficulties characteristic of SMA - temperature extremes, vibration attacks, high pressure, contact with water.
Permatex 81730
This is a flowable adhesive-sealant designed for hermetically sealing headlights and glass in a car. The composition is characterized by transparency. Frozen seams do not allow water to pass through and are not afraid of extreme temperatures. The operating range of the composition is from minus 62 to plus 232 °C. Great for the task. Costs on average - 175 rubles.
Kraftool
The composition is highly elastic. Withstands strong vibrations and heating up to plus 250 °C. Its main purpose is to seal connections in electric motors. Reliably fastens the halves of the product even without bolted connections. One tube can glue 4 tanks together. The cost is about 200 rubles.
Glue F
This is polyurethane glue. If you use it, then you won't need bolts. But it is so strong that if you need to disassemble the machine again, you will have to saw it again. The second disadvantage is the price, it costs much more than sealants, a 310 ml can costs almost 700 rubles.
ABRO 11AB-R
An ultra-resistant sealant that can withstand the harshest conditions. He is not afraid of very high temperatures, and is not afraid of chemically aggressive substances, including acids. The cost is approximately 350 rubles.
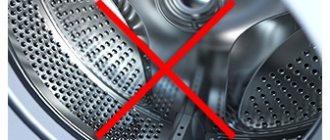
Types of tanks
There are two main types of tubs in washing machines: collapsible and non-dismountable. A collapsible tank is a structure connected using threaded connections. A non-separable washing machine tank is a structure made of two plastic halves sealed together.
Currently, no one except the manufacturer can give you an answer to the question of what kind of tank is in the machine. Therefore, before purchasing, you can ask the store to tilt the machine and inspect the tank from below to understand the type of construction of this element.
Tanks are also divided according to the type of construction materials from which they are made. They can be made of enameled steel, plastic or stainless steel.
Enameled steel tank
This element is made of steel coated with a special enamel, which protects the tank from corrosion. The main disadvantage of such a tank is its poor resistance to mechanical stress, which can lead to destruction of the enamel. Currently, such tanks are no longer produced.
Pros:
- Reliability
- Protected from corrosion
Minuses:
- Afraid of mechanical damage
- Not suitable for repair due to the fact that many components are no longer produced
Plastic tank
These are tanks made of polymer materials with the addition of various impurities. They are considered the most common throughout the world.
Pros:
- Have high strength
- Have little weight
- Do not let water through
- Almost no noise when rotating
Minuses
- Fragility
- Relatively short service life
Stainless steel tank
Stainless steel tanks are considered one of the most durable and reliable. But such elements of proper quality are installed only on premium-segment washing machines. When buying a cheap machine, you can’t say for sure how high-quality the tank is.
pros
- Not afraid of water
- Does not rust
- Highly durable
Minuses
- High price
- Noisier than plastic
- Weighs a lot
How to glue the halves?
There is nothing complicated here. The main thing is to properly prepare the parts for gluing. Before sawing, you need to make 30–40 small diameter holes across the seam. They are then precisely aligned when gluing, and the halves fit together flawlessly.
The joint of the halves is smeared with the selected composition, and then the bolts are screwed on. Moreover, they tighten the bolted connections without waiting for the glue/sealant to dry. The seam will dry completely in about two hours.
Features of tank disassembly
Depending on the type of washing machine, the steps to repair the tanks may vary, so the time costs may vary. However, the general operating algorithm is similar.
Tools
To disassemble the tank and repair damage, you need to prepare a number of tools in advance:
- screwdriver and screwdrivers - Phillips, slotted;
- hammer;
- pliers;
- set of hexagons.
Front loading washing machines
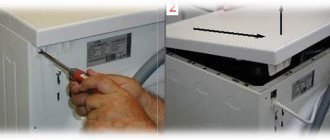
First, you need to disconnect the device from the network, remove the drain hose, and simultaneously turn off the water supply. Dismantling the machine is done as follows:
- unscrew the screws on the back panel and remove it;
- repeat the same steps for the front panel;
- remove the powder container;
- Using a slotted screwdriver, remove the control panel, but do not remove it completely, but carefully secure it to the side;
- remove the hatch cuff and bottom panel by tightening the screws;
- detach all additional elements from the tank: shock absorbers, electronic parts, wiring, clamps;
- remove the motor after unscrewing its bolts and disconnecting the wires;
- reach the tank by the springs, lifting it upwards, act carefully so as not to damage the wires;
- remove the remaining elements from the tank, which has already been removed (heating element, balancing element).
Top loading washing machines
Such machines are less common in everyday life, and yet their breakdowns also happen. The tank is secured in them with screws, and you need to get it out like this:
- remove the screws from the back and front walls of the device;
- move the side panel, then remove it too;
- carefully remove the wires in the casing area;
- unscrew the screws and shaft fixing screws;
- remove the tank.
Which washing machines have collapsible tanks?
Some models of the Electrolux and Indesit brands have collapsible tanks. Typically, such products have a high price and belong to the elite category. To disassemble, you need to remove the tank, as described above, remove the screws connecting the two halves. Before coating the components of the tank with glue, they must be cleaned of dirt and degreased.
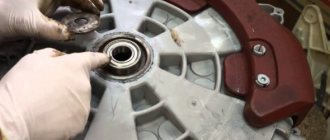
How to get it?
Disassembling and cutting the tank may be necessary when:
- bearing faults and seal wear;
- bearing wear, which leads to shaft deformation.
To cut a product, it must first be removed. Disassembly of SM from Indesit:
- Disconnection from the mains.
- Dismantling the panels - top and rear, by unscrewing the bolts.
- Removing the drive belt from the pulley.
- Disconnecting the wiring connected to the heating element.
- Loosening the clamp holding the drain pipe. Eating the last one.
- Unscrewing the shock absorber nuts.
- At the top of the SM, unscrew the suspension fasteners.
- Removing the powder container - unscrew the screw.
- Removing the panel and removing the detergent tray.
- Removing the cuff and pressure switch.
- Removing the product from the hangers and removing it.
What types of pipes are there in a washing machine?
Washing machines can use different types of pipes:
- The drain pipes are designed to connect the tank to the pump. They are made of rubber and can have any shape;
- The filler pipes act as a bridge between the detergent hopper and the tank itself. They are attached with adhesive sealant. If such a pipe fails, a leak will form on the left side directly under the bottom of the washing machine;
- pipes - hoses distribute water intake to the compartments of the hopper, which contains washing powder and rinse aid. If cracks or other damage to the rubber forms on the pipe, then these hoses must be urgently replaced.
The role of pipes
Pipes, along with hoses, are used in the washing machine to connect drains. Water enters the machine through the inlet hose, then through the water inlet valve, after which it is mixed with the powder. Water then flows into the dispenser pipes and into the drum. The water is drained through a pipe that connects to the pump and drain hose.
How to cut?
- The element intended for cutting is placed on the floor. The surface must be flat.
- Place marks under the screws.
- Drill holes in the plastic - 3 mm in diameter. Only 15–20 pieces.
- Place the product on its side. Using a metal file, they start cutting from the top.
- The maximum depth is 5 cm. A large cutting depth can damage the drum.
- As sawing proceeds, the seam is sprayed from time to time to make sawing easier and prevent the plastic from heating up.
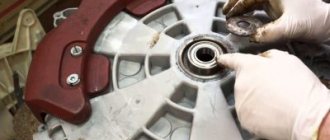
- Having cut the product into two halves, pull out the drum. For this purpose, unscrew the fastening bolt and disassemble the shaft - the drum is attached to it. Remove the pulley and remove the drum. Now you can change the bearings and seals. After replacing the parts, gluing begins.
How to seal the washing machine tank?
After repairing and replacing faulty parts, you need to reassemble the tank in the reverse order:
- First of all, carefully treat the joint surface of the tank halves. They should be smooth and free of rough scratches that may remain from sawing. To clean the surface, use a stationery knife:
- position the blade at 90 degrees to the surface being processed;
- Grind down all the irregularities, bringing it to perfect smoothness.
- Degrease the interface between the two halves of the tank.
- Lubricate the oil seal and shaft with oil seal grease.
- Insert the drum axle into the bearings.
- Secure with a pulley.
- Apply silicone glue (aquarium silicone washing machine sealant is ideal) to both halves of the tank.
- Spread the sealant layer so that it is even.
- Place both halves of the tank on top of each other.
- Tighten the halves around the circumference with bolts until the silicone dries.
- Let the glue dry.
- Reassemble the washing machine in the reverse order: screw the front weight, install the heating element, hang the tank, connect the pipes, motor, etc.
Repair of a non-separable tank
To repair the tank, which is a single whole, you will have to cut it. To do this, use a power tool to separate the front and rear halves. If done correctly, a ring with a rubber cuff should remain in your hands, which seals the tank. To replace the cuff, the elastic will have to be torn off.
During repairs, depending on the type of breakdown, the following actions are carried out:
- installation of new bearings coated with silicone grout;
- replacing oil seals and lubricating the front side with a special lubricant;
- cleaning of rust or complete replacement of the drum rotation axis.
Next, you need to carefully drill holes in the tank with a diameter of 3-5 mm every 5-9 cm, into which self-tapping screws are then inserted. After gluing the halves and securing them with bolts, the machine is assembled. Lubricating the parts is a prerequisite - this is the only way to achieve complete sealing of the tank. A day later, when the seam has dried, the tank is put back into the machine, it is collected and put into operation. It is better to fix serious damage in a specialized workshop, and small leaks in the tank can be repaired with sealant.
Do-it-yourself washing machine repair: the most common breakdowns
Although the designs of the machines are very similar, there are differences in them. However, there is a certain set of faults that are common to all washing machines.
Wash does not turn on
Repairing a washing machine with your own hands begins with the fact that you need to determine at what stage the program stopped. Sometimes the washing machine fails to start. There are several possible reasons:
- The door is not closed. Until the relay operates, the wash will not start. Push the door firmly against the body. If this does not help, there may be a foreign object in the lock or the latch may be faulty.
- No power or voltage too low.
- Check the integrity of the plug, socket, and cord.
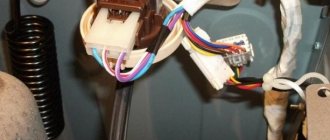
The cord may fray - The contacts on the terminal block where the power cord is connected may be oxidized. In this case, remove the cover of the washing machine, find the block and inspect the contacts, clean them if necessary.
- The time relay is faulty. Diagnosing its failure is not easy. You just need to switch programs several times. If at some point the washing starts, then the time relay is really faulty.
If all these points are checked, there are no faults, but the washing machine still does not turn on, the problem may be in the control board. This can only be determined by installing the working board.
Water does not fill
If the machine does not fill with water, first check if there is water in the water supply. It is also worth checking its pressure (open the tap and evaluate the pressure). If it is sufficient, we move on:
- Check the water supply hose. It may be pinched.
- The water supply filter is clogged. Then we act like this: shut off the water supply to the machine;
- remove the supply hose from the pipe;
- Using pliers, remove the filter from the machine and rinse it under running water;
- install it in place, put on the hose.
How to clean the filter on a washing machine
- connect to the inlet hose, in normal condition it is closed, so the water can be opened;
This is the intake valve
The same reasons lead to another breakdown - water is drawn into the machine slowly. If the pressure is normal, then either the hoses are pinched/flattened/clogged or the filter is clogged.
Water does not heat up
If the water in the machine does not heat up, the first thing that comes to mind is that the heating element has burned out. In this case, repairing the washing machine yourself consists of replacing the heating element. But this is not the only reason. There are three of them:
- The water level sensor is faulty. The heating element turns on only when there is enough water in the tank. If the sensor incorrectly detects the water level, the command to turn on the heating element is not given. Such a malfunction can be treated by replacing the sensor. It happens like this:
- Remove the top cover of the machine.
- We find the water level sensor (pressostat). This is a small plastic box on one of the side walls of the case. Conductors and a thin tube are connected to it.
- We unscrew the two bolts that secure the relay, remove the tube (unclench the clamp). If the tube is hard at the end, cut off the hard part (no more than 12-15 mm).
- Find a tube of the same cross-section as you just disconnected (about 10 mm) and a length of 20 centimeters or more. Place one end of the tube on the fitting and blow on the other. Keep the pressure switch near your ear. If you blow and hear a click, then the relay is working. If, despite all efforts, there is no click, the relay is faulty. You can measure the conductivity of the winding while blowing into the tube. In operating condition, the conductivity changes.
- We install the working pressure switch in place.
This is a water level sensor (pressostat). The body color can be any - The heating element is working, but the contacts have oxidized. In this case, having reached the contacts, they are cleaned to bare metal.
- Thermal relay is faulty. These sensors are located under the loading hatch. They can be of different shapes, as well as different types: bimetallic or gas-filled thermostat (looks like a tablet with a diameter of 2-3 cm) and a thermistor (in new models). Having removed the temperature sensor from the tank housing of the washing machine, we check it:
- We measure its resistance in a cold state.
- Apply it to a pan of hot water, wait a few minutes, and measure the resistance again.
- The difference must be very big. If so, then the relay is working normally. If the resistance has changed slightly, you need to replace the part with a similar, but serviceable one.
The thermal relay is responsible for timely turning on/off the heater.
If the water in the washing machine heats up, but for a very long time, most likely scale has formed on the heating element. You will have to extract the heating element and clean off the scale from it.
The drum does not spin
There are again several reasons. The first, most terrible thing - the engine burned out. To do this, you need to check the presence of voltage at its terminals. If there is no voltage, the motor is faulty. Other problems are not so global:
- The drive belt has slipped or loosened (if the washing machine has a rotary drive). Some models have the ability to adjust the belt tension. To do this, loosen the bolt securing the engine, pull it back a little, and secure it. There is no need to move too much - too much tension will lead to rapid wear of the bearings.
- In case of replacement, you need to put the belt on the pulley like this: pull the belt away from you with your hand and turn the pulley counterclockwise. To remove, we do the opposite.
How to put a belt on a pulley
Another possible option is that something has gotten between the tank and the drum that is blocking rotation. In this case, you need to disassemble the drum and remove the interfering objects.
Water does not drain
There are a lot of options here. There are too many factors, so this time repairing a washing machine with your own hands may take a lot of time - until you go through all the reasons... So, let's start with the simplest:
- The drain hose is pinched.
- If the car has stopped altogether, but the indicators are on normally, check if you accidentally pressed “Stop” and the car is in standby mode.
- The water level sensor is faulty. We have already written about it (the water does not heat up), the test is similar.
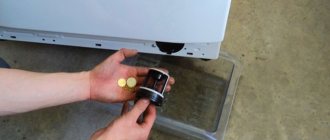
- The filter on the outlet pipe is clogged. It is always located on the front of the case at the bottom right, but, depending on the company, it can be hidden behind a small door (Indesit, Bosh, Sanussi) or behind a removable plastic panel (Sumsung). The filter has a small handle by which you need to unscrew it. Just place the container first - all the water in the drum will flow onto the floor. We wash the filter and put it in place.
How to clean the exhaust filter of a washing machine - The pump impeller is blocked. When washing, sometimes small objects get into the tank. They can get between the impeller blades and block it. The impeller is located behind the filter, so first remove the filter. Then, sticking your finger in, we feel for the impeller and check if anything is interfering with it. We remove the blockage. It may happen that the impeller is skewed. Then you will have to change the pump, because it will not work in this form.
Water is leaking from the washing machine
In this case, there are two different situations: it leaks a little and it leaks a lot. The reasons are similar, you can check everything. The first thing to do is drain the remaining water (by unscrewing the outlet filter - see the previous paragraph). If it’s not clear where it’s coming from, but not from the door, we start checking with the simplest thing:
- We check to see if the sewer hose has popped out or if the pipes are clogged.
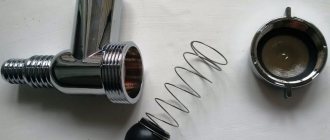
- We inspect the place where the exhaust hose is attached to the car. It's attached to the pump, so you have to get to it. For washing machines Samsung, LG, Candy, Beko, Ariston, Ardo, Indesit, Whirpool, access to the pump is obtained simply by turning the unit over - the pump is located at the bottom. A drain hose comes from it. It may leak at the connection point, then loosen the clamp, move the hose a little, and tighten it again. Electrolux and Zanussi will have to disassemble the case. You need to remove the cover, then unscrew the back wall (you will have to remove the inlet valve by unscrewing the bolts securing it). There will be a pump and drain hose.
This is what attaching the drain hose to the pump looks like.
Next, you will need to disconnect the pump from the wall so that you can get to the drain hose (remember how the pump is attached, or better yet, take a photo). Further work is similar. - Replacing the drain hose. It happens that the hose is cracked or frayed. Then it needs to be replaced. You already know how to access the connection point of the drain hose, and replacement is a simple matter. We removed the clamp, pulled the hose off the pipe, looked at where and how the hose is attached to the walls of the car (take a photo), and disconnected it. We took a new one, secured it to the walls, pulled it onto the pipe and tightened the clamp.
If it leaks from under a closed door, the reason is the wear of the elastic lining.
The car vibrates a lot
Typically, this breakdown occurs at the spin stage. The car starts knocking and jumping. In this case, repairing the washing machine yourself is rarely necessary. Most often, the reason is that the machine is overloaded or that the laundry is bunched together and not distributed throughout the drum as it should be. It's simple: we stop the washing, take out some of the items (if there is an overload) or distribute them. Turn it on and continue washing.
If none of these reasons are confirmed and the knocking becomes constant, the suspension springs may have broken, the shock absorbers have failed, or the ballast has become loose. The treatment method is clear: replacing the suspension springs or shock absorbers, tightening the bolts on the ballast.
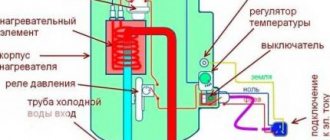
How does an automatic washing machine work?
To repair it yourself, you also need to know how the washing machine works. This will help determine the element that could lead to this breakdown. So, here is the operating procedure of the washing machine:
- When starting the car, the condition of the door lock is tested. If the door is closed, the lock is blocked, after which the water supply is turned on (the valve opens). Water flows through the powder supply unit.
- Water is drawn in until its level reaches the sensor, after which the valve closes.
- Next, if the mode is set to no soaking, the heating element turns on.
- The engine runs simultaneously with the heating element. The rotation speed is low, the direction is variable - sometimes in one direction, sometimes in the other.
Main nodes - After a certain period of time (depending on the running program), the dirty water is pumped out.
- A new portion is poured. Upon reaching the specified level, the drum begins to rotate in different directions - the laundry is rinsed.
- After a few minutes of operation in this mode, the engine turns off and the pump turns on, pumping out the water.
- The last stage is spinning. The engine rotates the drum at high speed, while the pump operates at the same time, pumping out the squeezed water.
There may be deviations in this algorithm - some programs have additional steps. For example, soaking and double spinning. But there are no innovations in them. Soaking occurs in the same way as rinsing, with double rinsing there are no problems at all, just water is pumped in twice.
Knowing this algorithm will help you determine where and at what stage the failure occurred. Accordingly, it will be possible to determine which parts of the machine may have broken.