The washing machine manufacturer Samsung pays special attention to the quality, reliability and functionality of such a washing machine element as the drum.
But malfunctions in the operation of a household appliance, as well as hard tap water, lead to the fact that even such a durable element fails.
A professional can quickly replace the drum, but a detailed study of how to remove the drum from a Samsung washing machine with your own hands will save a significant amount of money.
What tools will you need?
To ensure that work on dismantling the washing machine drum goes quickly, you should make sure you have the following tools in advance:
screwdrivers: Phillips and slotted (a screwdriver with attachments will significantly speed up the work);- a set of keys;
- pliers;
- hammer, chisel;
- marker;
- lubricant-cleaner and sealant.
Also, the work cannot be done without rags, a large basin and rubber gloves for hands.
How to get to the details?
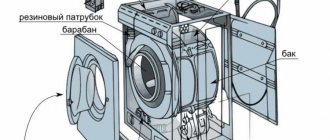
Disassembling a Samsung washing machine in order to remove the drum will be much easier if you follow a clear sequence of actions:
- Using a Phillips screwdriver, unscrew the bolts holding the top panel. After the bolts are unscrewed, push the cover towards you and slightly lift it up and remove it from the washing machine.
- Remove the dashboard. To do this, loosen all the fasteners located under the washing powder tray, also around the perimeter of the control unit. There is no need to disconnect the control unit wiring. The board is carefully laid out on top of the washing machine or hung on a special side hook.
- Dismantle the washer hatch doors (located in the lower right corner of the body). To dismantle, you need to pry up the panel with a screwdriver. After the door is removed, residual water will begin to pour out of the open hole. To keep your surroundings clean, lay rags on the floor or place some container under the technical hole.
Remove the front panel.
To do this, use a screwdriver to loosen the metal or plastic clamp on the hatch cuff. Afterwards, the seal is carefully folded inside the drum. Unscrew the screws around the perimeter of the panel and separate the front panel from the body by 3 cm.Through the opened gap, the wiring is disconnected from the UBL (the option of completely dismantling the blocker is possible).
- The next stage is to disconnect all conductors leading to the drum from the heating element, electric motor, pump, sensors. It is very important to act carefully and slowly so as not to damage the elements. The inlet valve, pressure switch, and pipe (connecting the tank and the powder receiver) are also dismantled.
- Pull out the counterweights. These are two concrete blocks located under the top cover of the washing machine. In order to dismantle the counterweights, it is necessary to unscrew the fixing bolts. You need to work very carefully, as concrete blocks are very heavy.
- Shock absorbers are removed. First of all, the lower shock absorbers (also known as dampers) are removed. These elements secure the tank. Next come the springs that secure the tank from above.
After the tank is removed from the washing machine, it is laid out on a flat surface with the pulley facing up. You must be prepared for the fact that the tank is very heavy and you will need help to remove it.
Removing the front wall
You've removed all the panels, however, that's not all. There are several parts in a Samsung washing machine that can also prevent the front wall from being removed. Therefore, proceed with the following steps.
Open the car hatch door, look for the hatch locking device and unscrew the two screws next to it. After this, you need to remove the lock and cuff of the hatch. How to do it? To do this, carefully pick up the spring located around the perimeter of the cuff with something and remove it. After this, the rubber blotch will come off easily (just remove it from the grooves). As for the lock, you've already removed the screws that hold it in place, so now just pull it out by grabbing it from the inside.
You may have to push the door lock back a little to get it to come off.
Now look at the top of the car again. You will see that under the control panel the front cover is secured with several more screws. Unscrew them. Next, look down. There are similar screws under the decorative panel that also need to be removed.
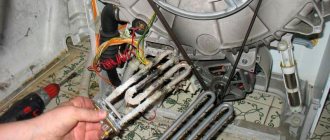
After all these manipulations, the front wall can be easily removed, and you will be able to interact with the contents of your washing machine. For example, you can work with a tubular electric heater (which is located at the bottom of the device). There is also a pump nearby, in other words, a drain pump, which is responsible for draining water into the sewer after washing. These are very important parts, and if they are faulty, your washing machine simply will not start, and in order to fix them, you will need to remove the front wall. And now you know how to do it no worse than the masters.
When disassembling the machine, try to remember in what order you did it and how to avoid difficulties during subsequent installation. Remember safety and be careful!
Interesting:
- How to change a bearing on a Samsung washing machine
- How to change a bearing in a washing machine
- How to disassemble a Zanussi washing machine
- Samsung washing machine shows error HE2
- How to repair a Samsung washing machine
- Washing machine in the kitchen under the countertop
2 reader comments
- 03/30/2020 at 16:19
Vladimir:
Very helpful
Answer
- 05/30/2020 at 20:48
Lydia:
I have a RAINFORD RWM 12-42 ND washing machine. It works fine, but in the lower right corner, if you look at the machine, a leak appears during washing. What can you recommend? With uv. Lydia.
Answer
How to get it out?
Before opening the tank and removing the drum from it, you must carefully study the material from which the tank is made and the principle of its connection .
Most often, the Samsung manufacturer equips washing machines with plastic, collapsible tanks.
In order to open such a tank, you need to unfasten the fixing brackets (you will need a flat-head screwdriver) and unscrew the screws around the perimeter (a screwdriver will speed up the process).
After the tank is opened, you must proceed according to the following algorithm:
- unhook the lower half of the tank (there is a cross and a pulley on it);
- remove the pulley from the tank (unscrew it with a wrench);
- insert the bolt into the vacant space and carefully, using a hammer, knock it out in the opposite direction.
In a situation where it is impossible to knock out the shaft, lubricant will come to the rescue . It is enough to carefully treat the joint and wait twenty minutes. Afterwards the work will go much faster.
Step-by-step replacement instructions
The removed drum is carefully inspected for defects.
If you decide to completely replace it, you should understand that the drum is sold complete with the tank. The drum cannot be purchased separately.
It is possible to quickly replace the drum with your own hands, provided you follow a certain sequence of actions:
- A pulley is connected to the tank and secured with a bolt.
- The tank together with the drum is lifted and installed through the top into its original place in the housing. The tank is hung on hooks.
This process must be carried out in tandem with an assistant.
How to replace the belt?
Owners of belt-driven washing machines may encounter problems with the belt stretching or jumping off. In this case, in order to return the machine to functionality, you will have to replace the rubber band. Let's figure out how to do this with the least amount of effort if you can't just remove the back wall of the machine.
Before starting repairs, be sure to turn off the power to the washing machine. The algorithm for further actions will be as follows:
- remove the top cover of the case by unscrewing the two bolts securing it using a screwdriver or screwdriver;
- slightly tilt the washing machine in your direction, hold the machine with your foot or stomach. At the same time, remove the drive belt located near the rear wall from the pulley by hand. To make the task of removing the rubber band easier, you can open the CMA hatch and pull the drum towards you a little, thereby leaving more space at the back of the machine for manipulating the belt. The discarded rubber band must be pulled out from under the washer;
- take a new Samsung belt, tilt the machine towards you again and carefully insert the belt into its original place. First of all, the rubber band is pulled onto the engine pulley. You may not be able to put on the belt the first time, so it is better to have an assistant who can “peep” under the bottom of the machine and control how successful your attempts to tighten the elastic band on the engine are;
- Place the drive belt on the drum pulley. First, position it tensioned on one side of the wheel, after which it is enough to turn the drum by hand (through the hatch door), the pulley will spin and the belt will be pulled tightly into place.
Be sure to ensure that the drive belt is located in the middle of the drum pulley, without sliding closer to any edge.
If the rubber band is positioned crookedly on the wheel, you need to manually adjust its position on the electric motor pulley. Next, you need to check the operation of the equipment - turn on the machine and run the spin cycle in test mode; if the drum starts rotating without any problems, it means the belt was replaced correctly. Then you can put the top cover in place, fix it with self-tapping screws and use the SMA.
Interesting:
- How to disassemble a Zanussi washing machine
- Replacing a washing machine pulley
- How to put a belt on a washing machine
- How to repair a Samsung washing machine
- How to change brushes on an Indesit washing machine
- Changing the belt on an Ariston washing machine
Reader comments
- Share your opinion - leave a comment
Reassembly and inspection
Once the new drum is installed, you can begin the reassembly process.
Algorithm of actions:
- put a drive belt on the pulley;
- connect heating elements to the wiring;
- connect drain hoses;
- install UBL connectors (hatch blocking device);
- mount the front panel of the washing machine in its original place;
- install the hatch cuff;
- fix the counterweights in place;
- install and fix the top cover of the washing machine.
All previously dismantled elements are fixed exactly in their places in the reverse order of dismantling. To avoid making mistakes, experienced craftsmen recommend making the necessary notes with colored markers (for example, recording the location of wires, the installation height of mechanisms).
It will also not be superfluous to check with the diagrams indicated in the user manual.
After the washing machine is assembled, it is necessary to check the quality of the work done . To do this, the household appliance is connected to the power supply network for water supply and sewerage.
They start any washing program, during which, with the drum correctly installed, there are no extraneous sounds or vibration of the washing machine body.
DIY Samsung washing machine repair
Malfunctions of Samsung washing machines can number in the hundreds, but first of all, if the device malfunctions, the following “pathologies” should be excluded:
- Worn or broken drive belt.
- Burnout of the internal resistance of the heating element.
- Inlet valve faulty.
- Drain pump failure.
- Bearing jamming.
- Electronics malfunction.
Electronic components are quite resistant to power surges and excessive vibration, so technicians very rarely deal with this type of malfunction. Most often, drive belts, heating elements and water drainage devices fail in washing machines. These malfunctions will be discussed in detail below.
The process of disassembling the washing machine
First, let's decide on the necessary tool. Since I started without knowing that I would need a tool, I looked for it as the repair progressed. I present to you a list of the entire set.
Since to replace the bearings you need to get to the drum of the machine, it is necessary to disassemble it completely. Some models have a special cover on the back of the case, which provides access to the motor and belt without disassembly. However, my model had to be completely disassembled. To do this, you need enough space to make it more convenient to work and arrange the parts.
Let's start disassembling. You must first remove the top cover, which is secured with two screws on the back side. To remove the cover, you must move it away from the face of the machine and lift it up.
Remove the washing powder tray. The container is removed and three hoses are disconnected from it; they are clamped with metal clamps. It is convenient to loosen these clamps using pliers.
After removing the lid, the large counterweight immediately catches your eye. The names of the parts are mine because I don’t know what they are actually called, but I think everything will be clear to you. We remove the large counterweight, which is secured with two long bolts.
Unscrew the bolts and remove the counterweight by lifting it up.
The counterweight is not light, so be careful not to drop it to avoid breaking it. By the way, it looks like a cast piece of cement mortar.
The body of the machine is connected to the drum by a rubber casing, which is attached to the drum with a large steel wire clamp. It is loosened by unscrewing the bolt.
Drum body without counterweight (top view).
Next, lay the car on its side and remove the bottom cover. It is made of plastic and is held in place by 4 self-tapping screws. Unscrew and remove.
Hidden behind the bottom cover is a small counterweight, an electric motor and a pump attached to the drum body. This entire structure is supported by two shock absorbers on the body of the machine.
Next we need to disconnect all the cables from the contacts of the electric motor and pump.
We disconnect the two shock absorbers from the washer body, which are bolted.
On the side of the top cover, a water inlet is connected to the body; unscrew it without disconnecting the wires. (the wires won't bother us).
The drum body is supported on top by spring hangers. Using pliers, we first disconnect the hooks from the drum body, and then from the machine body. You will have to suffer a little, but everything will definitely work out!
In order to remove the drum, you need to remove the front part of the washing machine. First, unscrew the control panel and then remove the front part with the door. They are all attached with self-tapping screws. The screwdriver did the job in half a minute.
And here in front of us is the disassembled body of the machine. We unscrew the small counterweight to make it easier to remove the drum body.
This is such a small counterweight.
Those same spring suspensions.
Now we carefully take out the drum body and place it on the floor. Here is the main part of the washing machine.
At the back, remove the belt that connects the drum wheel and the electric motor.
A size 8 hex bolt secures the wheel to the body. Unscrew it and remove the wheel.
We begin to disassemble the drum body.
We unscrew the shock absorbers first; we do not unscrew the bolts completely, but only to free the second half of the body. Shock absorbers are not only attached to the drum body, but also tighten it.
The body consists of two parts, which are compressed by brackets and clamps. It is easy to remove the clamps with a wrench.
A flathead screwdriver can be used to easily remove the staples.
Once again, I will remind you to make marks to correctly assemble the body.
The staples and clamps have been removed.
We open the case and see what's inside.
After I opened the drum body, I saw an unpleasant picture. The heating element was completely covered in scale. The inside of the plastic case itself and the drum were covered in scale.
The heating element is not easy to remove. The nut is unscrewed from the outside and it is squeezed out. You must first descale it. The element is fixed with an elastic band that expands after tightening the nut.
Now we disconnect the drum from the second half of the body.
Removing the drum showed that the oil seal was in poor condition. The seal is supposed to protect the bearings from moisture, but it got to them, and they began to make noise during operation.
All scale was removed from the body using a regular metal dishwashing brush. It doesn't scratch and does its job well. There were two full handfuls of scum.
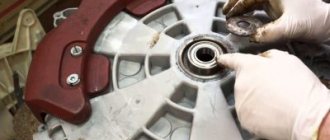
The outer bearing was fine, however I decided to replace all the bearings. I knocked out the outer one (aka small one) from the inside with a thick screwdriver and a hammer, carefully tapping the bearing rings. You need to be careful here, since the bearing is located in an aluminum bushing, so as not to scratch it. The inner bearing (large) was knocked out from the outside inwards with a metal tube of similar diameter.
I carefully hammered the new bearings into place with a hammer and placed a wooden block.
The washing machine is assembled in the reverse order.
We suggest you read How to clean gold jewelry at home
Possible difficulties during knot removal
During the process of dismantling the washing machine, an unpleasant fact may emerge - the drum is enclosed in a non-separable tank.
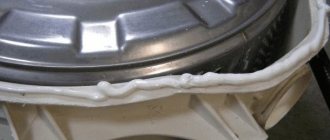
In this situation, in order to remove the required element (drum), the tank must be cut .
After repairing or installing a new drum, many holes are drilled along the seam for reassembly. Before putting the disassembled tank back together, the cut points are carefully coated with sealant.
You will find all the most useful and interesting things about the Samsung washing machine drum in this section.
Samsung Front Load Washing Machine Error Code dE - How to Remove
What does “de” mean on a Samsung washing machine? There could be a few different reasons why the dE error code may be showing up on your washing machine. Samsung washing machine getting error code dE ? Error code dE on the Samsung washing machine display indicates that the DOOR IS NOT LOCKED OR IS NOT CLOSED CORRECTLY. Problem . Problems that can cause this trouble code are that the washer door is NOT CLOSED , the drain hose is clogged or improperly positioned , the drain hose cannot be submerged and therefore causes an error, or the door lock and switch assembly is faulty . All These problems can cause your Samsung washing machine to display error code dE. For all these reasons, checking all the components listed below will clear the error and fix your Samsung washing machine.
Samsung Front Load Washing Machine Error Code dE - How to Remove
Why is the error code DE showing on the panel of my Samsung washing machine? You may encounter a situation where your washing machine is giving a “dE” error. THE MOST COMMON CAUSE OF ERROR CODE dE: The washing machine door is not properly locked or closed.
If your Samsung washing machine displays error code “dE”, check for the following issues: - ROOT CAUSE: The door must not be closed properly. -You can check the end of the drain hose to make sure it is too low. -Check that the drain hose holder at the rear of the washing machine is positioned correctly. -Check that the end of the drain hose is immersed in water.
Washer drain hose
For a more detailed solution to the Samsung error dE Error code: DE ERROR CODE DEFINITION OF SAMSUNG WASHING MACHINE: Door unlock error DE ERROR CODE DEFINITION OF SAMSUNG WASHING MACHINE: The door does not open after 7 attempts.
TO CORRECT ERROR CODE DE: -Unplug the washing machine and open the door. — Open the door slightly if it does not open. NOTE: Forcing the washer door open may damage the door lock and switch assembly. -Replace the entire door lock assembly if it is faulty or broken.
Samsung washing machine door locks
If the door lock and switch assembly does not solve the problem, you may need to replace the main electronic control board. PARTS THAT MAY NEED TO BE REPLACED: Door Lock and Switch Assembly - Main Electronic Control Board
Samsung washing machine control boards
This article applies to Samsung washing machine models: WA95BWBEH / XTL, WA95BWPEH / XTL, WA88TPBEH / XTL, WA90VNKEH / XTL, WA90VPBEH / XTL.
Have questions about the dE error code on Samsung washing machines? Please leave a comment below and we will help.
Please share our DIY renovation help projects:
ALLEN VETTER – DIY Repair Assistant
Allen is a home/appliance service professional and the author/creator of this website.
He has 33 years of experience troubleshooting and repairing all types of equipment. Contact here More DIY Tips, Tricks, Ideas, DIY Repairs:
.
