The most important engineering system in every home is the plumbing.
With its help, hot and cold water enters our homes.
To mix both liquid streams to a temperature that is comfortable for consumers, a special technical device called a mixer is installed in the kitchen or bathroom. Just like any other mechanism or device, faucets tend to break down. They sometimes become clogged and stop functioning normally.
Every owner in the house, if he considers himself one, should be able to cope with the simple work of repairing plumbing equipment.
Types of faucets
Mixers come in three modifications:
- single lever,
- valve,
- ball
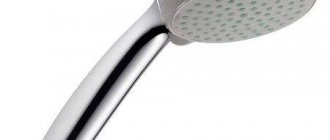
In this article we will talk about the most common type - the spherical type of construction. The mechanism itself is quite simple - just a single rotary lever.
When positioned up or down, the water pressure is regulated, and turning the knob to the left or right coordinates the water temperature.
If you hear the annoying, monotonous sound of dripping water from a faucet every day, this means that the faucet has become unusable and needs to be repaired or replaced.
What do you know about bioseptics for cesspools and septic tanks? Read information from experts about the use and selection of drugs for high-quality waste disposal in this useful article.
How to make a water-heated floor under a laminate with your own hands is written on this page.
The faucet is considered such an important element of plumbing equipment that its damage requires your immediate attention.
The following reasons may cause breakdowns:
- faucet leaks,
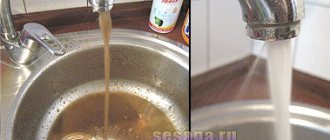
- reducing the volume of water flow,
- leakage of liquid from under the valve.
If you find at least one of the above signs, the product must be disassembled.
Do you want to not only dismantle the faucet yourself, but also try to fix the problem, and then also assemble it correctly?
To do this, you need to thoroughly know the structure of the mixer..
If you have information about what components this device consists of, you can insure yourself against errors and significantly reduce the time for its repair.
Product structure
Ball mixers are characterized as reliable and durable devices due to the non-separable cartridge included in their mechanism.
All its constituent elements are carefully ground in relation to each other.
The basic basis of these designs is a highly polished hollow ball located in the faucet body with holes and a pin for attaching it to the handle, which ensures rotation of the ball.
Cold and hot water enters this ball through two brass tubes and flexible hoses.
After that, it mixes there and flows out through a tap at a certain temperature.
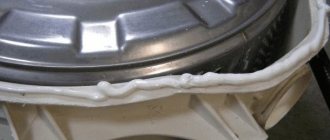
Tightness is achieved thanks to the presence of gaskets.
As a preventive measure to prevent the user from getting burns, faucet cartridges are equipped with a special ring that limits the angle at which the handle can be turned in the direction of hot water.
The cartridge inside can be made of stainless steel or ceramic.
Ceramic consists of two plates , high-quality polished using ultrasound and ideally ground to each other.
This surface polishing prevents droplets of liquid from seeping between the plates.
If you disassemble the cartridge, remove the washers from it and place them on top of each other, the elements should attract each other as if magnetized.
Using this elementary method, the quality of the cartridge is determined. In a single-lever device, no additional seals are provided in the mixer mechanism.
Due to the lack of seals and the strict compatibility of all parts, there is nothing to wash in ball-type mixers.
Do you know which heating cable for water supply is self-regulating? Read the description and methods of connecting a water pipe heater in this article.
About the installation of water supply pipes in an apartment with your own hands is written here.
The page: https://ru-canalizator.com/vodosnabzhenie/truby-i-furnitura/kak-gnut.html describes how to bend a chrome pipe at home.
If you disassemble the faucet and see that there are ceramic plates inside, then you will need to completely change the entire core.
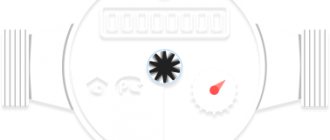
General structure and basic operating principle of ball valves
The body of a valve with a ball mechanism consists of a chamber, inlet and outlet pipes (often one of them is cast together with the chamber).
The chamber is equipped with a valve seat - it is a gasket made most often of metal (stainless steel), less often of rubber or fluoroplastic. In the center of the chamber there is a ball with a through hole, mounted on a vertical axis (rod), around which it can rotate.
Shut-off ball valves have one hole, regulating, mixing and redirecting valves have several.
All designs with a ball mechanism operate according to the following principle. When closed, the ball covers the valve seat, so the flow of medium is completely cut off. As the ball rotates on its axis, the through window begins to align with the lumen of the pipe, and water (gas) passes through the valve. When turning by 90, complete alignment occurs - the flow becomes maximum.
In a shut-off valve, a vertical rod is rigidly fixed in supports above and below a ball, which rotates in only one plane. There is an O-ring on the stem as it passes through the body.
Ball valve repair
If the ball mixer fails, you should not immediately run to the store for a new product.
You need to find out the cause of the breakdown and try to fix it yourself so that the tabletop does not deteriorate (how to install it yourself).
Moreover, this work is not very difficult, and almost any man who has the following tools in his household can handle it:
- hex key,
- flat screwdriver,
- small hammer,
- pliers.
Before you start disassembling the tap, you need to turn off the water supply in the house or apartment (read where the connection to the water supply network is located here).
Tips for proper installation of a ball valve
To correctly install a ball valve on a riser with your own hands, follow the following recommendations. When replacing an installed element, you must start by draining the existing piping system. If the installation is carried out in an apartment or private house, then in the place where the old fittings will be dismantled, it is necessary to prepare several rags or some suitable container for draining water from the system. This will allow you to work in more comfortable conditions in the future.
Scheme of installation and repair of a ball valve.
It is necessary to determine the future installation location so that the fittings are installed with the possibility of normal access to it and the freedom of rotation of the tap handle to the open and closed positions is ensured.
High-quality installation of a faucet with your own hands requires, first of all, the right choice of product. The ball valve must be selected so that its diameter matches the diameter of the riser on which it will be installed. It is necessary to pay attention to the fact that valve flanges can have different types of threads. Before you buy a product and start installing it yourself, you need to decide on the appropriate type of element.
The type of product will depend on the location of its installation on the existing pipeline. Before you begin installing the ball valve yourself, pay attention to the arrow on the marking. The direction of the arrow must correspond to the direction of movement of the medium. This condition is very important to comply with for the normal functioning of the system. You need to choose a model with suitable threads. Ball valves come in several types:
When screwing a ball valve onto a pipe, there must be at least 4 threads on it.
- with external thread on both sides;
- with internal thread on both sides;
- on one side it is external, and on the other - internal;
- on the one hand, American, and on the other, domestic.
Related article: How to desolder radio components from a board with your own hands
Installation of the product is carried out only after fum tape or flax with sealing paste has been pre-wound on the threads, which will ensure sealing of the connection. Instead of fum tape and flax, you can use liquid fum (suitable for joints no larger than 2′).
When winding tape and flax, make sure that the direction of winding coincides with the direction of winding the element onto the pipe. After the installation is completed, you must once again make sure that nothing prevents the normal rotation of the product handle.
If, when screwing the ball valve onto the pipe, it rotates too easily (by hand), then you should wind more fum tape or flax until the product is twisted with a certain force. Also try not to put in unnecessary effort, as in this case the installation may end in disaster: the product will simply burst.
Step-by-step instruction
- From a single-lever mixer with a ceramic or metal valve, you need to carefully remove the handle to control the supply of liquid substance.
You should know that such a lever is usually secured with a reliable screw, which is located under the decorative trim. In order to remove it you will need some sharp object. The inside of the faucet can only be accessed after the screw has been unscrewed. - Find out how to attach it. In each model of this plumbing fixture, it is different. There are models in which the lever is simply mounted on a rod. In this case, in order to remove the handle, you need to pull it up and, without unscrewing any bolts, carefully remove it (since this design does not have them).
When the small fastener is on the side of the ball mixer, you need to unscrew the finishing stop, which coordinates the supply of cold or hot liquid to the faucet.After removing the lever, it is necessary to unscrew the cover of the mixer frame.
- Basically, this cover is attached using grooves. Therefore, this element should be unscrewed manually, without using any tools.
But, if it is attached with a fixing bolt located on the side, then the screw must be unscrewed with a suitable screwdriver.Then use a sharp knife to pry up the upper casing and remove it by hand.
- Under the cover there is a large clamping nut. In order to unscrew it, you will need an adjustable or gas wrench. Only after this can you removecartridge in need of replacement.
Do not forget that there is a gasket under it and it is most likely compacted and stuck there. So removing it may not be as easy as you expected.Then, you need to turn on the water and see where there is a leak - in this way you can accurately find out the cause of the faucet failure.
After this, it will be possible to carry out repair work to replace the gasket or the cartridge as a whole. To change a worn-out part, you will have to get to the “unfavorable” place.
Using this diagram, you can disassemble the ball valve. As you can see, there is nothing complicated about this. If you follow the instructions above, there should be no problems with disassembly.
If your kitchen or bathroom has a mixer with two valves, then disassembly will need to be done using a slightly different method.
Preparing to install a ball valve
In order for the installation of a ball valve to be easy and without any difficulties, it is necessary to properly prepare for it. It is very convenient because it allows you to turn off the water immediately after the need arises. For this, as a rule, a ball valve is used, which is installed on a common water riser.
Installing ball valves makes using water supply and carrying out various preventive and repair work easier and more convenient.
Diagram of a ball valve.
In order to install a ball valve, it is necessary to shut off the water supply throughout the riser. In view of this, you need to worry in advance about obtaining permission to turn off the water supply from the relevant companies. You should prepare all the tools and materials that are necessary in order to correctly install the ball valve on the riser with your own hands. Minimum set of tools for installation:
- gas or adjustable wrench;
- fum tape (yellow or white tape for winding on threads).
Related article: Do-it-yourself doll furniture - setting up a house for dolls
How to properly disassemble a 2-valve mixer
This job is also quite easy to do.
To accomplish this goal, you will need a screwdriver and an adjustable wrench.
- First of all, we shut off the water supply to the apartment (about a storage tank for water supply of 500 liters is written here).
- Remove the blue and red plugs from the taps. Having dismantled them, you will find screws that need to be unscrewed with a screwdriver.
- After this you will be able to see what condition the rubber gaskets are in. By their appearance, you will understand whether they need to be replaced or whether the poor operation of the mixer is due to the fact that deposits have appeared (read about equipment for deferrizing water in this article) or the connections have become loose.
- There is another reason for the disgusting operation of the faucet - limescale deposits accumulated inside it. To remove it, take a long, flat screwdriver and use it to try to remove all the dirt.