How to clean a faucet aerator.
19 Feb 2012 |
Section: Miscellaneous Hello dear readers of the site sesaga.ru. This article, first of all, will be of interest to housewives, and will help those who do not know how to clean the faucet aerator .
Aerator
- This is a mesh filter located on the faucet spout and is designed to mix water with air, making it softer and more uniform.
It is no secret that tap water contains small solid particles of scale and metal oxides (rust), which over time are deposited on the mesh of the mixer aerator, clogging them. This usually happens after repair work has been carried out and the water supply has been turned off. And as a result, a stream of water from one turns into several, splashing all over the sink and beyond.
In such cases, it is necessary to clean the aerator grids from dirt, for which you need to unscrew the aerator head. For such purposes, it has edges so that it can be unscrewed with a wrench. But this must be done very carefully so as not to damage the nickel coating.
I usually unscrew it with pliers after wrapping the head in a dishcloth. You should unscrew it clockwise when looking at the tap from above. If the rubber gasket does not fall out, then it must be removed from the tap to assess its condition.
Next, by pressing your finger on the side of the water outlet from the head body, we squeeze out the cylinder with plastic filter meshes.
The next step is to remove the plastic double mesh filter for primary cleaning from the cylinder using the tip of a knife. Be careful not to cut yourself. It can also be removed using a thin flat-head screwdriver through a slot in the side. Whichever is more convenient for you.
When you have removed the mesh filter from the cylinder, separate the upper spherical mesh from it by prying it with the tip of a knife. You can see what's going on there.
Place the lower part of the filter under running water and use a needle or a thin awl to clean the holes from dirt. Do the same with the spherical part.
We still have a layer of metal mesh remaining in the lower part of the cylinder that has not been cleaned. They are squeezed out with your finger and also washed under running water. If there are still small particles left between them, then the meshes need to be separated from each other and washed separately.
When all the elements of the aerator are clean, they need to be assembled. I think you shouldn't have any problems assembling the aerator. If you still have questions, you can look through the article again. Just in case, here is the sequence of assembling the aerator.
When you install the aerator in place, place the rubber gasket on top and screw it together. You should tighten it counterclockwise when looking at the faucet from above.
Do not tighten it too much, it is enough if the aerator is tightened by hand. Open the water and if you see a leak from under the aerator head, then take some pliers, a washcloth and tighten it a little. As a rule, if the rubber gasket is in place, you will not need much effort to tighten it.
And if you need to disassemble the faucet or replace the cartridge in the faucet, read the article on how to disassemble the faucet and replace the cartridge. Good luck!
How to clean aerator screens from dirt and rust
Over time, due to the content of small particles of iron oxides in tap water, they are deposited on all surfaces with which the water comes into contact. The water aerator will not escape this fate either.
The coarse and fine screens become clogged, bubbles disappear from the water flowing from the tap, and it stops making the characteristic hissing sound. And all the advantages that the aerator created disappear. Of course, you can replace it with a new one. But it’s easy to clean the mesh from dirt and rust with your own hands.
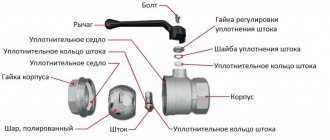
Design and principle of operation of the aerator
In most cases, aerators consist of three elements - a body, a rubber gasket and, of course, a “filter” system. The body can be made of plastic (cheap, but short-lived), pressed metal (the average option, which is also not particularly reliable, since it is susceptible to corrosion) or brass (the best option, it will serve for a long time and stably).
The main function of the faucet aerator is to limit the flow of water
When choosing a new faucet for your bathroom or kitchen, be sure to pay attention to the quality and method of fastening the aerator. Nozzles with internal and external threads are available for sale.
Water, passing through several meshes of the device, is mixed with air - the output is visually soft, with a milky tint (foamy) stream. Due to the fact that air is constantly mixed in the aerator, the pressure in the mixer seems to remain unchanged, despite the fact that the water flow rate decreases.
When washing your hands, dishes, washing your face, shaving, you won’t definitely feel the difference in the volume of “outgoing” water. But filling pots, sinks or bathtubs will now take twice as long.
In addition to reducing water consumption, the aerator also performs the following functions:
- improves (regulates) the quality of the jet. By uninstalling the aerator and opening the tap, you can see how the water flows randomly and what splashes fly in all directions;
- saturates water with oxygen and promotes the weathering of chlorine;
- purifies water from large particles.
Related article: Replacing the cartridge in a shower faucet
This is what a stream of water looks like without an aerator
And so - with an aerator
Features of aerators
When installing a faucet with an aerator, the user wonders what it is for. Not understanding the meaning of the device, they remove it, believing that it prevents the passage of water pressure, although the pressure in the water supply is already reduced. When dismantling the filter, a big mistake is made:
- The main purpose of the nozzle is to normalize the flow. When water hits an object, it does not splash out to the sides.
- Improving water quality. Chlorine compounds are removed from oxygen-saturated water. The aerator traps large particles of debris, sand and salts.
- Reduced consumption. Aerated jets increase in volume due to the division of the flow through the mesh with air bubbles. Thanks to this, the pressure seems normal, but the volume of water leaving is much smaller. Customer reviews about the water-saving aerator nozzle are extremely supportive.
In addition to its main purposes, the nozzle has a great advantage: air-saturated water makes less noise. There is also a drawback - fragility. Filters need to be replaced once a year.
The main parts of the aerator are:
- housing made of metal or plastic;
- additional filters to retain small particles of debris;
- a water and oxygen mixer containing holes around the perimeter through which air enters the body;
- an external mesh that divides the main flow of water into many small streams;
- bushings and seals for sealing.
In a cylindrical body, the grids are stacked one after another in a certain sequence. The first two meshes are used to direct and purify the flow of water, the rest are used to aerate the water.
The main task assigned to the aerator is performed by meshes; they are made from different materials:
- Metal - the most common and inexpensive models. They have a significant drawback - fragility. From exposure to water, chlorine impurities, salts quickly rust and collapse.
- Plastic – good quality attachments at a reasonable price. Resistant to the damaging effects of water. There is a range of designs from simple models to complex “tunnel” ones.
- Brass, bronze or ceramics are of excellent quality and have a long service life, but have a fairly high price.
- Stainless steel is a cheap alternative to brass and bronze. Relatively low-cost nozzles have a long service life. The meshes are resistant to water, do not rust or oxidize for a long time.
- Extruded aluminum is short-lived and brittle. Aerators are subject to rapid oxidation and sticking to the body. Under the slightest mechanical loads, they tend to break quickly.
In addition to differences in design features and materials, nozzles differ in diameter. It is necessary to select the correct parameters, because... The diameter of the nozzle must correspond to the diameter of the spout pipe.
An important classification is the method of installing the aerator: internal and external. In the first case, the presence of external fasteners on the body is provided. The nozzle is fixed into the inside of the gander's nose. This method does not change the design of the mixer, so it is suitable for any application.
With the external type, the installation is screwed onto the spout. Basically, such nozzles are made of brass or stainless steel, because... these materials are less susceptible to rust and mechanical stress.
Advantages and disadvantages of such a nozzle
The main advantages of using an aerator include:
- low price. The nozzle will cost you 2-10 dollars (depending on the design features);
- reducing the noise level during operation of plumbing fixtures. The water supplied along with the air does not make noise;
- ease of maintenance. The elementary design allows even a housewife to understand the intricacies of the device and operation of the nozzle;
- performs the function of a simple filter.
There is only one drawback - the fragility of the device. If your house has old pipes, you will have to change the aerators on the taps every six months to a year.
The aerator screens can be cleaned with a pin or needle.
Video of installing a new aerator
As this example clearly shows, replacing the aerator significantly affects the water pressure, which allows for significant savings. And this is important for all homeowners with water meters.
Cleaning will not require much effort from you, unless the aerator “sticks” strongly to the threads in the spout of the faucet.
The easiest way to unscrew the aerator is to use pliers. To avoid scratching the chrome coating, wrap thick electrical tape around the aerator or the pliers themselves.
- Unscrew the aerator by rotating it clockwise.
If it gets stuck, use a pipe wrench or pliers. First, wrap the body of the aerator with electrical tape or just a rag, otherwise there will be deep scratches on it (that’s how it happened for me; idiot, what can I say). - The aerator needs to be disassembled, it is not difficult. Just take out one element after another.
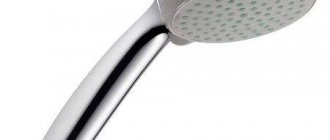
We disassemble the aerator in the kitchen shower head.
- Water flows after pressing the lever.
- Valve mechanism.
- Pen.
- Hose.
- Casing.
- Perforated disc for dispersing the water jet.
- Lid.
The plastic mesh in a regular aerator tends to constantly become clogged with pebbles and mineral salts. They need to be cleaned regularly.
If you have an older style aerator, use an awl or needle to remove small stones. If everything is very overgrown, place the aerator in apple cider vinegar and hold it there for a while until all the mineral deposits are dissolved.
With aerators in new faucets everything is much simpler, but the vinegar method also works great.
All that remains is to assemble the aerator and put it in place. Don't re-tighten it with pliers - just screw it in by hand.
How to clean and replace the aerator?
If it is necessary to clean the aerator (and there will be such a need), work should be carried out in the following order:
- Uninstall the aerator by rotating it with your hand, a wrench and pliers clockwise - when looking at the faucet from above. If the rubber gasket does not fall out immediately, it must be removed and the condition assessed.
- By pressing your finger on the side where the jet exits the body, remove the cylinder with mesh.
- Having disassembled the cylinder into “spare parts” using a stream of water and a needle (toothpick, thin awl), clean its individual elements.
- When all parts of the aerator are cleaned, you can assemble it and install it in place. Don’t forget to put a gasket on top of the nozzle - in a word, screw it together (counterclockwise when viewed from above). You should not tighten the aerator too much - it will be quite enough if you just do it by hand. If, after opening the water, you see a leak, just take pliers and a napkin and tighten slightly.
As you can see, the process of cleaning the aerator does not contain any difficulties. The same can be said about replacing the nozzle - unscrew the old one, install the new one, and that’s the end of it.
You can clean and replace the aerator with your own hands at any time - there is no need to resort to the services of a professional and not always “cheap” plumber.
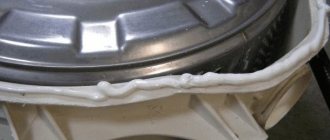
Plaque on the aerator and shower head
When cleaning the faucet, do not forget about the mesh filter at the end of the gander, which is called an aerator. It is designed to mix the flow of water with air to increase the volume of flow. This filter most often becomes clogged from debris that passes along with the water through the water pipes. The following phenomena may be a signal that the mesh is clogged:
- Weak or completely absent water flow when valves are open.
- Uneven and non-vertical water flow.
To clean the faucet mesh you need to do the following:
- Unscrew the nozzle using pliers, after wrapping it with a damp thin rag to avoid scratches and chips.
- Apply a rag soaked in vinegar to the nozzle if it does not come off.
- Rinse the filter under running tap.
- Soak the aerator in vinegar for several hours so that the mesh rods are completely cleared of plaque.
- Rinse the vinegar strainer in water and place it back on the faucet.
The shower head is cleaned in the same way, which should be disconnected from the hose, disassembled, cleaned of large debris and soaked in heated vinegar to completely remove plaque. After all this, all that remains is to assemble it in reverse order.
Aesthetics is found in the details
If you have children in your home or you are simply a connoisseur of pleasant little things, then you will definitely like an illuminated faucet aerator. The bodies of such nozzles are usually made of brass with a chrome plated finish.
The design of illuminated aerators assumes the presence inside the housing of a built-in microturbine with an electric generator and a temperature sensor with a diode system. The operating temperature of such a nozzle is up to 60 degrees Celsius.
Note! The original design of the jet regulators with LED backlight does not require additional power sources. Such aerators operate by rotating a turbine.
The illuminated faucet aerator attaches to the faucet spout as simply as a regular one. Screws in by hand, without using tools. When the tap is opened, the jet illumination appears automatically. Its color, as you might guess, completely depends on the current water temperature:
- at temperatures below 29 degrees – green;
- at a temperature of 30-38 – blue;
- at temperatures of 39 and above - red.
The beautiful illumination of luminous aerators will not leave either children or adults indifferent.
- 5
- 4
- 3
- 2
- 1
An aerator is definitely needed, but in an apartment an S class aerator is quite sufficient (without limiting the water flow to a certain value - class Z aerators). This is shown by a simple calculation: hot + cold water consumption = 9 cubic meters per month. 30 percent is consumption in the washbasin and sink, the rest: flush tank, washing machine, bathroom with shower. Two faucets, one in the bathroom on the sink, the other in the kitchen on the sink. 9*0.3/2=1.35 cubic meters of water per month through one mixer. Or, roughly, 1.5/30=1500/30=50 liters per day. Or 50/24=2.1 liters per hour (2.4/60=0.04 liters per minute).
The most economical aerator with limited water flow, made in Italy, at 3 atmospheres of pressure in the water supply, begins to limit the flow at a value of 1.7 liters per minute, and your average daily flow rate is 0.04 liters per minute. Will it work? Yes, it will happen when you need to fill a 10 liter bucket of water. You open the tap fully, with a flow rate of 15 liters per minute, and the flow rate will be 1.5 liters per minute. Instead of 40 seconds, it will take you 7 minutes to fill the bucket, otherwise this aerator will behave like a regular one.
Do you need an aerator at all? Yes, yes, and yes again. It allows you to save up to 2-3 cubic meters of water per month, despite the fact that it itself is inexpensive. It’s a pity to waste even a small amount, but the aerator gives decent savings. But we must remember that there will be no savings if the tap is open as much as possible. And it is necessary to buy aerators with a flexible membrane for water, they save water. It is easy to distinguish - the upper mesh is slightly convex and bends when pressed with a finger. Well, illuminated aerators are not for everyone, although they are very beautiful.
Related article: How to disassemble a bathroom faucet
We recently renovated the bathroom and kitchen. The plumbing and faucets were completely replaced. Previously, there were simple taps without aerators. I must say that the article correctly noted about water consumption - without this useful nozzle, water literally flows in a stream, and it is useless; without an aerator, by the way, you will need to keep the plate under the tap more in order to rinse it. Modern plumbing is not only beautiful and convenient, but also much more profitable to use than old faucets. Now the amount of payment in the receipt for water has noticeably decreased, this cannot but make us happy, you must agree :))
In our apartment there is an aerator not only on the kitchen faucet, but also on the shower in the bathroom. It's so convenient! When you turn on the aerator mode, the water from the shower comes out like a cloud of water dust. Not all family members like this, but you can turn it off. As my husband says, thanks to these devices, water consumption (we have had meters for a long time) has decreased by one and a half times, so here’s a source of savings!
Tell me, what kind of aerator did you install?! The article recommends brass, what is their price range?!
Main types and versions of aerators
Classic models
There are two types of faucet aerators:
- with adjustable flow - good because they allow you to set the required amount of jet;
- with unregulated flow.
The popularity rating among classic models is headed by rotary aerators. Thanks to the articulated joint, they allow you to change the angle of the outgoing flow, making the process of taking water procedures or washing dishes more comfortable.
The material used to make the aerator body can be:
- brass is the best option, which will serve well for many years;
- pressed metal is a more budget-friendly, but durable option;
- plastic - the most affordable models, the quality of which is inferior to metal products.
A significant disadvantage of metal nozzles is their short service life. This is due to the fact that the metal quickly breaks down under the influence of impurities contained in tap water.
Looking for an aerator that provides low water flow? Opt for a vacuum device.
Due to the fact that air is constantly mixed into the nozzle, an effect occurs in which it seems that the pressure in the mixer remains constant. In fact, water consumption decreases.
Experts recommend giving preference to models equipped with an additional silicone coating. Lime does not stick to them well, making these tips easy to clean with just the touch of a finger.
Upgraded options
When arranging modern kitchens and bathrooms, many owners pay key attention not only to the functionality of the elements, but also to their decorative design.
The jet is illuminated automatically; you just need to open the tap slightly. Inside the housing of such a device there is a microturbine equipped with an electric generator and a temperature sensor. The model is designed in such a way that the color of the backlight depends on the temperature of the water flowing from the tap:
- cool water up to 31°C is colored green;
- warm water within 43°C acquires a blue tint;
- hot water above 45 °C is red.
In addition to its aesthetic function, the backlight reports the temperature of the water coming from the tap. The operating temperature of this type of device is limited to 60 degrees.
In homes where there are small children, attachments in the form of animal figures are especially popular.
The nozzles in the form of figurines of fairy-tale characters have a universal size, so they can be attached to taps with any type of spout.
The model, created by design student Simin Ju, once again proves the statement that a person can look at three things indefinitely, one of which is a mesmerizing pattern of streams of flowing water.
The faucet turns the flow of water into an elegant, intricately twisted spiral. Numerous jets emanating from the tap twist into spirals, which, intertwining with each other, create a beautiful water grid at the outlet.
How to clean a water faucet aerator
All modern water mixers are equipped with aerators (water dividers) of one design or another. Regardless of design, these devices require periodic cleaning. In addition to the fact that the aerator mesh filter retains all the small particles of dirt and scale circulating through the water pipes, it also gradually becomes overgrown with lime deposits.
When is it time to clean the aerator? You can understand this if the stream of water flowing from the faucet has become uneven, scatters in different directions, or has become less frequent. You can easily clean the aerator yourself without resorting to the services of a plumber.
What does an aerator consist of?
Diagram of a disassembled aerator for a faucet in the kitchen or bathroom.
- Aerator with slotted hole and plastic parts.
- Aerator with disc and screen.
- Faucet spout.
- Disc with slots.
- Disc support.
- Component for deflecting a jet of water.
- Jet splitter.
- Aerator body.
- Washer.
- Perforated disc.
- Brass screen.
- The aerator body screws into the spout of the faucet.
This technology has been around for decades and has changed dramatically over time. Previously, the aerator was a metal disk with holes and a protective screen. Unfortunately, this design quickly becomes clogged.
Photos of aerators of three different sizes and what they consist of: a metal body, a plastic module and a rubber gasket.
In new versions, the aerator is made of plastic, and the holes are much larger. However, any aerator clogs over time, since tap water contains a lot of lime and minerals.
We suggest you read: How to remove limescale from a faucet in the bathroom or kitchen
Popular aerators
Advanced rotary aerator NRG. Saves water thanks to WaterSense technology, has two operating modes (jet/spray). A metal faucet mount will last much longer than a plastic one.
The high-performance vacuum aerator consumes extremely little water, ensuring normal water pressure. The secret is in a special “vacuum” valve, which provides aeration of the water, which is compressed under pressure. The result is a powerful jet with low water consumption - only 1.1 liters per minute.
Another interesting option is a low-flow adjustable aerator that fits into both bathroom and kitchen faucets. Low water consumption and strong pressure are the characteristics of a good aerator. The rotary dial allows you to change the pressure with one finger without affecting the water temperature. Water consumption is 5.5 liters per minute. This is significantly inferior to the performance of a vacuum aerator, but the price is several times lower.
If your faucet has an old metal aerator, you can save yourself a lot of hassle by replacing it with a new version. Well, for now, let’s figure out how to clean the faucet aerator.
Cleaning the aerator
In order to clean the aerator, it will first be necessary to remove it from the mixer spout. Most often, this can be done with your bare hands, or by wearing rubber household gloves to improve your grip. If the aerator is twisted too tightly, then you will have to resort to using an adjustable wrench or pliers.
The great variety of faucet designs will not allow us to fit on one page all possible options for aerators and methods for their removal. But, to summarize, the following options can be considered:
1.
The aerator is screwed onto the spout (aerator with internal thread, “female”)
2.
The aerator is screwed into the spout (aerator with external thread, “male”)
3.
The aerator is screwed into the mixer body using a special key
Option number one
The easiest way to unscrew is to grasp the dry aerator body with one hand and hold the spout with the other. Rotate the aerator in a counterclockwise direction. If your hand slips on the surface of the aerator, put on rubber household gloves and try again.
In the event that these efforts are not enough, you will have to use pliers. Spread the jaws of the pliers so much that you can cover the body of the aerator, while placing a rubber lining or wrapping the jaws of the pliers with electrical tape in several layers so as not to damage the chrome surface of the aerator.
Use the same principle to remove aerators that screw into the faucet.
Unlike aerators that screw onto a faucet spout, an aerator with external threads has special protrusions for a puller key.
Therefore, if it cannot be unscrewed by hand (and it can be difficult to grasp due to the low height of the aerator body), use an adjustable wrench or pliers.
Option number three
it will also not be difficult, unless you have lost the special key that is sold complete with the mixer.
If you have a key, then to remove the aerator you need to insert the key into the water outlet hole in the mixer, align the protrusions on the key with similar depressions on the aerator body and rotate it counterclockwise. If you still have the instructions for such a mixer, proceed according to the instructions.
Removed aerators and their mesh filters must be cleaned of stuck particles of scale and rust moving through the water pipes.
Clean carefully, being careful not to damage the plastic mesh filters installed in the aerator. Take an old toothbrush and use it to clean all the meshes of the aerator. If large particles are stuck in the mesh and cannot be removed with a toothbrush, try to carefully remove them with a toothpick.
If there are still particles left in some grid cells that cannot be removed, leave them there. It is better to leave a couple of mesh cells of the aerator clogged than to make a hole in the mesh.
Treat the outer mesh of the aerator with a limescale or scale remover. If the plaque on the outer mesh is insignificant, you can skip this point.
Reinstall the washed, cleaned and assembled aerator in reverse order. Don't forget to install the rubber gasket if it was standing separately. When installing, tighten the aerator firmly by hand.
If this later turns out to be insufficient (water will leak from under the threads), tighten the aerator a little with a wrench or pliers. Do not tighten too much, because you will have to unscrew it more than once. Be especially careful if the water divider body is made of plastic.
Related article: Do-it-yourself bathroom faucet repair
Attention:
Be especially careful and careful when reinstalling plastic aerators, which are installed in faucets using a special key. Typically, such dividers are made entirely of plastic, and if you immediately begin to forcefully screw the aerator into the metal mixer body without getting into the threads, you can easily damage the delicate turns of the plastic thread on the aerator body. After this, it will be difficult to tighten it normally. Start tightening lightly, without pressing, turning the key in a clockwise direction. When you feel that the aerator screws in easily, tighten it slightly with a wrench.
Topic tip:
If you are going to clean the faucet from limescale so that it shines like new, it is better to use liquid limescale removers for cleaning.
If your faucet has a ceramic cartridge (one handle for adjusting pressure and temperature), DO NOT
clean it with cleaning cream, paste or powder. These cleaning products contain abrasive grains, which, when the product is washed off, will certainly get inside the cartridge and get stuck between its plates. As a result, you will get a problem in the form of a squeaking cartridge that will be very difficult to open, close and adjust.
This disgrace will continue until all abrasive particles leave the space between the ceramic plates of the mixer cartridge. Depending on the intensity of use of the mixer, this can last for weeks.
So, if you don't want to disassemble the faucet and clean the cartridge of abrasive particles stuck in it, use liquid descalers to clean the faucet.
It is also worth noting that if the aerator you removed is clogged to such an extent that it is not possible to clean it, or it breaks during cleaning, do not worry. Take the aerator body with the threaded part and go to the market or hardware store. There they will help you choose an aerator that is suitable in shape, with which you can easily replace your broken divider.
In conclusion, I recommend watching a short video to clearly see the process of removing and cleaning the aerator and to better understand the whole process. The video will open in a separate window.
Press the ↓↓↓ button
and share with your friends if you find this article useful!
How to take a faucet apart
Limescale not only causes stains on chrome surfaces. It accumulates between the mixer elements and interferes with their normal operation. Therefore, to clean the internal areas, you have to remove the faucet and disassemble it into parts.
In the bathroom
Bathrooms often have two-handle faucets because they require more precise temperature control. To remove such a mixer, the first step is to shut off the supply of both hot and cold water to the pipes.
The further procedure is as follows:
- disconnect the mixer from the water pipes by unscrewing the nuts holding it;
- remove the red and blue plugs on the faucet handles and unscrew the screws underneath them;
- Unscrew both faucet axle boxes from the mixer using an adjustable wrench;
- disconnect the faucet spout from the aerator.
If your device uses rubber or plastic gaskets, it is recommended to update them.
There is no point in repairing the crane axle boxes themselves with ceramic elements; it is easier to buy new ones to replace them. It won't cost much. We clean all the parts with a rust and lime detergent and reassemble the structure in the reverse order.
In the shower
A shower faucet with a diverter is similar in design to one that only has two valves. Having disconnected the mixer from the water supply network, unscrew the faucet axle boxes for cold and hot water from it, then remove the shower/gander switch. To do this, also remove the plug and, by unscrewing the screw, remove the lever. After cleaning the parts, they are reassembled into a single structure.
In this case, you need to pay attention to the safety of the shower hose. It can be easily damaged by a metal tool, so it is better to disconnect the hose manually.
If this fails, the nuts should be wrapped in cloth to prevent scratching. The shower head is removed and placed in a vinegar solution for several hours to clean out the water holes. Particularly heavily clogged holes are pierced with a toothpick.
In the kitchen
Many people prefer to install a single lever faucet in the kitchen. During cooking, it is convenient to regulate the water with one hand. To clean such a mixer, you need:
- remove the plug located under the lever and unscrew the screw;
- pull the lever handle up and remove it from the cartridge rod;
- remove the cap that closes the mechanism from above and unscrew the clamping nut;
- remove the cartridge from the mixer body.
Master class: quick cleaning of the aerator in the mixer with your own hands
Everyone has experienced the fact that the water pressure in the faucet has dropped, or, worse, the flow splashes out, getting anywhere but where it is needed. Unfortunately, this is a fairly common occurrence associated with the quality of water flowing through the mixer. You will learn how to fix this in our master class.
Rust, scale, scale from water heating devices, tow residues - all this, moving through the water supply system, settles on the aerator, which is a structure of several mesh filters assembled in series, installed at the outlet of the flow from the mixer. Its task is to normalize the flow of water and saturate it with air. Due to this, water consumption is reduced without losing the efficiency of its use.
More global problems may also be the reason for the decrease in water pressure from the mixer. But let's start small, looking at the step-by-step process of cleaning a standard aerator on your own.
Features of aerators
When installing a faucet with an aerator, the user wonders what it is for. Not understanding the meaning of the device, they remove it, believing that it prevents the passage of water pressure, although the pressure in the water supply is already reduced. When dismantling the filter, a big mistake is made:
- The main purpose of the nozzle is to normalize the flow. When water hits an object, it does not splash out to the sides.
- Improving water quality. Chlorine compounds are removed from oxygen-saturated water. The aerator traps large particles of debris, sand and salts.
- Reduced consumption. Aerated jets increase in volume due to the division of the flow through the mesh with air bubbles. Thanks to this, the pressure seems normal, but the volume of water leaving is much smaller. Customer reviews about the water-saving aerator nozzle are extremely supportive.
In addition to its main purposes, the nozzle has a great advantage: air-saturated water makes less noise. There is also a drawback - fragility. Filters need to be replaced once a year.
The main parts of the aerator are:
- housing made of metal or plastic;
- additional filters to retain small particles of debris;
- a water and oxygen mixer containing holes around the perimeter through which air enters the body;
- an external mesh that divides the main flow of water into many small streams;
- bushings and seals for sealing.
In a cylindrical body, the grids are stacked one after another in a certain sequence. The first two meshes are used to direct and purify the flow of water, the rest are used to aerate the water.
The main task assigned to the aerator is performed by meshes; they are made from different materials:
- Metal - the most common and inexpensive models. They have a significant drawback - fragility. From exposure to water, chlorine impurities, salts quickly rust and collapse.
- Plastic – good quality attachments at a reasonable price. Resistant to the damaging effects of water. There is a range of designs from simple models to complex “tunnel” ones.
- Brass, bronze or ceramics are of excellent quality and have a long service life, but have a fairly high price.
- Stainless steel is a cheap alternative to brass and bronze. Relatively low-cost nozzles have a long service life. The meshes are resistant to water, do not rust or oxidize for a long time.
- Extruded aluminum is short-lived and brittle. Aerators are subject to rapid oxidation and sticking to the body. Under the slightest mechanical loads, they tend to break quickly.
In addition to differences in design features and materials, nozzles differ in diameter. It is necessary to select the correct parameters, because... The diameter of the nozzle must correspond to the diameter of the spout pipe.
An important classification is the method of installing the aerator: internal and external. In the first case, the presence of external fasteners on the body is provided. The nozzle is fixed into the inside of the gander's nose. This method does not change the design of the mixer, so it is suitable for any application.
Getting ready for work
I would like to note right away that reading this article will probably take more time than it will take to complete the work described below, due to its simplicity.
To clean the aerator we will need:
- rags;
- old toothbrush;
- knife;
- an adjustable wrench of at least 22 mm or a suitable open-end wrench.
The last position is useful if the aerator has been tightly screwed in or has become sour in the housing.
How to replace an old aerator on a kitchen faucet spout
As I wrote earlier in this topic about replacing spout gaskets, this faucet I have is quite ancient, but unfortunately it still works great