Reasons for disassembling the boiler
In what cases will you have to disassemble the equipment yourself? There may be several reasons. First, we will give signs by which you can recognize the problem:
- The water has an unpleasant odor and a cloudy color.
- Flakes of scale are noticeable.
- The body is electrocuted.
- The RCD often trips. Why a water heater knocks out an RCD, read in a separate article.
- The water takes a long time to heat up or does not heat up at all.
- The set is slow, the flow is weak.
- Housing leak.
These signs indicate problems with the boiler. What could have caused the problem:
- Late tank maintenance . If the region has hard water, magnesium and potassium salts settle on the walls of the housing and parts when heated. As a result, an unpleasant odor and turbidity appear. The water takes a long time to heat up because the thermal conductivity of the heating element decreases. Once every six months it is recommended to look into the tank and check its condition, replace the magnesium anode and clean the parts.
- Wear of gaskets . If the tank is leaking, the gaskets are inspected first. If the housing becomes corroded, replacement will be required.
- The heating element burned out . In such cases, you need to install a new element.
- Thermostat failure.
How does a boiler work?
There are storage and instantaneous water heaters. The first ones consist of a large container in which a heating element is installed. Water enters the device and is stored there at a certain temperature.
Using a temperature sensor connected to a thermostat , the temperature is maintained at the set level. To prevent loss of thermal energy, the body of the storage tank is covered with a layer of insulation.
Before starting to operate the boiler, you should study its structure, technical characteristics and manufacturer’s operating recommendations in order to prevent breakdowns
Flow models work differently. They also have a housing and a heating element, but do not store water inside. The device turns on the moment water flows through its body. The liquid quickly heats up to the desired temperature. These devices are more powerful than storage models; they consume more electricity. But their sizes are compact and installation is a little easier.
And yet, in everyday life, a storage version of the water heater is more often used. Failures of different types of devices are similar, and they are eliminated using approximately the same means.
To automate the operation of the water heater, use a thermostat . This element receives data about the current state using a temperature sensor. It turns the heating element on and off based on incoming information. This helps not only maintain the optimal temperature inside the drive, but also makes it possible to save energy.
The device also prevents dangerous overheating of water, which could cause a serious accident.
If the boiler is leaking in the area where the water pipes are connected, incorrect installation of the device is most likely to blame, and the connections will need to be resealed
Hot water is gradually withdrawn from the tank and replaced by cold streams from the water supply. At this moment the heating element usually turns on. If the hot water in the boiler has not been used for a long time, it may cool down. Too low a temperature also gives a signal to turn on the heating element.
Types of heaters according to the heating element used
There are boilers with “dry” and “wet” heating elements. In the first version, the heating element is placed in a special flask, and in the second it is in direct contact with water. Both models have certain advantages. In terms of boiler repair, it is believed that it is much easier to replace a “dry” heating element than a “wet” one, since to do this you just need to remove it from the flask and put a new element there.
In the case of a “wet” heating element, you will first have to completely drain the water from the container, and only then replace it. Typically, “dry” heating elements are less efficient than the “wet” version, so not one, but two such heating elements are most often installed in a boiler.
A “dry” heating element is not the same, but replacing it is somewhat easier, since you do not need to drain the water from the tank
Due to the nature of their operation, “dry” heating elements burn out more often and need to be replaced, therefore models with “wet” heating elements are more popular. It is worth noting that you can also find modern boilers with very reliable “dry” heating elements of the latest generation, but the cost of such devices may be too high.
But the type of heating element does not affect the amount of scale formed during operation. But if with a “wet” element scale deposits directly on the surface, then with a “dry” heating element the deposits accumulate on the protective flask.
How to disassemble a Termex water heater
Thermex is a leading company in Europe that manufactures only water heaters. Water heaters from this company rarely break down, but it happens, and for repairs and preventive maintenance you need to know how to disassemble such water heaters.
Disassembling a water heater from this company should be done as follows:
- Shut off the water supply to the boiler. If the water heater is installed correctly, a tap must be installed at the bottom of its body to shut off the water supply.
- Disconnect the heater from the power supply.
- Using a straight screwdriver, carefully remove the protective cover. If the lid is seated very tightly, then it is necessary to pry the edges of the lid in a circle. When removing the cover, it is important not to damage the enamel.
- After dismantling the cover, you need to check all contacts with an indicator or special equipment. The device or indicator should not show that there is voltage.
- Drain all the water from the barrel. Note that in some situations it becomes necessary to remove the boiler from the wall.
- Before disconnecting the wires from their contacts, you must record the location of the wires on your phone. This is necessary for ease of connection.
- We unscrew the nuts that hold the heating element and thermostat one at a time. This unscrewing is necessary so that the remaining water drains gradually. After you have taken out the heating element and thermostat, you need to wipe them with a dry cloth. And check the gaskets for wear.
At this point, disassembly is complete, and you can move on to the next steps. You can carry out cleaning or repair operations and then reassemble in the reverse order of disassembly.
In what cases is it necessary to disassemble the boiler?
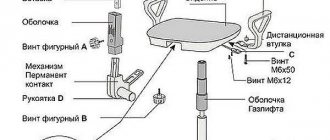
Gas boiler wiring diagram.
The magnesium anode in the boiler, used as a catalyst to protect against corrosion of the tank walls and aggressive effects on the heating device, must be changed periodically.
The service life of the anode depends on the quality of the water used in the boiler (it is recommended to install a special filter on the cold water supply pipe), the operating temperature of the water, and the intensity of operation of the water heater.
The standard period of use of a magnesium anode, indicated in the boiler operating instructions, does not exceed 6 months. When using the boiler in a gentle mode, the magnesium anode can last 1-1.5 years without replacement.
We recommend: Weather-compensated automation for heating systems: features
Along with replacing the anode, as a preventative measure for the water heater, it is necessary to thoroughly clean the inside of the tank from scale and wash the walls.
The heating element must also be cleaned using special chemicals or a regular metal dish sponge.
An additional need to disassemble the water heater arises as a result of an accident, breakdown or reaction of the boiler to non-standard operating conditions.
As a rule, the heating element fails.
Diagram of connecting the boiler to the network.
If the water from the boiler has an unpleasant odor, yellow or brownish tint, this indicates corrosion and clogging of the tank. The same is evidenced by the fact that the water takes too long to heat up and the appearance of loud extraneous sounds during operation of the heating element.
It is necessary to immediately disassemble the boiler, determine the malfunction and eliminate it. In any case, you should thoroughly rinse the boiler and make sure that both the walls of the storage tank and the heating element are clean.
If there is a leak in the boiler, you need to make sure that the rubber waterproofing gasket is reliable. If necessary, the gasket should be changed.
If the leak occurred as a result of depressurization of the storage tank itself, it is not possible to repair such a breakdown with your own hands. This may be a manufacturing defect - then the boiler must be replaced in accordance with the warranty agreements.
Sometimes, as a result of improper operation of the boiler, the walls of the storage tank may rust. In this case, the procedure for replacing the storage tank may cost more than a new water heater.
Disassembling the water heater
You can disassemble the boiler yourself only if you have a number of tools:
- screwdrivers;
- knife;
- rubber hose;
- key;
- metal brush;
- anode;
- cleaning products;
- water containers.
First of all, it is necessary to eliminate the effect of electric current on the device, that is, de-energize it. It is important to remember that the sequence of steps for disassembling the boiler can only be carried out when the device is de-energized. Violation of this rule can lead to dire consequences. After turning off the power, you must disconnect all wires. To do this, you need to remove the cover from the bottom of the boiler and disconnect all existing wires.
The third stage is draining the water according to one of the above algorithms. This can be done in the most accessible and optimal way: the drain valve is equipped with a prepared hose, the diameter of which was pre-selected relative to the valve. (See also: How to change the heating elements in a water heater)
The pipe intended for supplying hot water is closed, while the cold pipe is disconnected from the device, after which you can safely unscrew the valve. The other end of the hose is pulled to a designated place for draining water, this may be a sewer.
After the water issue is resolved, we move on to the body, where you need to find large bolts located at the bottom of the device. Before unscrewing them, you need to place a basin on the floor at their level. Firmly screwing the bolts indicates a high-quality device, so you should not spare effort in unscrewing them.
It is not always possible to do this the first time; sometimes you have to resort to removing the device, since it is not possible to remove the bolts by weight. After removal, the device is carefully placed on a soft, flat surface, where the fight with the bolts continues until a positive result. (See also: Do-it-yourself boiler cleaning)
The next step is to find the electrical part of the device. Once it is found, you need to pull it, but do not use too much force, as there is a risk of damaging the rubber gasket. The anode, conveniently located near the heating element, prevents the development of corrosion, so if it looks unsightly, it is best to replace it with a new one.
It is recommended to clean the electric heating part using special chemical compounds. Of course, many resort to using a knife and a metal brush. For the greatest cleaning effect, it is recommended to clean the surfaces of the device themselves, deposits on which can be easily removed with a regular sponge.
Features of various designs
Before you start repairing a water heater with your own hands, you need to figure out what type of device it is. There are several varieties:
- electric boilers;
- flow-through;
- indirect heating systems;
- geysers.
The word "boiler" means "boiler". It follows from this that such products include not only storage devices, but also flow-through devices.
Electric heaters
This type of boiler is considered the most popular. The design consists of a tank, a thermal insulation layer (polyurethane foam is often used), and an upper casing.
The heating element is located at the bottom of the device. The water is heated to a certain temperature, which is pre-set on the thermostat, the maximum value is +75°C.
If no water is drawn, the device maintains temperature readings by turning the heating element on and off. It is equipped with overheating protection, so when the maximum performance is reached, the device turns off.
The optimal temperature value is +55°C; it is in this operating mode that the structure will last longer and save electricity.
This device is the most common
Hot water is drawn through a tube located at the top of the device. The cold liquid inlet is located at the bottom of the device. The metal tank is protected from corrosion by a special magnesium anode, which has a certain working life. The element must be replaced once or twice a year, depending on the hardness of the water.
Indirect heating systems
Such products do not independently generate thermal energy; water is heated using a coil in which the coolant is located.
Cold water comes from the bottom of the device, hot water comes out from the top. Indirect heating devices can provide large quantities of hot water, which is why they are often installed in large houses. The operating principle is to exchange heat between liquids at different temperatures. In order for the output to be +55°C, heating is carried out to +80°C.
The process takes a lot of time, this feature must be taken into account when choosing a suitable device. Like their electrical counterparts, indirect ones are equipped with a magnesium anode. The structures can be wall-mounted or floor-mounted; in addition, they can be connected to a double-circuit gas boiler. More expensive models are equipped with additional electric heating elements, which reduce heating time as needed.
Gas and flow structures
Gas-powered appliances are only wall-mounted. There is a thermal insulation layer inside the structure. There is a chimney pipe at the top, and a gas burner at the bottom. The latter is a source of heating, in addition, it is helped by the heat circulation of combustion products. An automatic electronic system monitors and extinguishes the gas as needed. The column is equipped with a protective anode.
Gas water heaters produce large amounts of hot water in a short period of time.
Flow systems do not accumulate liquid inside. The heating process occurs at the moment the tap is opened, when the devices allow water to flow through them. The structures operate on both gas and electricity. Gas products are modern modifications of popular geysers.
Electrical systems carry out heating using heating elements of increased productivity. Despite their small dimensions, the products are high-power, so their scope of use is limited. Hot water flows regularly without interruption for heating.
Gas water heaters have greater efficiency
Preparing and draining water
Before cleaning the device, it is necessary to drain all liquid from it in advance. This is one of the most important rules that must be followed before carrying out the main work. First, turn off the electric heater from the network. Then you need cold water to flow, unscrew the tap. The warm valve must be left open, because the liquid needs to drain somewhere.
You are lucky if the boiler is located under the bathtub; in this case, you don’t have to wait for the water to drain, but immediately begin removing the heating element. But if you are not satisfied with this option, then you need to connect the hose to the fitting, and then lower it into a tank, say, a sink. This option can significantly reduce the amount of splashes. But even if this option does not suit you, the last option left is the safety valve. Draining water using this method is a rather tedious process, so we advise you to wait until the water cools down.
Of course, to carry out the cleansing you will need the following tools:
- wrench;
- screwdriver;
- sandpaper;
- Phillips and straight screwdrivers;
- special cleaning agent.
Once you are sure that there is no more liquid inside the boiler, it’s time to start disassembling it. First make a drawing or photographs of the boiler design diagram, because devices from different manufacturers have different assembly options. Let's begin.
Remove the decorative cover, the bolts securing it, and disconnect the fasteners. Usually the fasteners are held on by screws. Some models have a panel behind the cover that can be removed simply by prying it with a straight screwdriver.
When you get to the fasteners and contacts, the first thing to do is remove the temperature sensors. Unscrew the grounding. Next, unscrew all the bolts and wires holding the flange on which the heating element sits. We remove the thermal relay so that the wires do not interfere with the process of removing the electric heating element.
Boiler models differ from each other; in some heating elements it is enough to push the flange up, turn it, and start pulling it out. If you carried out the cleansing procedure not long ago, it will be easy to do, but if not, try to knock out the scale from the inside, over time you will be able to pull it out. If it doesn't work, read the instructions, you may need to do it a little differently.
Selecting a heating element
When replacing a heating element, the question may arise: “dry” or “wet”.
First, let's look at what they are.
- Wet - this is a regular heating element, which is found in many people; it is called wet because it is located directly in the water.
- Dry - an oblong version with ceramic inserts, inside there is a metal tube in which the so-called heating element is located.
Their difference is that a wet heating element has the same temperature as water, while for a dry heating element it is always higher, and accordingly, heating occurs faster. But the main difference is that a regular one always corrodes much faster, which means it needs to be cleaned often. And it also spends much more energy, unlike dry, which needs to be cleaned quite rarely, because it does not have direct contact with water. True, the dry option is expensive and does not fit all models, but the service life is up to 15 years. Buy to the best of your ability, both options have negative qualities, if you are ready for regular cleaning, buy wet, most importantly, carry out regular technical inspections.
Tools for disassembling and assembling water heaters
To disassemble the device, you will need a small number of tools; in most cases, every person has them at home, so no additional costs will be required.
Before you start disassembling the water heater, you need to prepare all the tools in advance and lay them out in front of you, so that if something happens you won’t be distracted by searching for a particular screwdriver.
We recommend: How to descale a boiler at home, do-it-yourself water heater cleaning
List of required tools:
- Indicator screwdriver.
- Phillips and flat-head screwdrivers (depending on the screws with which the parts are fastened).
- Adjustable wrench.
- Set of spanners.
- Knife and scissors.
- Tow.
- Microfiber cloth to wipe down the insides and parts.
Required Tools
Boiler disassembly sequence
To carry out scheduled disassembly and subsequent preventive cleaning of the storage water heater you will need:
Scheme of a storage water heater.
- screwdrivers: flat, small and medium Phillips;
- adjustable wrench;
- wrench 13;
- rubber hose;
- a basin or other mobile container for water;
- knife;
- soft brush and metal sponge for dishes;
- chemicals for cleaning heating elements;
- new magnesium anode;
- hairdryer
Boiler de-energization
The first step in disassembling the boiler is to always turn off the power to the device. It is strictly forbidden to disassemble a water heater that is not disconnected from the power supply.
It is necessary to unplug the boiler power cord from the socket. If the cord is connected to a bag machine, you need to turn off the bag switch.
Using a small Phillips screwdriver, the screws of the protective casing or cover are unscrewed, and the cover itself is removed. If the protective casing is attached to plastic latches, then they are pressed out using a knife and a flat-head screwdriver.
All wires connected to the thermostat, heating element, indicator and ground terminals are disconnected. To do this, use a medium Phillips screwdriver.
Attention! To carry out the correct re-installation of the boiler's electrical system, it is necessary to sketch or photograph the original wiring diagram.
Draining water from the storage tank
Diagram of the heating element device.
Using a shut-off valve, the cold water supply to the apartment is shut off. If a local valve is provided for the boiler, which shuts off only the necessary part of the apartment water supply, it should be used.
The hot water intake valve on the boiler and the cold water supply check valve are closed.
Using an adjustable wrench, the cold water supply hose to the water heater is disconnected, but the hot water extraction hose is not disconnected.
A rubber hose is placed on the boiler check valve. The second end of the rubber hose is directed into the sink, jacuzzi, bathtub. Water from the boiler will drain through it.
The boiler check valve and the hot water intake valve open. All hot water taps connected to the water heater are fully opened: in the bathroom, in the kitchen.
Atmospheric pressure is generated in the boiler storage tank, and water is pushed out through a check valve. Typically, water is discharged from the boiler in several portions as the pressure in the tank increases.
You can check that all the water has been drained by blowing into the rubber hose on the check valve. If water remains in the tank, a characteristic gurgling sound will be heard.
It may happen that the pressure in the water supply system is not enough to displace all the water from the boiler. In this case, the hot water extraction hose is removed and additional pressure is pumped into the tank through the hot water extraction tube using a compressor.
Attention! The cold water supply pipe to the storage tank rises above the level of the bottom wall. Therefore, a small part of the water will remain in the boiler and will drain only through the mounting hole of the heating element panel. This factor must be taken into account when further disassembling the water heater.
How to drain water from a water heater
Before disassembling the water heater, it is necessary to drain the storage tank - drain the remaining water in the water heater. Typically, two pipes are connected to the device:
- liquid withdrawal system;
- system for collecting liquid from a water supply system.
Drying can be done in several ways.
Standard method
This method is given in the operating instructions for the device. You will need to use a tee, which is located next to the valve and pipes of the system. Drying is carried out by shutting off the water supply pipe. The remainder of the already stored liquid is drained through the mixer.
The described method is relevant for models of the previous generation; modern devices are most often not equipped with a tee.
Using a lever (trigger)
A device located on the safety valve will help quickly get rid of accumulated water. All you have to do is simply bend the lever and the boiler will drain. It is worth noting that the procedure performed using a trigger can take a long time. Connecting a hose will help speed up the process significantly. By attaching it to the spout, you will greatly facilitate the outflow of water, but the water will still drain within two hours.
Alternative method
If none of the listed devices are installed on the device, you will have to resort to a more complex method. To do this, you need to unscrew the check valve counterclockwise. The pressure of the drained water will be very strong, no need to panic because of this, prepare a suitable container and clothes that you don’t mind getting wet. To protect the room from water, experts recommend using a durable hose, the length of which will be sufficient to connect it to the drain of the bathtub or toilet.
We recommend: Horizontal heating system - wiring options, advantages and disadvantages
If water does not flow after unscrewing the valve, this means that the hot water supply is cut off. At the same time, the flow of air is blocked, without which draining is impossible. Only after completing this procedure can you begin to further disassemble the boiler.
Step-by-step instructions: remove the cover from a domestic water heater
Disassembling a boiler takes place in several stages, which can be handled successfully if you know exactly how to remove the cover from a domestic water heater.
We recommend disassembling the structure in the following sequence:
- Turn off the water supply. In most cases, the valve is located at the bottom of the housing.
Cold water valve location
- It is necessary to disconnect the equipment from electrical networks. If the device is not connected directly, but through a surge protector, it is better to completely unplug the extension cord from the outlet and take it out of the room, since devices connected to the network only increase the likelihood of a current short circuit.
- Next, you need to drain the water from the hose attached to the drain pipe. It is better to pour it into a basin or bucket, and then into the toilet. This will prevent accumulated scale from clogging your bathroom or sink drain.
- Using a straight screwdriver, unscrew the screws and remove the protective cover from the bottom of the case. The tight-fitting lid is removed very slowly - as if unscrewing the lid on a can of canned food. It is very important not to damage the enamel.
Removing the protective cover from the tank
- After removing the cover, use an indicator screwdriver to determine the voltage at the terminals. To do this, ring all the contacts one by one, touching the iron cap of the screwdriver. The light in the screwdriver should not light up or blink in any case.
- Next, you need to empty the tank of water. You must wait until the contents of the tank cool down. Some models need to be removed from the wall. In this case, it is necessary to disconnect the hot and cold fluid supply hoses.
- If the equipment is still under warranty, you cannot drain the water, otherwise it may be considered as a non-warranty case. This must be indicated in the instructions or warranty card.
To drain, you will need a gas wrench and a hose. The sequence of actions to free the water heater from water is as follows:
- Use a gas key to turn off the cold water supply - the valve for incoming water;
- open the hot tap on the mixer to avoid vacuum;
- drain the water to the mark - this will take from 1 to 10 minutes;
- do not close the mixer, open the tap and let the water drain, you can also simply tighten the nuts at the cold water inlet and the liquid will easily drain;
- connect the water outlet hose to the thread of the heater, lower its second end into a sink or some container deep enough;
- then disconnect the hot water outlet hose from the body - this way we will get rid of the liquid accumulated around them;
- when you unscrew the nuts, the remaining water will finally drain from the water heater tank.
READ MORE: Rating of the TOP 7 best chest freezers: how to choose, characteristics, reviews, price
Emptying a small tank from residual water
This method of draining remaining water is suitable for units whose volume does not exceed 20 liters. Most often these are heaters of the Termex, Ariston, and Oasis brands. If the tank volume is large or a valve without a lever is installed, you will have to remove the water yourself. You cannot unscrew such a part, but you can press out the spring yourself.
Removing the cover and panel with heating element
Using a medium Phillips screwdriver, unscrew the screws that secure the large bottom cover (not available on all models). The cover is removed.
The thermostat is removed. To do this, you need to smoothly, without pressing to the side, pull the thermostat block down.
Keeping in mind the water remaining in the tank, it is necessary to place a basin or other container for water under the boiler.
Using a 13 mm wrench or an adjustable wrench, unscrew the nuts securing the heating element panel.
The panel fasteners are removed carefully so as not to damage the waterproofing gasket.
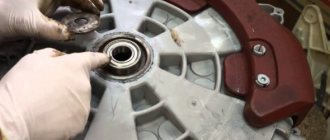
The panel with the heating element and magnesium anode is removed.
To do this, the panel is pushed deep into the tank by hand, turned over and removed. If you do not turn the heating element over, then its bent part, thickened with scale, may not allow the panel to be removed out.
Central nut 55
If you need to disassemble a water heating tank, in which the heating element is secured at the bottom with a large hex nut, as in the photo below, you can do everything quickly.
First of all, disconnect the boiler from the power supply and water supply. Before unscrewing the flexible hoses, be sure to turn off the cold water supply. After disconnecting, you need to drain the water from the water heating tank, which can be easily done using this video instruction:
Proper drainage of water
When the water is drained, you need to disassemble the bottom cover of the water heater housing, which is usually attached to 2 self-tapping screws. Under the cover you will find this large nut and the thermostat, which also needs to be removed by disconnecting the terminals that go to it. Now that you have free access to the nut, take a gas wrench No. 2 or a hub wrench 55, both can be seen in the photo:
For self-repair, you need to unscrew the heating element of the water heater counterclockwise. To make it more convenient to completely disassemble the storage boiler with your own hands, remove it from the wall and turn it upside down. When the nut is unscrewed, carefully remove the heating element by rocking it slightly from side to side.
Since after draining the water from the tank, a small part of it may remain inside, it is recommended that when disassembling it, place a bucket under the boiler so that the residue drains into it and not onto the floor. And another piece of advice - if scale interferes with removing the heating element, use a hard non-metallic object to try to clean the hole and the heating element itself a little.
Boiler assembly
The water heater is reassembled in the reverse order.
Attention! Before installing the panel with the heating element, the boiler and all its parts must be thoroughly dried with a hairdryer.
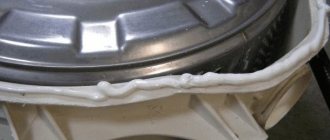
When installing the panel, pay special attention to the sealing gasket. Water should not seep through.
The cold water supply and hot water supply hoses are connected (if it was disconnected). The hot water tap opens. The tank is filled with cold water until it flows out of the “hot” tap.
After making sure that the boiler is sealed, the electrical wires are connected, the lid and protective casing are closed.
Helpful Tips:
- It is better to carry out all work on disassembling the boiler while wearing rubber gloves;
- In order for the boiler to serve longer and without interruptions, it is recommended to heat the water no higher than 60-70°C;
- if water is often drained from the boiler, it is advisable to install tees equipped with taps for drainage on the inlet and intake pipes.
Such prevention will ensure normal, uninterrupted operation of the water heater for many years.
Boiler assembly and care
You can assemble a boiler with your own hands, but you need to act carefully. Step by step, in the reverse order in which he understood, all the parts should be put in place. However, the elements must only be dry.
Wet parts should not be connected, otherwise a short circuit may occur. After assembly, test for leaks and finally install on the wall.
Important!
Empty tanks cannot be used when plugged into the network. First it is connected to a water source, filled and only then connected to electricity.
Cleaning a boiler with your own hands is a long process and involves a certain risk: what if after assembly the boiler stops functioning? To avoid risk, you need to properly care for titanium. Here's how it's done:
- install filters on pipes; they cut off a significant part of the dirt;
- Galvanized or ferrous heating elements deteriorate faster; you should not purchase them;
- if the water is too hard, it is not recommended to heat titanium to more than 60 degrees;
- insufficient temperature conditions are also harmful: microorganisms cannot be sterilized and occupy the internal cavity of the boiler;
- if titanium sits idle, the water must be drained from it - a filled, stagnant tank quickly rusts and leaks.
And, of course, the service life of the magnesium anodes in the heater is taken into account. They are operational for more than 1 year, after which they are replaced. Timely replacement of anodes increases the service life of equipment
Timely replacement of anodes increases the service life of equipment.
How to disassemble a flat tank water heater
Action plan:
- the boiler is disconnected from the power supply, the water is drained and the check valve is unscrewed;
- unscrew the plug nut;
- plastic shields are dismantled;
- in the center of the plastic cover, a screw is unscrewed, which is most often sealed with a sticker;
- the bottom cover is removed and access to the complex circuit of electrical components is opened (before disassembling it, it is advisable to photograph the structure, sketch and label each component, this will then help to assemble everything correctly and quickly);
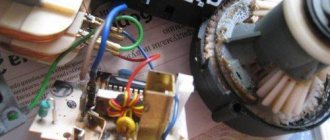
- The next step in disassembling a water heater with a flat tank will be to disconnect the control board and thermal protection, for which you unscrew all the screws and nuts of the grounding bracket (you should remember that the thermal protection and electronic board are afraid of water, so it is very important to protect them from its influence);
- disconnect the connector that comes from the outer board from the electronic control board;
- to dismantle the heating element, which is attached to the flange, you should unscrew the nuts (the work can be complicated if the heating element is covered with scale; remove it slowly, with extreme caution).
Sometimes it is necessary to dismantle both the internal and external control board, which is located on the outside of the water heater body. Before removing it, remove the plastic sticker from the front panel and unscrew the bar.
It's simple. Anyone can do this kind of work with their own hands, without the help of specialists.
Main features: how to disassemble a water heater
Before examining the issue in detail regarding the features of disassembling a water heater, you need to learn about the different types of boilers. Each type has its own characteristics during disassembly.
Heaters are divided into 4 types, namely:
- Water heater with heating element;
- Economy class water heater;
- Medium class boiler;
- And the 4th is a boiler with a flat tank.
In order to disassemble the water heater, you will need the following tools and devices:
- Pens;
- Buckets;
- Rubber hose;
- Magnesium anodes.
The first thing you need to do when disassembling any water heating unit is to drain all the water. In order to do this, it is necessary to shut off the supply of hot and cold water. Then place a bucket under the water heater and begin to unscrew the check valve on the boiler. After unscrewing the cold water supply hose, we put it aside, and in its place we screw a rubber hose, the second end of which is lowered into a bucket. After this, open the hot water tap near the boiler in the kitchen or bathroom. Thus, the water drains. To check whether the water has drained from the tank, you need to blow into a rubber hose; this is necessary to break through the fence that prevents water from draining.
Next, you need to turn off the thermostat with all the electrical parts, and stick pieces of paper of different colors on the folded wires. With the help of such a sticker it will be easy for you to connect the wires in their place. Next, place a bucket under the water heater and unscrew the bolt on the top cover to drain the remaining water.
It is very important to remember to clean the surface inside the tank and check for the presence of a magnesium anode. This device looks like a welding electrode.
Medium class water heater
This type of heaters belongs to the middle price segment, which indicates the high quality of their components. In most cases, the manufacturer supplies the device with a flange that is secured to the neck of the device using six bolts.
Disassembling the unit includes the following steps.
- Standard procedure for de-energizing the device and draining the device, removing the check valve.
- To remove the top cover, you need to unscrew the screws, the location of which depends on the model.
- The next step is to remove the temperature sensor. It can be connected to the heating element by wires or fixed to its surface.
This completes the disassembly procedure. Thoroughly wash the inner walls of the tank, remove scale and deposits. Check the condition of the anode and replace it with a new one if necessary. Examine the condition of the wires, pipes and connections. Everything must be complete and airtight. Apply sealant to suspicious areas: this precaution will help avoid leaks.