For so many years she worked for you, helped, helped out, and then one day - the fairy tale ended. Yes, washing machines break down over time, and you have to study what exactly broke. In this article we will look at how to properly disassemble a washing machine, clean the pipes and remove partially or completely broken modules.
The article is relevant for the following models of washing machines: Ardo / Ardo, Beko / Beko / Veko, Bosch Avantixx, Classixx, Logixx, Maxx, SportLine / Bosch Avantix, Classics / Classic, Logix, Max, Sportline; Brandt / Brandt, Candy Aquamatic, Holiday, CNE, CTS / Candy Aquamatic, Holiday; Daewoo / Daewoo, DEXP / Dexp, Electrolux Time Manager / Electrolux, excuse me, Timemanager, Evgo / Evgo, Gorenje / Gorenje, Haier / Hayer, Hansa / Hansa, Hotpoint Ariston Margherita, RSM, ARSL, ARWM / Hotpoint Ariston Margherita, Indesit IWSB , WISL, WISN, WITL, Innex / Indesit Wisl, Inex; LG / LJ/LV; Miele / Miele, Samsung Diamond, WF, EcoBubble, Bio Compact / Samsung Diamond, Eco Bubble, Bio Compact; Siemens / Siemens, Vestel / Vestel, Whirlpool AWG / Whirlpool, Zanussi Aquacycle, EcoValve / Zanussi Aquacycle, EcoValve; Atlant, Vyatka, Desna, Donbass, Malyutka-2, Saturn, Siberia, Fairy-2, Eureka-3 and other brands with vertical and horizontal loading, automatic and semi-automatic.
How does disassembling a horizontal machine differ from a vertical one?
Disassembly schemes for machines with different loads differ in the types of fasteners, bolts and other small points. The process of removing broken parts from the case is almost the same. We create universal instructions to help repair any equipment, so we omit unnecessary nuances.
At the end of the material there are videos with disassembly of different models of machines - watch them to “free” understand the subtleties “in pictures” and repeat everything with your own hands at home.
How to prepare for disassembly
De-energize the device
Never disassemble the washing machine with the power on. This will harm the machine and, first of all, its owner.
Turn off the water supply
Turn off the water supply to the machine, as well as the drain hose leading from the water valve to the sewer. And drain off the remaining water.
Get these tools ready
- service hook;
- wrenches with a diameter of 8, 9, 19;
- flat-head screwdriver;
- Phillips head screwdriver;
- wire cutters or pliers needed for clamping clamps;
- construction nippers;
- pliers with insulated handles;
- curved pliers (somewhat similar to tongs).
Record the disassembly sequence
We recommend recording or filming the disassembly process; this will save a lot of time in the future when you start putting the washer back together.
How to disassemble a washing machine: instructions
Below is the procedure for disassembling the washing machine down to its “internals” - drum, motor, belt, pump, bearings, etc. Strictly follow the instructions provided. If something went wrong, go through all the points again: perhaps you missed something.
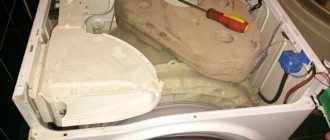
Removing the top cover
To remove the top panel, move to the back of the unit and unscrew the two screws. When nothing will hold the lid, grab the panel and pull it towards you. Do everything carefully so as not to damage anything.
Removing the back panel
Pull the panel to the side. It is attached with latches, so there should not be any difficulties here. If it does not budge, slightly bend the latches with a screwdriver. The main thing is not to overdo it.
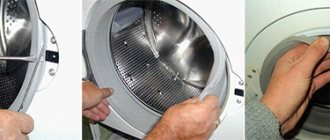
Removing the control unit
Take a screwdriver and carefully unscrew the front panel bolts at the top. Unscrew the control unit 90 degrees and carefully remove it from the fasteners. Using the service hook, securely secure the panel to the side of the washer.
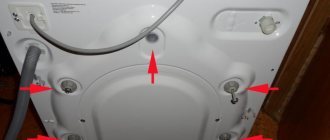
Removing the front (service) panel
Before disassembling, do not forget to remove the powder tray - first remove the container, then unscrew the bolts that hold it in place. Then pry up the front panel using a flat-head screwdriver. On the side, below, from the front, you need to unscrew the bolts.
Remove the center panel
Simply unscrew the screws that hold this part of the machine in place and pull the part out completely.
How to assemble a washing machine?
The machine is assembled in the reverse order. Photos will also help you if you took them during the disassembly process. On them we recommend capturing the location of certain parts, as well as the methods of their fastening and the wires suitable for them. Looking at these pictures, you can easily assemble the washing machine.
Also, for clarity, we suggest you watch the video. In this video, the bearings will be replaced, during which the entire machine will be disassembled. The recording is in English, but even without translation you can disassemble the machine by simply repeating the steps of the master.
How to disassemble a washing machine - video
Read our site and good luck with the disassembly!
Interesting:
- Washing machine with vertical or front…
- Review of built-in dishwashers Hans 60 cm
- Dimensions of a front loading washing machine
- How does a Hansa washing machine work?
- Who is the manufacturer of Hansa washing machines?
- Comparison of technical characteristics of washing machines
readers
- 01/24/2015 at 11:46
Dmitriy:
There’s nothing easier to figure out, and even with such tips! Russians are invincible!!!
Answer
- 02/24/2017 at 10:44
Rinat:
Respect to the author for a good presentation of the material
Answer
- 04/08/2017 at 23:38
Yuri:
Author, tell me how to unscrew the cross from the drum of a Samsung washing machine? One of the mounting lugs burst and the drum moved forward, cutting the outer tank. Now the crosspiece needs to be replaced. If I lose the page, write me a personal message: georg-smt(dog)mail.ru
Answer
- 10.26.2017 at 18:24
Dimon:
Not in Russian. But everything is clear from the video. Thank you.
Answer
- 01/18/2018 at 02:57
Arthur:
I forgot to lubricate the oil seal, broke off the latches on the tank in vain, and you can knock out the bearings with a rubber hammer for a day. Well done.
Answer
Analysis of washing machine parts
Luke
Open the hatch as far as it will allow. You will see two bolts that secure the centrifuge door to the center panel. Unscrew them. When you finish with the second bolt, hold the drum itself so that it does not fall.
On the right side, unscrew the UBL mounting bolts and carefully pull it towards you. Now open the connector.
If the door or locking device does not unlock, read here.
Motor
First, remove the drive belt. It's easy to find. It goes from the pulley, which is located on the drum, to the motor. Remove all wiring going to the motor and tank, and then the engine.
Shock absorbers and tank
To remove the tank, first remove the shock absorbers and springs. Unscrew the shock absorbers and remove the springs that hold the structure suspended. Pull out the tank itself.
How to replace and repair shock absorbers on a washing machine with your own hands: step-by-step instructions
heating element
The water heater is located on the back side at the bottom of the machine. To remove the heating element, unscrew the fixing nut in the center. Do you see the hairpin? Press it down until it fits inside. Take a flat head screwdriver, pry up the heating element and pull it out. Do everything carefully without damaging the part.
Instructions for checking and replacing the heating element - water heater of washing machines
Counterweights
These blocks are located at the front or back and hold the machine so that it does not dangle too much during washing. They are removed by unscrewing the long bolts on which they are attached.
Hoses and wiring
The first hose to be removed is the hose from the inlet valve. You will need pliers. Take them and bend the clamp that secures the hose. Then remove the hose itself along with the clamp.
Do the same with the hose going to the pressure switch: loosen the clamp, disconnect the hose, clamp and cuff. Also disconnect the hoses going to the tank.
With wires everything is also easy. Disconnect them by pulling them out of their respective slots.
Major breakdowns
Rinse or spin mode does not turn on
Before rinsing, the machine stops, starts draining water and displays an error. There are 2 LEDs blinking on the panel: above the button with the image of a clock and with the “lock” icon.
Error code F08 means the relay for turning on the heating element is stuck, a signal if there is emptying. Or the pressure switch is stuck in the “filling” position.
To resolve this error, you should check:
- pins of connector J3 on the board
- state of the reset switch by ringing it on the connectors
- wires connecting the transfer switch to J3 connectors
- the need to replace the pressure switch, control board or heating element
Most often, such an error code signals a damaged heating element, the main heating element. This part is easy to replace yourself and is accessible through the rear panel.
Water leakage
The presence of a leak indicates a hole in the rubber cuff sealing the hatch. If the cuff is not damaged, but water is leaking, you should clean the lower part of the door glass from the inside.
During operation, dirt accumulates in this place, worsening the contact between the glass and the rubber seal. To eliminate this problem, simply wipe the glass with a cotton swab dipped in nail polish remover.
Washing machines of the Wisl series provide additional protection for the housing against leaks.
The washing machine does not turn on
If the washing machine does not respond when you press the power button, you need to check the serviceability of the socket.
Disconnect the cord plug from the outlet and plug in any other electrical device, for example, a table lamp. If the outlet is working properly, you need to visually inspect the power cord for damage.
A complete failure of the machine to operate may indicate a malfunction of the electronic control module and requires specialist intervention.
If the machine turns on but does not start the washing program, you need to check that the door is closed tightly.
Various blockages
Blockages in the drain system are considered one of the main problems with Indesit washing machines. If the drain hose and filter are clogged, the machine stops draining water. If the model is equipped with a display, error code F05 is displayed on it.
Cleaning the filters yourself is not difficult even for those who do not have the skills to handle equipment. To clear the blockage, you need to open the bottom door on the front panel, lay rags on the floor or place a flat tray and pull out the catch filter, rotating it counterclockwise.
Garbage and small objects (coins, buttons, pins) accumulate here. After cleaning the filter, the unit is ready for use. This procedure is recommended to be done once every few months as a preventative measure.
Failure of parts
The Italian brand Indesit complies with European technical standards. Washing machines of this brand have vulnerabilities that you should pay attention to when operating and repairing the devices.
The following parts are subject to frequent breakdowns:
- Surge filter - can withstand operation for up to 4 years, often defective
- Heating element (tubular heating element) - made of stainless steel without coating, which leads to rapid scale fouling
- Electric motor parts - capacitors, trim and tachogenerator sensor
- Depressurization of the door seal
Experts consider replacing bearings to be difficult to repair due to the tank being welded tightly. Often, owners of the Indesit Wisl automatic machine contact the service due to blockages in the drain system.
Breakdowns occur due to improper connection of equipment, careless handling of the machine, or as a result of natural wear and tear.
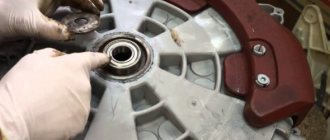
Bearings
A special feature of the Indesit washing machine is its lightweight, sealed tank. This is the weak point of the unit, due to which bearings often break. The design of the tank does not allow you to disassemble it yourself; it is better to contact a workshop where the tank will be completely replaced. This is an expensive operation, so sometimes it is cheaper to purchase a new device.
A number of Indesit models produced in Italy, Turkey and some other countries provide the ability to replace bearings. Only a qualified technician can determine whether the device can be repaired.
Control module
The electronic control module in Wisl series machines is highly reliable. It is equipped with an automatic protection system that is triggered if the operating requirements of the machine are not met.
The control module of the Indesit washing machine is sensitive to air humidity, drops of water entering the system or voltage drops.
In order to “please” the electronics, you should strictly follow the instructions included with the device.
If a module error code is displayed on the panel, you need to check:
- condensation on current-carrying circuits
- reliability of contact fastening
- presence of oxidations
- no blockages in the drain hose and filter
- accumulation of dirt on components and parts.
After eliminating inconsistencies with the program requirements, the machine can be restarted - many models support starting the cycle from the middle.
Electric motor
A commutator type electric motor is installed here.
The most common problems:
- Brushing of brushes. Occurs if you use the device too often. When starting the program, it does not start working, which indicates a breakdown of the main motor brushes. The parts are paired and must be replaced at the same time for correct operation of the motor.
- Peeling of lamellas on the collector. The lamellas peel off most often in old devices when the brushes rub them into holes.
- Break or interturn short circuit in the rotor and stator windings. If there are any signs of winding burning, the motor must be completely replaced.
Electric motor failure is also determined by the lack of rinsing and spinning. If the washing machine heats the water and washes, but when moving to the final modes the engine starts to turn idle, this means that the engine is broken and must be replaced.
Shock absorber and dampers
The shock absorber is an elongated device, inside of which there is a piston with a return spring. They serve to reduce drum vibrations.
Dampers are devices similar to shock absorbers, they differ in the absence of a return spring. Dampers are installed in new models of washing machines.
If the tank knocks during washing and vibrates with a hum, it is worth checking the condition of the shock absorbers. The lack of lubrication in them is indicated by the characteristic creaking and tight rotation of the drum.
Some washing machine owners save on parts by replacing the rubber insert in the old shock absorber. This method does not guarantee correct operation of the device; it is better to purchase a new working shock absorber.
water pump
The pump is part of the drainage system of the washing machine and performs the important function of pumping water out of the tank. This part experiences the greatest loads and can quickly fail. You can determine if the pump is faulty by hearing.
Signs of pump failure:
- When draining water, the pump makes a loud noise, but no water flows into the tank.
- Pump doesn't work
Before changing the pump, you should make sure the drainage system is clean. Inspect and, if necessary, clean the drain filter, hose and drain pump impeller. Find out if there are any foreign objects in the system.
If the above measures do not help, the pump must be replaced.
Water supply problem
If problems arise with the water supply, you need to check the presence of pressure in the tap, and then inspect the inlet hose and its filter.
The washing machine does not fill with water well
If the pump does not fill the tank with water, this may indicate a clogged filter in the fill valve. You should turn the unit away from the wall and unscrew the drain hose from the rear panel. Using pliers, pull out the fill valve filter and then rinse it well under running hot water. If necessary, clean with a brush.
The washing machine does not fill with water
If the washing machine does not fill with water, you need to check:
- connecting the inlet hose to the tap
- hose for kinks and kinks
- tap water pressure
- water supply tap open/closed
- pressing the "Start" button
If you suspect a blockage, you need to turn off the water supply to the washing machine, unscrew the inlet hose, direct it into the basin and resume the water supply. This will allow you to rinse it free of debris.
It is recommended to check the inlet hose at least once a year and replace it immediately if there is any suspicion of a leak. Do not install used hoses.
The supply of washing powder is interrupted
If the powder does not pass through the washing machine, and water flows out of the tray where it is poured, this indicates a blockage.
To solve the problem, carefully pour a small amount of boiling water into the tray. A similar problem occurs when using poor quality washing powder or too low pressure in the pipe that connects the tray and the tank of the machine.
As a result, a dense powder plug is formed, which prevents water from entering the tank. Periodically it is worth rinsing the cuvette itself under running water.
Recommendations from professionals
- Before disassembling, check again whether the water supply is stopped and whether the device is turned off from the network.
- There are many plastic parts in the machine that are easy to damage. Make sure that they do not break during disassembly.
- Take photographs of each dismantling step so you don’t forget the sequence later during assembly.
- Another way to help yourself during assembly: use felt-tip pens to mark the parts that you remove at a particular stage. You can write the number on the part itself, you can put it on a sheet (or sheets) of paper and sign the stage number next to it.
Preservation of the machine
It is necessary to understand that there is always water inside the washing machine, and if it is not drained, when tilted or jumping during transportation, the liquid will easily get on the wiring or electronic board. The consequences of such moisture are sad, so it is better to carefully “preserve” the machine. To do this we do the following:
- We place the prepared containers behind the machine below the waterline, and spread the prepared rags around, be prepared for the water to spill and splash;
- we check whether the water supply valves are closed; it is worth considering that you can easily turn the switches to the open position by accident;
- wait about a minute after closing the valves for the pressure in the hoses to normalize;
- remove the clamps on the inlet hose from both sides, lower it into a bucket or basin and drain the water.
To unscrew the hoses, you need to rotate them clockwise, and if this is difficult to do, use a flat-head screwdriver, wrench or pliers. Plastic nuts can only be removed by hand.
Attention! When using tools, we control the pressure force, since excessive force can easily strip the thread and damage the nut.
We repeat the procedure with the drain hose. There are several variations here depending on the existing drain. This could be a connection to a sink siphon, a hole in the floor, a public water supply, or a sewer built into the wall. The main thing is to turn the switch, turn off the water, loosen the clamp (if there is one, then the rubber gasket) and remove the hose. You can leave the machine alone and let it dry. During this time, pour out the drained water and wipe the floor dry. To avoid slipping when further preparing the washing machine for moving.