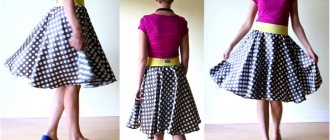
A skirt with an elastic band is considered the simplest option for processing a skirt waistband. Most often, this treatment is used for floor-length skirts made of light summer fabrics. Such a belt is suitable for a circle skirt, a circle skirt, and especially for a children's skirt.
In this article you will learn how to sew a skirt with an elastic band with your own hands, how to make a simple pattern for a “Tatyanka” skirt, as well as several ways to process a belt with an elastic band.
In this video you will learn how easy it is to make a skirt pattern for a girl directly on the fabric. The technology of sewing a children's skirt with an elastic band instead of a belt is also shown.
Elastic belt options
The elastic band can be inserted into the belt in a circular manner. You can sew a wide elastic band in a circle using a zigzag, then there is no need to make a belt at all. You can even insert pieces of elastic into the waistband. But this method is used when sewing skirts for overweight women. Two pieces 20-25cm long are inserted into the belt in the area of the side seam through two sections left “unclosed”. Then they are sewn with a finishing stitch. This method is very useful for those who have to constantly sit at the table. Short pieces of elastic will stretch and you won't feel the belt cutting in. However, let's return to the topic of the article and see how you can make a skirt with an elasticated belt.
If the elastic is inside the waistband, then when creating the pattern you need to take this into account and cut out a double-width waistband plus allowances for hems and seams. You also need to take into account that a skirt with an elastic band always has a slight gather at the waist, and therefore the belt should be slightly larger than the waist. The rubber band inserted into it should compress it slightly. That is, the length of the belt should be at least equal to the measurement of the volume of the hips, otherwise it will simply be impossible for you to wear such a skirt.
Another version of a skirt with an elasticated belt, when the belt does not open, and the double width of the belt is simply added to the waist line of the skirt pattern, plus a hem. This option is ideal for a Tatyanka skirt and is most often used when sewing simple skirts for girls.
Video on how to make small gathers on fabric using a straight stitch on a sewing machine.
How to sew an elasticated belt for a skirt?
The belt is not necessarily made of elastic tape. It can also be sewn from a strip of fabric, and only then insert a regular elastic band.
Important! Since the skirt will be without a fastener, its length should be equal to the circumference of the hips, otherwise you simply will not be able to wear your creation.
Here is a simple procedure for sewing an elastic waistband for a skirt:
- Cut a strip of fabric, the length of which is equal to the circumference of the hips, the width is twice the width of the future belt, plus 1 cm allowances on all sides.
- Fold the strip right side out, aligning the long edges.
- Iron the fold.
- Fold the allowances on the long sides inward and iron them too.
- Sew the workpiece into a ring along the wrong side.
- Place the top section of the skirt between the allowances and baste.
- Sew the waistband close to the edge with a finishing stitch.
- On the wrong side, make a hole for the elastic and overcast it.
The elastic is located inside the skirt's waistband
This photo shows how to prepare the hem of a skirt's waistband before inserting the elastic. And this is exactly the case when the belt is not cut out separately. The hem is simply ironed, basted and a finishing stitch is given along the wrong side.
An elastic band is inserted into the section of the belt left “unclosed”. It is best to use a large safety pin for this operation.
This photo shows how to make finishing stitches along the waistband. But you don’t need to do this, especially for a skirt made of such dense fabric. The elastic will definitely stretch and the belt will become too loose. As a last resort, such stitches can be given on skirts made from light and airy fabrics. It is best to make perpendicular fastening stitches along the waistband in the area of the side seams. And if the fabric is colorful, then you can additionally give them in the center of the front and back halves of the skirt. Then the elastic band will not “shrink” in the waistband, because this is precisely why finishing stitches are made along the waistband with an elastic band.
If the belt is cut, then its processing is approximately the same. First, the belt connected together is stitched. Then the seam allowance is ironed up and a stitch is given. In this case, the stitching should be done along the front side, focusing on the line of sewing the belt.
How to make a one-piece belt with a wide elastic band for a children's skirt or pants.
Skirt with elastic tulle
An original skirt with elastic can be made without any seams at all. For this you will need tulle. It is cut into strips 10-15 cm wide and a length equal to twice the length of the product. There is no need to leave any allowances, the main thing is to cut it evenly, but this is quite easy, since the fabric has a mesh structure.
Operating procedure:
- Sew the belt into a ring.
- Fold the tulle strip in half.
- Tie it to your belt with any knot you know.
- Tie the remaining strips in the same way, placing them close to each other.
The elastic is sewn to the skirt separately
A very popular version of a skirt with an elastic band, when instead of a belt, a wide elastic band connected in a circle is adjusted. Such a belt can be used not only for popular floor-length skirts, but also for short and fitted models, almost office options.
In appearance, this is not at all difficult to do, you just need to have a sewing machine with a zigzag. In fact, when sewing such a skirt, you will encounter many surprises. The first of them will be that the sewing machine will be capricious, skip stitches, loop, and even break the thread. But now we won’t figure out how to set up a sewing machine. Let us only note that setting an elastic band for a sewing machine is considered an extreme case, because it is not fabric, but half rubber. See Sewing knitwear without skipping or looping.
The second problem that inexperienced seamstresses have is that the gathering under the elastic along the skirt will be uneven. This is where you can give advice. When you connect the elastic band in a circle into one whole, divide it (in an unstretched state) into four equal parts, maybe more. In the same way, divide the skirt panel into four equal parts (side seams, center front and back). Naturally, you need to carefully place marks on both the elastic band and the skirt. Now, when you adjust the elastic to the skirt, align these marks and distribute the fabric evenly. Just when sewing with both hands, pull this piece of elastic along with the fabric. The marks can even be pinned together.
It is also necessary to mention that the upper section of the skirt must be overlocked with an overlocker, and the seam allowance must be marked on the fabric with chalk or a pencil. Apply the edge of the elastic to this line.
Constructing a straight skirt pattern.
How to sew a pleated skirt with elastic?
Beginning needlewomen are often scared off by folds. This seems incredibly difficult. In fact, sewing such a skirt is not much more difficult than a straight one. If desired, you can even make pleating if you try hard enough. The most important thing is to calculate the amount of fabric and mark the folds:
- Determine how many pleats you need.
- Measure your hips.
- Add the allowance to this measurement.
- Divide the result by the number of folds - this will be the width.
Important! For such a skirt, of course, you will need a cut of 2 lengths of the product with a width of 140-150 cm.
The belt is sewn on. It is an elastic band or a strip of fabric folded in half with an elastic band inserted into it. The first option is more convenient in many respects.
The skirt consists of two identical panels. It is better to cut directly on the fabric. If you fold the cut in half lengthwise, it will be more convenient to work:
- Set aside an allowance from the top cut and draw a perpendicular line to the edges.
- From this line, set aside the length of the product, draw another perpendicular to the entire width of the cut.
- Set aside hem allowance.
- Mark the second panel in the same way.
Assembly
Start by stitching one of the side seams and finishing the allowances if necessary. Then mark the folds - divide the upper cut into equal sections, their number equal to the number of folds:
- Fold the panel like an accordion and place a basting stitch along each fold.
- Sew the second side seam.
- Sew the elastic tape into a ring.
- Baste it to the top of the skirt, stretching it slightly.
- Sew the waistband using a zigzag stitch.
Important! Folds can be ironed immediately.
Tatyanka skirt pattern
The site has a number of articles on how to make patterns for a skirt. There is a pattern for a circle skirt, a pattern and technology for sewing a circle skirt, and, of course, a pattern for a regular straight skirt. All these materials are copyrighted and provided by a professional technologist and teacher. Use them if you want to not only learn how to sew a skirt with an elastic band, but also create a pattern for the skirt models listed above.
In this same article we offer you a pattern for the simplest skirt, the “Tatyanka” skirt. Despite the “age” of this skirt model, its popularity does not fall, and one of the reasons is the simplicity of the pattern and sewing. We didn’t even begin to draw the pattern as expected, we’ll just explain to you the diagram of its construction, and you will see for yourself that no construction on paper is required.
Fold the fabric in half (edge to edge) with right sides facing in. Pin the edge together just in case. Next, set aside the length of the skirt, not forgetting the hem allowance for the hem (4-6cm) and the seam allowance for the waistband (1-1.5cm). Step back to the left of the fold line of the fabric and set aside the half-girth of your hips. Draw a vertical line from the waist to the bottom of the skirt. Now look at the diagram. The inscription “+ folds” means that this section (doubly) will be used for gathering or folds. Decide in advance how much extra fabric you will need for folds or gatherings, and set this distance from the vertical line to the left. All that remains is to outline where the belt will be cut. In this diagram it is placed at the top (along the shared thread). But you can place it differently, on the side of the skirt. Of course, if you still have a big lunge. It is not necessary to follow the rule of fractional direction when sewing a skirt with an elastic band. This way you can save an extra 10 cm of fabric.
Now you know how to make a simple skirt pattern and you can start cutting and sewing a skirt with an elastic band yourself.
Please note that the site contains information not only about constructing patterns for various models of skirts (sun skirt, half-sun skirt, straight classic skirt, etc.), but also a lot of information on processing and sewing skirts.
Video on how to make a counter pleat for a skirt.
“Tatyanka.” Master Class
How to sew a Tatyanka skirt with an elastic band instead of a belt? Perhaps this is the simplest DIY elastic skirt. One or two seams, fold the bottom and top, insert an elastic band - that’s the whole science. However, even such a simple skirt can have a top that can be decorated in different ways:
- on a wide elastic band;
- on the drawstring;
- on a sewn-on belt with an elastic band inserted into it.
Important! The cutting will be the same, but in the first and third cases, a minimum allowance is left along the upper cut to sew on a wide elastic band or a belt sewn separately, and in the second, double the width of the drawstring and an allowance must be added to the total length.
Fabric calculation
A do-it-yourself summer skirt with an elastic band is made from one or two parts, depending on the width of the cut and the circumference of the hips. First you need to take a few measurements:
- hip girth;
- waist circumference;
- product length.
Hip circumference is measured by the most protruding parts of the body - the buttocks and pelvic bones. In this case, great precision is not needed, since the skirt will be quite loose.
Important! This measurement, like the length of the product, is needed in order to determine the amount of fabric.
There are several options:
- If the hip circumference is less than the cut width and you want a not very wide skirt, one length is enough, plus 10-15 cm for the drawstring and hem.
- If the hip circumference is greater than the width of the fabric, you will need 2 lengths, plus 20-30 cm for processing.
- A cut in two lengths of the product will also be required if you want to sew a very full skirt or make folds.
Important! A skirt made of gauze is sewn in 2-3 layers, and accordingly, the material consumption increases.
Direct “Tatyanka”
The number of gathers and folds in this case will be minimal. Cutting such a skirt is extremely simple:
- Fold the cut in half, aligning the edges.
- Decide where the top will be and where the bottom will be, and from the top cut, set aside an allowance for the hem of the drawstring and the width of the drawstring.
- Draw a line perpendicular to the edges across the entire width of the cut.
- Set aside another width of drawstring and draw a line parallel to the previous one.
- From this line, lay down the length of the product along the edge or along the fold.
- Draw another line perpendicular to the fold.
Assembly
This skirt has only one seam - it can be located at the back or side. If the fabric is slippery, it is better to sweep it or pin it. The further procedure will be as follows:
- Sew the main seam.
- Iron the seam allowances and overcast them (by hand or with an overlocker).
- Fold the drawstring allowance to the wrong side and iron.
- Fold the upper part of the drawstring to the wrong side and iron it too.
- Sew the drawstring.
- Make a hole in it from the wrong side and overcast it.
- Fold the bottom of the skirt by 0.5 and 1 cm, hem it with a blind seam or stitch it.
- Insert a regular elastic band.
Lush “Tatyanka”
To sew a fluffy skirt with elastic, you need to take more fabric. This tatyanka is cut almost the same way as the previous one, only there will be two seams, and it is better to place them on the sides.
Important! If you leave edges, there is no need to overcast the seam allowances.