A skirt is a waist-length product, the supporting points of which are the waist and hips. The model, the belt of which is replaced with an elastic band, has a loose fit and is comfortable to wear thanks to the stretchability of the rubber threads. Due to the indifference interval along the waist line, which reaches one size, convenience and variability are achieved. You should figure out step by step how to properly sew an elastic band to a skirt, replacing it with a stitched belt made from the main fabric.
cottonandcurls.com
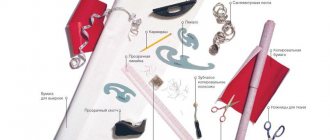
Materials and tools
- Fabric the size of the length of the product with processing allowances for a fabric width of 140-150 cm. For a circle skirt no more than 60 cm long, 160 cm of fabric is needed, since the consumption is 2 lengths + 2 recess radii. When the length is greater than the width of the fabric folded in half, it is necessary to process the side seams, which increases material consumption.
- Elastic braid with a width of 3 cm and wider. Rubber bands are available in plain and decorative colors. The length is approximately equal to the waist circumference. Strong tension on the elastic in the sock is not required.
- Centimeter tailor's tape for measuring and working with the pattern.
- Cutting scissors and pins.
- Sewing threads to match the fabric.
- Sewing machine with decorative wide stitch function.
blogspot.com
Elastic belt - figure decoration
Fashion designers believe that the innovation, which came into fashion several years ago, really slims and beautifies the figure. Most often, this new item is sewn on flared items, for example, on a circle skirt or tatyanka.
But a pencil skirt that “fits” exactly to your figure will look no less original.
Experienced dressmakers can make a pattern according to the recommendations of Anastasia Korfiati, where there is a subgluteal dart , which so beautifully highlights seductive shapes, and also ensures a perfect fit.
Before you start sewing elastic to flared items , choose a wide elastic that is 2-3 cm larger than your waist size. The belt will have to be shirred a little. It is better to sew with a zigzag.
But on a straight-style , you won’t have to shirring, especially if the material has poor stretch or lacks stretch. In the end result, you may be disappointed by unnecessary folds. Therefore, the elastic must be selected according to the size of the waist, and even novice dressmakers can sew it on.
A pencil skirt can be made with or without a zipper, as you like. If you do not sew in a zipper, the fabric must stretch well, otherwise you will not be able to put on the finished product. Good stretchy knitwear is suitable for this.
And now the sequence of your actions.
- Tailor the product according to the patterns of a regular straight skirt, adjusted to your measurements.
- Sew the middle and side seams, leaving space for the zipper and vents.
- Finish the edges with a zigzag.
- Cut the ribbon and finish the edges by hand or with a zigzag stitch.
- Baste the elastic to the top of the skirt.
- Sew with a double needle or make two neat seams at the very edge.
- Sew on a zipper. First, cut it to the “dog”, process the edges by hand or bend it and sew it tightly to the zipper material.
- Sew on a zipper.
- Process the reverse side by hand.
The color of the belt is matched to the color of the dark stripe or tone on tone, as in the photo.
Fabric selection
There are various styles of skirts, the belt of which can be decorated with braid. The choice of fabric depends on the silhouette and design of the model. For a flared skirt, choose lightweight fabrics with good drape. This means that the fabric easily forms beautiful flounces and gathers into small folds. It can be either natural, with the addition of artificial fibers, or completely synthetic. A skirt with an elastic band is usually full in shape, so adding elastane, which gives the product a good fit, is not required. For midi and maxi length models, synthetic or silk chiffon, mesh tulle or tulle are suitable.
If the composition contains fibers of natural origin, cotton, linen, it is necessary to decate the fabric before cutting. Moisten the surface of the material with a spray bottle or iron steam and iron the fabric.
How to sew an elastic band to a skirt instead of a belt: choosing a skirt style
An elastic band instead of a belt is a godsend for beginning craftswomen. Sewing it is simple and quick, the skirt immediately becomes complete and turns out very stylish. You can wear straight or wide skirts with elastic.
Skirt styles
It can be:
- Tatyanka;
- Sun;
- half sun;
- skirts with different hem lengths.
The fabric for such products can be absolutely any. If you choose a strict straight version made of dense, non-elastic fabric, you will have to sew in a zipper. The remaining options provide for the absence of an additional fastener. Such a skirt is always convenient to wear, put on and take off.
Advice! A wide elastic belt will emphasize a narrow waist. But the elastic band can be quite narrow. It depends on your preference.
Today, fluffy tulle skirts with elastic are popular. Making them yourself will not be difficult even for those who are good at sewing. The skirt is cut like the sun in several layers or in one layer of tulle with a lining of denser fabric. The elastic is sewn according to the description given above.
Skirt design
To calculate the design of a model cut on the bias, it is enough to measure the waist circumference and the length of the finished product.
blogspot.com
- Prepare paper, pencil, long ruler. The silhouette pattern is built on paper or directly on the material.
- From the left corner, set aside the waist length measurement + 2 cm, divided by the number 6.28.
- Draw an arc to the perpendicular side of the paper. To control, measure the resulting arc with a measuring tape placed on the edge: its length should be ¼ of the waist measurement.
- Place the desired length of the product down from the arc.
- Bring the arc of the bottom edge to the perpendicular edge of the paper and cut out the resulting pattern.
- Fold the fabric lengthwise, creating four layers. Lay out the pattern and add seam allowances.
- Cut out a solid part of the product without side cuts. When unfolded, you should get a full circle with a hole, the length of which is equal to the length of the waist.
blogspot.com
Sew the part to the product
Let's take a closer look at how to sew an elastic band into the waistband of a skirt.
Note method
In this case, the tape is not sewn very tightly, but only to create folds. To sew an elastic band into the waistband of a skirt, you must follow this algorithm:
- Draw a line with chalk or pencil along which our element will be sewn.
- Find an elastic band of the required length, wrap it around your waist so that it does not squeeze it, but presses it, cut off the desired length.
- Divide this segment in two: one half is sewn to the front of the product, the second to the back.
- Divide the sewing line into certain sections that will be convenient to hold with two fingers.
- Transfer the marks to the part that has already been pre-tensioned.
- Sew the marks on the tape to the marks on the waistband.
- Stitch it stretched along the intended line. This can be done using a regular stitch or a zigzag stitch. After one section is stitched, the machine needs to be stopped, then pull on the next section and continue sewing the elastic tape in this way.
Zigzag method
This course of action is the simplest and fastest. You can even sew a belt to a skirt with an elastic band by hand, because the zigzag seam is not so difficult to make.
Important! In this way, you can sew both elastic tape and thread. This method is good because any elastic component will be sewn evenly, regardless of its width.
In order to do this, you must follow this algorithm:
- Wrap the thread or ribbon around the waist and cut to the desired length.
- Cutting the piece in half is a sample elastic band.
- Sew a wide zigzag seam behind the edges of the long piece so that it can be easily moved under this seam.
- Try the sample on the elastic under the seam, making two marks on it where the edges of the sample are.
- Pull the edges of the element until the marks are close to the edge of the product. This tension will be the most comfortable for you.
- Fix the marks, that is, sew them with your own hands to the edges of the skirt with several stitches - they must be strong.
The required part is sewn on. This procedure is easy to perform both mechanically and manually.
Rocker method
In order to sew a wide elastic band into the waistband of a skirt using the drawstring method, you should follow the following procedure:
- Use a measuring tape to measure the line along which the elastic band will be sewn.
- Measure a strip of material the same length and leave seam allowances on it.
- Sew the drawstring to the line where the elastic will be sewn, thread the prepared part into this “tunnel” - this can be done using a safety pin.
- Secure the sewn element on both sides.
Skirt assembly steps
- Overlock or zigzag the top edge of the skirt to protect it from fraying.
- Prepare the elastic: wrap the tape around the waist to determine the length, stitch the short edges, press them flat and fix them flat.
- The result is a flat belt with clean edges.
- Place the elastic band with the wrong side on the right side of the top edge of the skirt.
- Distribute the length of the braid and the top edge evenly, pinning it perpendicular to the cut. Pins placed in this way can be left under the sewing machine needle.
- Stitch the elastic on the machine using any type of stitch, stretching the tape evenly under the presser foot. A zigzag stitch or any wide decorative stitch will additionally securely secure the braid and the inner cut of the fabric.
- The finished top cut looks evenly placed on the elastic band.
- An important step in making a skirt cut on the bias is the foundation of the hemline. Place the skirt on a mannequin or figure. Specify the hem line, which will deform under its own weight, especially in the 45-degree sections of the cut. Trim sagging areas.
- One option for processing the bottom: overcast the open cut, iron it 0.7-0.75 cm to the wrong side.
- Topstitch the edge using a straight stitch machine. Depending on the fabric, another hemming method may be chosen.
- The circle skirt with an elastic belt is ready.
The elastic is sewn to the skirt separately
A very popular version of a skirt with an elastic band, when instead of a belt, a wide elastic band connected in a circle is adjusted. Such a belt can be used not only for popular floor-length skirts, but also for short and fitted models, almost office options.
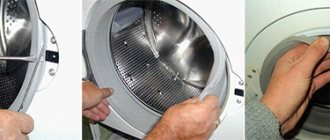
In appearance, this is not at all difficult to do, you just need to have a sewing machine with a zigzag. In fact, when sewing such a skirt, you will encounter many surprises. The first of them will be that the sewing machine will be capricious, skip stitches, loop, and even break the thread. But now we won’t figure out how to set up a sewing machine. Let us only note that setting an elastic band for a sewing machine is considered an extreme case, because it is not fabric, but half rubber. See Sewing knitwear without skipping or looping.
The second problem that inexperienced seamstresses have is that the gathering under the elastic along the skirt will be uneven. This is where you can give advice. When you connect the elastic band in a circle into one whole, divide it (in an unstretched state) into four equal parts, maybe more. In the same way, divide the skirt panel into four equal parts (side seams, center front and back). Naturally, you need to carefully place marks on both the elastic band and the skirt. Now, when you adjust the elastic to the skirt, align these marks and distribute the fabric evenly. Just when sewing with both hands, pull this piece of elastic along with the fabric. The marks can even be pinned together.
It is also necessary to mention that the upper section of the skirt must be overlocked with an overlocker, and the seam allowance must be marked on the fabric with chalk or a pencil. Apply the edge of the elastic to this line.
Constructing a straight skirt pattern.
Options for skirts with elastic
There are other technology options for sewing an elastic band to a skirt instead of a belt. For example, in a tulle model, the belt is made of knitted elastic fabric folded in half. This is how the mesh sections are edged and closed.
If the skirt has a lining, then the belt is sewn from the face, and the wrong side is closed with a cover seam or trimmed with trim.
If you are wondering how to sew a wide elastic band with a decorative edge, use the basic principle of stitching the braid, placing it on the front side of the top edge of the skirt.
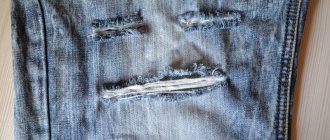
The elastic is located inside the skirt's waistband
This photo shows how to prepare the hem of a skirt's waistband before inserting the elastic. And this is exactly the case when the belt is not cut out separately. The hem is simply ironed, basted and a finishing stitch is given along the wrong side.
An elastic band is inserted into the section of the belt left “unclosed”. It is best to use a large safety pin for this operation.
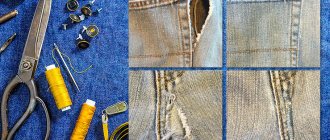
This photo shows how to make finishing stitches along the waistband. But you don’t need to do this, especially for a skirt made of such dense fabric. The elastic will definitely stretch and the belt will become too loose. As a last resort, such stitches can be given on skirts made from light and airy fabrics. It is best to make perpendicular fastening stitches along the waistband in the area of the side seams. And if the fabric is colorful, then you can additionally give them in the center of the front and back halves of the skirt. Then the elastic band will not “shrink” in the waistband, because this is precisely why finishing stitches are made along the waistband with an elastic band.
If the belt is cut, then its processing is approximately the same. First, the belt connected together is stitched. Then the seam allowance is ironed up and a stitch is given. In this case, the stitching should be done along the front side, focusing on the line of sewing the belt.
Sewing a circle skirt
It’s better to start work by sewing a belt.
Connect the waistband and lining piece and fold the seam allowances from the two long sides of the waistband to the wrong side, securing the folds with an iron. Fold the waistband lengthwise, right side inward, and secure the fold with pins.
Machine stitch the edges on both sides and then turn the waistband right side out.
Hem the bottom of the skirt using a stitch that matches your fabric. You can, for example, process the edge of a skirt using an overlocker or fold the fabric twice.
Iron the bottom edge of the skirt and begin working on the waistband.
Apply a seam to the skirt piece at a seam allowance distance from the edge of the fabric. It will help you navigate when sewing on the belt. At this point you can sew the back seam, leaving a slit for sewing in the zipper.
Fold the edges of the cut and secure them with a machine stitch.
Sew on the belt
Pin the belt to the top edge of the skirt so that the fabric is located between its halves. Sew the belt to the skirt.
All that remains is to sew a zipper into the skirt, having previously secured it with pins.
Fashionable DIY skirt? It's simple!
You need to start the process of making a simple-cut skirt by creating a pattern. This model does not have a fastener and consists of 2 pieces of fabric. You can sew the product in a couple of hours. It is recommended to take a fabric that will stretch in the transverse direction. Knitted materials with medium elasticity are ideal.
The A-line skirt model does not require the waist line to be made with great precision, so a simplified method is used to construct its pattern. If your figure is close to the average parameters and clearly corresponds to the size, making the pattern will be very simple. As an example, let’s take a skirt with a length of 40 cm, a hip circumference of 96 cm, and an increase in fit at the hips of 4 cm, but you can take more. Now it turns out that the volume of the product at the hips will be 100 cm. In order to complete the pattern drawing, you need to take ¼ of this value, that is, 25 cm.
First you need to build a simple mesh. Mark the bottom line on paper, and from it the length of the skirt will go up - 40 cm, then the waist line, and 20 cm below it the hip line. The side vertical line will be located 25 cm from the center line of the fabric cut.
When the net is ready, start building the side line. The skirt needs to be made slightly flared; to do this, tilt the side line slightly. Determine the size of the slope yourself, depending on how fluffy the skirt you want to sew. To create a side line, reduce the waist line by 4 cm, while the hip line should remain unchanged. Draw a straight line through 2 points, as a result the bottom line will expand.
In the example, it increased by 4 cm; for a longer skirt the increase will be greater. You should only reduce the waist by 4 cm if you are sewing a product from elastic fabric, otherwise a fastener will be required. Before starting work, it is recommended to check your fabric for stretchability.
Next you need to build a line for the bottom of the product and the waist. On the skirt pattern, the waist line should intersect with the side line and form a right angle with it. To simplify the process, take a right triangle and use it to draw a perpendicular to the side line, which starts from the waist line. In the same way, position the bottom line of the product. Measure the length of the skirt along the side and center lines. The resulting sizes must match, discrepancies along the side line plus 1 cm are allowed. Now measure your waistline and multiply the value by 4, and then compare with your waist circumference. The size on the pattern should be larger.
Outline the lines of the waist and bottom smoothly, smoothing the corners in the central part. This creates a pattern for the front part of the product with a fold located in the middle. The back of the skirt is cut using the same pattern. When laying out a paper pattern on fabric, do not forget to allow seam allowances of at least 1 cm, but it is better to leave 1.5 cm.
Options for laying out patterns on fabric:
- If the fabric has a large width, you can get 2 solid parts. For such a case, use the 1st layout method. Fold the fabric with the edges into the middle and place the center line at the fold. Both parts will be folded and will only need to be sewn along the side seams.
- When the width of the fabric is insufficient, you have to make the back of the skirt from 2 halves and make a middle seam. The fabric needs to be folded with the edges to the right and the paper pattern placed on it.
- This method of making a paper pattern for a skirt is perfect for cutting linings for flared skirts of any model. When sewing, you need to place folds at the waist line so that the top cut of the lining coincides with that of the skirt. If the skirt has a fastening at the back, the lining should be cut with a back seam.
- Before sewing on the elastic, you need to prepare the skirt. After you have folded your fabric and pinned the pattern to it, make seam allowances and carefully cut out the 2 pieces. Then start grinding them down. Place the pieces on top of each other with the right sides facing inward and pin together with safety pins, baste the pieces along the side seams with a basting stitch. If you want to make a lining, cut it in the same way from another fabric, but make it a little smaller.
- Sew the details of the skirt using a sewing machine along the side seams, sew 2 parts of the lining. Match the waistline of the skirt and its lining. If the skirt is larger, carefully gather it in so that the top edges match the lining. Machine stitch at a distance of 0.5 cm from the top edge. Finish the free top edge by hand or with an overlocker.