Why does the sole crack?
The base of shoes is often exposed to slush, frost, rain and chemicals. Due to mechanical loads, deformation occurs. Therefore, when making soles, special requirements are placed on the choice of material. It must be durable with maximum resistance to humidity and temperature changes. Products made from polyvinyl chloride are considered less elastic, so cracks appear during strong bending.
The next reason that the sole cracks is thickness. Very often, manufacturers use microporous rubber. If it is of poor quality, then after a couple of socks the first damage will appear. Also, the sole is made of polyurethane, which is prone to destruction. This can happen even if the shoes have not been worn.
The most common reason is various mechanical damage. While walking, a man stepped on a sharp object, and after a while a crack appeared. If you do not take any action, then dirt, dust and chemicals gradually accumulate in the fractures. The crack will get bigger each time, and eventually the shoes will become unusable.
Causes of cracks
The basis of the shoe is its sole. That is why special requirements are placed on it. According to operating conditions, the sole must be durable, sufficiently flexible, comfortable and stable. But despite this, it is often deformed.
There are several reasons why the sole of a shoe breaks.
Poor quality materials
The cause of deformation of the base of the shoe can be loads. For example, some people have the habit of squatting. Frequent intense bending may cause the sole to crack.
Is it possible to return shoes to the store if the warranty has not expired?
When a person buys shoes, he hopes that they will last at least one season, but in practice the situation is a little different. The reason for the unsuitability of the product may be a manufacturing defect. Things are always covered by a guarantee, so the buyer can return the shoes to the store, exchange the goods or return the money according to the law.
The guarantee is established in accordance with the requirements of the current law.
Also, according to the law, in 2021 the buyer has every right to obtain information about the manufacturer of the product.
The following information may be requested:
- address;
- product name;
- Work mode;
- availability of state registration.
Prevention
The sole does not have to be restored if the shoes are used carefully. To extend the life of your favorite model, you need to take preventive measures. They are as follows:
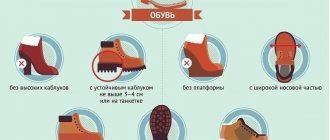
- To avoid abrasion of summer models, you need to glue outsoles to their base. For a sedentary lifestyle, stickers 1 millimeter thick are considered the best option. For frequent walking on asphalt, it is better to give preference to two-millimeter rolls.
- It is recommended to install protection with high wear-resistant and thermal insulation characteristics on winter shoes. Such measures will also prevent slipping on a smooth surface in icy conditions.
- To prevent moisture from getting into the seams of demi-season shoes, their soles must be treated with water-repellent aerosols for shoes. A budget option is castor and linseed oil.
In most cases, the soles of shoes crack due to lack of proper care. Regardless of the type of model, all wet products must be dried in a timely manner. In this case, the use of heat sources is not allowed. It is better to let the boots dry on their own at room temperature. Shoes also need to be cleaned regularly to remove dirt and dust. However, it is strictly prohibited to wet the products excessively.
Knowing the reason why the sole of a shoe burst and how to restore it at home, you can solve several problems at once. Firstly, no longer make the mistakes that led to the deformation of the product. Secondly, by carrying out repairs yourself, you can save a lot.
To avoid abrasion, you need to stick on the outsoles
Install anti-slip protection on winter shoes
Treat with water-repellent aerosols for shoes
Regularly clean from dirt and dust. Dry promptly.
What you need to buy for home repairs
To repair shoes at home, you should first purchase tools.
The following tools will be required:
- shoe knife;
- degreasing agent;
- sandpaper;
- awl;
- special glue;
- a piece of rubber or hard leather;
- household matches;
- shoe hook;
- pencil;
- heavy weight for quick gluing;
- nylon threads.
It is advisable to carry out repairs in a room with good ventilation, and also to be away from heat sources.
How to properly seal a broken sole
Repairing a broken sole can be done in several ways. The choice of one of them depends on the nature of the damage and its location. In most cases, shoe repair specialists use the classic method.
- The boot is bent and all the debris is removed from the opened crack.
- The defect site is treated with sandpaper.
- The edges of the crack are degreased.
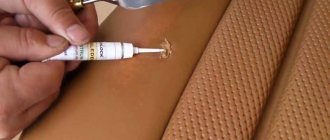
- A small amount of glue is applied to the rupture site.
- Press the product and wait until the adhesive dries.
- To give greater strength, stitch the crack with nylon thread.
How to repair shoes if the sole is cracked
There are many options for restoring a damaged product. The simplest solution is to glue a piece of rubber or other suitable material to the crack. But this method is not suitable for all types of shoes.
You can also glue the areas of the cracked sole with special glue. In this way, you can eliminate small cracks that are located near the heel. It is better in the part where there is the least load. The damaged area can also be replaced.
Classic renovation
This method is suitable for soles made of plastic rubber or polyurethane. No special skills or knowledge are needed here. The product must be glued and sewn properly.
Repairs are carried out as follows:
- Pour glue into the crack, which dries quickly. Press well.
- Draw a zigzag on the sole.
- Cut through with a shoe knife.
- Sew the cracks with short stitches along the slits.
- The edge of the nylon thread can be slightly scorched with hot fire.
Partial replacement of the damaged area with a patch on a smooth sole
If cracks appear, for example, on the soles of dress shoes.
Repairs are carried out as follows:
- Pour literally a couple of drops of glue into the crack and hold the sole under pressure for a while so that the glue sets well.
- The area requiring repair must be degreased. Acetone is suitable for leather material.
- The crack is treated with sandpaper.
- Next, the shoes are placed on the material of the future outsole, the shape of the sole is outlined, then the workpiece is cut along the line.
- Process the workpiece and get rid of irregularities.
- Apply glue to the sole in an even layer. In this case, it is recommended to use a spatula so that the product lies evenly (the same operation is carried out with a new heel), then dry the glue.
- Reapply the glue again, and only then glue the patch.
- Use force to press the patch. It is necessary to ensure that the material does not move from its place.
- Press down the shoes with a weight and leave for a day. The glue should harden.
Repair of high tread products
Shoe repair is carried out using the same method as on smooth soles. But instead of dense additional material, a small piece of rubber is used. The thickness of the patch should be less than the tread or at the same height. This method is suitable if the crack is longitudinal or transverse.
If the sole bursts
If the sole cracks after the warranty period, a more complex restoration option is required.
What will be needed for repairs
- Scotch.
- High-quality polyurethane glue.
- Soldering iron.
- Small spatula.
- Copper tip for a soldering iron (you can take any piece of wire that is suitable in diameter, since it will have to be thrown away after repair).
- Fiberglass mesh.
- Small brush.
- Acetone.
- Hair dryer.
Important! Buy polyurethane adhesive only from well-known brands, such as TEROSON. There are quite a lot of fakes on the market at the moment, so you need to be more careful when purchasing.
Advantages of polyurethane glue
You can use other types of glue, but we advise you to buy polyurethane as it has the following advantages.
- Good elasticity, so it will not crack when using the shoes.
- The glue has high tensile strength.
- The increased degree of adhesion allows you to repair any shoes.
How to fix a broken sole
- wash your shoes well to remove dust and dirt. After this, it must be dried thoroughly.
- Broken areas should be treated with cotton pads soaked in acetone .
- Next, you need to insert the tip into the soldering iron and turn it on, now wait 5-10 minutes for the tip to heat up well.
- Using a soldering iron , melt the sole material a little deeper. We will later pour glue into these recesses.
Attention! Be careful when creating indentations! There is no need to go deeper into the material than 5 millimeters. If you melt deeper, you can ruin your shoes.
- Wait for the shoes to cool and re-treat the areas with acetone . This is done to remove traces of your hands and dust from the soles. This way the glue will stick better to the material. At the end of the treatment, you should dry the shoes with a hairdryer .
- Using a brush, apply a 1 mm layer of glue into the recesses on the sole
. After this, wait 5 minutes so that the glue can dry a little. - Then cut a fiberglass mesh along the width of the shoe and glue it with glue . To do this, you need to apply 1 more thin layer on top.
- Then apply glue to the spatula and begin to fill the recesses . You need to leave about 2 mm until it is completely leveled with the sole.
- After this, lay down pieces of fiberglass, this is necessary to strengthen the repaired areas. A final layer of adhesive is applied over the fiberglass
. Be sure to level it carefully and remove any excess. - After 5 minutes, cover the areas to be repaired with tape
. This is done to prevent the glue from leaking out. - Now you can turn the shoes over and leave them in a warm place for 12 hours , only after that the glue will dry.
- Next, you should peel off the tape from the shoes and carefully inspect them. If the polyurethane glue has leaked in some places, cut it off with a utility knife.
At this point, the repair is completely completed, and you can use the shoes for a long time! Now you know how you can restore a damaged sole. We wish you good luck with the renovation!
Source
Video
Source
| Very often, shoe soles are made from low-cost raw materials. These are PVC, ethylene vinyl acetate and polyurethane. Such materials are elastic and weightless, but they have low performance qualities. |
| Domestic roads are littered with sharp objects. When you step on them, small cracks appear in the sole. With further use of the shoe, minor deformations grow, and a gap forms between the insole and the wedge. |
| Temperatures below 20 degrees, rain, snow, and dampness negatively affect the properties of the sole material. Therefore, it wears out faster, which subsequently leads to cracks. |
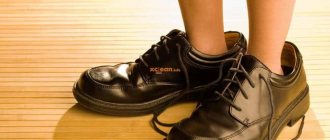
| If demi-season or summer shoes are chosen incorrectly, the heel becomes loose. This phenomenon leads to breakage of the instep support. When it is damaged, cracks first form on the sole, and then the product breaks. |