Ingredients for jellied meat
Jelly is a simple peasant dish; its spread was greatly facilitated by the order of Field Marshal Suvorov to include jelly in the soldier’s camp ration, undoubtedly to increase the utilization of cattle seized from the population for the needs of the army.
However, pigs were also confiscated, with pleasure. The gastronomic idea of jelly turned out to be attractive on Russian soil, but for a long time there were no special gelling agents, with the exception of fish glue - karluk, which was extracted from the outer shell of the swim bladder of sturgeon fish and was used mainly for gluing violins. It is clear that it was too expensive for culinary use and did not go beyond the prince’s mansions. However, from the collagen-rich parts of the carcass they learned long ago to cook aspic-lanspik and wood glue, which differed only in transparency. The rural population was content with a frozen broth of horns and hooves.
Now we have at our disposal a whole set of tools for jelly - gelatin, agar-agar, arrowroot, fillet, pectin, etc., but this solution seems unsporting for the people's favorite jellied meat - in the current production of thick meat jelly filled with boiled meat and more . The correct choice of suitable cuts and technology allows you to obtain a product that perfectly retains its shape at room temperature without the use of by-products. The composition of jellied meat in many cases is completely minimalist - parts of carcass and water. Salt and garlic.
The correct choice of suitable cuts and technology allows you to obtain jellied meat that retains its shape perfectly.
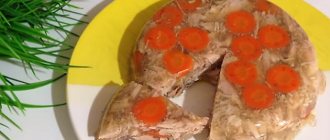
Decor
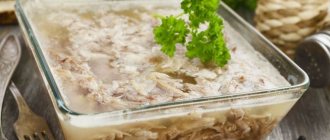
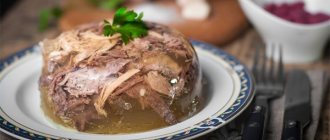
Jellied meat looks great on a holiday table, served in portions for each guest. The meat and broth for such jellied meat are poured and laid out in small portioned molds, and it’s a good idea to put decorations on the bottom of the mold: sprigs of greenery, mugs of carrots, half an egg, etc. When you take the jellied meat out onto a plate, the decorations will be on top.
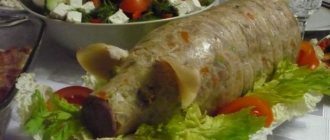
Jellied meat looks great frozen in a bottle; it can be cut into large circles, like a roll. To obtain such a round jelly, you need to pour the meat and broth into a plastic bottle with the top cut off and let the dish harden. Then pour hot water over the bottle and take out the jellied meat.
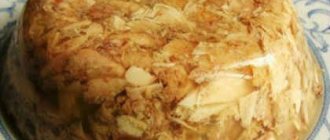
You can also use molds for cakes and pastries with ribbed walls for jellied meat - it will turn out beautiful and original.
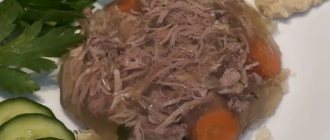
If you want to decorate the jellied meat, you can boil carrots and other vegetables separately; those that were boiled with the meat most likely have lost their marketable appearance.
How to choose meat for jellied meat
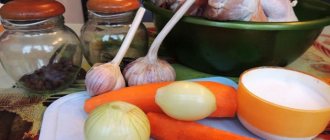
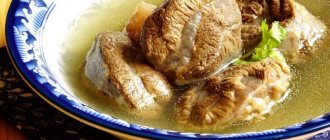
It is clear that not all meat is suitable for jellied meat. The first requirement is a high content of collagen, cartilage and connective tissue, and the presence of bones. The best answer to this is the so-called “legs” - the lower part of the animal’s leg, ending in a hoof. True, there is very little meat there. And in the final product I would like meat, and not just jelly.
Legs contain a lot of collagen, cartilage and connective tissue, so they are ideal for jellied meat
Again, not all meat is suitable as a filler for jellied meat. Many select cuts of meat consist of solid long fibers and are designed to be cut crosswise into chunks and slices. That is, it’s great for frying, but when boiled, in pieces, it’s not very interesting, it’s dry, it’s boring in texture and it gets stuck in the teeth. For jellied meat, low-grade cuts are best suited, where the muscle bundles are thin and there is again a lot of connective tissue that retains moisture and dilutes the texture. There are many such parts in the carcass - ribs, thighs, neck, but - in order not to go far, you can use the part above the foot - the drumstick, in the case of a cow - the shank (aka broth). In short, what is below the knee is just right for jellied meat.
To achieve more gastronomically interesting results, you can use various combinations. I myself usually cook jellied meat from veal shanks and chicken. There is much more collagen in veal than in beef, since many future bones still remain cartilage, but the broth is poor in taste - a large, elderly chicken or rooster provides it with the necessary flavors. You can also extract the necessary gelling agent from cheap pork legs - they give a stable result and a tasty broth, and use beef as a filler, for example, bone-in brisket or ribs. In any case, avoid trimmed, monotonous pieces of meat - the more varied the structure, including muscles, connective tissues, tendons, and skin, the better the final dish will be.
The more varied the structure of the meat, the better the final dish will be.
Legs are not the only source of jelly. Oxtails, chicken feet and wing tips, pork skins, snouts and tails and similar offal produce similar results. But there should be quite a lot of them, the ratio with the filler is approximately 2:1.
Just avoid excess fat. Fat does not harden into jelly - pork and beef form a hard, unpleasant crust on the surface, chicken remains as semi-liquid flakes. In any case, fat does not add anything to the taste and cannot be eaten. If it is impossible to get rid of fat before cooking, be sure to remove it from the finished broth.
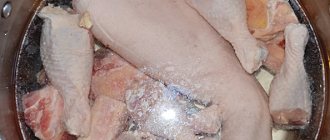
If you buy raw materials for jellied meat at the market, ask to chop (or better yet, saw) large bones - this will speed up the cooking process and allow you to more fully extract all the benefits.
How to cook jellied meat
Now we have come close to the cooking process. This is a very leisurely undertaking, which, however, does not require much effort from the performer. All you need is a larger pan and a reliable source of even, low heat. Wash all the preparations and place them tightly in the pan - there is no need for excess liquid during cooking. It is desirable to have a ratio of solid and liquid components no higher than 1:1, i.e. liter of water per kilogram of meat and bones. We can correct the result, of course, but it’s better to immediately get into the right proportion.
How many raw materials are needed? Cooking a cup of jellied meat is not wise, of course, and not so easy - no one will sell you half a kilo of broth. I cook it from veal shanks - this is about a kilogram, two pork legs - also a kilogram, and large chicken - this is two kilos. Plus, you will need at least three liters of water when laying tightly, i.e. The total weight of the bookmark is seven kilograms. Accordingly, a pan with a capacity of 8 liters or more will be convenient. The output can be expected from two liters of the finished product, but no more than three.
Place the pan over high heat and bring to a boil. Reduce the heat and skim off the foam, usually there is not much of it. Cover the pan with a lid, leaving a “smile”, and forget about it for two to two and a half hours. The heating should be minimal - so that sometimes it gurgles. For now, you don’t need to add anything to the broth.
After this time, add salt - the broth should taste slightly saltier than usual; as it cools, the salty taste will significantly decrease. But at this stage it is better to under-salt, because some of the water will still boil away. Now you have to decide how cooked the meat that you plan to use as filler is. It is likely that it has already been cooked, although some chickens can cook for 5 hours without much change. If the meat is soft enough, then you should not cook it any further; it will not gain anything useful, it will only become dry. Take out the cooked part and leave to cool, continue to cook the rest until done, i.e. another two to three hours until the bones begin to separate freely.
Cook the meat until the bones come off freely
Spices for jellied meat: to add or not?
Spices and roots in jellied broth are a subject of debate. Quite often, nothing but salt is added to the broth, but personally, such minimalism seems excessive to me. On the other hand, such a broth doesn’t need excess spice either; the rich meat taste is good in itself, we don’t want to overshadow it. For these reasons, I put in the broth about an hour before cooking a couple of onions in the husk, cut with a cross, a couple of coarsely chopped carrots, roots of parsley, celery or parsnips, a teaspoon of black and allspice grains and two or three bay leaves, 4-5 clove buds. In order not to catch the spices later, it is convenient to tie them in a piece of gauze. In addition, the roots will improve the color of the broth, otherwise it may turn out gray.
Vegetables and herbs highlight the meaty taste of the broth, but do not overshadow
When is jellied seasoning added?
Any spices are sensitive to heat treatment. Long cooking times will completely destroy their flavor. This happens if you add spices to the broth at the very beginning of cooking. Therefore, experts recommend adding seasonings no earlier than 30-40 minutes before the end of cooking. Only then will they transfer all the taste and aroma into the finished treat.
Chefs advise not to get carried away with the amount of seasonings and spices. Jellied meat is a meat dish with its own specific aroma. And a large number of spices can “clog” the flavor of the meat itself.
Salt, which is also a classic spice, is added shortly before the meat is cooked. The fact is that at the beginning of cooking the meat is poured with a large amount of water, which covers the surface of the meat.
During the cooking process, the broth boils away a lot. If you salt the meat at the very beginning, then by the end of cooking the volume of liquid will decrease significantly. The broth will be oversalted due to the high concentration of salt in a small amount of the finished dish.
After finishing cooking, be sure to strain the broth. This removes spices and seasonings that can ruin the color and clarity of the liquid.
How transparent should jellied meat be?
Unlike aspic, jellied meat does not require crystal transparency, but turbidity or whitishness does not decorate the product. Veal-beef-chicken broth cooked in a gentle mode will have sufficient transparency on its own, with pork it is more difficult, but after cooling and removing the fat it may also turn out to be quite suitable. This means that there is no particular need to clarify and draw out the broth like a ceremonial aspic. At the very end, taste the broth again for salt and adjust if necessary.
Unlike aspic, jellied meat does not require crystal transparency, but it should not be very cloudy either.
How to disassemble meat for jellied meat
When everything is cooked, the stage of disassembling, disassembling or disassembling begins. The point of this stage is to separate the wheat from the chaff - namely, to pull out and throw away everything unnecessary, and cut everything that is necessary in an appropriate way. I recommend immediately removing the vegetables from the pan with a slotted spoon (they tend to fall apart and extra care will not hurt), then insert a large colander into another pan of sufficient volume and pour the contents of the pan with the future jellied meat through it. If you don’t have another large saucepan, just use a slotted spoon to catch everything useful for the dish, for example, and strain the broth anyway, preferably through a linen napkin.
Now you need to catch the moment when the separated solid (already soft) fraction cools down enough to be able to work with it, but also does not harden, when disassembly will be difficult due to sticking. You will need to remove all the bones, and there are many of them in the “legs”, including very small ones. Be careful, however, there is still cutting ahead and this helps to detect missed small details. Everything else can be safely sent to ready-made jellied meat without much analysis. The bones, of course, can and should be sucked and sucked out - this is the most pleasant moment of the process. To do this, however, everything must still be quite hot - take care of your hands.
The meat must be carefully and thoroughly removed from all bones.
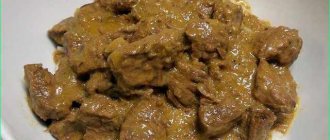
Meat cutting stage . Also a debatable point. In stores and grocery stores you can often see jellied meats with an almost homogeneous, fine filling. I am not a supporter of this practice and prefer rather large cubes, about a centimeter and a half on a side, which makes it possible to identify a specific piece. You can make it larger, but then it will be inconvenient to cut and divide. In my opinion, this picture is more elegant, the monotony is boring, but decide at your own discretion. Yes, don’t forget about the meat that was cooked first and was removed from the broth after two to two and a half hours. It’s just more convenient to cut it when it’s cooled, it will come out neater.
Pieces of meat with a side of 1.5 cm - ideal for jellied meat
Analysis of jellied meat and filling into forms
When the jellied meat is cooked, the meat is removed from the broth with a slotted spoon. It is removed from the bones, separated from the cartilage, and the skin is removed. All meat is cut into small pieces. It is often recommended to add finely chopped cartilage to the meat, so the jellied meat will be denser.
Try to choose peppercorns and bay leaves from the meat.
Place the meat in molds and trays, strain the broth and pour it over the meat. You can stir, or you can leave the meat at the bottom so that there is a layer of jelly above it.
How to pour jellied meat correctly
The final stage is pouring. Usually jellied meat is poured into flat, wide containers, but jellied meat also looks elegant in individual molds or even glasses, especially if you have a clear, golden-colored broth. Otherwise, it’s better to just mask the flaws with volume. Another subject for discussion is the ratio of broth and filler. There are lovers of jellied meat made almost exclusively from meat, but I also like the broth itself; I like a transparent layer of one and a half to two centimeters thick on top. After distributing the chopped filling evenly among the containers or molds, decide for yourself how much broth you want to pour on top. The amount of broth you have may or may not be enough. Both can be corrected. The excess can be reduced, and this will only strengthen your broth; the deficiency can be compensated by pouring boiling water within 200 ml; this will not weaken the gelling properties.
Before pouring the broth on top (it should be warm enough to freely penetrate everywhere, if necessary, heat it to 60C), you can add finely chopped garlic to the filling, if you like. This technology allows you to make the aroma and taste of garlic especially bright, so don’t get carried away. Place the containers or molds filled with jellied meat in the refrigerator or on the balcony and wait until it hardens. This usually takes two to three hours.
The broth must be warm enough before pouring.
Garlic and bay leaf
Garlic is known to the vast majority of not only our country, but the entire planet. Not everyone likes the special aroma of this plant, but it is irreplaceable when preparing meat snacks. It’s unlikely that jellied meat lovers can imagine this appetizer without garlic.
Garlic gives the dish a completely unique taste. It contains approximately 400 components that have a beneficial effect on the human body. The garlic should be evenly distributed throughout the entire volume of the finished treat.
To do this, you need to grind the seasoning, and not use whole cloves. This spice should be added after cooking so that the high temperature does not destroy the aroma.
Bay leaf is a common spice that is used in preparing meat snacks. The leaves emit a strong odor due to the multicomponent essential oil contained in the composition. The list of beneficial properties of this plant is long. It has bactericidal properties and activates metabolism.
What to do to make jellied meat freeze
The freezing of the jellied meat is the most alarming moment in the whole undertaking. Many are so nervous that their psychosomatics and emanations of fear do not allow the jellied meat to freeze. On the contrary, strong self-confidence contributes to successful and reliable freezing. But - “this can happen to anyone” - the jellied meat may indeed turn out to be weak or not freeze at all. The issue is solvable and not even very troublesome. You will have to transfer the jellied meat from the containers back into the pan and boil again. While the pan is heating, dissolve 20 grams of sheet or powdered gelatin per liter of jellied meat in 100-150 ml of warm water, put it on the fire in a small ladle and let it dissolve completely, then pour it into a large pan and bring it all together almost to a boil. Pour into containers or molds again and again wait for fate to decide. There is a high probability that this time she will be favorable.
If the jellied meat does not freeze, transfer it back to the pan and boil again