Alternative repair versions
If you don’t have a repair kit at hand, which makes it impossible to fix the wheel yourself, then it is important to prevent air leaks in order to get home. There are several ways to do this
No glue
You can temporarily seal a puncture using materials that do not allow air to pass through:
- a piece of polyethylene;
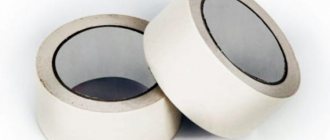
- insulating tape;
- foil.
After the improvised patch is applied, you need to quickly inflate the wheel in order to press the patch as much as possible onto the hole. This method of repair does not guarantee 100% tightness, but it will allow you to get to the house.
Curing
You can go to the nearest auto repair shop, where they will seal the inner tube with raw rubber.
In doing so, they do the following:
- a special rubber patch is applied to the hole;
- the chamber with the patch applied to it is heated to a high temperature.
This connection is characterized by increased strength, but this cannot be done with improvised means.
Small machines for home vulcanization are available on the market, but they are expensive. It makes no sense to buy such equipment to seal a bicycle inner tube.
Wheel repair without glue
In the extreme position, you can seal the bike tube with electrical tape or a moistened piece of plastic bag. These simple methods will help you get to your destination where you can have your camera professionally repaired.
In this case, the tire is stripped and a patch is applied so that it is pressed against the surface of the tube.
This method is short-lived and requires compliance with certain rules:
- The road surface must be dry and smooth;
- Do not overload the wheel;
- The patch must be under constant pressure; for this it is recommended to drive non-stop to your destination.
How to tape a camera
Properly sealing a bicycle tube is not difficult at all. The main problems arise when removing the tube from the tire and installing it back. This is especially problematic if the tires are hard - you will definitely need plastic beads.
Using patches
Repair using patches is the best way to seal a bicycle inner tube at home. The patches last as long as the original coating and, when installed correctly, do not allow air to pass through. To begin the procedure, you need to prepare a repair kit, a key and beads.
Algorithm of actions:
- Carefully inspect the punctured wheel for sharp objects and remove them. Removing the wheel will make the procedure easier.
- Remove the tube from under the tire. Disassembly may take some time if the tire is thick and hard. In this case, plastic borders should be used.
- Check the rim tape. The cause of a puncture can be an incorrectly installed tape, due to which the spoke heads protrude beyond the rim. If they really protrude and put pressure on the camera, you will have to file the spokes.
- Inflate the air - this will make it easier to detect a puncture if it has not been noticed before. If you cannot visually find a puncture, you should bring the product to your face: this way you will be able to feel the movement of air. The third option is to lower the camera into the water. Air bubbles will indicate the puncture site.
- Lower the camera.
- In order not to lose the puncture of the bicycle wheel, it is recommended to circle it with a marker.
- Rub the puncture site with sandpaper or grout - this will help remove fat, upon contact with which rubber glue will not work. Select a patch of the appropriate size and remove the protective foil from the back (orange) side. It is strictly forbidden to touch the adhesive side of the patch and the puncture site with your fingers.
- Carefully apply bike tube adhesive around the puncture and onto the orange side of the patch. Wait about two minutes. Apply the patch, press it down with a heavy object and wait another 10-15 minutes.
It is important not to confuse which side to apply the patch to the camera. The black ribbed side should be on top, and the orange one should be applied to the puncture
Another important point is the film on the ribbed side of the patch. There is no need to remove it: it protects the tube from sticking to the inside of the tire.
If there are no patches
The question of how to seal a bicycle inner tube if there is no patch arises for cyclists in the field. If you don’t have a repair kit with you, you can use a piece of polyethylene for temporary repairs.
How to perform an emergency repair:
- take a piece of polyethylene 10 cm wider than the puncture and 5 cm wider than the tire;
- remove the camera, fold the polyethylene in half and apply it to the damaged area;
- start putting on the tire so that it first covers the puncture site and presses the polyethylene.
Such emergency repairs will help you get home. After, of course, you need to replace the polyethylene with a patch.
Near the nipple
There are no ways to seal a bicycle inner tube near the nipple. If the rupture goes along the base of the nipple, you will have to completely replace the camera.
Any cyclist can quickly seal a bicycle inner tube; all that is required is a repair kit and minimal skill. If your tire gets punctured too often, it is recommended to carry a spare tube with you. It is also worth checking the tread for wear - it may need to be replaced.
Remove the camera.
Now you need to remove the tube from the tire. If your wheel is not on the eccentric, then you will also need wrenches to remove it. You can get the camera without removing the wheels from the bike, but it will be less convenient to glue it on. It is worth remembering that it is not always possible to easily disassemble a wheel manually, so plastic mountings will come in handy here. Never use screwdrivers, hexagons or other keys - this may damage the camera.
Emergency: a note for cyclists
In the event of force majeure circumstances, the real gain will be a special repair kit with express patches. The kit will help you quickly troubleshoot problems and continue on your way. If you do not have a bicycle first aid kit and suitable equipment for sealing the hole in the tube, you need to inflate the tires to five atmospheres. High pressure will press the tube against the tire, and accordingly the air will come out of it more slowly. This will allow you to get to your destination and then begin repairs.
To protect yourself from such troubles, you can use a special anti-puncture liquid (sealant) for bicycle inner tubes: when a puncture occurs, it instantly fills the puncture area and hardens upon contact with air. It is enough to spin the wheel several times, pump it up, and you can continue on your way.
How to repair a camera if you have few tools at hand
You may not always have all the materials you need to urgently repair your bike. But don't panic: getting your two-wheeler back into working order will at least help you find a place where you can thoroughly inspect your bike and carry out a full repair.
It is quite possible to seal a puncture to prevent air leakage without glue. You will need any sealing material: foil, polyethylene, electrical tape. With their help, you can apply a kind of patch. Then the wheel needs to be inflated, pressing the patch as much as possible against the hole.
There is another quick way to repair a damaged camera. It is called vulcanization and involves the use of raw rubber. This repair needs to be done in two steps: apply a patch to the break and warm up the chamber. As a result, you will create a stronger connection than that described in the first case.
The procedure for sealing the camera with your own hands is as follows:
— after determining the location of the damage, you should estimate its size for preparing a patch. It is better to cut it out of the old camera in the form of a circle, with a diameter of up to 2 cm. If a hole is found on the camera, a patch with a diameter of up to 3 cm will be required. The larger the patch, the worse it will hold
Therefore, it is important to adjust it exactly to the size of the damage. Before cutting out the patch, you should first sand the old camera, degrease its surface with alcohol and stick a piece of electrical tape on the side that will be glued
This manipulation will protect the patch from contamination;
clean from dirt, sand and degrease the puncture site itself;
Apply a thin layer of glue to the patch and camera around the damage, wait for the time specified in the instructions for the glue. Rubber glue “Moment” requires 10-15 minutes. expectations;
apply a patch to the damaged area so that the hole is in its center
It is important that the patch lies in an even layer without the formation of air under its surface;
Cover the repair area with paper and put the camera under a press for 12-24 hours.
How to glue a rubber patch to a bicycle tube
To repair a wheel using a special kit, you should perform the following steps:
- Clean the surface from dirt and degrease it. To do this, you should use gasoline or acetone. On the road, simply wipe the surface with a clean cloth.
- Sand the product with sandpaper.
- Remove the protective film from the patch.
- Apply glue. In this case, you should follow the instructions on the packaging. The composition is applied to one or two sides at once.
- Press the patch firmly against the camera and hold it, being careful not to move the elements.
After this, just wait until the glue sets. This can happen immediately or after a quarter of an hour. Quality kits usually include modern glue that works quickly. However, they often use a standard Moment, which takes a long time to harden. Features of the use of the substance are described on the packages from the repair kit.
Sequence of actions in case of an accident
How to glue correctly? Let's look at the sequence of actions in case you don't have a spare camera. As many years of practice have shown, the inconveniences in nature are as follows:
- darkness;
- lack of opportunity to sit down;
- the presence of mosquitoes, midges and other “bloodsuckers”.
So…
- Once you are sure that you are shaking hard and the tire is flat, first of all try to pump it up. It is quite possible that the puncture occurred half an hour ago, and the camera “holds.” In this case, after making one or two pumpings, you can easily get home and fix the defect in comfortable conditions.
- If the wheel “radically flattens” in less than a minute, you need to choose a level place and put the bike “on its butt”.
- Using eccentrics, loosen the wheel fastening in the fork stays; be sure to disconnect the brake pads (V-brake) to remove the wheel. If the rear wheel is punctured, you need to move the shifter lever on the right to the smallest driven sprocket, and on the left to the smallest drive sprocket, disconnect the brake pads and, wearing gloves, remove the wheel.
- The most crucial moment is that the wheel needs to be beaded. To do this, the mounting is inserted into the gap between the rim and the tire, and then it is used as a lever, and the tire ends up outside the rim.
- By running the tire around the rim (parallel to the spokes), the tire begins to wobble. Now, on the other side, you can pull out the camera and carefully, being careful not to damage it, release the valve from the rim hole.
Now you can carry out diagnostics. Sometimes it happens that a nail continues to stick out in the tire with the point inward. If you overlook it, then, despite the repair, you will immediately get a second puncture.
- For diagnostics, the chamber is inflated to an elastic state.
- The primary location of the puncture is determined by the place of hissing.
- If you place the camera with the hissing part towards your lips, you can feel the breeze from the air flow.
- Then you can moisten the intended puncture site with water or simply spit on it. The place where the bubbles originate is the puncture site.
Sometimes it is not possible to identify the hole this way. In this case, the chamber is wetted entirely or placed under water (if possible). Sometimes it happens that the camera is intact, but the valve is leaking. If there is no spare chamber, then you can try to move the valve inside or seal it with chewing gum after inflating the chamber.
- Once a location is found, it can be easily lost. Take a pen and mark it with a cross or a circle.
- To properly seal, thoroughly dry the chamber and clean the area with sandpaper with an area of about 1 square meter. see based on a point puncture. You don’t have to clean it, but degrease it, for example, with alcohol.
- Then we also clean the surface of the selected patch.
- Spread the glue over the chamber (first layer), wait a minute or two until the glue dries.
- Then apply a second layer on top of the first, wait 3-5 minutes.
- Then the surfaces are tightly connected so that they do not “ride” relative to each other.
- To seal the camera, the glue is left in place for 1-3 minutes, and then the camera is carefully put in place and the valve is threaded.
- The wheel “beads” and slowly inflates.
All! You can go.
Of course, it is better to have a modern first aid kit without glue. I applied it and “forgot.” Even better is having a whole new bike tube. And it’s even better to try not to drive where there is a high risk of “catching a nail.”
If you can’t fix the tube or you forgot something, then you have a way out of the situation: as a last resort, you can try to tightly fill the tire with grass or hay and carefully continue driving. In this case, you will move, although without the usual comfort, but much better than on the “bone shakers” that existed before the invention of rubber tubes and tires
What glue to use
The glue must meet a number of requirements:
after drying, the seam should not change properties during inflation/deflation of the wheel;
dry as quickly as possible (especially important when a hole occurs during a bike ride).
Regarding elasticity, any glue for gluing rubber is suitable, but not based on cyanoacrylate - anything that contains the words “superglue, cyanoacrylate, cosmofen”.
- Moment glue is good for rubber. It’s inexpensive, easy to use, and if it gets on your hands, it’s easy to wash off. Disadvantage: it is not suitable for quick repairs, since the sonnet takes from 30 minutes to two hours.
- Tip-Top patch glue, however, takes a very long time to dry (2-4 hours).
- Quick-drying Red Sun glue, which was mentioned above (from the repair kit of the same name). To dry completely, the glue needs 5-15 minutes. Not sold separately, only available with the set.
Several more representatives are written in the table.
| Name | Complete drying, h |
| Sprut or 88-NT from Novbytkhim | 24 |
| 88-SA from Anles | 24 |
| Moment-1 Classic | 24 |
How to properly apply a patch
After we have found and marked the puncture site of the bicycle tube, we should begin to repair it, namely, seal this hole. To do this, you must perform the following operations.
If the camera is wet (after searching for a defect), then you should wait for it to dry completely. Plus, it must be completely deflated. Using sandpaper or a special perforated iron plate (which is usually found in bicycle repair kits for inner tubes), we clean the puncture site until a matte color appears. The sanding area should be 1 centimeter larger than the diameter of the bicycle patch. After this procedure, we try not to touch this area with our hands or other objects. Remove the protective film from the surface of the patch that we will glue to the camera. Apply glue. It can be applied only to the patch, only to the camera, or to both places. This information can be found on the glue tube.
We also pay attention to the air exposure time and complete hardening time indicated there (the last two points may not be indicated).
We firmly press the patch to the place we need, squeeze out the air from under it (to do this, press on its center and gradually move towards the edges) and keep it in this state for several minutes. The procedure is simplified if you place the camera on a flat surface, place a strong plate on top (for example, a piece of laminate) and press it down with all your weight by stepping on it
We compress the gluing area for about 5 minutes.
Many people say that after this you can immediately put the camera in the bicycle wheel and ride, but I would advise you to wait at least another 30 minutes.
Install the tire
Once you have sealed it, you can put the tube back into the wheel. Gradually inflate the wheel, checking whether the tire fits evenly into the rim and whether the tube is deflating. Perhaps the patch did not stick well or you missed another hole, it happens. If everything is fine, the tire is aligned, and the wheel does not flatten anymore, put the wheel back on the bike and go on the road!
Finally, it is worth adding that if you get punctures very often, then perhaps the tread of your tire is very worn out and it is time to replace it. And carry a spare camera with you.
Go to the section with patches and cameras >>>
How to determine the puncture site
The seemingly simple procedure of identifying the location of a flat tire can become significantly more complicated depending on where you find the flat tire (at home or while traveling). To simplify the search procedure, it should be taken into account that in 90% of cases it is located on the so-called “contact patch” of the wheel with the road, usually no higher than 2/3 of the height of the camera. An exception may be damage from the rim (if the rim tape on the latter has failed) or the iron strands of the tire cord that have come out. Therefore, we will look at several options for how to find the hole in the bicycle chamber through which air is released.
- The easiest way is to lower the camera into water. It is enough to have a small tank, the depth of which allows you to immerse it at least 2/3 of the height. We rotate the camera until we detect air bubbles that will escape from the water. Then we take it out, find the puncture site and begin the repair.
- If there is no water nearby, then fine dust (which can be found on dirt roads) will come to the rescue. We increase the pressure in the chamber to intensify the air stream from the hole and bring it a short distance to the dust (without touching it). We rotate the camera and look at the place where the dust begins to fly away.
- If there is no wind outside, the puncture can be detected by holding the camera to the wet wrist (its inner side). The skin should be wet to simplify the search procedure as much as possible. For this method it is also desirable to increase the pressure.
- If there is a strong puncture in a quiet place, it can be detected by ear.
How to replace a bicycle tube while walking
Remove the wheel by unscrewing the locking nut or loosening the eccentric;
Wipe off dirt from the rim and tire; Place the bike wheel on its side and make a chalk mark on the tire opposite the tube nipple; Unscrew the nipple. While pressing the nipple, release the air until the entire tire comes off the rim.
At the same time, there is no point in venting all the air; Using a mounting tool, pry the tire from the edge and carefully pull it out; Make sure that the rubber does not get into the space between the mounting tool and the rim, as this may damage it. If you don’t have a store-bought assembly, you can use a non-sharp object of a similar shape, preferably made of plastic
It is not advisable to use wooden or metal objects when removing a tire. The former may have burrs. And metal can damage the rim coating, so the amount of sealing will increase. Do not use sharp objects, as both the tire and the tube may be damaged.
- Remove the bicycle tire completely;
- Check the inside of the tire and bicycle rim for any foreign objects or debris. This must be done before mounting the new camera on the bike;
- Inflate the bicycle tube, determine the puncture area and mark it with chalk;
Bleed all air through the nipple; Place the bike tube against the tire so that its nipple is located opposite the mark. Make a second mark at the location where the damage was found; Feel the inside of your bicycle tire to find the object causing the damage.
This is important so that the new rubber is not punctured by a sharp object remaining in the tire; Remove the foreign object with pliers and tweezers; Place one of the tire beads on the bicycle rim, not forgetting to take into account the direction of the tread pattern. Arrows on the side of the tire indicate the direction of rotation; Insert the tube inside the tire and pull the tube out through the hole located on the bicycle rim. Put the remaining tire bead back into place; Inflate and cap the nipple
Put the remaining tire bead back into place; Inflate with the pump and close the nipple with a cap.
Tips to avoid punctures
In order not to think about how best to seal the camera, you can use self-sealing products. They contain resin, which, if there is a hole, reliably seals it from the inside. The downside is that after a certain time you will still have to spend money on repairs, despite the fact that such a camera itself costs an order of magnitude more and weighs 2 times more.
To reduce the risk of tube punctures, you should use the following tips:
- monitor the pressure in the wheels - it should be optimal (for bicycles the figure is 2.5-9 bar, depending on the type of equipment);
- on cold days, inflate the inner tube a little more, but not higher than the maximum allowable (indicated in the instructions for the bicycle);
- change worn tires on time;
- Do not “storm” obstacles, do not hit the wheels.
You can also purchase a special anti-puncture tape for bicycles, which reliably protects the tube from punctures. This strip of rubberized plastic or Kevlar is placed between the tube and the tire. Over time, the tape can wear down the camera, so it is recommended to use such a device in dangerous situations, and not constantly. It is better to choose clean roads and ride in special areas for cyclists, so that you do not have to waste time repairing a damaged tube.
Causes of a tire puncture
The rubber inner tube of a car or bicycle can be damaged - punctured, cut or even torn - by colliding with objects lying on the road. Usually the cause of the problem is nails or screws, pieces of sharp strong wire. Thanks to careless people throwing bottles on the road, a wheel can be damaged by broken glass. It also happens that other iron parts that have come off the vehicles end up in the driver’s path.
Because of this “diversity,” there is a risk of ending up with a damaged tire even on the highway, so it is better to always have a minimum tire repair kit on hand. Most often, motorists who drive on old, worn tires or those who purchased a low-quality product encounter trouble.
This is interesting: How and with what to properly glue a foam plastic ceiling plinth - a step-by-step description of the methods: we study in general terms
How to seal a car camera: procedure
To repair a wheel at home, you need to get a piece of old rubber. You will need high-quality glue, for example, “Moment” or another that is suitable for rubber products. Also, to fix the problem you should prepare:
- sandpaper with medium grain;
- a container of water (even a puddle on the road will do);
- a piece of soap;
- scissors;
- solvent or other degreasing liquid;
- pump.
To repair cameras, you can purchase a ready-made kit at any car store, although the price will be higher.
Finding the location of the damage
After a tire puncture, a side cut, a small or deep crack, or a puncture may form. Such defects lead to a violation of the tightness of the product. Air begins to escape through the hole and the chamber deflates. Finding a puncture can sometimes be difficult, especially in wet weather when the tires are dirty. Most often, a defect forms on the “contact patch” - where the wheel comes into contact with the road. It is located no higher than 2/3 of the total height of the camera.
Rim damage caused by damage to the rim tape occurs less frequently. Another possible problem is a tear in the tube from the exposed iron strands of the tire cord. You can find the location of the defect using different methods. First you need to remove the tube using any non-sharp object or a special tire mounting device. Afterwards it must be visually inspected for holes. If there is no result, you can use the following methods:
- Dipping into water. Place the camera in water; even a small container will do. Rotate the product in water until escaping air bubbles become visible - this is where the puncture site will be. This method is even more effective when the water is soapy. Large car inner tubes can simply be lubricated with soapy water.
- Fine dust. This is usually found on roads in dry weather. It is necessary to bring the camera to the dust and press firmly on the product. When a stream of air begins to emerge from the damaged area, dust will begin to fly away.
- Hand. In calm weather, you can simply hold your wet hand at a distance of 1-2 cm from the surface of the camera. This is enough to feel a breath of air from the hole. To increase the effectiveness of the method, you can attract an assistant who will put pressure on the camera.
- Sound. If it is quiet outside or in the garage, you can hear the sound of air escaping (a slight whistle) from the puncture. You should first inflate the wheel to maximum elasticity.
After identifying the hole, you need to carefully mark it with a ballpoint pen. Then you can begin repair work. In a similar way, it is possible to repair other rubber inflatable products, for example, tubing for skating.
Patch
Applying a patch is a simple process. To properly prepare it, you need to take a piece of rubber (an unnecessary car inner tube or one taken from a cheesecake sled will do) and cut out an oval or round part with scissors. The size of the patch should not be large, covering the hole on each side by only 15 mm.
Next, you need to use sandpaper to clean the area where the patch is applied, as well as the cut out element itself. This way the adhesion force of the parts will be better. Afterwards, both surfaces must be degreased with acetone and alcohol.
Sealing the damaged area
Having prepared high-quality glue, you can start working with already degreased surfaces:
Apply glue to both bases
Carefully level the adhesive layer with a small spatula and let it dry for 3-5 minutes. If indicated in the instructions, apply another layer on top of the first
You should not make the glue seam too thick, as this can ruin the quality of the finished product. Press the camera and patch together. For a tighter fit of the part over the entire plane, the camera must first be laid out on a table or other flat surface. After gluing, the patch should be at the top. Take a hammer and tap from the center to the edges of the patch in a spiral motion so that the element sticks more securely. It is enough to go through the patch 3 times.
After complete drying, you need to put the tube back into the tire, inflate it, and return the wheel to its proper place.
Necessary tool for sealing a bicycle inner tube
Remember that not every composition is suitable for sealing punctures in bicycle inner tubes. Let's consider several win-win options for home repairs.
Special repair kit for sealing cameras
Many companies involved in the production of bicycle components produce special repair kits. The repair kit includes:
- Case;
- Sanding agent;
- Chalk;
- Patches of different sizes and configurations;
- Glue.
The composition of the glue is selected specifically for the material of the patches included in the kit. It is not surprising that sealing with other materials may be ineffective. The amount of glue is strictly calculated for the number of sealings.
Repair kits from China for sealing bicycle inner tubes
Despite the prejudice against Chinese products, these bike kits performed quite well. And, in comparison with famous brands, the cost of Chinese bike kits is much lower. But there is also a minus. The sealing kit includes only patches and glue, and the latter is clearly not enough.
Seal the bicycle inner tube with a homemade patch
Of all the sealing options, this is the least reliable. You can use any rubber glue as an adhesive. The latter must be selected so that it does not burst at bends when gluing. As for the reliability of sealing, this is pure luck. As they say, at your own peril and risk.
How to seal a bicycle inner tube using vulcanization at home
This is a good and reliable method, but only if you contact a good bicycle repairman. It is quite difficult to carry out vulcanization at home on your own; if you are not used to it, there is a risk of hopelessly damaging your bicycle tube. In field conditions this cannot be done at all.
Repair process
To seal a wheel on a bicycle, you must first remove it. Let's consider the main stages of repair.
How to remove a wheel from a bicycle
For ease of use, you should turn the bike over, placing it on the handlebars and wheels. Next you need to do the following:
- Unscrew the bolts holding the brake.
- Remove the brakes.
- Remove the wings (if they make further actions difficult).
- Unscrew the holding bolts.
- Pull the wheel out of the grooves.
The broken wheel has been dismantled, you can proceed to the next stage.
How to remove a tire and remove a tube
Now you need to remove the tire and take out the damaged bicycle tube. It is not difficult:
- We unscrew the spool from the nipple (you can simply press it with a thin object).
- We take out the installation tool and insert it between the rim and the tire.
- Gently press the surfaces of the tire and rim over the entire wheel.
- We remove the nipple from the rim.
After all the manipulations, you can remove the camera.
How to find the location of the damage
There are several ways to find the damaged area:
- Visually. Large holes can be detected by inspecting the surface.
- By hearsay. To do this, you need to squeeze the camera as much as possible and listen to where the air is coming from.
- Soap solution. Wash the surface with soap and water - bubbles will appear at the puncture site.
- Immersion in water. The damaged area is identified by air bubbles.
When damage is discovered, you should outline it with chalk.
Helpful advice. It is not always possible to detect the puncture site visually or by ear, and it can be difficult to find water in the field. You can make your work easier if you put a piece of foam sponge, soap and a small bottle of water in your first aid kit. A soap solution will significantly speed up the search.
How to properly seal a bicycle tube
To seal the damaged area and keep the patch firmly in place, you need to perform the following operations:
- dry the surface (if the search was carried out using water or soap solution);
- clean the area with sandpaper;
- degrease with a solvent (alcohol, gasoline or acetone);
- remove the protective film from the patch;
- lubricate the patch or camera with glue;
- After applying the glue, press the patch firmly onto the damaged area;
- wait for the drying time specified in the glue instructions.
In addition to the special patch sold in the repair kit, you can seal the camera with thin pieces of rubber.
Once the patch is attached, it is recommended to inflate the chamber and check for additional damage. In addition, you need to carefully inspect the tire. It is not uncommon for nails, needles, or other small sharp objects to become stuck in the tire, causing repeat damage after the tube is installed.
How to put a wheel back together
The camera is sealed and needs to be reinstalled. To do this, all the previously described operations are performed in reverse order:
- insert the nipple into the hole on the rim;
- carefully place the deflated tube between the rim and the tire;
- Using a tire installer, tuck the tire behind the rim.
All that remains is to inflate the wheel and install it in place.
What types of punctures are there?
- A puncture on the inside of the chamber is due to the spokes sticking out inside the rim. In this case, after replacing or repairing the tube, you should carefully check that the protective tape is positioned correctly on the inside of the rim.
- Cut - if the cut is short, then gluing it will not be difficult, but if the cut is significant, then gluing the camera is useless. A damaged camera can be used to make patches.
- Puncture on the seam of the camera - in case of such a puncture, it is necessary to clean the puncture site with sandpaper to get rid of the protruding seam. If you don’t have sandpaper on your way, you can use a stone or road surface.
- A puncture at the base of the air valve - such a cut cannot be repaired and the camera can be scrapped. Such cases occur due to the presence of metal burrs along the edges of the hole in the rim where the chamber valve is inserted.
That's basically all we wanted to tell you about how to properly glue bicycle tubes.
In this article, we did not consider unusual cases such as repairing a camera without glue using a washer and other non-standard methods. A separate article will be devoted to this. Share your opinion and leave comments in the block below!
Do you even remember where you learned how to glue patches on a camera? From the survey conducted among friends, not a single one confirmed that they had read the instructions. It seems like we have this knowledge from birth, hehe. Perhaps this happens because we most often make the first independent patch in a circle of friends, and everyone helps with practical advice or has a special technique for gluing patches. So in this topic we will share with you aspects of installing patches.
To seal the camera you will need:
- Camera with extra hole
- Patch kit and glue
- Solvent and sandpaper
- Marker
- Container of water or keen hearing
The algorithm is quite simple and does not require special skills. If you are gluing the patch at home, it is better to remove the wheel from the bicycle and remove the tube. In any case, you'd better check out our article on how to replace your camera. Go
If you can’t do this “by ear,” then a container of water may help. You will immediately notice bubbles at the puncture site.
Mark the location of the new hole in your chamber using a marker. There is no need to paint the camera with Khokhloma. Just make a visible enough mark so you don't lose track of the puncture site.
Using sandpaper, clean the puncture site, try to remove technological residue from the seams so that the surface is smooth and the patch adheres perfectly.
Using a solvent, alcohol or solvent is also great, clean the patch area. This will help remove excess dirt and grease that may impair contact between the patch and the camera.
Lubricate the surface of the camera where the patch will be installed with the glue that comes with your patches. Do not apply too thick a layer. To ensure that the edges stick securely and you have room to maneuver, the size of the glue spot should be one and a half times larger than the patch. You can smear it with a tube during application, with the back of the patch or with your finger (if it is clean).
Depending on the composition and layer, the glue will dry in 1-2 minutes. An excellent reference is the recently shiny surface of the adhesive, which has now become dull.
.
There is no need to blow on the glue or try to “dry” it with a lighter (there are such shots). While the glue dries, remove the protective foil from the patch. Never touch the adhesive surface of the patch!
Hold the patch by the transparent film.
Press the patch firmly against the camera and hold it there for 1-2 minutes.
Important! Each edge of the patch must stick well to the camera, otherwise the patch will not last long.
You can see the difference between a correctly and incorrectly glued patch below:
No need to peel off the film from the patch
. This film serves as a kind of “sliding coating” and allows you to immediately install your camera into the wheel. Thanks to the film, the patch will not move from the installation site when you inflate the tire.
No need to check how the camera is sealed
. Never inflate the tube without installing it in the wheel! Glue that has not completely hardened most likely simply will not be able to hold the patch in place while the chamber is stretched during pumping. But the patch, already pressed to the inner wall of the tire, will stick perfectly!
The patch will help temporarily fix a cut in the tire.
Where to begin? Determining the puncture site
The most common causes of tube punctures are tire wear and off-road driving. Although in reality there are much more reasons. A common culprit for the appearance of holes in the inner tubes can be riding on a flat tire, which will lead to wear of the tire and rim, the repair of which is much more difficult and expensive than repairing the inner tube.
Before you start sealing, you should make sure that there is a puncture and determine its location. To do this, you need to inflate the wheel, tighten the nipple well and determine by ear where the wheel is leaking air.
The next step is to unscrew the wheel. To do this, the bike should be placed on the handlebars, having previously placed a protective base under the seat to avoid scratches and contamination. When unscrewing the rear wheel, you should place the chain on the back of the smallest sprocket. This will greatly simplify the procedure for assembling it after repair. The presence of a v-brake type brake pad provides for its opening by arching the brake levers and pulling the metal arched tip of the jacket out of the groove. If the wheel is secured with bolts, unscrew them. With normal fastening, you should unscrew the eccentric by bending the lever and turning the nut in the opposite direction.
After the wheel is removed, we proceed to disassembly:
- lower the tire;
- Using a spatula, we pick up the bead of the tire and turn it outward, attaching the other end of the tire to the spoke;
- repeat the procedure at a distance of about 20 cm from the first shoulder blade;
- remove the tire by hand.
If you don’t have the tools at hand, try doing it yourself. A small video guide will help you:
Having taken out the camera, you should pump it up and put it in a sink with water. The presence of holes in it will be visible by a thin stream of air in the form of bubbles. If the damage is very small, you need to squeeze the chamber with your hand, increasing the pressure in it. This will cause air to escape faster. Holes in the chamber can be caused not only by a puncture, but also by a breakdown. In the latter case, several short parallel cuts will be observed
It is important to carefully inspect the tire for the presence of various kinds of stuck objects that could cause a re-puncture.
What to do if the camera still goes down after repair
So, you did everything right, but the camera still deflates over time, despite the sealing. The reasons may be the following.
- The air continues to leak from under the patch. If you discovered this using one of the methods already described, you will have to do everything again: remove the bicycle tire and stick the patch on again;
- Check to see if there are any other punctures that are not as significant as the one already sealed? If there are, then they need to be sealed;
- Air leaks at the nipple. They can be detected by applying a soap solution to the nipple. If characteristic bubbles are found, you need to tighten the nipple with a wrench;
- The destruction of the metallized cord on tires is great. The problem can be solved by replacing the tire. No amount of pulling out the cord helps. If your bike tire is not replaced, punctures due to tires and sealing will recur regularly.
Preventing punctures
One of the best ways to avoid tire punctures is to purchase self-sealing inner tubes. Inside this structure there is a special resin, which in case of punctures flows into the puncture point and completely seals it.
Self-sealing cameras allow you to forget about repairs, but they are expensive and exceed the weight standard of conventional cameras by two, two and a half times.
The second way to prolong the life of the camera is anti-puncture tape. This device is placed between the tire and the tube, thereby reducing the risk of a possible puncture. The tape is made of thick rubber and is simply an additional layer of protection.
General recommendations for preventing punctures:
- Inflate the wheel correctly: it should not be overinflated or poorly inflated; an optimally inflated chamber is elastic to the touch, but pliable when pressed;
- It is not recommended to drive on littered roads: sharp stones, screws, glass can pose a serious threat to tires;
- avoid collisions with curbs and potholes, this can further lead to damage to the protective qualities of the tire;
- use a special tape placed between the tire and the tire to prevent damage;
- use special products with sealant inside. This filler allows you to immediately seal the tire without intervention from the cyclist.
- Also, many professional cyclists take a spare tube with them when going for rides.
How to prevent a puncture?
Repairing a bicycle always requires some effort, so the best option is to prevent a tire puncture rather than seal it later. There are several simple tips for this:
- Buy self-sealing cameras. They contain resin or a special gel inside, which, in the event of a hole, is poured through the hole and hardens on its own in the air, thereby “sealing” the tire. Excellent technology, but expensive, 1.5–2 times the price of a regular tire.
- It's good to inflate a bicycle tire. The pressure must be in balance; if you underinflate the tire, it will begin to stick to the rim and create kinks; if you overinflate, you will exceed the pressure level.
- Ride on special bike paths or on a smooth road where there are no iron pins, hooks, nails or remnants of fittings lying around.
- Do not hit the front wheel on curbs or stones. If you hit an obstacle, check your tires. Pressure surges in the tire lead to damage.
- Apply a special anti-puncture tape - this is a rubber strip that is attached between the tire and the bicycle tire.
Top articles: Bicycle keys
Sealing a puncture is much easier than it seems at first glance
It is important to be careful and careful when removing the wheel, as well as to find the source of air etching and attach a good patch to the glue. Why contact a master and pay money? Now you yourself are an experienced rider who can easily repair any bicycle tire. https://www.youtube.com/embed/yYze2K0nQNk
Fix the puncture
Once you find the hole in the tube, mark it with a pen or chalk in case you lose your spot. Use a small piece of sandpaper to lightly rub the puncture to provide a better surface for the rubber solution. Apply enough glue to the tube to cover the size of the patch. Leave the solution for a minute or two to get tacky - if you add the patch too early, the repair will not work. Pull the silver foil from the back of the patch and be careful not to touch that side as you don't want to contaminate it. Place the patch over the hole and hold it in place for a minute. You can leave the attached paper sideways, but if you want to remove it, make sure you allow a few minutes to dry first.
Pump some air into the tube to check that the repair is holding and to avoid puncturing the tube between the tire and rim. Insert the tube back into the tire and turn the tire back on. If you use tire levers here, be careful not to pinch the tube or you risk another puncture. Fully inflate and you're gone.
Step-by-step instruction
To repair a bicycle inner tube, you will need certain tools and materials. Before work you need to prepare everything
Particular attention should be paid to the adhesive. Only after this can you begin to disassemble the bike and fix the problem.
A step-by-step master class explaining how to seal a bicycle inner tube correctly consists of the following steps:
- wheel removal;
- removing the camera;
- searching for the puncture site;
- sizing;
- assembly.
Selection of materials and tools
For repairs you will need the following kit:
- A set of patches with adhesive for a bicycle inner tube - sold in specialized stores.
- Plastic tool for dismantling and assembling a wheel. It is better not to use a screwdriver or wrench, as they can damage the rim.
- Medium rough sandpaper.
- Pump.
- Chalk to mark the puncture site.
Set of patches, bicycle mounts
Medium abrasive sandpaper
Pump
The main point is the correct glue. In this case, it must be plastic after drying, so that during operation the repaired areas do not diverge.
There are several options for rubber adhesive. The most popular were:
- “Moment” - budget composition, complete bonding is achieved after 24 hours;
- special adhesive for bicycles Red Sun - works after 15 minutes;
- Tip Top SC 2000 is the most reliable product, consisting of two components, it takes 2-4 hours to dry.
Moment
Red Sun
Tip Top SC 2000
Removing the wheel
Camera repair begins with removing the wheel. This is quite easy to do using the following algorithm:
- Disconnect the rim brakes;
- if the wings interfere with disassembly, they must also be removed;
- put the bike wheels up;
- remove the wheel by unscrewing the mounting bolts.
Removing the Camera
Dismantling the camera is the most difficult stage. This can be done using a bead or a regular screwdriver. First you need to deflate the wheel by unscrewing the nipple valve. Sometimes this process is performed before removing the wheel.
The wheel should be grasped so that the nipple is at the rear. One end of the bead is inserted between the tire and the rim. The second one is at a distance of 10 cm or more from the first one according to the same pattern. Then, pulling the bead toward you like a lever, you need to lift the tire. The rim should move beyond the edge of the wheel; all that remains is to free it with your hands.
Search for damage
At this stage, the damage itself must be found. There are several ways. The most popular of them:
- Place the camera in a bowl of water. Air will escape at the puncture site, forming bubbles. The easiest way, after which the tire must be thoroughly dried.
- Inflate the tire and listen to where the air comes out.
- In some cases, a good inspection of the camera is enough. This method is the least accurate, as you may not notice other punctures.
- Apply soap solution to suspicious areas. Bubbles will appear where there is damage.
The discovered puncture site must be marked with chalk. You should definitely inspect the tire from all sides to see if there are any foreign objects left there. If any, they must be removed before sealing.
Gluing and assembly
Before sealing the bicycle inner tube yourself, you need to degrease the damaged area. For these purposes, use gasoline, thinner or alcohol. Then it is recommended to sand the surface with sandpaper to better bond the glue and patch.
Top articles: Recreational bikes
The required amount of glue is applied to the patch, then it is tightly applied to the tire and pressed. Keep in this position for a while so that the glue sets. If necessary, the treated area is fixed with a weight and left for several hours. Then you need to check whether the repair was successful. To do this, inflate the tube on the bicycle and check to see if any air is escaping. If all is well, the tire is deflated and prepared for assembly:
- the camera is carefully installed on the rim using a “mounter” - the tire should fit tightly;
- pump air into the tire;
- install the wheel in place, securing it with bolts.